2024 CHEVROLET SILVERADO EV hood open
[x] Cancel search: hood openPage 329 of 429
Chevrolet Silverado EV Owner Manual (GMNA-Localizing-U.S./Canada-
16702912) - 2024 - CRC - 1/13/23
328 Vehicle Care
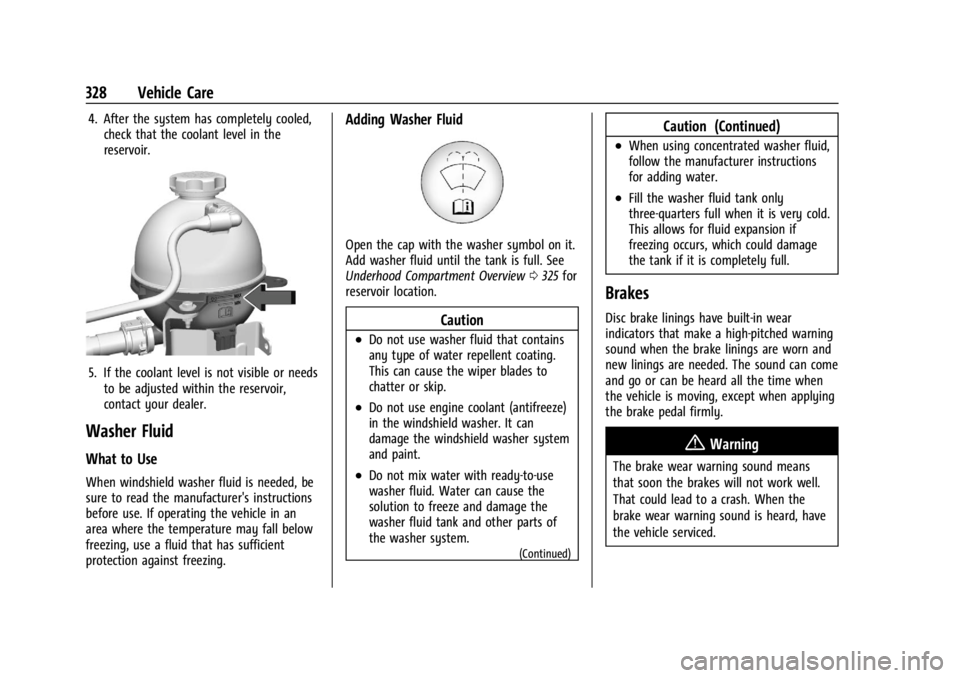
4. After the system has completely cooled,check that the coolant level in the
reservoir.
5. If the coolant level is not visible or needsto be adjusted within the reservoir,
contact your dealer.
Washer Fluid
What to Use
When windshield washer fluid is needed, be
sure to read the manufacturer's instructions
before use. If operating the vehicle in an
area where the temperature may fall below
freezing, use a fluid that has sufficient
protection against freezing.
Adding Washer Fluid
Open the cap with the washer symbol on it.
Add washer fluid until the tank is full. See
Underhood Compartment Overview 0325 for
reservoir location.
Caution
.Do not use washer fluid that contains
any type of water repellent coating.
This can cause the wiper blades to
chatter or skip.
.Do not use engine coolant (antifreeze)
in the windshield washer. It can
damage the windshield washer system
and paint.
.Do not mix water with ready-to-use
washer fluid. Water can cause the
solution to freeze and damage the
washer fluid tank and other parts of
the washer system.
(Continued)
Caution (Continued)
.When using concentrated washer fluid,
follow the manufacturer instructions
for adding water.
.Fill the washer fluid tank only
three-quarters full when it is very cold.
This allows for fluid expansion if
freezing occurs, which could damage
the tank if it is completely full.
Brakes
Disc brake linings have built-in wear
indicators that make a high-pitched warning
sound when the brake linings are worn and
new linings are needed. The sound can come
and go or can be heard all the time when
the vehicle is moving, except when applying
the brake pedal firmly.
{Warning
The brake wear warning sound means
that soon the brakes will not work well.
That could lead to a crash. When the
brake wear warning sound is heard, have
the vehicle serviced.
Page 335 of 429
Chevrolet Silverado EV Owner Manual (GMNA-Localizing-U.S./Canada-
16702912) - 2024 - CRC - 1/13/23
334 Vehicle Care
Windshield Replacement
Driver Assistance Systems
If the windshield needs to be replaced and
the vehicle is equipped with a front camera
sensor for the Driver Assistance Systems, a
GM replacement windshield is
recommended. The replacement windshield
must be installed according to GM
specifications for proper alignment. If it is
not, these systems may not work properly,
they may display messages, or they may
not work at all. See your dealer for proper
windshield replacement.
Gas Strut(s)
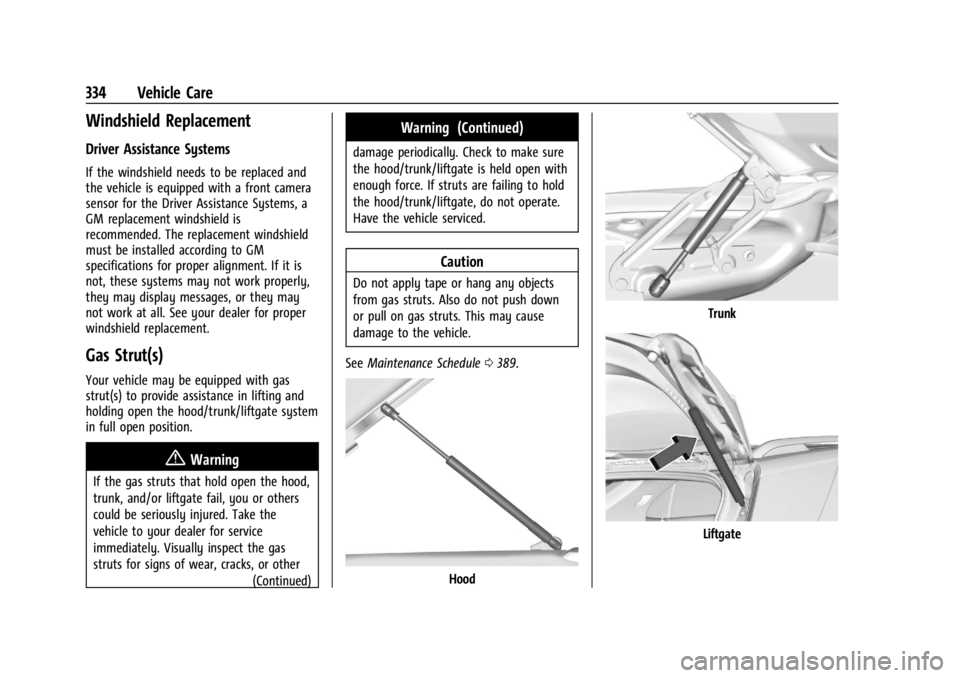
Your vehicle may be equipped with gas
strut(s) to provide assistance in lifting and
holding open the hood/trunk/liftgate system
in full open position.
{Warning
If the gas struts that hold open the hood,
trunk, and/or liftgate fail, you or others
could be seriously injured. Take the
vehicle to your dealer for service
immediately. Visually inspect the gas
struts for signs of wear, cracks, or other(Continued)
Warning (Continued)
damage periodically. Check to make sure
the hood/trunk/liftgate is held open with
enough force. If struts are failing to hold
the hood/trunk/liftgate, do not operate.
Have the vehicle serviced.
Caution
Do not apply tape or hang any objects
from gas struts. Also do not push down
or pull on gas struts. This may cause
damage to the vehicle.
See Maintenance Schedule 0389.
Hood
Trunk
Liftgate
Page 369 of 429
Chevrolet Silverado EV Owner Manual (GMNA-Localizing-U.S./Canada-
16702912) - 2024 - CRC - 1/13/23
368 Vehicle Care
If the vehicle only has a cigarette lighter,
use the cigarette lighter.
Do not pinch the power plug cord in the
door or window.
7. Start the vehicle. The vehicle must be running while using the air compressor.
8. Press the on/off button (4) to turn the tire sealant and compressor kit on.
The compressor will inflate the tire with
air only.
9. Inflate the tire to the recommended inflation pressure using the pressure
gauge (6). The recommended inflation
pressure can be found on the Tire and
Loading Information label. See Tire
Pressure 0349.
The pressure gauge (6) may read higher
than the actual tire pressure while the
compressor is on. Turn the compressor
off to get an accurate pressure reading.
The compressor may be turned on/off
until the correct pressure is reached.
Caution
If the recommended pressure cannot be
reached after approximately 25 minutes,
the vehicle should not be driven farther.
(Continued)
Caution (Continued)
The tire is too severely damaged and the
tire sealant and compressor kit cannot
inflate the tire. Remove the power plug
from the accessory power outlet and
unscrew the inflating hose from the tire
valve. See Roadside Assistance Program
0 399.
10. Press the on/off button (4) to turn the tire sealant and compressor kit off.
Be careful while handling the compressor
as it could be warm after usage.
11. Unplug the power plug (7) from the accessory power outlet in the vehicle.
12. Turn the air only hose (8) counterclockwise to remove it from the
tire valve stem.
13. Replace the tire valve stem cap.
14. Return the air only hose (8) and power plug (7) back to their original storage
location.
15. Return the equipment to its original storage location in the vehicle.
Accessory adapters that can be used to
inflate an air mattress or a ball, etc., are
located on the bottom of the compressor kit
Storing the Tire Sealant and
Compressor Kit
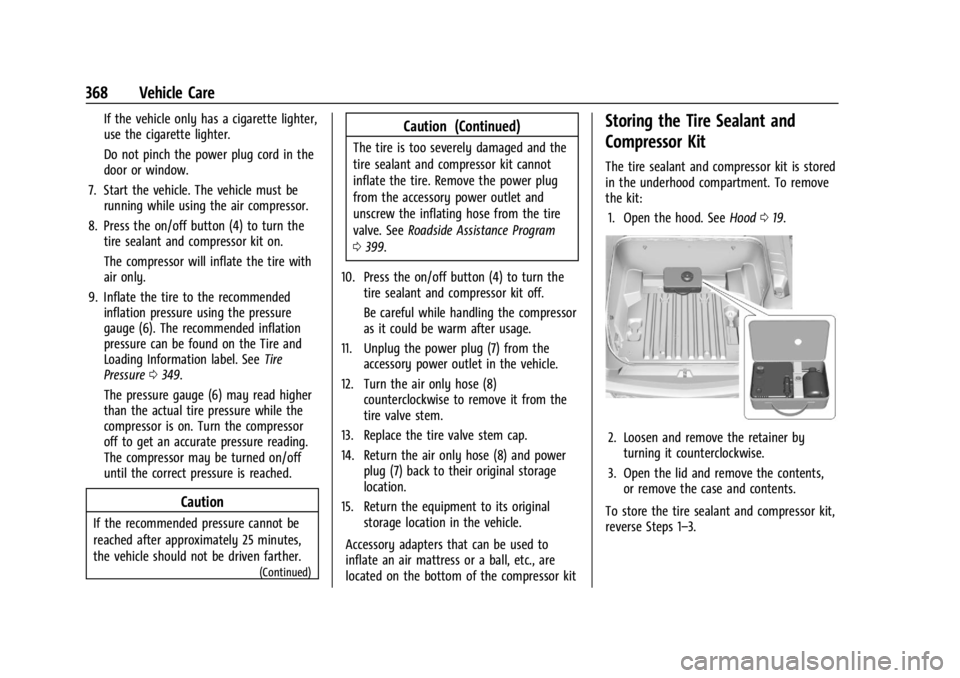
The tire sealant and compressor kit is stored
in the underhood compartment. To remove
the kit: 1. Open the hood. See Hood019.
2. Loosen and remove the retainer by
turning it counterclockwise.
3. Open the lid and remove the contents, or remove the case and contents.
To store the tire sealant and compressor kit,
reverse Steps 1–3.
Page 370 of 429
Chevrolet Silverado EV Owner Manual (GMNA-Localizing-U.S./Canada-
16702912) - 2024 - CRC - 1/13/23
Vehicle Care 369
Tire Changing
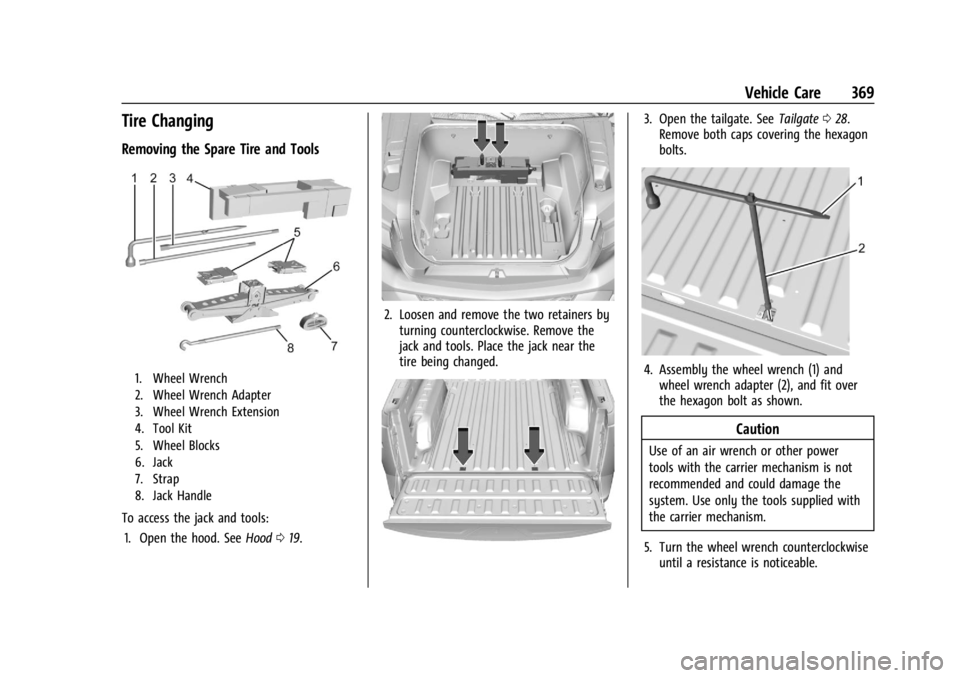
Removing the Spare Tire and Tools
1. Wheel Wrench
2. Wheel Wrench Adapter
3. Wheel Wrench Extension
4. Tool Kit
5. Wheel Blocks
6. Jack
7. Strap
8. Jack Handle
To access the jack and tools:1. Open the hood. See Hood019.
2. Loosen and remove the two retainers by
turning counterclockwise. Remove the
jack and tools. Place the jack near the
tire being changed.
3. Open the tailgate. See Tailgate028.
Remove both caps covering the hexagon
bolts.
4. Assembly the wheel wrench (1) and wheel wrench adapter (2), and fit over
the hexagon bolt as shown.
Caution
Use of an air wrench or other power
tools with the carrier mechanism is not
recommended and could damage the
system. Use only the tools supplied with
the carrier mechanism.
5. Turn the wheel wrench counterclockwise until a resistance is noticeable.
Page 377 of 429
Chevrolet Silverado EV Owner Manual (GMNA-Localizing-U.S./Canada-
16702912) - 2024 - CRC - 1/13/23
376 Vehicle Care
Before you connect the cables, here are
some basic things you should know.
Positive (+) will go to the positive (+)
terminal. Negative (−) will go to the
negative (−) terminal on the battery
providing the jump start to the negative
grounding point for the discharged battery.
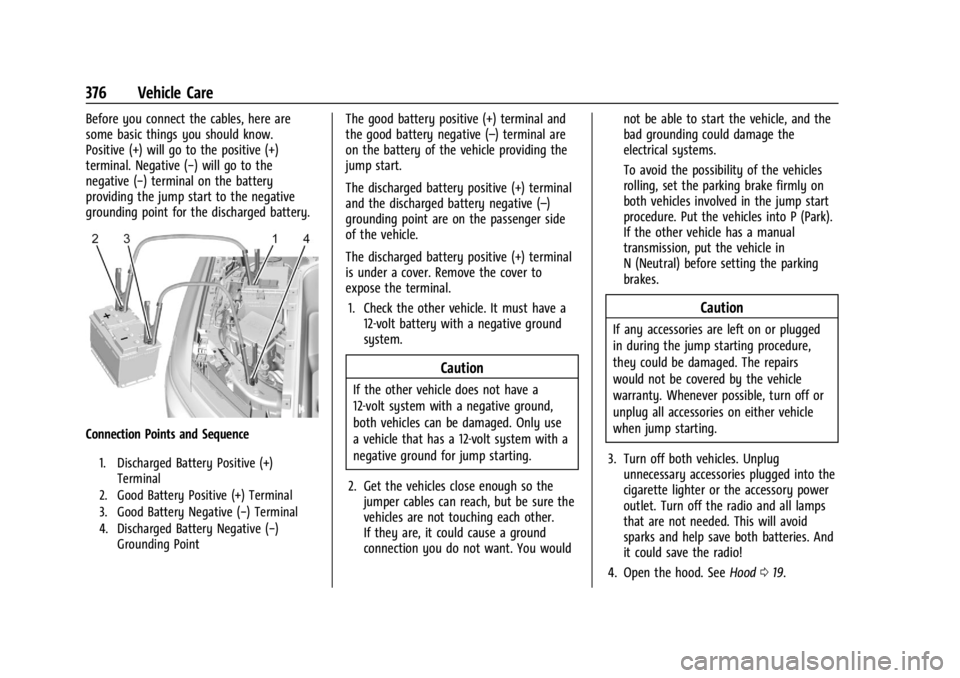
Connection Points and Sequence
1. Discharged Battery Positive (+)Terminal
2. Good Battery Positive (+) Terminal
3. Good Battery Negative (−) Terminal
4. Discharged Battery Negative (−) Grounding Point
The good battery positive (+) terminal and
the good battery negative (–) terminal are
on the battery of the vehicle providing the
jump start.
The discharged battery positive (+) terminal
and the discharged battery negative (–)
grounding point are on the passenger side
of the vehicle.
The discharged battery positive (+) terminal
is under a cover. Remove the cover to
expose the terminal.
1. Check the other vehicle. It must have a 12-volt battery with a negative ground
system.
Caution
If the other vehicle does not have a
12-volt system with a negative ground,
both vehicles can be damaged. Only use
a vehicle that has a 12-volt system with a
negative ground for jump starting.
2. Get the vehicles close enough so the jumper cables can reach, but be sure the
vehicles are not touching each other.
If they are, it could cause a ground
connection you do not want. You would not be able to start the vehicle, and the
bad grounding could damage the
electrical systems.
To avoid the possibility of the vehicles
rolling, set the parking brake firmly on
both vehicles involved in the jump start
procedure. Put the vehicles into P (Park).
If the other vehicle has a manual
transmission, put the vehicle in
N (Neutral) before setting the parking
brakes.
Caution
If any accessories are left on or plugged
in during the jump starting procedure,
they could be damaged. The repairs
would not be covered by the vehicle
warranty. Whenever possible, turn off or
unplug all accessories on either vehicle
when jump starting.
3. Turn off both vehicles. Unplug unnecessary accessories plugged into the
cigarette lighter or the accessory power
outlet. Turn off the radio and all lamps
that are not needed. This will avoid
sparks and help save both batteries. And
it could save the radio!
4. Open the hood. See Hood019.
Page 383 of 429
Chevrolet Silverado EV Owner Manual (GMNA-Localizing-U.S./Canada-
16702912) - 2024 - CRC - 1/13/23
382 Vehicle Care
.Solvents, alcohols, fuels, or other harsh
cleaners.
.Ice scrapers or other hard items.
.Aftermarket appearance caps or covers
while the lamps are illuminated, due to
excessive heat generated.
Caution
Failure to clean lamps properly can cause
damage to the lamp cover that would
not be covered by the vehicle warranty.
Caution
Using wax on low gloss black finish
stripes can increase the gloss level and
create a non-uniform finish. Clean low
gloss stripes with soap and water only.
Air Intakes
Clear debris from the air intakes, between
the hood and windshield, when washing the
vehicle.
Shutter System
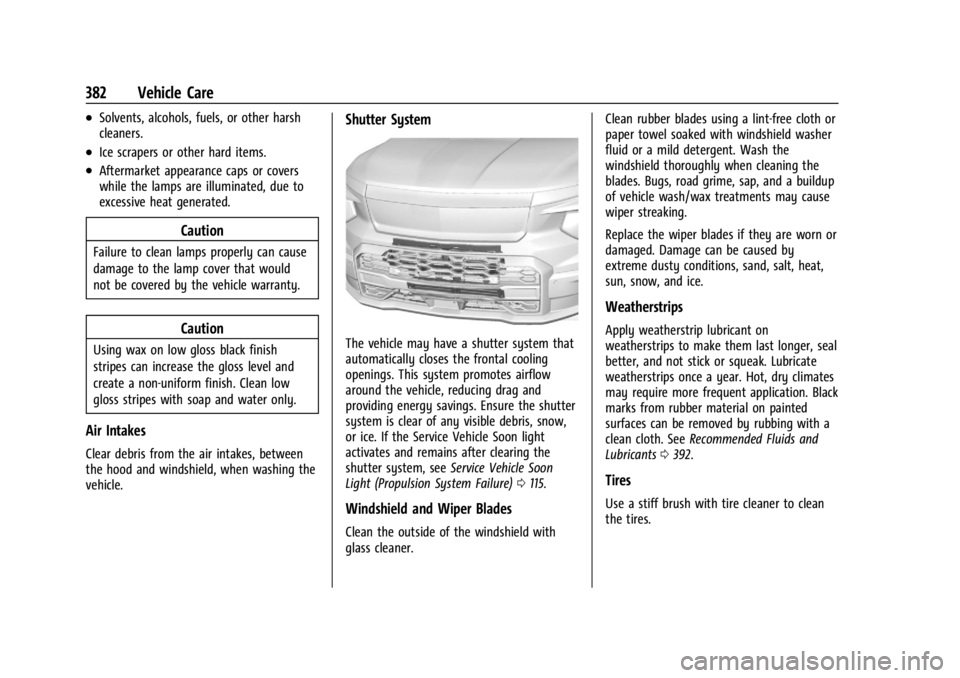
The vehicle may have a shutter system that
automatically closes the frontal cooling
openings. This system promotes airflow
around the vehicle, reducing drag and
providing energy savings. Ensure the shutter
system is clear of any visible debris, snow,
or ice. If the Service Vehicle Soon light
activates and remains after clearing the
shutter system, seeService Vehicle Soon
Light (Propulsion System Failure) 0115.
Windshield and Wiper Blades
Clean the outside of the windshield with
glass cleaner. Clean rubber blades using a lint-free cloth or
paper towel soaked with windshield washer
fluid or a mild detergent. Wash the
windshield thoroughly when cleaning the
blades. Bugs, road grime, sap, and a buildup
of vehicle wash/wax treatments may cause
wiper streaking.
Replace the wiper blades if they are worn or
damaged. Damage can be caused by
extreme dusty conditions, sand, salt, heat,
sun, snow, and ice.
Weatherstrips
Apply weatherstrip lubricant on
weatherstrips to make them last longer, seal
better, and not stick or squeak. Lubricate
weatherstrips once a year. Hot, dry climates
may require more frequent application. Black
marks from rubber material on painted
surfaces can be removed by rubbing with a
clean cloth. See
Recommended Fluids and
Lubricants 0392.
Tires
Use a stiff brush with tire cleaner to clean
the tires.
Page 421 of 429

Chevrolet Silverado EV Owner Manual (GMNA-Localizing-U.S./Canada-
16702912) - 2024 - CRC - 1/13/23
420 Index
Folding Mirrors . . . . . . . . . . . . . . . . . . . . . . . . . . . .35
Four-WheelSteering Light . . . . . . . . . . . . . . . . . . . . . . . . . . . 119
Four-Wheel Drive . . . . . . . . . . . . . . . . . . . . . . . . 204
Four-Wheel Steering . . . . . . . . . . . . . . . . . . . . . 210
Four-Wheel-Drive Light . . . . . . . . . . . . . . . . . . . . . . . . . . . . . . . . . . . . 117
Frequency Statement Radio . . . . . . . . . . . . . . . . . . . . . . . . . . . . . . . . . . 404
Front Heated and Ventilated Seats . . . . . . . . . . . . 47
Front Seats Adjustment . . . . . . . . . . . . . . . . . . . . . . . . . . . . . 43
Full-Size Spare Tire . . . . . . . . . . . . . . . . . . . . . . . 374
Fuses Fuses and Circuit Breakers . . . . . . . . . . . . . 337
Instrument Panel Fuse Block . . . . . . 340, 342
Underhood Compartment . . . . . . . . . . . . . . 337
G
Garage Door Opener . . . . . . . . . . . . . . . . . . . . . . 137
Programming . . . . . . . . . . . . . . . . . . . . . . . . . . . 137
Gas Strut(s) . . . . . . . . . . . . . . . . . . . . . . . . . . . . . . 334
Gauges Battery . . . . . . . . . . . . . . . . . . . . . . . . . . . . . . . . 110
Odometer . . . . . . . . . . . . . . . . . . . . . . . . . . . . . 110
Power Indicator . . . . . . . . . . . . . . . . . . . . . . . . . 111
Speedometer . . . . . . . . . . . . . . . . . . . . . . . . . . 110 Gauges (cont'd)
Trip Odometer . . . . . . . . . . . . . . . . . . . . . . . . . 110
Warning Lights and Indicators . . . . . . . . . 107
General Information Service and Maintenance . . . . . . . . . . . . . . 388
Towing . . . . . . . . . . . . . . . . . . . . . . . . . . . . . . . . 293
Vehicle Care . . . . . . . . . . . . . . . . . . . . . . . . . . . 324
Generator Onboard . . . . . . . . . . . . . . . . . . . . . . . . . . . . . . . 101
Glass Replacement . . . . . . . . . . . . . . . . . . . . . . . 333
Global Positioning System (GPS) . . . . . . . . . . 157
Glove Box . . . . . . . . . . . . . . . . . . . . . . . . . . . . . . . . .91
GM Mobility Reimbursement Program . . . . . . . . . . . . . . . . . . . . . . . . . . . . . . . 399
Guidance Problems with the Route . . . . . . . . . . . . . . 158
H
Hazard Warning Flashers . . . . . . . . . . . . . . . . .142
Head Restraints . . . . . . . . . . . . . . . . . . . . . . . . . . . .41
Head-Up Display (HUD) . . . . . . . . . . . . . . . . . . . 133
Headlamps
Aiming . . . . . . . . . . . . . . . . . . . . . . . . . . . . . . . . 335
Automatic . . . . . . . . . . . . . . . . . . . . . . . . . . . . . 142
Daytime Running Lamps (DRL) . . . . . . . . . . 141
Flash-to-Pass . . . . . . . . . . . . . . . . . . . . . . . . . . . . 141
High-Beam On Light . . . . . . . . . . . . . . . . . . . . 121
High/Low Beam Changer . . . . . . . . . . . . . . . 141 Headlamps (cont'd)
Lamps On Reminder . . . . . . . . . . . . . . . . . . . . 121
Heated Mirrors . . . . . . . . . . . . . . . . . . . . . . . . . . . . . . . . . 36
Rear Seats . . . . . . . . . . . . . . . . . . . . . . . . . . . . . . . 51
Steering Wheel . . . . . . . . . . . . . . . . . . . . . . . . . 97
Ventilated Front Seats . . . . . . . . . . . . . . . . . . 47
Heating . . . . . . . . . . . . . . . . . . . . . . . . . . . . . . . . . . .174
High Voltage Battery Gauge . . . . . . . . . . . . . .110
High Voltage Devices and Wiring . . . . . . . . 335
High-Beam On Light . . . . . . . . . . . . . . . . . . . . . . 121
High-Speed Operation . . . . . . . . . . . . . . . . . . . 350
Hill and Mountain Roads . . . . . . . . . . . . . . . . 190
Hill Start Assist (HSA) . . . . . . . . . . . . . . . . . . . . 206
Hood . . . . . . . . . . . . . . . . . . . . . . . . . . . . . . . . . . . . . .19
Horn . . . . . . . . . . . . . . . . . . . . . . . . . . . . . . . . . . . . . . 98
How to Wear Seat Belts Properly . . . . . . . . . 54
HVAC . . . . . . . . . . . . . . . . . . . . . . . . . . . . . . . . . . . . .174
I
Immobilizer . . . . . . . . . . . . . . . . . . . . . . . . . . . . . . . .33
Indicator Pedestrian Ahead . . . . . . . . . . . . . . . . . . . . . . . 118
Speed Limiter . . . . . . . . . . . . . . . . . . . . . . . . . . . 112
Vehicle Ahead . . . . . . . . . . . . . . . . . . . . . . . . . . 117
Indicators
Warning Lights and Gauges . . . . . . . . . . . . 107
Infants and Young Children, Restraints . . . . . 71