2024 CHEVROLET SILVERADO EV remote control
[x] Cancel search: remote controlPage 53 of 429
Chevrolet Silverado EV Owner Manual (GMNA-Localizing-U.S./Canada-
16702912) - 2024 - CRC - 1/13/23
52 Seats and Restraints
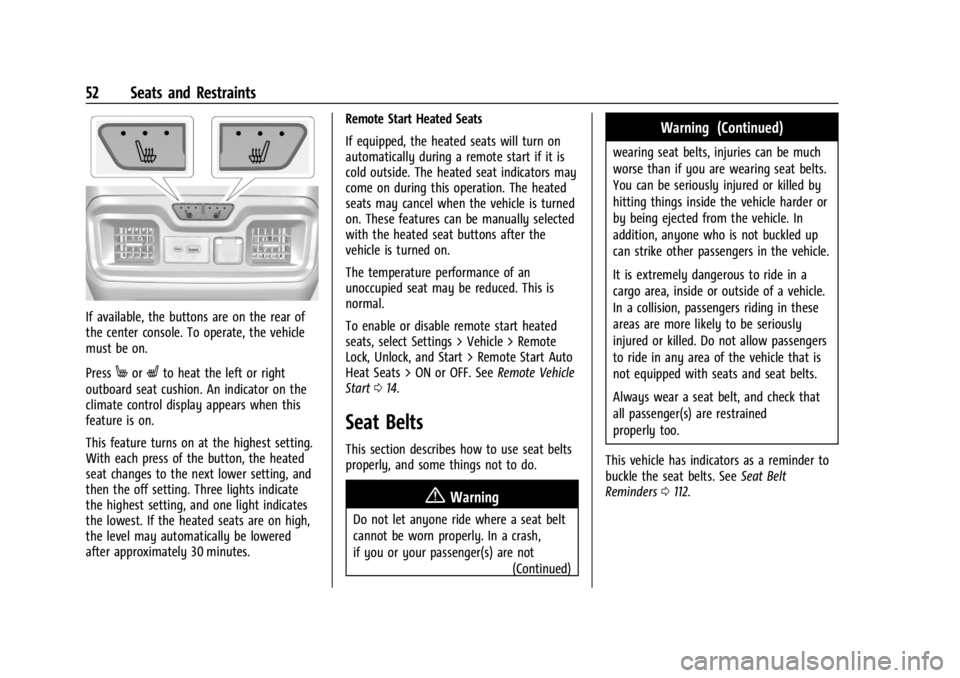
If available, the buttons are on the rear of
the center console. To operate, the vehicle
must be on.
Press
MorLto heat the left or right
outboard seat cushion. An indicator on the
climate control display appears when this
feature is on.
This feature turns on at the highest setting.
With each press of the button, the heated
seat changes to the next lower setting, and
then the off setting. Three lights indicate
the highest setting, and one light indicates
the lowest. If the heated seats are on high,
the level may automatically be lowered
after approximately 30 minutes. Remote Start Heated Seats
If equipped, the heated seats will turn on
automatically during a remote start if it is
cold outside. The heated seat indicators may
come on during this operation. The heated
seats may cancel when the vehicle is turned
on. These features can be manually selected
with the heated seat buttons after the
vehicle is turned on.
The temperature performance of an
unoccupied seat may be reduced. This is
normal.
To enable or disable remote start heated
seats, select Settings > Vehicle > Remote
Lock, Unlock, and Start > Remote Start Auto
Heat Seats > ON or OFF. See
Remote Vehicle
Start 014.
Seat Belts
This section describes how to use seat belts
properly, and some things not to do.
{Warning
Do not let anyone ride where a seat belt
cannot be worn properly. In a crash,
if you or your passenger(s) are not
(Continued)
Warning (Continued)
wearing seat belts, injuries can be much
worse than if you are wearing seat belts.
You can be seriously injured or killed by
hitting things inside the vehicle harder or
by being ejected from the vehicle. In
addition, anyone who is not buckled up
can strike other passengers in the vehicle.
It is extremely dangerous to ride in a
cargo area, inside or outside of a vehicle.
In a collision, passengers riding in these
areas are more likely to be seriously
injured or killed. Do not allow passengers
to ride in any area of the vehicle that is
not equipped with seats and seat belts.
Always wear a seat belt, and check that
all passenger(s) are restrained
properly too.
This vehicle has indicators as a reminder to
buckle the seat belts. See Seat Belt
Reminders 0112.
Page 97 of 429
Chevrolet Silverado EV Owner Manual (GMNA-Localizing-U.S./Canada-
16702912) - 2024 - CRC - 1/13/23
96 Instruments and Controls
Instruments and Controls
Controls
Steering Wheel Adjustment . . . . . . . . . . . . 97
Heated Steering Wheel . . . . . . . . . . . . . . . . . 97
Horn . . . . . . . . . . . . . . . . . . . . . . . . . . . . . . . . . . . 98
Pedestrian Safety Signal . . . . . . . . . . . . . . . . 98
Windshield Wiper/Washer . . . . . . . . . . . . . 98
Clock . . . . . . . . . . . . . . . . . . . . . . . . . . . . . . . . . . . 99
Power Outlets . . . . . . . . . . . . . . . . . . . . . . . . . . 99
Onboard Generator . . . . . . . . . . . . . . . . . . . . 101
Wireless Charging . . . . . . . . . . . . . . . . . . . . . 104
On-Screen Controls . . . . . . . . . . . . . . . . . . . . 107
Warning Lights, Gauges, and Indicators
Warning Lights, Gauges, andIndicators . . . . . . . . . . . . . . . . . . . . . . . . . . . . 107
Instrument Cluster (Base Level) . . . . . . . . 107
Instrument Cluster (Uplevel) . . . . . . . . . . . 109
Speedometer . . . . . . . . . . . . . . . . . . . . . . . . . . 110
Odometer . . . . . . . . . . . . . . . . . . . . . . . . . . . . . . 110
Trip Odometer . . . . . . . . . . . . . . . . . . . . . . . . . 110
Battery Gauge (High Voltage) . . . . . . . . . 110
Power Indicator Gauge . . . . . . . . . . . . . . . . . 111
Speed Limiter Indicator . . . . . . . . . . . . . . . . . 112
Seat Belt Reminders . . . . . . . . . . . . . . . . . . . . 112
Airbag Readiness Light . . . . . . . . . . . . . . . . . 113
Passenger Airbag Status Indicator . . . . . . 114
Charging System Light . . . . . . . . . . . . . . . . . 114
Low State of Charge Light . . . . . . . . . . . . . 114 Charge Cord Connected Light . . . . . . . . . . 114
Battery Fault Light . . . . . . . . . . . . . . . . . . . . . 115
Propulsion Power is Limited Light . . . . . . 115
Service Vehicle Soon Light (Propulsion
System Failure) . . . . . . . . . . . . . . . . . . . . . . . 115
Brake System Warning Light . . . . . . . . . . . 115
Electric Parking Brake Light . . . . . . . . . . . . 116
Service Electric Parking Brake Light . . . . 116
Antilock Brake System (ABS) Warning Light . . . . . . . . . . . . . . . . . . . . . . . . . . . . . . . . . 116
Four-Wheel-Drive Light . . . . . . . . . . . . . . . . . 117
Lane Keep Assist (LKA) Light . . . . . . . . . . . 117
Automatic Emergency Braking (AEB) Disabled Light . . . . . . . . . . . . . . . . . . . . . . . . 117
Vehicle Ahead Indicator . . . . . . . . . . . . . . . . 117
Pedestrian Ahead Indicator . . . . . . . . . . . . . 118
Traction Off Light . . . . . . . . . . . . . . . . . . . . . . 118
Traction Control System (TCS)/Electronic Stability Control Light . . . . . . . . . . . . . . . . 118
Electronic Stability Control (ESC) Off Light . . . . . . . . . . . . . . . . . . . . . . . . . . . . . . . . . 119
Driver Mode Control Light . . . . . . . . . . . . . 119
Four-Wheel Steering Light . . . . . . . . . . . . . 119
Air Suspension Light . . . . . . . . . . . . . . . . . . . 119
Tire Pressure Light . . . . . . . . . . . . . . . . . . . . . 120
Security Light . . . . . . . . . . . . . . . . . . . . . . . . . . 121
Vehicle Ready Light . . . . . . . . . . . . . . . . . . . . 121
One-Pedal Driving Light . . . . . . . . . . . . . . . . 121
High-Beam On Light . . . . . . . . . . . . . . . . . . . . 121
Lamps On Reminder . . . . . . . . . . . . . . . . . . . . 121 Cruise Control Light . . . . . . . . . . . . . . . . . . . . 122
Driver Attention Assist Light . . . . . . . . . . . 122
Door Ajar Light . . . . . . . . . . . . . . . . . . . . . . . . 122
Information Displays
Charging . . . . . . . . . . . . . . . . . . . . . . . . . . . . . . . 123
Driver Information Center (DIC) (Base
Level) . . . . . . . . . . . . . . . . . . . . . . . . . . . . . . . . 129
Driver Information Center (DIC) (Uplevel) . . . . . . . . . . . . . . . . . . . . . . . . . . . . . 130
Vehicle Status . . . . . . . . . . . . . . . . . . . . . . . . . 132
Head-Up Display (HUD) . . . . . . . . . . . . . . . . 133
Vehicle Messages
Vehicle Messages . . . . . . . . . . . . . . . . . . . . . . 135
Propulsion Power Messages . . . . . . . . . . . 136
Vehicle Speed Messages . . . . . . . . . . . . . . . 137
Universal Remote System
Universal Remote System . . . . . . . . . . . . . . 137
Universal Remote System Programming . . . . . . . . . . . . . . . . . . . . . . . . 137
Universal Remote System Operation . . . 138
Page 98 of 429
Chevrolet Silverado EV Owner Manual (GMNA-Localizing-U.S./Canada-
16702912) - 2024 - CRC - 1/13/23
Instruments and Controls 97
Controls
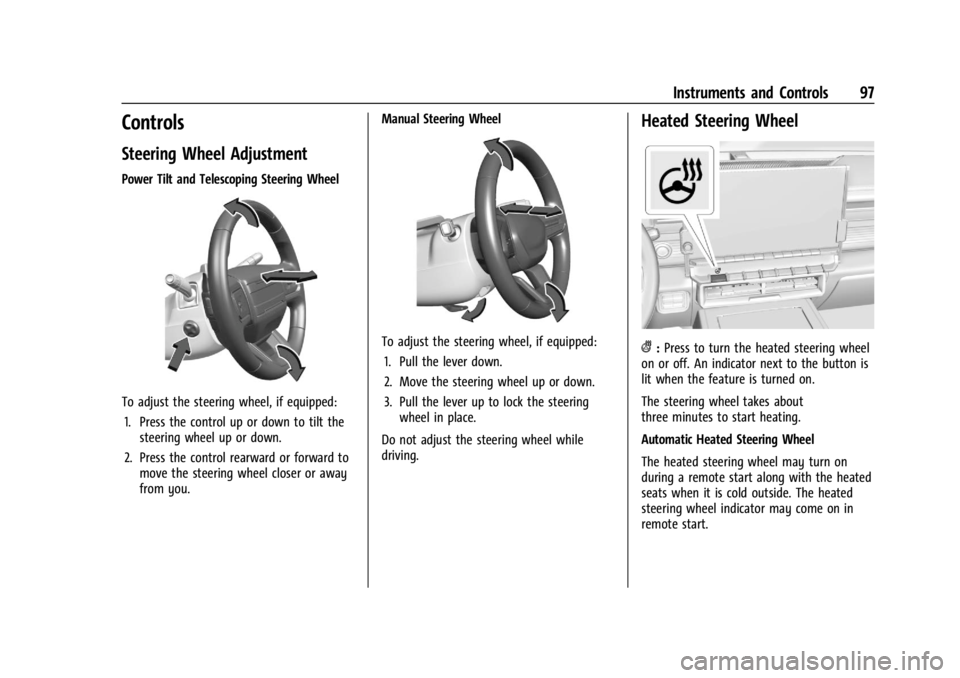
Steering Wheel Adjustment
Power Tilt and Telescoping Steering Wheel
To adjust the steering wheel, if equipped:1. Press the control up or down to tilt the steering wheel up or down.
2. Press the control rearward or forward to move the steering wheel closer or away
from you. Manual Steering Wheel
To adjust the steering wheel, if equipped:
1. Pull the lever down.
2. Move the steering wheel up or down.
3. Pull the lever up to lock the steering wheel in place.
Do not adjust the steering wheel while
driving.
Heated Steering Wheel
(: Press to turn the heated steering wheel
on or off. An indicator next to the button is
lit when the feature is turned on.
The steering wheel takes about
three minutes to start heating.
Automatic Heated Steering Wheel
The heated steering wheel may turn on
during a remote start along with the heated
seats when it is cold outside. The heated
steering wheel indicator may come on in
remote start.
Page 127 of 429
Chevrolet Silverado EV Owner Manual (GMNA-Localizing-U.S./Canada-
16702912) - 2024 - CRC - 1/13/23
126 Instruments and Controls
temperature, and outside air temperature.
To learn more about the vehicle battery see
Plug-In Charging0278.
The peek-in charging screen can be used to
monitor your vehicle’s charge status when
the vehicle is off, see Instrument Cluster
(Base Level) 0107 or
Instrument Cluster (Uplevel) 0109. To
monitor the charging status remotely,
download the myChevrolet app on your
mobile device.
Fast Charging
The vehicle will immediately begin charging
when plugged into a fast charging station.
While Fast Charging, the vehicle will bypass
any schedule or departure time selection.
See Plug-In Charging 0278.
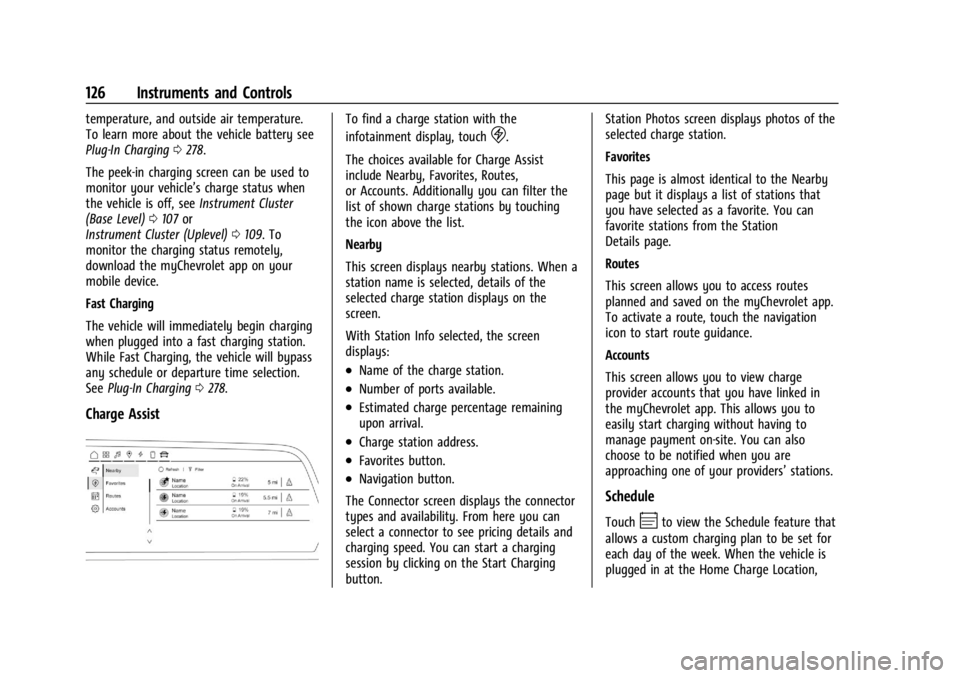
Charge Assist
To find a charge station with the
infotainment display, touch
D.
The choices available for Charge Assist
include Nearby, Favorites, Routes,
or Accounts. Additionally you can filter the
list of shown charge stations by touching
the icon above the list.
Nearby
This screen displays nearby stations. When a
station name is selected, details of the
selected charge station displays on the
screen.
With Station Info selected, the screen
displays:
.Name of the charge station.
.Number of ports available.
.Estimated charge percentage remaining
upon arrival.
.Charge station address.
.Favorites button.
.Navigation button.
The Connector screen displays the connector
types and availability. From here you can
select a connector to see pricing details and
charging speed. You can start a charging
session by clicking on the Start Charging
button. Station Photos screen displays photos of the
selected charge station.
Favorites
This page is almost identical to the Nearby
page but it displays a list of stations that
you have selected as a favorite. You can
favorite stations from the Station
Details page.
Routes
This screen allows you to access routes
planned and saved on the myChevrolet app.
To activate a route, touch the navigation
icon to start route guidance.
Accounts
This screen allows you to view charge
provider accounts that you have linked in
the myChevrolet app. This allows you to
easily start charging without having to
manage payment on-site. You can also
choose to be notified when you are
approaching one of your providers’
stations.
Schedule
TouchEto view the Schedule feature that
allows a custom charging plan to be set for
each day of the week. When the vehicle is
plugged in at the Home Charge Location,
Page 131 of 429
Chevrolet Silverado EV Owner Manual (GMNA-Localizing-U.S./Canada-
16702912) - 2024 - CRC - 1/13/23
130 Instruments and Controls
Tire Pressure :Shows the approximate
pressures of all four tires. Tire pressure is
displayed in either kilopascal (kPa) or in
pounds per square inch (psi). If the pressure
is low, the value for that tire is shown in
amber. See Tire Pressure Monitor System
0 351 and
Tire Pressure Monitor Operation 0351.
If equipped, Tire Temperature is located near
the tire pressure graphic. Tire Temperature
shows overall temperature as either Cold,
Cool, Normal, Warm, or Hot. Normal is
typical for normal driving while Warm is
typical for spirited driving. Unknown
displays when tire temperature information
is unavailable.
Trailer Brake : On vehicles with the
Integrated Trailer Brake Control (ITBC)
system, the trailer brake display appears in
the DIC.
TRAILER GAIN shows the trailer gain setting.
This setting can be adjusted from 0.0 to 10.0
with either a trailer connected or
disconnected.
TRAILER OUTPUT shows the power output to
the trailer any time a trailer with electric
brakes is connected. Output is displayed as a
bar graph. Dotted lines may appear in the
OUTPUT display if a trailer is not connected. Energy Usage :
Shows energy usage of the
Driving, Remote Start, Climate and
Conditioning vehicle systems as percentages
of overall vehicle energy use.
Energy Efficiency : Shows a graph showing
the energy efficiency that has been used by
the vehicle over a recently driven distance.
Off : Allows for no information to be
displayed in the cluster info display areas.
Driver Information Center (DIC)
(Uplevel)
The DIC is displayed in the instrument
cluster. It shows the status of many vehicle
systems.
DIC information is broken down into two
main zones:
Left Zone : Displays on the instrument
cluster to the left of the speedometer.
Right Zone : Displays on the instrument
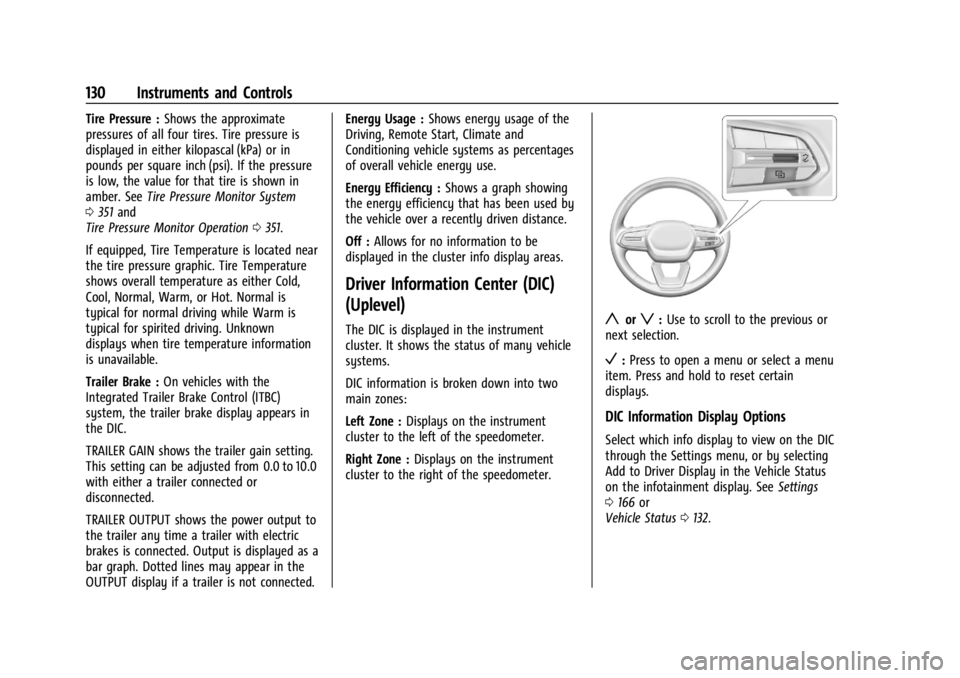
cluster to the right of the speedometer.yorz: Use to scroll to the previous or
next selection.
V: Press to open a menu or select a menu
item. Press and hold to reset certain
displays.
DIC Information Display Options
Select which info display to view on the DIC
through the Settings menu, or by selecting
Add to Driver Display in the Vehicle Status
on the infotainment display. See Settings
0 166 or
Vehicle Status 0132.
Page 132 of 429
Chevrolet Silverado EV Owner Manual (GMNA-Localizing-U.S./Canada-
16702912) - 2024 - CRC - 1/13/23
Instruments and Controls 131
DIC Information Displays
The following is the list of all possible DIC
information displays and their locations.
Some of the information displays may not
be available for your particular vehicle.
Left Zone
Trip 1 or Trip 2 and Average Efficiency :The
Trip display shows the current distance
traveled, in either kilometers (km) or
miles (mi), since the trip odometer was last
reset. To reset the current trip, touch and
hold the touchscreen display when trip
odometer is displayed on the vehicle status
screen.
The Average Efficiency shows the
approximate average kWh per
100 kilometers (kWh/100 km), kilometers
per kilowatt hour kWh (km/kWh), or miles
per kilowatt hour kWh(mi/kWh). This
number is calculated based on the number
of kWh/100 km, km/kWh, or mi/kWh
recorded since the last time this menu item
was reset. This number only reflects the
approximate average electrical energy
economy that the vehicle has at that
moment, and changes as driving conditions
change. Current Trip :
Displays distance driven,
average efficiency, and time elapsed since
vehicle startup. It resets when you turn your
vehicle off.
Time/Date : Displays current date and time
information.
Tire Pressure : Shows the approximate
pressures of all four tires. Tire pressure is
displayed in either kilopascal (kPa) or in
pounds per square inch (psi). If the pressure
is low, the value for that tire is shown in
amber. See Tire Pressure Monitor System
0 351 and
Tire Pressure Monitor Operation 0351.
If equipped, Tire Temperature is located
below the tire pressure graphic. Tire
Temperature shows overall temperature as
either Cold, Cool, Normal, Warm, or Hot.
Normal is typical for normal driving while
Warm is typical for spirited driving.
Unknown displays when tire temperature
information is unavailable.
Trailer Brake : On vehicles with the
Integrated Trailer Brake Control (ITBC)
system, the trailer brake display appears in
the DIC. TRAILER GAIN shows the trailer gain setting.
This setting can be adjusted from 0.0 to 10.0
with either a trailer connected or
disconnected.
TRAILER OUTPUT shows the power output to
the trailer any time a trailer with electric
brakes is connected. Output is displayed as a
bar graph. Dotted lines may appear in the
OUTPUT display if a trailer is not connected.
Trailer Tire Pressure :
If equipped, shows the
approximate pressures of all trailer tires. Tire
pressure is displayed in either
kilopascal (kPa) or in pounds per square
inch (psi). If the pressure is low, the value
for that tire is shown in amber. See
Trailering App 0310.
Trailer Tire Temperature is located below the
tire pressure. Trailer Tire Temperature shows
each trailer tire temperature in either
degrees Celsius (°C) or degrees Fahrenheit
(°F).
Energy Usage : Shows energy usage of the
Driving, Remote Start, Climate and
Conditioning vehicle systems as percentages
of overall vehicle energy use.
Energy Efficiency : Shows a graph showing
the energy efficiency that has been used by
the vehicle over a recently driven distance.
Page 133 of 429
Chevrolet Silverado EV Owner Manual (GMNA-Localizing-U.S./Canada-
16702912) - 2024 - CRC - 1/13/23
132 Instruments and Controls
Off :Allows for no information to be
displayed in the cluster info display areas.
Right Zone
Auto Lane Change : Displays the status of a
driver-requested lane change when Super
Cruise is active. See Super Cruise0227.
Audio Now Playing : Displays the actively
playing audio.
Navigation : Displays a variety of navigation
information.
Phone : Displays a variety of call
information.
Off : Allows for no information to be
displayed in the cluster info display areas.
Vehicle Status
The following are all possible vehicle status
features.
To access the vehicle status menu touch
A
from the list of home page icons displayed
on the left side of the infotainment display.
Vehicle status content is shown on cards
that are grouped together in option tabs
that are displayed on the infotainment
display. Touching a card on the infotainment display
opens up a dialog box for that card. To
select a desired option within a dialog box,
touch the option and follow any message or
alerts that may display. Some options may
be unavailable while driving.
Touch Add to Driver Display to send the
desired card to the Driver Information
Center (DIC) on the instrument cluster.
Touch Remove from Driver Display to
remove the selected card from the
instrument cluster. See
Driver Information
Center (DIC) (Base Level) 0129 or
Driver Information Center (DIC) (Uplevel)
0 130.
Options
The following is the list of all possible cards
and their locations. Some of the cards may
not be available for your particular vehicle.
Overview
Displays an interactive 3-D rendered image
of your vehicle that shows performance and
health information.
Tire Pressure
Displays the approximate pressures of all
four tires. Tire pressure is displayed in either
kilopascal (kPa) or in pounds per square inch (psi). If the pressure is low, the value
for that tire is shown in amber. See
Tire
Pressure Monitor System 0351 and
Tire Pressure Monitor Operation 0351.
If equipped, Tire Temperature is located
below the tire pressure graphic. Tire
Temperature shows overall temperature as
either Cold, Cool, Normal, Warm, or Hot.
Normal is typical for normal driving while
Warm is typical for spirited driving.
Unknown displays when tire temperature
information is unavailable.
When selected, the following options may
be chosen in the dialog: Relearn Tire
Pressure, Turn Off/On Leak Detection, Reset
Leak Detection, and Add to Driver Display.
When enabled, you will receive alerts when
a fast and/or slow tire leak is detected. The
Leak Detection speeds shown are either Tire
Leak or Fast Leak. When disabled, you will
still receive low tire pressure alerts.
However, you will stop receiving additional
alerts when a tire is leaking air.
Energy Info
Energy Usage : Displays how energy is
being used for the current drive since the
last time the vehicle was started.
Percentages of the Driving, Remote Climate,
and Climate and Prep vehicle systems as
Page 138 of 429
Chevrolet Silverado EV Owner Manual (GMNA-Localizing-U.S./Canada-
16702912) - 2024 - CRC - 1/13/23
Instruments and Controls 137
Vehicle Speed Messages
SPEED LIMITED TO XXX KM/H (MPH)
This message shows that the vehicle speed
has been limited to the speed displayed. The
limited speed is a protection for various
propulsion and vehicle systems, such as
lubrication, thermal, brakes, suspension,
Teen Driver if equipped, or tires.
Universal Remote System
SeeRadio Frequency Statement 0404.
Universal Remote System
Programming
If equipped, the Universal Garage Door
(Universal Remote) controls are located on
the infotainment screen.
This system can replace up to eight remote
control transmitters used to activate devices
such as garage door openers, security
systems, and home automation devices.
These instructions refer to a garage door
opener, but can be used for other devices. Do not use the Universal Remote system
with any garage door opener that does not
have the stop and reverse feature. This
includes any garage door opener model
manufactured before April 1, 1982.
Keep the original hand-held transmitter for
use in other vehicles as well as for future
programming. Erase the programming when
vehicle ownership is terminated. See
“Erasing Universal Remotes.”
To program a garage door opener, park
outside directly in line with and facing the
garage door opener receiver. Clear all people
and objects away from the garage door.
Make sure the hand-held transmitter has a
new battery for quick and accurate
transmission of the radio-frequency signal.
Programming the Universal Remote
System
Programming involves time-sensitive actions
and may time out, requiring the procedure
to be repeated. Read these instructions
completely before programming the
Universal Remote system. It may help to
have another person assist with the
programming process. 1. On the infotainment home screen,
navigate to the Universal Remote
controls.
2. Hold the end of the hand-held transmitter about 3 to 8 cm (1 to 3 in)
away from the rear-view mirror. The
hand-held transmitter was supplied by
the manufacturer of the garage door
opener.
3. Select the “Add Remotes” option on the
infotainment screen.
4. Press and hold the hand-held transmitter button. Do not release the hand-held
transmitter button until “Signal Found”
appears on the infotainment screen.
5. Once the signal is found, test the Universal Remote System by pressing the
Test button. If your garage door moves,
then programming was successful. You
may need to press the Test button
several times. Indicate the successful
programming of a remote by pressing
the It Worked button. After successfully
programming a remote, there is no need
to complete Steps 6–10.