2024 CHEVROLET SILVERADO EV display
[x] Cancel search: displayPage 307 of 429
Chevrolet Silverado EV Owner Manual (GMNA-Localizing-U.S./Canada-
16702912) - 2024 - CRC - 1/17/23
306 Driving and Operating
This symbol is on the Trailer Brake Control
Panel on vehicles with an ITBC system. The
power output to the trailer brakes is
proportional to the amount of vehicle
braking. This available power output to the
trailer brakes can be adjusted to a wide
range of trailering situations.
The ITBC system is integrated with the
vehicle brakes, Antilock Brake System (ABS),
and StabiliTrak/Electronic Stability Control
(ESC) systems. In trailering conditions that
cause the vehicle’s anti-lock brake or
StabiliTrak/ESC systems to activate, power
sent to the trailer's brakes will be
automatically adjusted to minimize trailer
wheel lock-up. This does not imply that the
trailer has StabiliTrak/ESC.
If the vehicle brakes, ABS, or StabiliTrak/ESC
systems are not functioning properly, the
ITBC system may not function fully or at all.
Make sure all of these systems are fully
operational to allow the ITBC system to
function properly.
The ITBC system is powered through the
vehicle's electrical system. Turning the
vehicle off will also turn off the ITBC
system. The ITBC system is fully functional
only when the vehicle is in ON/RUN.{Warning
Connecting a trailer that has an air brake
system may result in reduced or
complete loss of trailer braking, including
increased stopping distance or trailer
instability which could result in serious
injury, death, or property damage. Only
use the ITBC system with electric or
electric over hydraulic trailer brake
systems.
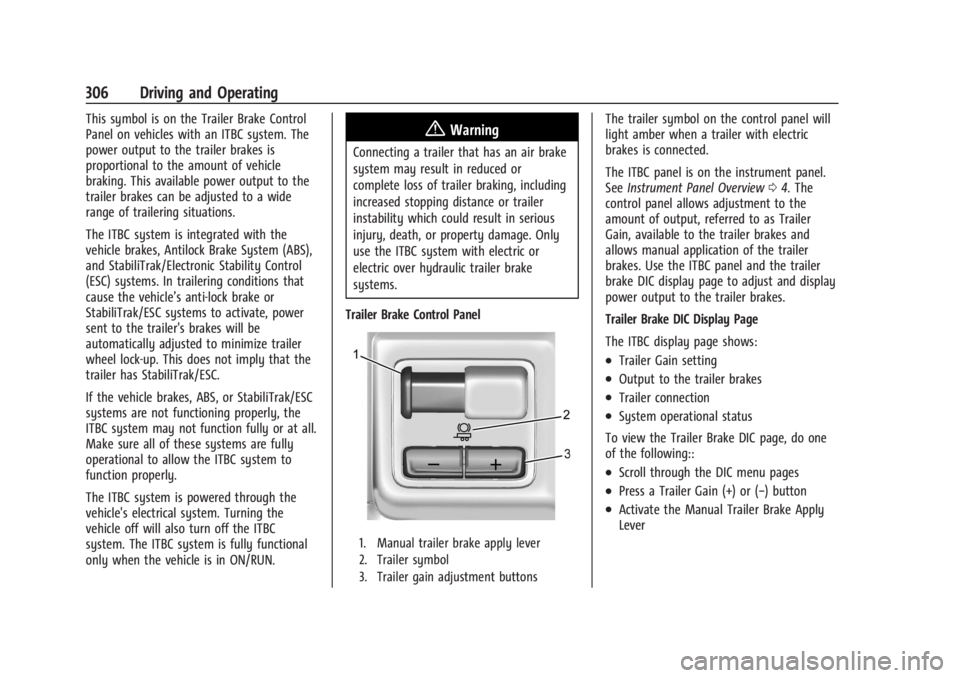
Trailer Brake Control Panel
1. Manual trailer brake apply lever
2. Trailer symbol
3. Trailer gain adjustment buttons
The trailer symbol on the control panel will
light amber when a trailer with electric
brakes is connected.
The ITBC panel is on the instrument panel.
See Instrument Panel Overview 04. The
control panel allows adjustment to the
amount of output, referred to as Trailer
Gain, available to the trailer brakes and
allows manual application of the trailer
brakes. Use the ITBC panel and the trailer
brake DIC display page to adjust and display
power output to the trailer brakes.
Trailer Brake DIC Display Page
The ITBC display page shows:
.Trailer Gain setting
.Output to the trailer brakes
.Trailer connection
.System operational status
To view the Trailer Brake DIC page, do one
of the following::
.Scroll through the DIC menu pages
.Press a Trailer Gain (+) or (−) button
.Activate the Manual Trailer Brake Apply
Lever
Page 308 of 429
Chevrolet Silverado EV Owner Manual (GMNA-Localizing-U.S./Canada-
16702912) - 2024 - CRC - 1/17/23
Driving and Operating 307
TRAILER GAIN:
Press a Trailer Gain button to recall the
current Trailer Gain setting. Each press and
release of the gain buttons will change the
Trailer Gain setting. Press the Trailer
Gain (+) or (−) to adjust. Press and hold to
continuously adjust the Trailer Gain. To turn
the output to the trailer off, adjust the
Trailer Gain setting to 0.0. This setting can
be adjusted from 0.0 to 10.0 with a trailer
connected or disconnected.
TRAILER OUTPUT: This displays anytime a
trailer with electric brakes is connected.
Output to the trailer brakes is based on the
amount of vehicle braking present and
relative to the Trailer Gain setting. Output is
displayed from 0–100% for each gain
setting.
The Trailer Output will indicate“- - - - - -”on
the Trailer Brake Display Page whenever the
following occur:
.No trailer is connected
.A trailer without electric brakes is
connected, no DIC message will display
.A trailer with electric brakes has become
disconnected, a CHECK TRAILER WIRING
message displays on the DIC
.There is a fault present in the wiring to
the trailer brakes, a CHECK TRAILER
WIRING message displays on the DIC
.The ITBC system is not working due to a
fault, a SERVICE TRAILER BRAKE SYSTEM
message displays in the DIC
Manual Trailer Brake Apply Lever
Slide this lever right to apply the trailer’s
electric brakes independent of the vehicle’s
brakes. Use this lever to adjust Trailer Gain
to achieve the proper power output to the
trailer brakes. This lever may also be used
to request additional trailer braking at any
time. The trailer and vehicle brake lamps
will come on when either vehicle brakes or
manual trailer brakes are applied and
properly connected.
Trailer Gain Adjustment Procedure
Trailer Gain should be set for a specific
trailering condition and it must be
readjusted anytime vehicle loading, trailer
loading, or road surface conditions change.
{Warning
Trailer brakes that are over-gained or
under-gained may not stop the vehicle
and the trailer as intended and can result (Continued)
Warning (Continued)
in a crash. Always follow the instructions
to set the Trailer Gain for the proper
trailer stopping performance.
To adjust Trailer Gain for each towing
condition: 1. Drive the vehicle with the trailer attached on a level road surface
representative of the towing condition
and free of traffic at about 32–40 km/h
(20–25 mph) and fully apply the Manual
Trailer Brake apply lever. Adjusting
Trailer Gain at speeds lower than
32–40 km/h (20–25 mph) may result in
an incorrect gain setting.
2. Adjust the Trailer Gain, using the Trailer Gain adjustment buttons, to just below
the point of trailer wheel lockup,
indicated by trailer wheel squeal or tire
smoke when a trailer wheel locks. Trailer
wheel lockup may not occur if towing a
heavily loaded trailer. In this case, adjust
the Trailer Gain to the highest allowable
setting for the towing condition.
Page 309 of 429
Chevrolet Silverado EV Owner Manual (GMNA-Localizing-U.S./Canada-
16702912) - 2024 - CRC - 1/17/23
308 Driving and Operating
3. Readjust Trailer Gain any time vehicleloading, trailer loading, or road surface
conditions change or if trailer wheel
lockup is noticed at any time while
towing.
Other ITBC-Related DIC Messages
TRAILER BRAKES CONNECTED: This message
will briefly display when a trailer with
electric brakes is first connected to the
vehicle. This message will automatically turn
off in about 10 seconds. This message can
be acknowledged before it automatically
turns off.
CHECK TRAILER WIRING: This message will
display if:
.The ITBC system first determines
connection to a trailer with electric brakes
and then the trailer harness becomes
disconnected from the vehicle.
‐ If the disconnect occurs while the
vehicle is stationary, this message will
automatically turn off in about
30 seconds. This message will also turn
off if it is acknowledged or if the trailer
harness is reconnected.
‐ If the disconnect occurs while the
vehicle is moving, this message will
continue until the vehicle is turned off. This message will also turn off if it is
acknowledged or if the trailer harness
is reconnected.
.There is an electrical fault in the wiring to
the trailer brakes. This message will
continue as long as there is an electrical
fault in the trailer wiring. This message
will also turn off if it is acknowledged.
To determine whether the electrical fault is
on the vehicle side or trailer side of the
trailer wiring harness connection: 1. Disconnect the trailer wiring harness from the vehicle.
2. Turn the vehicle off.
3. Wait 10 seconds, then turn the vehicle back to RUN.
4. If the CHECK TRAILER WIRING message reappears, the electrical fault is on the
vehicle side.
If the CHECK TRAILER WIRING message
only reappears when connecting the
trailer wiring harness to the vehicle, the
electrical fault is on the trailer side.
SERVICE TRAILER BRAKES OR REDUCED
TRAILER BRAKING: This message will display
if the electric trailer brake performance is
either reduced or non-functional. HOLD LAST KNOWN GAIN: This message will
display if it is no longer possible to adjust
the trailer brake gain. Trailer brakes may or
may not still be functional, and it is not
possible to adjust brake gain based on road
conditions. The trailer brakes may remain
functional until the next time the vehicle is
turned off.
TRAILER BRAKES DISABLED SERVICE
REQUIRED: This message will display when
there is a problem with the ITBC system.
If this message continues over multiple
restarts, have the vehicle serviced.
If the CHECK TRAILER WIRING, TRAILER
BRAKES DISABLED SERVICE REQUIRED,
SERVICE TRAILER BRAKE SYSTEM, or REDUCED
TRAILER BRAKING message displays while
driving, the ITBC system may not be fully
functional or may not function at all. When
traffic conditions allow, carefully pull the
vehicle over to the side of the road and turn
the vehicle off. Check the wiring connection
to the trailer and turn the vehicle back on.
If either of these messages continue, either
the vehicle or trailer needs service.
Page 312 of 429
Chevrolet Silverado EV Owner Manual (GMNA-Localizing-U.S./Canada-
16702912) - 2024 - CRC - 1/17/23
Driving and Operating 311
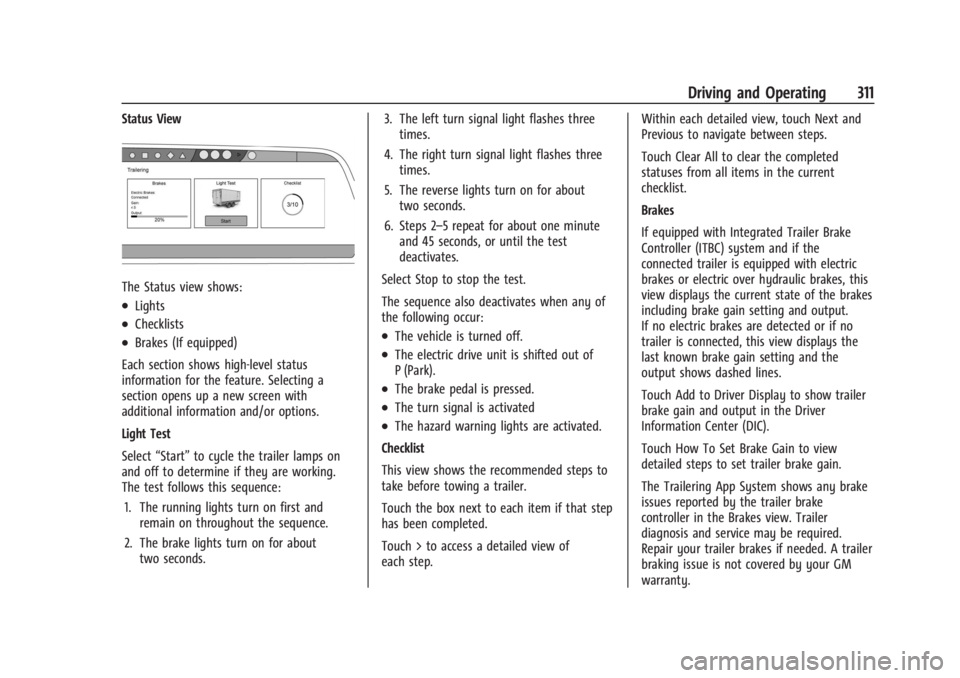
Status View
The Status view shows:
.Lights
.Checklists
.Brakes (If equipped)
Each section shows high-level status
information for the feature. Selecting a
section opens up a new screen with
additional information and/or options.
Light Test
Select “Start” to cycle the trailer lamps on
and off to determine if they are working.
The test follows this sequence:
1. The running lights turn on first and remain on throughout the sequence.
2. The brake lights turn on for about two seconds. 3. The left turn signal light flashes three
times.
4. The right turn signal light flashes three times.
5. The reverse lights turn on for about two seconds.
6. Steps 2–5 repeat for about one minute and 45 seconds, or until the test
deactivates.
Select Stop to stop the test.
The sequence also deactivates when any of
the following occur:.The vehicle is turned off.
.The electric drive unit is shifted out of
P (Park).
.The brake pedal is pressed.
.The turn signal is activated
.The hazard warning lights are activated.
Checklist
This view shows the recommended steps to
take before towing a trailer.
Touch the box next to each item if that step
has been completed.
Touch > to access a detailed view of
each step. Within each detailed view, touch Next and
Previous to navigate between steps.
Touch Clear All to clear the completed
statuses from all items in the current
checklist.
Brakes
If equipped with Integrated Trailer Brake
Controller (ITBC) system and if the
connected trailer is equipped with electric
brakes or electric over hydraulic brakes, this
view displays the current state of the brakes
including brake gain setting and output.
If no electric brakes are detected or if no
trailer is connected, this view displays the
last known brake gain setting and the
output shows dashed lines.
Touch Add to Driver Display to show trailer
brake gain and output in the Driver
Information Center (DIC).
Touch How To Set Brake Gain to view
detailed steps to set trailer brake gain.
The Trailering App System shows any brake
issues reported by the trailer brake
controller in the Brakes view. Trailer
diagnosis and service may be required.
Repair your trailer brakes if needed. A trailer
braking issue is not covered by your GM
warranty.
Page 314 of 429
Chevrolet Silverado EV Owner Manual (GMNA-Localizing-U.S./Canada-
16702912) - 2024 - CRC - 1/17/23
Driving and Operating 313
a maximum of two minutes to detect and
label each TTPMS sensor. After each sensor
is learned, a check mark appears next to the
tire, the vehicle horn sounds, the vehicle
brake lamps flash, and all working trailer
lamps flash.
The recommended tire pressure must be
entered for the trailer tires. An alert appears
when a trailer tire's pressure is high or low.
Tool Method: A TTPMS activation tool can
be purchased separately to learn the trailer
TTPMS sensor locations.
Manual Method: Without the TTPMS
activation tool, the air pressure can be
increased or decreased in each tire for
10 seconds. Do not exceed the maximum
inflation pressure found on the tire
sidewalls. Make sure to readjust tire
pressure to the recommended level when
the process is complete.
Sensor Learning Steps
To complete the sensor-to-vehicle learn
process:1. Touch Start on the Learn Sensors screen. The horn chirps twice and the Learning
Active screen appears on the
infotainment display. 2. Start with the driver side front
trailer tire.
3. Activate the tool near the valve stem or adjust the air pressure of this tire until
the horn chirps and all working vehicle
and trailer lights flash.
The process stops without saving the
sensor locations if this step takes more
than two minutes.
4. Move to the next tire and repeat Step 3 for each sensor. The horn chirps twice
when all sensors are completed.
5. Return to the vehicle to complete the setup.
Maintenance Reminders
To set up maintenance reminders, touch the
Trailer Maintenance icon. Follow the
on-screen prompts. The maximum number
of reminders is 50.
Camera Views and Guides
To set up the trailer camera and guideline
features, if equipped, touch the Camera
Views and Guides icon.
1. Select the number of axles on the trailer.
2. Select the wheel location on the trailer (inboard or outboard). 3. Enter the trailer dimensions as prompted.
Follow the on-screen instructions to
complete setup for available features.
Certain trailer features require a compatible
trailer profile be configured and selected.
A compatible trailer is a box-type trailer
(cargo, camper, etc.) with a conventional
hitch.
Transparent Trailer Setup
If equipped, the rear trailer camera must be
mounted on the trailer and electrically
connected to the vehicle before transparent
trailer feature can be used. See Assistance
Systems for Parking or Backing 0246.
Follow the on-screen instructions to enter
the trailer dimensions.
Trailer dimensions must be in range and
transparent trailer must be calibrated
before use.
.Trailer Length: Measure from center of
coupler to furthest rear point on the
trailer.
.Trailer Total Width: Measure from the left
most edge of trailer, including the wheels,
to the right most edge.
Page 316 of 429
Chevrolet Silverado EV Owner Manual (GMNA-Localizing-U.S./Canada-
16702912) - 2024 - CRC - 1/17/23
Driving and Operating 315
.Maintenance
.Checklist
.Weight
.Brakes (if equipped)
Each section shows high level status
information for the feature. Selecting a
section opens up a new screen with
additional information and/or options.
Selecting the checklist, camera,
or maintenance icon opens up the
corresponding screen.
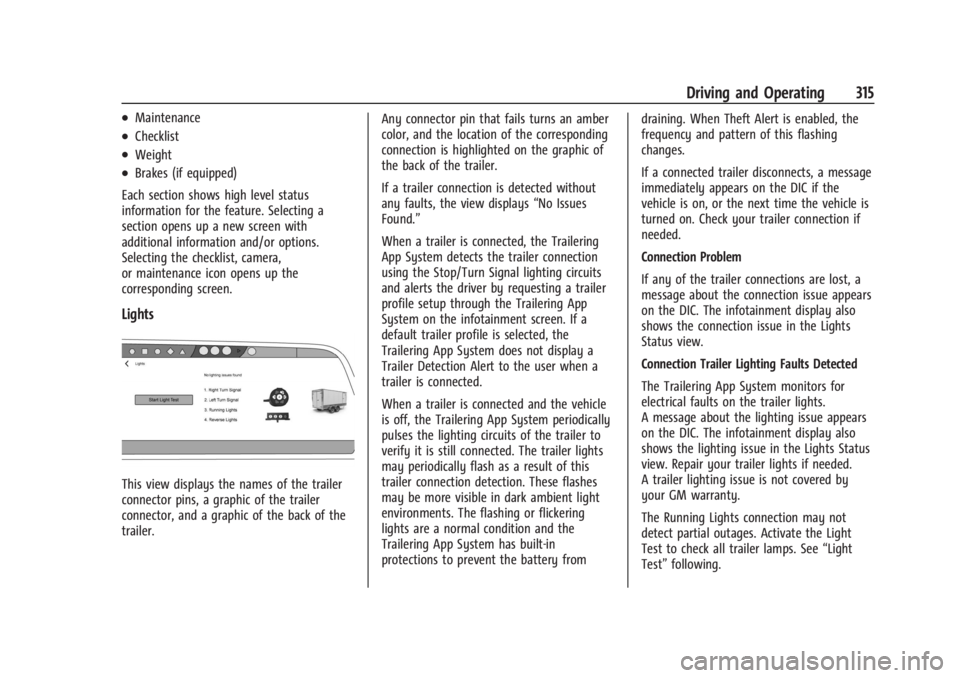
Lights
This view displays the names of the trailer
connector pins, a graphic of the trailer
connector, and a graphic of the back of the
trailer. Any connector pin that fails turns an amber
color, and the location of the corresponding
connection is highlighted on the graphic of
the back of the trailer.
If a trailer connection is detected without
any faults, the view displays
“No Issues
Found.”
When a trailer is connected, the Trailering
App System detects the trailer connection
using the Stop/Turn Signal lighting circuits
and alerts the driver by requesting a trailer
profile setup through the Trailering App
System on the infotainment screen. If a
default trailer profile is selected, the
Trailering App System does not display a
Trailer Detection Alert to the user when a
trailer is connected.
When a trailer is connected and the vehicle
is off, the Trailering App System periodically
pulses the lighting circuits of the trailer to
verify it is still connected. The trailer lights
may periodically flash as a result of this
trailer connection detection. These flashes
may be more visible in dark ambient light
environments. The flashing or flickering
lights are a normal condition and the
Trailering App System has built-in
protections to prevent the battery from draining. When Theft Alert is enabled, the
frequency and pattern of this flashing
changes.
If a connected trailer disconnects, a message
immediately appears on the DIC if the
vehicle is on, or the next time the vehicle is
turned on. Check your trailer connection if
needed.
Connection Problem
If any of the trailer connections are lost, a
message about the connection issue appears
on the DIC. The infotainment display also
shows the connection issue in the Lights
Status view.
Connection Trailer Lighting Faults Detected
The Trailering App System monitors for
electrical faults on the trailer lights.
A message about the lighting issue appears
on the DIC. The infotainment display also
shows the lighting issue in the Lights Status
view. Repair your trailer lights if needed.
A trailer lighting issue is not covered by
your GM warranty.
The Running Lights connection may not
detect partial outages. Activate the Light
Test to check all trailer lamps. See
“Light
Test” following.
Page 317 of 429
Chevrolet Silverado EV Owner Manual (GMNA-Localizing-U.S./Canada-
16702912) - 2024 - CRC - 1/17/23
316 Driving and Operating
Light Test
Touch Start Light Test to cycle the trailer
lights on and off to determine if they are
working. The test follows this sequence:1. The running lights turn on first and remain on throughout the sequence.
2. The brake lights turn on for about two seconds.
3. The left turn signal light flashes three times.
4. The right turn signal light flashes three times.
5. The reverse lights turn on for about two seconds.
6. Steps 2–5 repeat for approximately one minute and 45 seconds, or until the
test deactivates.
Touch Stop to manually stop the test. The
test automatically ends after one minute
and 45 seconds.
The Light Test also deactivates when any of
the following occur:
.The vehicle is turned off.
.The vehicle is shifted out of P (Park).
.The brake pedal is pressed.
.The turn signal is activated.
.The hazard warning flashers are activated.
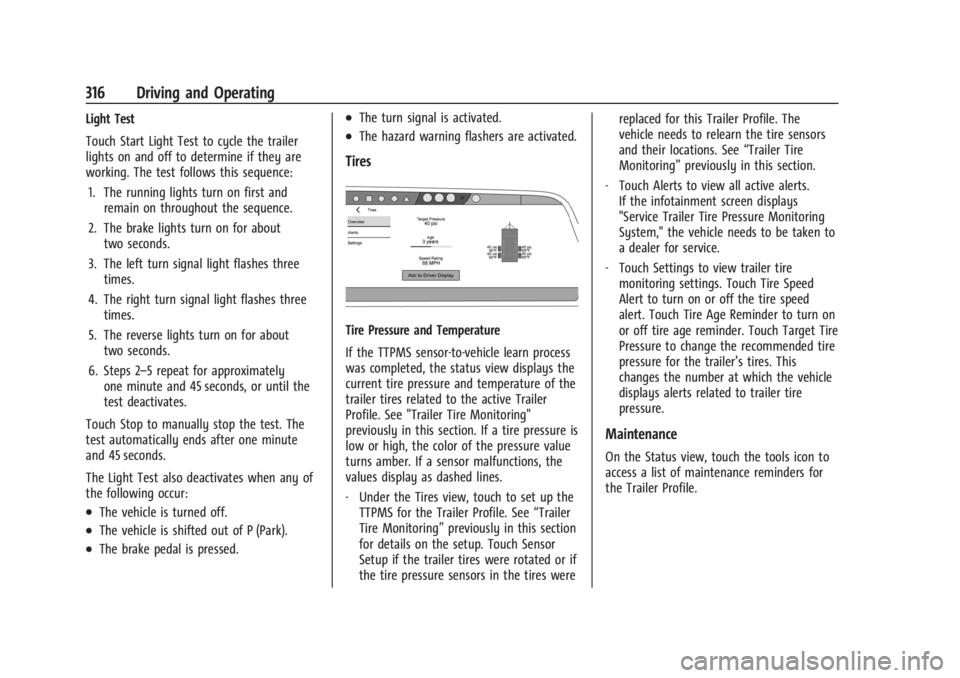
Tires
Tire Pressure and Temperature
If the TTPMS sensor-to-vehicle learn process
was completed, the status view displays the
current tire pressure and temperature of the
trailer tires related to the active Trailer
Profile. See "Trailer Tire Monitoring"
previously in this section. If a tire pressure is
low or high, the color of the pressure value
turns amber. If a sensor malfunctions, the
values display as dashed lines.
‐ Under the Tires view, touch to set up the
TTPMS for the Trailer Profile. See “Trailer
Tire Monitoring” previously in this section
for details on the setup. Touch Sensor
Setup if the trailer tires were rotated or if
the tire pressure sensors in the tires were replaced for this Trailer Profile. The
vehicle needs to relearn the tire sensors
and their locations. See
“Trailer Tire
Monitoring” previously in this section.
‐ Touch Alerts to view all active alerts.
If the infotainment screen displays
"Service Trailer Tire Pressure Monitoring
System," the vehicle needs to be taken to
a dealer for service.
‐ Touch Settings to view trailer tire
monitoring settings. Touch Tire Speed
Alert to turn on or off the tire speed
alert. Touch Tire Age Reminder to turn on
or off tire age reminder. Touch Target Tire
Pressure to change the recommended tire
pressure for the trailer’s tires. This
changes the number at which the vehicle
displays alerts related to trailer tire
pressure.
Maintenance
On the Status view, touch the tools icon to
access a list of maintenance reminders for
the Trailer Profile.
Page 318 of 429
Chevrolet Silverado EV Owner Manual (GMNA-Localizing-U.S./Canada-
16702912) - 2024 - CRC - 1/17/23
Driving and Operating 317
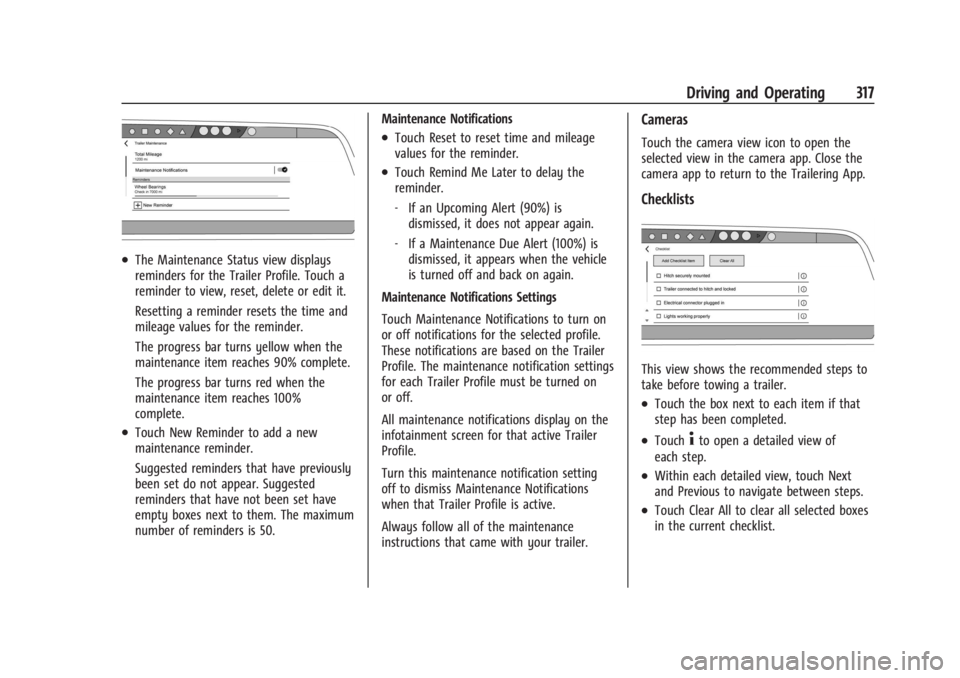
.The Maintenance Status view displays
reminders for the Trailer Profile. Touch a
reminder to view, reset, delete or edit it.
Resetting a reminder resets the time and
mileage values for the reminder.
The progress bar turns yellow when the
maintenance item reaches 90% complete.
The progress bar turns red when the
maintenance item reaches 100%
complete.
.Touch New Reminder to add a new
maintenance reminder.
Suggested reminders that have previously
been set do not appear. Suggested
reminders that have not been set have
empty boxes next to them. The maximum
number of reminders is 50.Maintenance Notifications
.Touch Reset to reset time and mileage
values for the reminder.
.Touch Remind Me Later to delay the
reminder.
‐
If an Upcoming Alert (90%) is
dismissed, it does not appear again.
‐ If a Maintenance Due Alert (100%) is
dismissed, it appears when the vehicle
is turned off and back on again.
Maintenance Notifications Settings
Touch Maintenance Notifications to turn on
or off notifications for the selected profile.
These notifications are based on the Trailer
Profile. The maintenance notification settings
for each Trailer Profile must be turned on
or off.
All maintenance notifications display on the
infotainment screen for that active Trailer
Profile.
Turn this maintenance notification setting
off to dismiss Maintenance Notifications
when that Trailer Profile is active.
Always follow all of the maintenance
instructions that came with your trailer.
Cameras
Touch the camera view icon to open the
selected view in the camera app. Close the
camera app to return to the Trailering App.
Checklists
This view shows the recommended steps to
take before towing a trailer.
.Touch the box next to each item if that
step has been completed.
.Touch4to open a detailed view of
each step.
.Within each detailed view, touch Next
and Previous to navigate between steps.
.Touch Clear All to clear all selected boxes
in the current checklist.