2024 CHEVROLET SILVERADO EV light
[x] Cancel search: lightPage 277 of 429
Chevrolet Silverado EV Owner Manual (GMNA-Localizing-U.S./Canada-
16702912) - 2024 - CRC - 1/17/23
276 Driving and Operating
To turn LKA on and off, pressAon the
instrument panel to the left of the steering
wheel. If equipped, the indicator light on the
button comes on when LKA is on and turns
off when LKA is disabled. In some vehicles,
you must press the button for more than
three seconds to turn LKA off.
LKA is not available when Terrain Mode,
Snow/Ice Mode, or Off-Road Mode is
selected.
See Driver Mode Control 0209. See
Four-Wheel Steering 0210.
When attempting to enable LKA in any of
the above conditions, LKA UNAVAILABLE will
display.
When on,
Ais white, if equipped,
indicating that the system is not ready to
assist.
Ais green if LKA is ready to
assist. LKA may assist by gently turning the
steering wheel if the vehicle approaches a
detected lane marking.
Ais amber when
assisting. It may also provide a Lane
Departure Warning (LDW) alert by flashing
Aamber if the vehicle crosses a
detected lane marking. Additionally, there
may be three beeps, or the driver seat may
pulse three times, on the right or left,
depending on the lane departure direction. Take Steering
The LKA system does not continuously steer
the vehicle. If LKA does not detect active
driver steering, an alert and chime may be
provided. Steer the vehicle to dismiss. LKA
may become temporarily unavailable after
repeated take steering alerts.
When the System Does Not Seem to
Work Properly
The system performance may be
affected by:
.Close vehicles ahead.
.Sudden lighting changes, such as when
driving through tunnels.
.Banked roads.
.Roads with poor lane markings, such as
two-lane roads.
If the LKA system is not functioning
properly when lane markings are clearly
visible, cleaning the windshield may help.
A camera blocked message may display if
the camera is blocked. Some driver
assistance systems may have reduced
performance or not work at all. An LKA or
LDW unavailable message may display if the
systems are temporarily unavailable. This
message could be due to a blocked camera. The LKA system does not need service. Clean
the outside of the windshield behind the
rearview mirror.
LKA assistance and/or LDW alerts may occur
due to tar marks, shadows, cracks in the
road, temporary or construction lane
markings, or other road imperfections. This
is normal system operation; the vehicle does
not need service. Turn LKA off if these
conditions continue.
Surround Vision Recorder
If equipped, this system records the 360°
camera views to an SD card. Only images
are recorded, no sound. An SD card will be
needed for this system. The minimum
recommended SD card specifications are at
least 64GB with FAT32 file system, Class V30
or greater.
Page 281 of 429
Chevrolet Silverado EV Owner Manual (GMNA-Localizing-U.S./Canada-
16702912) - 2024 - CRC - 1/17/23
280 Driving and Operating
4. Plug in the AC charge cord into thevehicle charge port . Make sure the AC
vehicle plug is fully connected to the AC
charge port. If it is not properly
connected, the vehicle may not be
charged.
5. Verify that the Headlight Charging Status Indicator (CSI) illuminates on the
headlamps (if enabled), charge port light
turns on, and an audible chirp occurs.
See Charging Status Feedback 0283.
To End AC Charging 1. Unlock the charge cord from the vehicle by pressing the button on the top of the
charge cord plug. Unplug the charge cord
from the vehicle.
2. Close the charge port door by pressing firmly in the center until it latches.
3. Unplug the charge cord from the electrical outlet.
4. Place the charge cord into the storage case.
DC Charging
DC Charging Station Hardware
The vehicle can be charged using DC
charging equipment typically found at
service stations and other public locations. Check the charging station DC vehicle plug
for compatibility with the DC charge port on
this vehicle. This vehicle is compatible with a
Combined Charging System 1 (CCS1)
connector.
When recharging at a DC charge station, the
charging cable connected to the vehicle
must be less than 10 m (33 ft) in length to
meet functionality and regulatory
requirements.
{Warning
Do not use the charging station if the
handle has defects such as cracks,
exposed wires, burnt or missing pins,
or any other damage. A damaged handle
may result in personal injury and/or
damage to the vehicle, the charging port
or other property.
For maximum charging performance, and to
prevent charging interruptions or damage to
the high voltage battery and vehicle:
.Remove your hands from the charging
handle once it has been plugged in. If not
done, this can cause a charging
interruption.
.Ensure that the charge cord plug clicks. Follow the steps listed on the charging
station to perform a DC vehicle charge.
If for any reason DC charging does not
begin or is interrupted, check the DC
charging station display for messages.
Unplug the cord to restart the DC charging
process.
To Start DC Charging
1. Put the vehicle in P (Park).
2. Press the Electric Parking brake (EPB) switch. See Electric Parking Brake 0205.
3. Push the rearward edge of the charge port door and release to open the door.
In cold weather conditions, ice may form
around the charge port door. The charge
port door may not open on the first
attempt. Remove ice from the area and
repeat attempting to open the charge
port door.
Page 282 of 429
Chevrolet Silverado EV Owner Manual (GMNA-Localizing-U.S./Canada-
16702912) - 2024 - CRC - 1/17/23
Driving and Operating 281
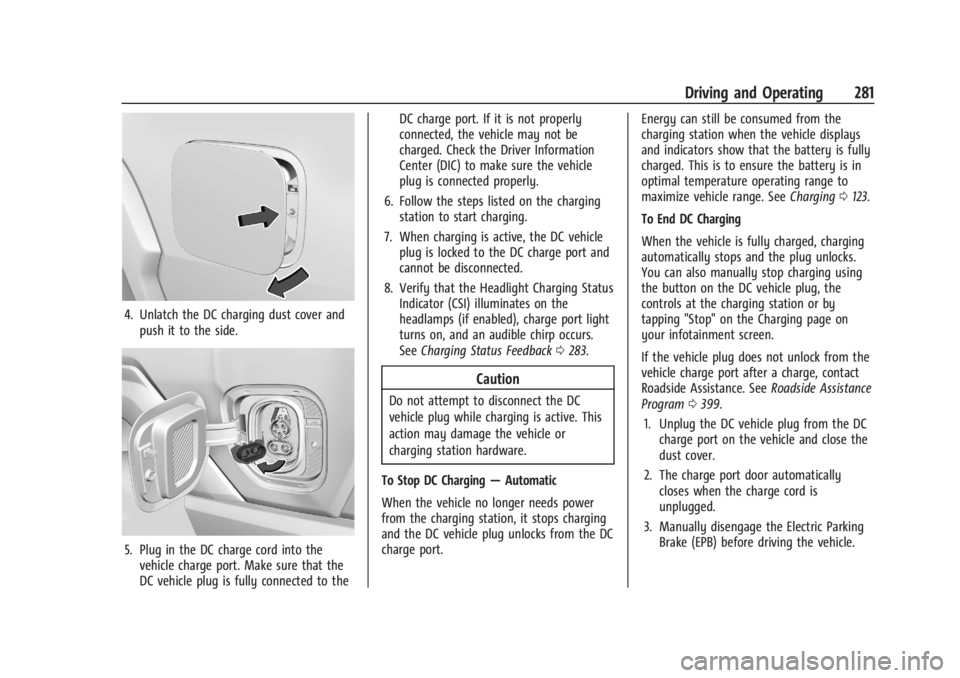
4. Unlatch the DC charging dust cover andpush it to the side.
5. Plug in the DC charge cord into thevehicle charge port. Make sure that the
DC vehicle plug is fully connected to the DC charge port. If it is not properly
connected, the vehicle may not be
charged. Check the Driver Information
Center (DIC) to make sure the vehicle
plug is connected properly.
6. Follow the steps listed on the charging station to start charging.
7. When charging is active, the DC vehicle plug is locked to the DC charge port and
cannot be disconnected.
8. Verify that the Headlight Charging Status Indicator (CSI) illuminates on the
headlamps (if enabled), charge port light
turns on, and an audible chirp occurs.
See Charging Status Feedback 0283.
Caution
Do not attempt to disconnect the DC
vehicle plug while charging is active. This
action may damage the vehicle or
charging station hardware.
To Stop DC Charging —Automatic
When the vehicle no longer needs power
from the charging station, it stops charging
and the DC vehicle plug unlocks from the DC
charge port. Energy can still be consumed from the
charging station when the vehicle displays
and indicators show that the battery is fully
charged. This is to ensure the battery is in
optimal temperature operating range to
maximize vehicle range. See
Charging0123.
To End DC Charging
When the vehicle is fully charged, charging
automatically stops and the plug unlocks.
You can also manually stop charging using
the button on the DC vehicle plug, the
controls at the charging station or by
tapping "Stop" on the Charging page on
your infotainment screen.
If the vehicle plug does not unlock from the
vehicle charge port after a charge, contact
Roadside Assistance. See Roadside Assistance
Program 0399.
1. Unplug the DC vehicle plug from the DC charge port on the vehicle and close the
dust cover.
2. The charge port door automatically closes when the charge cord is
unplugged.
3. Manually disengage the Electric Parking Brake (EPB) before driving the vehicle.
Page 284 of 429
Chevrolet Silverado EV Owner Manual (GMNA-Localizing-U.S./Canada-
16702912) - 2024 - CRC - 1/17/23
Driving and Operating 283
Charging Status Feedback
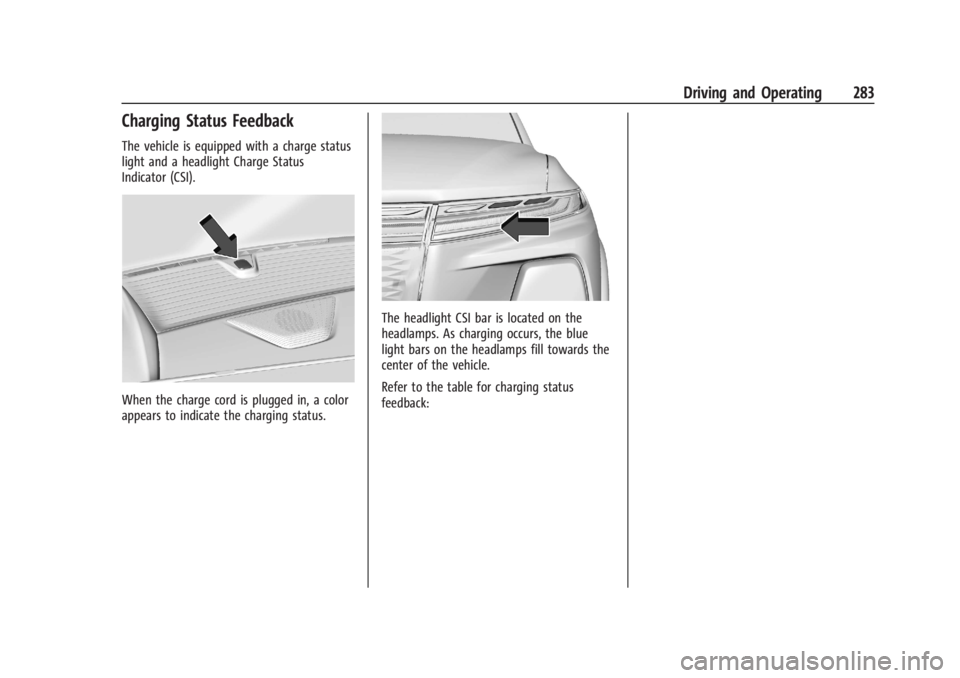
The vehicle is equipped with a charge status
light and a headlight Charge Status
Indicator (CSI).
When the charge cord is plugged in, a color
appears to indicate the charging status.
The headlight CSI bar is located on the
headlamps. As charging occurs, the blue
light bars on the headlamps fill towards the
center of the vehicle.
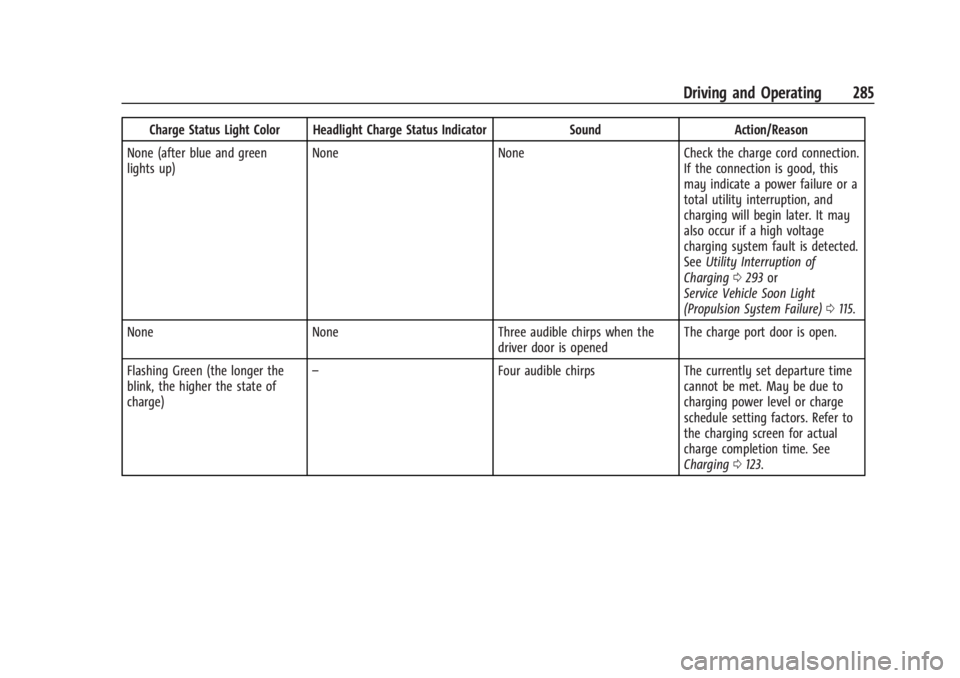
Refer to the table for charging status
feedback:
Page 285 of 429

Chevrolet Silverado EV Owner Manual (GMNA-Localizing-U.S./Canada-
16702912) - 2024 - CRC - 1/17/23
284 Driving and Operating
Charge Status Light Color Headlight Charge Status IndicatorSoundAction/Reason
Solid Blue – – Initial connection is successful.
Pulsing Blue Single light bar flashing Two audible chirps Charging is delayed by charging
screen or by a total utility
interruption. Charging will begin
later. See Utility Interruption of
Charging 0293.
Utility Override (“Demand
Response”).
Blinking Green (the longer the
blink, the higher the state of
charge) Solid light bars represent the
available state of charge. The
remaining light bars build in a
swipe pattern towards the center
of the vehicle. One audible chirps
Vehicle is actively charging.
Solid Green All light bars are solid None Charging is complete.
Pulsing Red Off NoneError
Check the charge cord connection.
There may be no power supplied
to the vehicle.
None (upon plug-in) None NoneCheck the charge cord connection.
Page 286 of 429
Chevrolet Silverado EV Owner Manual (GMNA-Localizing-U.S./Canada-
16702912) - 2024 - CRC - 1/17/23
Driving and Operating 285
Charge Status Light Color Headlight Charge Status IndicatorSoundAction/Reason
None (after blue and green
lights up) None
NoneCheck the charge cord connection.
If the connection is good, this
may indicate a power failure or a
total utility interruption, and
charging will begin later. It may
also occur if a high voltage
charging system fault is detected.
See Utility Interruption of
Charging 0293 or
Service Vehicle Soon Light
(Propulsion System Failure) 0115.
None None Three audible chirps when the
driver door is opened The charge port door is open.
Flashing Green (the longer the
blink, the higher the state of
charge) –
Four audible chirpsThe currently set departure time
cannot be met. May be due to
charging power level or charge
schedule setting factors. Refer to
the charging screen for actual
charge completion time. See
Charging 0123.
Page 287 of 429
Chevrolet Silverado EV Owner Manual (GMNA-Localizing-U.S./Canada-
16702912) - 2024 - CRC - 1/17/23
286 Driving and Operating
Charge Cord
IMPORTANT SAFETY INSTRUCTIONS
This symbol indicates risk of electrical shock.
SeeRadio Frequency Statement 0404.
The vehicle comes with a portable charge
cord used to charge the high voltage
battery. When used correctly, the Charge
Cord provides a safe connection between a
standard electrical outlet and your vehicle's
on-board charger.
When storing the charge cord in the vehicle,
ensure the charge cord bag is secured.
Depending on the storage location, tether
the charge cord bag to vehicle.
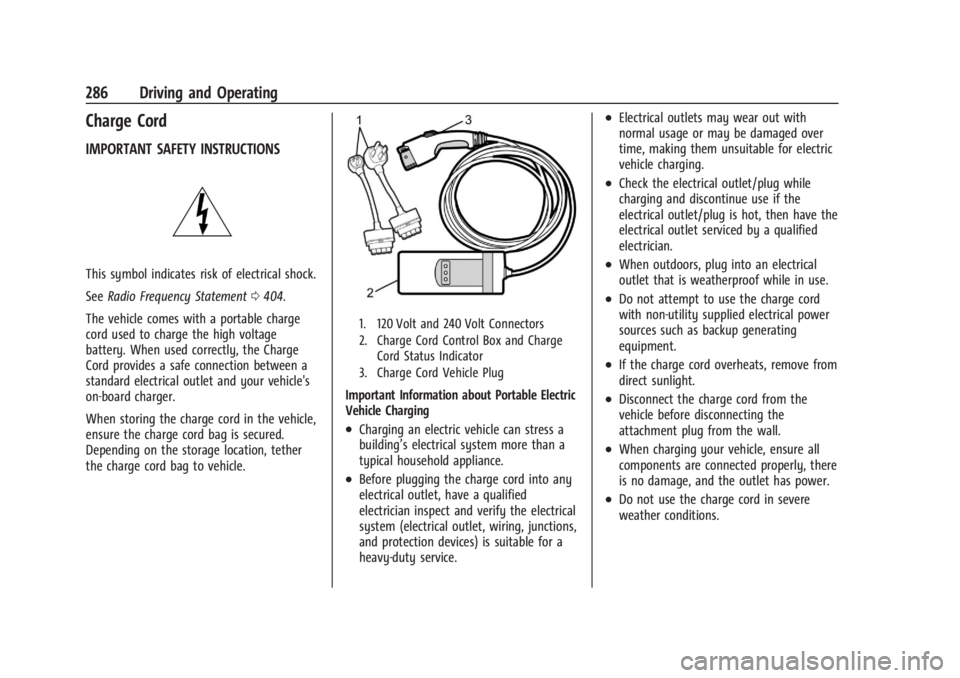
1. 120 Volt and 240 Volt Connectors
2. Charge Cord Control Box and Charge Cord Status Indicator
3. Charge Cord Vehicle Plug
Important Information about Portable Electric
Vehicle Charging
.Charging an electric vehicle can stress a
building’s electrical system more than a
typical household appliance.
.Before plugging the charge cord into any
electrical outlet, have a qualified
electrician inspect and verify the electrical
system (electrical outlet, wiring, junctions,
and protection devices) is suitable for a
heavy-duty service.
.Electrical outlets may wear out with
normal usage or may be damaged over
time, making them unsuitable for electric
vehicle charging.
.Check the electrical outlet/plug while
charging and discontinue use if the
electrical outlet/plug is hot, then have the
electrical outlet serviced by a qualified
electrician.
.When outdoors, plug into an electrical
outlet that is weatherproof while in use.
.Do not attempt to use the charge cord
with non-utility supplied electrical power
sources such as backup generating
equipment.
.If the charge cord overheats, remove from
direct sunlight.
.Disconnect the charge cord from the
vehicle before disconnecting the
attachment plug from the wall.
.When charging your vehicle, ensure all
components are connected properly, there
is no damage, and the outlet has power.
.Do not use the charge cord in severe
weather conditions.
Page 291 of 429
Chevrolet Silverado EV Owner Manual (GMNA-Localizing-U.S./Canada-
16702912) - 2024 - CRC - 1/17/23
290 Driving and Operating
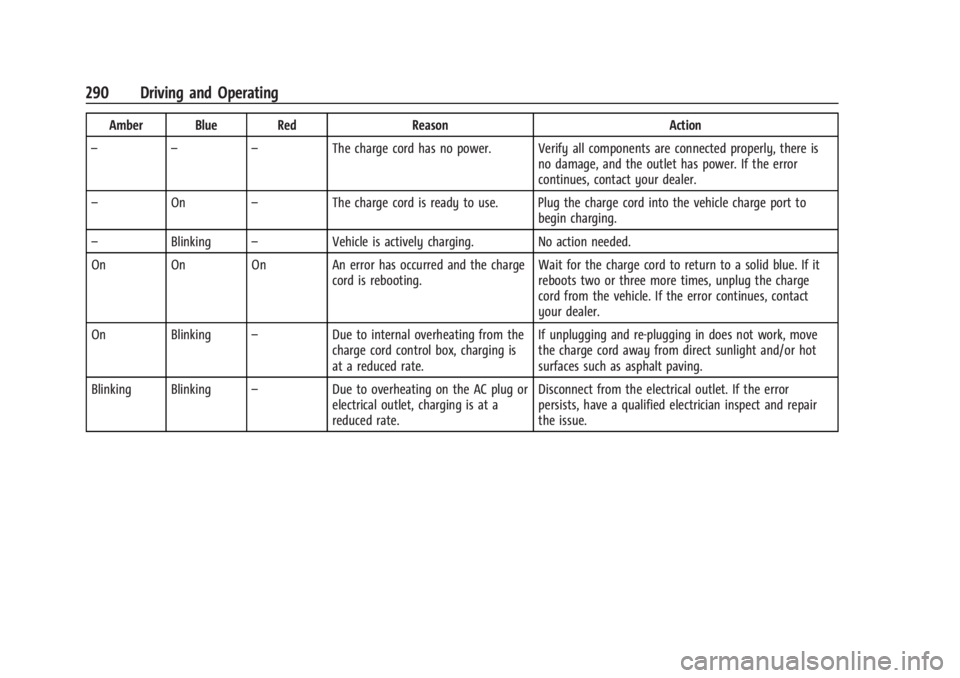
Amber Blue RedReasonAction
– – – The charge cord has no power. Verify all components are connected properly, there is
no damage, and the outlet has power. If the error
continues, contact your dealer.
– On –The charge cord is ready to use. Plug the charge cord into the vehicle charge port to
begin charging.
– Blinking –Vehicle is actively charging. No action needed.
On On On An error has occurred and the charge cord is rebooting.Wait for the charge cord to return to a solid blue. If it
reboots two or three more times, unplug the charge
cord from the vehicle. If the error continues, contact
your dealer.
On Blinking –Due to internal overheating from the
charge cord control box, charging is
at a reduced rate. If unplugging and re-plugging in does not work, move
the charge cord away from direct sunlight and/or hot
surfaces such as asphalt paving.
Blinking Blinking –Due to overheating on the AC plug or
electrical outlet, charging is at a
reduced rate. Disconnect from the electrical outlet. If the error
persists, have a qualified electrician inspect and repair
the issue.