2024 CHEVROLET SILVERADO EV interior lights
[x] Cancel search: interior lightsPage 34 of 429
Chevrolet Silverado EV Owner Manual (GMNA-Localizing-U.S./Canada-
16702912) - 2024 - CRC - 1/23/23
Keys, Doors, and Windows 33
Vehicle Alarm System
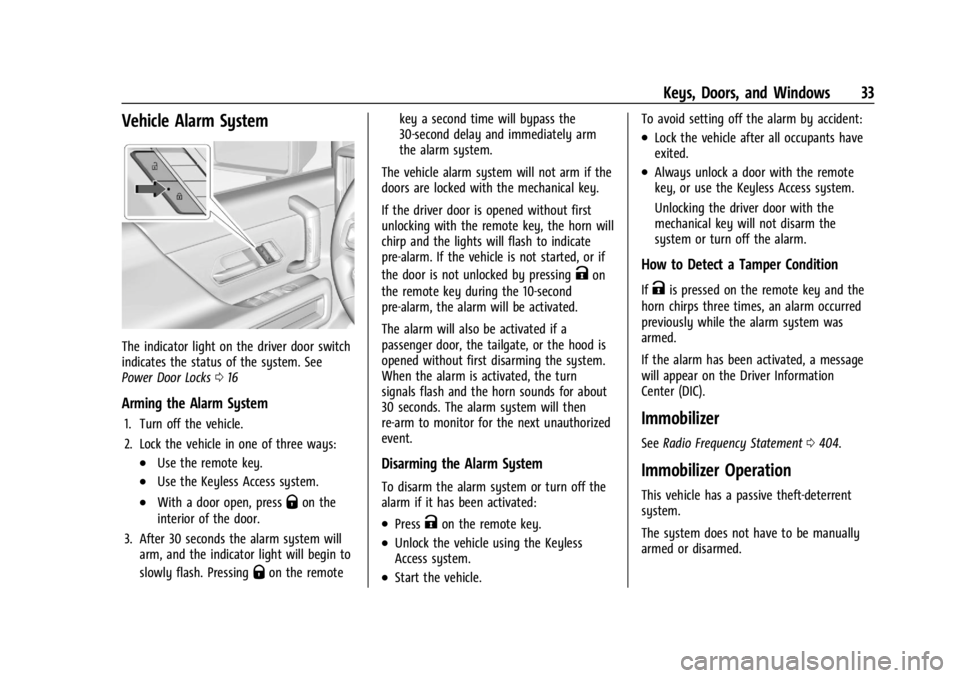
The indicator light on the driver door switch
indicates the status of the system. See
Power Door Locks016
Arming the Alarm System
1. Turn off the vehicle.
2. Lock the vehicle in one of three ways:
.Use the remote key.
.Use the Keyless Access system.
.With a door open, pressQon the
interior of the door.
3. After 30 seconds the alarm system will arm, and the indicator light will begin to
slowly flash. Pressing
Qon the remote key a second time will bypass the
30-second delay and immediately arm
the alarm system.
The vehicle alarm system will not arm if the
doors are locked with the mechanical key.
If the driver door is opened without first
unlocking with the remote key, the horn will
chirp and the lights will flash to indicate
pre-alarm. If the vehicle is not started, or if
the door is not unlocked by pressing
Kon
the remote key during the 10-second
pre-alarm, the alarm will be activated.
The alarm will also be activated if a
passenger door, the tailgate, or the hood is
opened without first disarming the system.
When the alarm is activated, the turn
signals flash and the horn sounds for about
30 seconds. The alarm system will then
re-arm to monitor for the next unauthorized
event.
Disarming the Alarm System
To disarm the alarm system or turn off the
alarm if it has been activated:
.PressKon the remote key.
.Unlock the vehicle using the Keyless
Access system.
.Start the vehicle. To avoid setting off the alarm by accident:
.Lock the vehicle after all occupants have
exited.
.Always unlock a door with the remote
key, or use the Keyless Access system.
Unlocking the driver door with the
mechanical key will not disarm the
system or turn off the alarm.
How to Detect a Tamper Condition
IfKis pressed on the remote key and the
horn chirps three times, an alarm occurred
previously while the alarm system was
armed.
If the alarm has been activated, a message
will appear on the Driver Information
Center (DIC).
Immobilizer
See Radio Frequency Statement 0404.
Immobilizer Operation
This vehicle has a passive theft-deterrent
system.
The system does not have to be manually
armed or disarmed.
Page 49 of 429
Chevrolet Silverado EV Owner Manual (GMNA-Localizing-U.S./Canada-
16702912) - 2024 - CRC - 1/13/23
48 Seats and Restraints
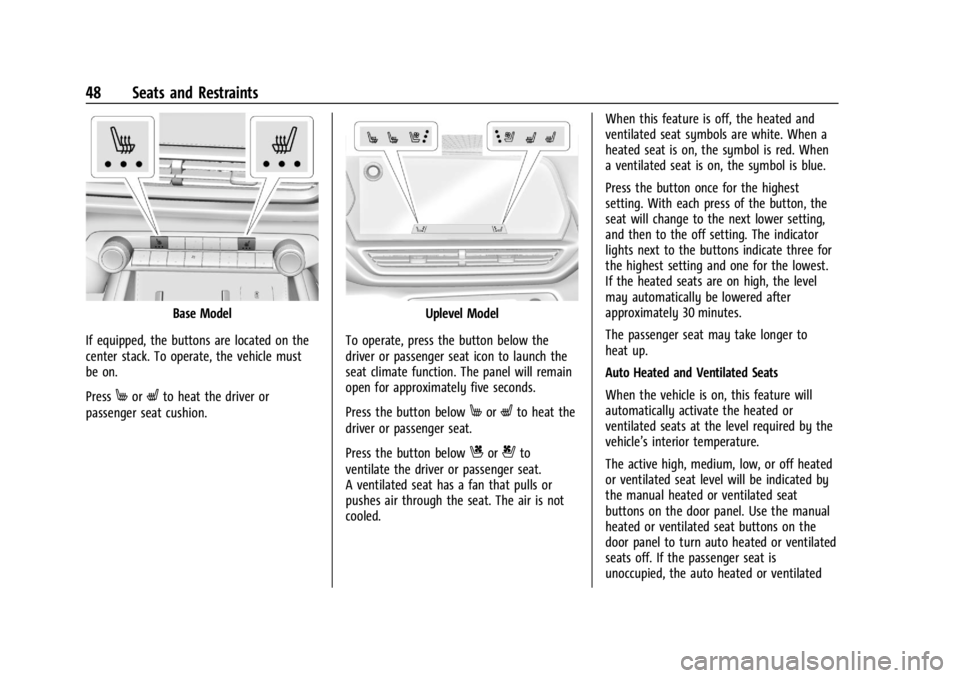
Base Model
If equipped, the buttons are located on the
center stack. To operate, the vehicle must
be on.
Press
MorLto heat the driver or
passenger seat cushion.
Uplevel Model
To operate, press the button below the
driver or passenger seat icon to launch the
seat climate function. The panel will remain
open for approximately five seconds.
Press the button below
MorLto heat the
driver or passenger seat.
Press the button below
Cor{to
ventilate the driver or passenger seat.
A ventilated seat has a fan that pulls or
pushes air through the seat. The air is not
cooled. When this feature is off, the heated and
ventilated seat symbols are white. When a
heated seat is on, the symbol is red. When
a ventilated seat is on, the symbol is blue.
Press the button once for the highest
setting. With each press of the button, the
seat will change to the next lower setting,
and then to the off setting. The indicator
lights next to the buttons indicate three for
the highest setting and one for the lowest.
If the heated seats are on high, the level
may automatically be lowered after
approximately 30 minutes.
The passenger seat may take longer to
heat up.
Auto Heated and Ventilated Seats
When the vehicle is on, this feature will
automatically activate the heated or
ventilated seats at the level required by the
vehicle’s interior temperature.
The active high, medium, low, or off heated
or ventilated seat level will be indicated by
the manual heated or ventilated seat
buttons on the door panel. Use the manual
heated or ventilated seat buttons on the
door panel to turn auto heated or ventilated
seats off. If the passenger seat is
unoccupied, the auto heated or ventilated
Page 141 of 429
Chevrolet Silverado EV Owner Manual (GMNA-Localizing-U.S./Canada-
16702912) - 2024 - CRC - 1/13/23
140 Lighting
Lighting
Exterior Lighting
Exterior Lamp Controls . . . . . . . . . . . . . . . . 140
Exterior Lamps Off Reminder . . . . . . . . . . . 141
Headlamp High/Low-Beam Changer . . . . 141
Flash-to-Pass . . . . . . . . . . . . . . . . . . . . . . . . . . . 141
Daytime Running Lamps (DRL) . . . . . . . . . 141
Automatic Headlamp System . . . . . . . . . . 142
Hazard Warning Flashers . . . . . . . . . . . . . . 142
Turn and Lane-Change Signals . . . . . . . . . 143
Exterior Cargo Lamps . . . . . . . . . . . . . . . . . . 143
Interior Lighting
Instrument Panel IlluminationControl . . . . . . . . . . . . . . . . . . . . . . . . . . . . . . 143
Dome Lamps . . . . . . . . . . . . . . . . . . . . . . . . . . 144
Reading Lamps . . . . . . . . . . . . . . . . . . . . . . . . 144
Lighting Features
Entry Lighting . . . . . . . . . . . . . . . . . . . . . . . . . 144
Exit Lighting . . . . . . . . . . . . . . . . . . . . . . . . . . . 145
Battery Load Management . . . . . . . . . . . . 145
Battery Power Protection . . . . . . . . . . . . . . 145
Exterior Lighting Battery Saver . . . . . . . . 146
Exterior Lighting
Exterior Lamp Controls
The exterior lamp controls, also known as
headlights, are in the Controls App on the
infotainment home screen. Select Controls >
Lights > Headlights.
To operate, select the following options:
Off : Turns off the exterior lamps.
For vehicles first sold in Canada, the
headlamps will automatically reactivate
when the vehicle is shifted out of P (Park).
Auto : Automatically turns on the
headlamps, parking lamps, taillamps,
instrument panel lights, roof marker lamps
(if equipped), license plate lamps or Daytime
Running Lamps (DRL), depending on outside
light conditions.
Parking : Turns on the parking lamps.
On : Turns on the exterior lamps.
IntelliBeam System
If equipped, this system turns the high-beam
headlamps on and off according to
surrounding traffic conditions. The system turns the high-beam headlamps
on when it is dark enough and there is no
other traffic present.
This light
bappears on the instrument
cluster when the IntelliBeam system is
enabled.
Turning the IntelliBeam On and Off
To enable and disable the IntelliBeam
system on the infotainment home screen,
select Control App > Lights >
bAuto
High Beams when the headlights are set in
the Auto position.
Driving with IntelliBeam
The system only activates the high beams
when driving over 40 km/h (25 mph).
The blue high-beam on light appears on the
instrument cluster when the high beams
are on.
There is a sensor near the top center of the
windshield that automatically controls the
system. Keep this area of the windshield
clear of debris to allow for best system
performance.
Page 144 of 429

Chevrolet Silverado EV Owner Manual (GMNA-Localizing-U.S./Canada-
16702912) - 2024 - CRC - 1/13/23
Lighting 143
Turn and Lane-Change Signals
Move the lever all the way up or down to
signal a turn.
An arrow on the instrument cluster flashes
in the direction of the turn or lane change.
Raise or lower the lever until the arrow
starts to flash to signal a lane change. Hold
it there until the lane change is complete.
If the lever is moved momentarily to the
lane change position, the arrow will flash
three times. It will flash six times if
Tow/Haul mode is active.
The lever returns to its starting position
when it is released.
If after signaling a turn or lane change, the
arrow flashes rapidly or does not come on, a
signal LED may be burned out.See your dealer for service. If a LED is not
burned out, check the fuse. See
Instrument
Panel Fuse Block (Left) 0340 or
Instrument Panel Fuse Block (Right) 0342.
Exterior Cargo Lamps
The exterior cargo lamps provide more light
in the cargo area or on the sides of the
vehicle, if needed.
The exterior cargo lamps controls are in the
Controls App on the infotainment home
screen. To turn the exterior lamps on or off,
select Controls > Lights > Exterior Cargo
Lamps when the vehicle is in P (Park),
R (Reverse), or N (Neutral).
Activating the exterior cargo lamps may also
activate the lamps inside the pickup box, in
the tailgate handle, the hitch, cargo switch
indicator, and/or the cargo mirror lamps,
if equipped.
Become familiar with and follow all state
and local laws that apply to cargo lamp
operation.
Interior Lighting
Instrument Panel Illumination
Control
Work Truck
Page 145 of 429
Chevrolet Silverado EV Owner Manual (GMNA-Localizing-U.S./Canada-
16702912) - 2024 - CRC - 1/13/23
144 Lighting
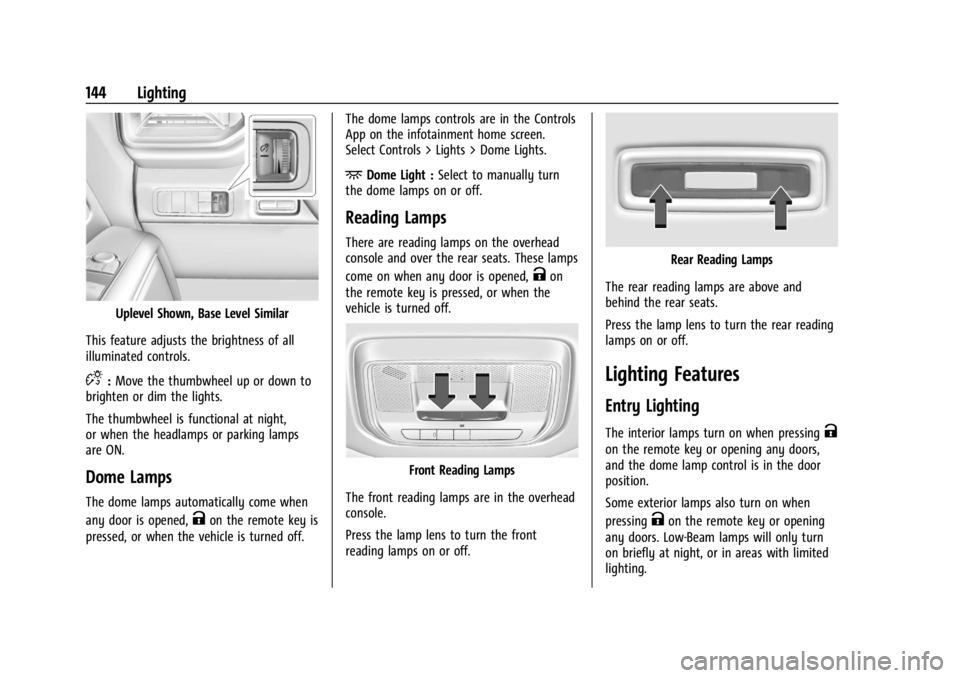
Uplevel Shown, Base Level Similar
This feature adjusts the brightness of all
illuminated controls.
D: Move the thumbwheel up or down to
brighten or dim the lights.
The thumbwheel is functional at night,
or when the headlamps or parking lamps
are ON.
Dome Lamps
The dome lamps automatically come when
any door is opened,
Kon the remote key is
pressed, or when the vehicle is turned off. The dome lamps controls are in the Controls
App on the infotainment home screen.
Select Controls > Lights > Dome Lights.
+Dome Light :
Select to manually turn
the dome lamps on or off.
Reading Lamps
There are reading lamps on the overhead
console and over the rear seats. These lamps
come on when any door is opened,
Kon
the remote key is pressed, or when the
vehicle is turned off.
Front Reading Lamps
The front reading lamps are in the overhead
console.
Press the lamp lens to turn the front
reading lamps on or off.
Rear Reading Lamps
The rear reading lamps are above and
behind the rear seats.
Press the lamp lens to turn the rear reading
lamps on or off.
Lighting Features
Entry Lighting
The interior lamps turn on when pressingK
on the remote key or opening any doors,
and the dome lamp control is in the door
position.
Some exterior lamps also turn on when
pressing
Kon the remote key or opening
any doors. Low-Beam lamps will only turn
on briefly at night, or in areas with limited
lighting.
Page 146 of 429
Chevrolet Silverado EV Owner Manual (GMNA-Localizing-U.S./Canada-
16702912) - 2024 - CRC - 1/13/23
Lighting 145
All lamps will gradually fade out after about
30 seconds.
Entry lighting can be disabled manually by
closing all doors, pressing
Qon the remote
key, or starting the vehicle.
This feature can be changed. On the
infotainment home page, select Settings
T
VehicleTVehicle Locator Lights.
Exit Lighting
Some exterior lamps and interior lamps turn
on when the driver door is opened after the
vehicle is turned off.
The exterior and interior lamps remain on
for a set amount of time, then automatically
turn off.
The interior lights turn on when the vehicle
is turned off.
The exterior lamps turn off immediately by
turning the exterior lamp control off.
This feature can be changed. On the
infotainment home screen, select Settings
T
VehicleTExit Lighting.
Battery Load Management
The vehicle has Electric Power Management
(EPM) that estimates the battery
temperature and state of charge. It then
adjusts the voltage for best performance
and extended life of the 12-volt battery.
When the battery state of charge is low, the
voltage is raised slightly to quickly increase
the charge. When the state of charge is
high, the voltage is lowered slightly to
prevent over charging. As this adjustment
occurs, you may see the voltage move up or
down on the voltmeter gauge or voltage
display on the Driver Information Center
(DIC), if equipped. This is normal. If a
problem occurs, an alert will be displayed.
If the electrical loads are very high, the
battery can be discharged when the vehicle
is stationary. A high electrical load occurs
when several features are on, such as:
headlamps, high beams, rear window
defogger, climate control fan at high speed,
heated seats, motor cooling fans, trailer
loads, and loads plugged into accessory
power outlets.
EPM works to prevent excessive discharge of
the battery by balancing the electrical
system output and the vehicle's electrical needs. In some cases, it can temporarily
reduce the power demands of some
accessories.
These actions occur in steps or levels
without being noticeable. In rare cases at
the highest levels of corrective action, this
action may be noticeable to the driver. If so,
a DIC battery voltage and charging message
displays. It is recommended that the driver
reduce the electrical loads as much as
possible. See
Driver Information Center (DIC)
(Base Level) 0129 or
Driver Information Center (DIC) (Uplevel)
0 130.
Battery Power Protection
This feature helps prevent the battery from
being drained if the interior courtesy lamps
or reading lamps are accidentally left on.
If any of these lamps are left on, they
automatically turn off after 10 minutes when
the vehicle is turned off. The lamps will not
come back on again until one of the
following occurs:
.The vehicle is started.
.The doors are closed and then re-opened.
Page 422 of 429

Chevrolet Silverado EV Owner Manual (GMNA-Localizing-U.S./Canada-
16702912) - 2024 - CRC - 1/13/23
Index 421
InformationPublication Ordering . . . . . . . . . . . . . . . . . . . 404
Infotainment Using the System . . . . . . . . . . . . . . . . . . . . . . 149
Infotainment System . . . . . . . . . . . . . . . . . . . . 407
Inspection Multi-Point Vehicle . . . . . . . . . . . . . . . . . . . . 390
Instrument Cluster . . . . . . . . . . . . . . . . . . .107, 109
Instrument Panel Overview . . . . . . . . . . . . . . . . 4
Interior Rearview Mirrors . . . . . . . . . . . . . . . . . 36
Introduction . . . . . . . . . . . . . . . . . . . . . . . . . . . 2, 147
J
Jump Starting - North America . . . . . . . . . . . . . . . 375
K
Keys . . . . . . . . . . . . . . . . . . . . . . . . . . . . . . . . . . . . . . . 8Digital . . . . . . . . . . . . . . . . . . . . . . . . . . . . . . . . . . 18
Remote . . . . . . . . . . . . . . . . . . . . . . . . . . . . . . . . . . 9
Remote Operation . . . . . . . . . . . . . . . . . . . . . . . 9
L
Labeling, Tire Sidewall . . . . . . . . . . . . . . . . . . . 346
LampsDaytime Running (DRL) . . . . . . . . . . . . . . . . . 141
Dome . . . . . . . . . . . . . . . . . . . . . . . . . . . . . . . . . . 144
Exterior Cargo . . . . . . . . . . . . . . . . . . . . . . . . . 143
Exterior Controls . . . . . . . . . . . . . . . . . . . . . . . 140 Lamps (cont'd)
Exterior Lamps Off Reminder . . . . . . . . . . . 141
Exterior Lighting Battery Saver . . . . . . . . 146
Flash-to-Pass . . . . . . . . . . . . . . . . . . . . . . . . . . . . 141
High/Low Beam Changer . . . . . . . . . . . . . . . 141
On Reminder . . . . . . . . . . . . . . . . . . . . . . . . . . . 121
Reading . . . . . . . . . . . . . . . . . . . . . . . . . . . . . . . . 144
Lane Keep Assist Light . . . . . . . . . . . . . . . . . . . . . . . 117
Lap-Shoulder Belt . . . . . . . . . . . . . . . . . . . . . . . . . 56
LATCH System Replacing Parts after a Crash . . . . . . . . . . . 85
LATCH, Lower Anchors and Tethers for Children . . . . . . . . . . . . . . . . . . . . . . . . . . . . . . . . . 76
LED Lighting . . . . . . . . . . . . . . . . . . . . . . . . . . . . . 335
Lighting Entry . . . . . . . . . . . . . . . . . . . . . . . . . . . . . . . . . . 144
Exit . . . . . . . . . . . . . . . . . . . . . . . . . . . . . . . . . . . . 145
Illumination Control . . . . . . . . . . . . . . . . . . . 143
LED . . . . . . . . . . . . . . . . . . . . . . . . . . . . . . . . . . . . 335
Lights
Air Suspension . . . . . . . . . . . . . . . . . . . . . . . . . . 119
Airbag Readiness . . . . . . . . . . . . . . . . . . . . . . . 113
Antilock Brake System (ABS)Warning . . . . . . . . . . . . . . . . . . . . . . . . . . . . . . 116
Automatic Emergency Braking (AEB)
Disabled . . . . . . . . . . . . . . . . . . . . . . . . . . . . . . 117
Battery Fault . . . . . . . . . . . . . . . . . . . . . . . . . . . 115 Lights (cont'd)
Brake System Warning . . . . . . . . . . . . . . . . . 115
Charge Cord Connected . . . . . . . . . . . . . . . . . 114
Charging System . . . . . . . . . . . . . . . . . . . . . . . 114
Cruise Control Light . . . . . . . . . . . . . . . . . . . . 122
Door Ajar . . . . . . . . . . . . . . . . . . . . . . . . . . . . . . 122
Driver Attention Assist . . . . . . . . . . . . . . . . . 122
Driver Mode Control . . . . . . . . . . . . . . . . . . . . 119
Electric Parking Brake . . . . . . . . . . . . . . . . . . . 116
Electronic Stability Control
(ESC), Off . . . . . . . . . . . . . . . . . . . . . . . . . . . . . 119
Four-Wheel Steering . . . . . . . . . . . . . . . . . . . . 119
Four-Wheel-Drive . . . . . . . . . . . . . . . . . . . . . . . 117
Gauges and Indicators . . . . . . . . . . . . . . . . . 107
High-Beam On . . . . . . . . . . . . . . . . . . . . . . . . . . 121
Lane Keep Assist . . . . . . . . . . . . . . . . . . . . . . . . 117
Low State of Charge . . . . . . . . . . . . . . . . . . . . 114
One-Pedal Driving . . . . . . . . . . . . . . . . . . . . . . . 121
Seat Belt Reminders . . . . . . . . . . . . . . . . . . . . 112
Security . . . . . . . . . . . . . . . . . . . . . . . . . . . . . . . . . 121
Service Electric Parking Brake . . . . . . . . . . . 116
Service Vehicle Soon . . . . . . . . . . . . . . . . . . . . 115
Tire Pressure . . . . . . . . . . . . . . . . . . . . . . . . . . . 120
Traction Control System
(TCS)/Electronic Stability Control
Light . . . . . . . . . . . . . . . . . . . . . . . . . . . . . . . . . . 118
Traction Off . . . . . . . . . . . . . . . . . . . . . . . . . . . . . 118
Vehicle Ready . . . . . . . . . . . . . . . . . . . . . . . . . . 121