2024 CHEVROLET SILVERADO EV wheel
[x] Cancel search: wheelPage 276 of 429
Chevrolet Silverado EV Owner Manual (GMNA-Localizing-U.S./Canada-
16702912) - 2024 - CRC - 1/17/23
Driving and Operating 275
The LKA system is not intended to keep the
vehicle centered in the lane. LKA will not
assist or alert if the turn signal is active,
or if it detects that you are accelerating,
braking, or actively steering. LKA can be
overridden by turning the steering wheel.
If the system detects you are steering
intentionally across a lane marker, the LDW
alert may not be given. Do not expect the
LDW alert to occur when you are
intentionally crossing the lane marker.
{Warning
The LKA system does not continuously
steer the vehicle. It may not keep the
vehicle in the lane or give a Lane
Departure Warning (LDW) alert, even if a
lane marking is detected.
The LKA and LDW systems may not:
.Provide an alert or enough steering
assist to avoid a lane departure or
crash.
.Detect lane markings under poor
weather or visibility conditions. This
can occur if the windshield or
headlamps are blocked by dirt, snow,(Continued)
Warning (Continued)
or ice; if they are not in proper
condition; or if the sun shines directly
into the camera.
.Detect road edges.
.Detect lanes on winding or hilly roads.
If LKA only detects lane markings on one
side of the road, it will only assist or
provide an LDW alert when approaching
the lane on the side where it has
detected a lane marking. Even with LKA
and LDW, you must steer the vehicle.
Always keep your attention on the road
and maintain proper vehicle position
within the lane, or vehicle damage,
injury, or death could occur. Always keep
the windshield, headlamps, and camera
sensors clean and in good repair. Do not
use LKA in bad weather conditions or on
roads with unclear lane markings, such as
construction zones.
{Warning
Using LKA on slippery roads could cause
loss of control of the vehicle and a crash.
Turn the system off.
{Warning
LKA will not alert the driver if a towed
trailer crosses into an adjacent lane of
travel. Serious injury or property damage
may occur if the trailer moves into
another lane. Always monitor the trailer
position while towing to make sure it is
within the same lane as the tow vehicle.
How the System Works
LKA uses a camera sensor installed on the
windshield ahead of the rearview mirror to
detect lane markings. It may provide brief
steering assist if it detects an unintended
lane departure. It may further provide an
audible alert or the driver seat may pulse
indicating that a lane marking has been
crossed. The system does not provide an
LDW when intentionally steering across a
lane marker.
Page 277 of 429
Chevrolet Silverado EV Owner Manual (GMNA-Localizing-U.S./Canada-
16702912) - 2024 - CRC - 1/17/23
276 Driving and Operating
To turn LKA on and off, pressAon the
instrument panel to the left of the steering
wheel. If equipped, the indicator light on the
button comes on when LKA is on and turns
off when LKA is disabled. In some vehicles,
you must press the button for more than
three seconds to turn LKA off.
LKA is not available when Terrain Mode,
Snow/Ice Mode, or Off-Road Mode is
selected.
See Driver Mode Control 0209. See
Four-Wheel Steering 0210.
When attempting to enable LKA in any of
the above conditions, LKA UNAVAILABLE will
display.
When on,
Ais white, if equipped,
indicating that the system is not ready to
assist.
Ais green if LKA is ready to
assist. LKA may assist by gently turning the
steering wheel if the vehicle approaches a
detected lane marking.
Ais amber when
assisting. It may also provide a Lane
Departure Warning (LDW) alert by flashing
Aamber if the vehicle crosses a
detected lane marking. Additionally, there
may be three beeps, or the driver seat may
pulse three times, on the right or left,
depending on the lane departure direction. Take Steering
The LKA system does not continuously steer
the vehicle. If LKA does not detect active
driver steering, an alert and chime may be
provided. Steer the vehicle to dismiss. LKA
may become temporarily unavailable after
repeated take steering alerts.
When the System Does Not Seem to
Work Properly
The system performance may be
affected by:
.Close vehicles ahead.
.Sudden lighting changes, such as when
driving through tunnels.
.Banked roads.
.Roads with poor lane markings, such as
two-lane roads.
If the LKA system is not functioning
properly when lane markings are clearly
visible, cleaning the windshield may help.
A camera blocked message may display if
the camera is blocked. Some driver
assistance systems may have reduced
performance or not work at all. An LKA or
LDW unavailable message may display if the
systems are temporarily unavailable. This
message could be due to a blocked camera. The LKA system does not need service. Clean
the outside of the windshield behind the
rearview mirror.
LKA assistance and/or LDW alerts may occur
due to tar marks, shadows, cracks in the
road, temporary or construction lane
markings, or other road imperfections. This
is normal system operation; the vehicle does
not need service. Turn LKA off if these
conditions continue.
Surround Vision Recorder
If equipped, this system records the 360°
camera views to an SD card. Only images
are recorded, no sound. An SD card will be
needed for this system. The minimum
recommended SD card specifications are at
least 64GB with FAT32 file system, Class V30
or greater.
Page 278 of 429
Chevrolet Silverado EV Owner Manual (GMNA-Localizing-U.S./Canada-
16702912) - 2024 - CRC - 1/17/23
Driving and Operating 277
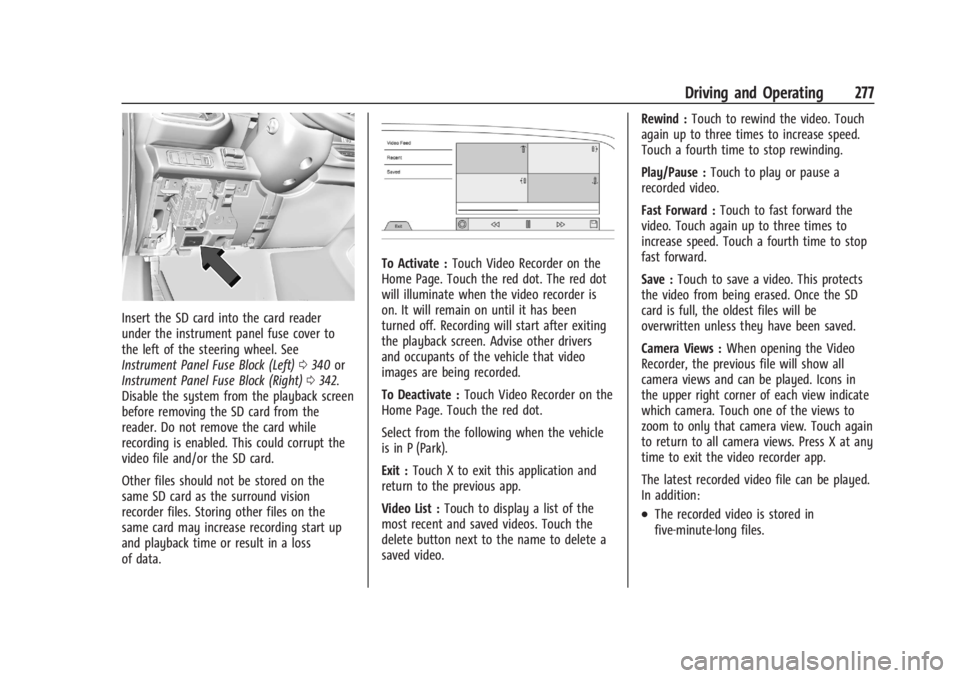
Insert the SD card into the card reader
under the instrument panel fuse cover to
the left of the steering wheel. See
Instrument Panel Fuse Block (Left)0340 or
Instrument Panel Fuse Block (Right) 0342.
Disable the system from the playback screen
before removing the SD card from the
reader. Do not remove the card while
recording is enabled. This could corrupt the
video file and/or the SD card.
Other files should not be stored on the
same SD card as the surround vision
recorder files. Storing other files on the
same card may increase recording start up
and playback time or result in a loss
of data.
To Activate : Touch Video Recorder on the
Home Page. Touch the red dot. The red dot
will illuminate when the video recorder is
on. It will remain on until it has been
turned off. Recording will start after exiting
the playback screen. Advise other drivers
and occupants of the vehicle that video
images are being recorded.
To Deactivate : Touch Video Recorder on the
Home Page. Touch the red dot.
Select from the following when the vehicle
is in P (Park).
Exit : Touch X to exit this application and
return to the previous app.
Video List : Touch to display a list of the
most recent and saved videos. Touch the
delete button next to the name to delete a
saved video. Rewind :
Touch to rewind the video. Touch
again up to three times to increase speed.
Touch a fourth time to stop rewinding.
Play/Pause : Touch to play or pause a
recorded video.
Fast Forward : Touch to fast forward the
video. Touch again up to three times to
increase speed. Touch a fourth time to stop
fast forward.
Save : Touch to save a video. This protects
the video from being erased. Once the SD
card is full, the oldest files will be
overwritten unless they have been saved.
Camera Views : When opening the Video
Recorder, the previous file will show all
camera views and can be played. Icons in
the upper right corner of each view indicate
which camera. Touch one of the views to
zoom to only that camera view. Touch again
to return to all camera views. Press X at any
time to exit the video recorder app.
The latest recorded video file can be played.
In addition:
.The recorded video is stored in
five-minute-long files.
Page 296 of 429
Chevrolet Silverado EV Owner Manual (GMNA-Localizing-U.S./Canada-
16702912) - 2024 - CRC - 1/17/23
Driving and Operating 295
The trailer structure, the tires, and the
brakes must be all be rated to carry the
intended cargo. Inadequate trailer
equipment can cause the combination to
operate in an unexpected or unsafe manner.
Before driving, inspect all trailer hitch parts
and attachments, safety chains, electrical
connectors, lamps, tires, and mirrors. See
Towing Equipment0301. If the trailer has
electric brakes, start the combination
moving and then manually apply the trailer
brake controller to check the trailer brakes
work. During the trip, occasionally check
that the cargo and trailer are secure and
that the lamps and any trailer brakes are
working.
Towing with a Stability Control System
When towing, the stability control system
might be heard. The system reacts to
vehicle movement caused by the trailer,
which mainly occurs during cornering. This is
normal when towing heavier trailers.
Following Distance
Stay at least twice as far behind the vehicle
ahead as you would when driving without a
trailer to help to avoid heavy braking and
sudden turns.
Passing
More passing distance is needed when
towing a trailer. The combination of the
vehicle and trailer will not accelerate as
quickly and is much longer than the vehicle
alone. It is necessary to go much farther
beyond the passed vehicle before returning
to the lane. Pass on level roadways. Avoid
passing on hills if possible.
Backing Up
Hold the bottom of the steering wheel with
one hand. To move the trailer to the left,
move that hand to the left. To move the
trailer to the right, move that hand to the
right. Always back up slowly and, if possible,
have someone guide you.
Making Turns
Caution
Turn more slowly and make wider arcs
when towing a trailer to prevent damage
to your vehicle. Making very sharp turns
could cause the trailer to contact the
vehicle. Make wider turns than normal when towing,
so the trailer does not go over soft
shoulders, over curbs, or strike road signs,
trees, or other objects. Always signal turns
well in advance. Do not steer or brake
suddenly.
Driving on Grades
Reduce speed before starting down a long or
steep downhill grade. Use regenerative
braking to help slow the vehicle or maintain
speed by keeping the vehicle in gear and
limiting the initial battery charge to 80% or
less. Avoid using Regen on Demand. See
Hill
and Mountain Roads 0190.
Viewing Systems
If equipped, the viewing systems on the
vehicle can improve visibility while hitching,
backing up, and driving with a trailer. See
Advanced Driver Assistance Systems 0244.
Parking on Hills
{Warning
To prevent serious injury or death,
always park your vehicle and trailer on a
level surface when possible.
Page 297 of 429
Chevrolet Silverado EV Owner Manual (GMNA-Localizing-U.S./Canada-
16702912) - 2024 - CRC - 1/17/23
296 Driving and Operating
When parking your vehicle and trailer on
a hill:1. Press and hold the brake pedal, but do not shift into P (Park). Turn the wheels
toward the curb if facing downhill or
toward traffic if facing uphill.
2. Have someone place chocks under the trailer wheels.
3. When the wheel chocks are in place, gradually release the brake pedal to
allow the chocks to absorb the load of
the trailer.
4. Reapply the brake pedal. Then apply the electric parking brake and shift into
P (Park).
5. Release the brake pedal.
Leaving After Parking on a Hill
1. Apply and hold the brake pedal.
.Start the vehicle.
.Shift into the desired gear.
.Release the parking brake.
2. Let up on the brake pedal.
3. Drive slowly until the trailer is clear of the chocks.
4. Stop and have someone pick up and store the chocks.
Launching and Retrieving a Boat
Backing the Trailer into the Water
{Warning
.Have all passengers get out of the
vehicle before backing onto the sloped
part of the ramp. Lower the driver and
passenger side windows before
backing onto the ramp. This will
provide a means of escape in the
unlikely event the vehicle slides into
the water.
.If the boat launch surface is slippery,
have the driver remain in the vehicle
with the brake pedal applied while the
boat is being launched. The boat
launch can be especially slippery at
low tide when part of the ramp was
previously submerged at high tide. Do
not back onto the ramp to launch the
boat if you are not sure the vehicle
can maintain traction.
.Do not move the vehicle if someone is
in the path of the trailer. Some parts
of the trailer might be underwater and
not visible to people who are assisting
in launching the boat. Disconnect the trailer wiring before backing
the trailer into the water to prevent damage
to the electrical circuits. Reconnect the
wiring to the trailer after removing the
trailer from the water. If the trailer has
electric brakes that can function when the
trailer is submerged, it might help to leave
the electrical trailer connector attached to
maintain trailer brake functionality while on
the boat ramp.
To back the trailer into the water:
1. Slowly back down the boat ramp until the boat is floating, but no further than
necessary.
2. Press and hold the brake pedal, but do not shift into P (Park).
3. Have someone place chocks under the front wheels of the vehicle.
4. Gradually release the brake pedal to allow the chocks to absorb the load of
the trailer.
5. Reapply the brake pedal. Then apply the parking brake and shift into P (Park).
6. Release the brake pedal.
Page 303 of 429
Chevrolet Silverado EV Owner Manual (GMNA-Localizing-U.S./Canada-
16702912) - 2024 - CRC - 1/17/23
302 Driving and Operating
Vehicle SeriesTrailer Weight Weight-Distributing Hitch Usage Hitch Distribution
EV Truck Up to 3 175 kg (7,000 lb) Not Required50%
EV Truck Up to 3 175 kg (7,000 lb) Required50%
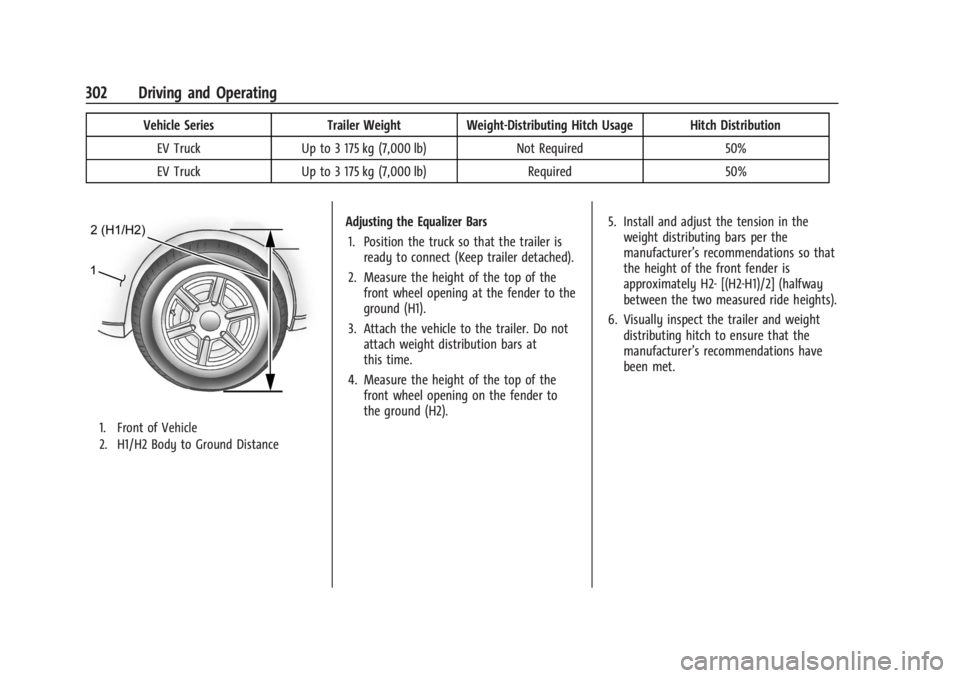
1. Front of Vehicle
2. H1/H2 Body to Ground Distance
Adjusting the Equalizer Bars
1. Position the truck so that the trailer is ready to connect (Keep trailer detached).
2. Measure the height of the top of the front wheel opening at the fender to the
ground (H1).
3. Attach the vehicle to the trailer. Do not attach weight distribution bars at
this time.
4. Measure the height of the top of the front wheel opening on the fender to
the ground (H2). 5. Install and adjust the tension in the
weight distributing bars per the
manufacturer’s recommendations so that
the height of the front fender is
approximately H2- [(H2-H1)/2] (halfway
between the two measured ride heights).
6. Visually inspect the trailer and weight distributing hitch to ensure that the
manufacturer’s recommendations have
been met.
Page 304 of 429
Chevrolet Silverado EV Owner Manual (GMNA-Localizing-U.S./Canada-
16702912) - 2024 - CRC - 1/17/23
Driving and Operating 303
MeasurementHeight Example 1500 (mm)
H1 1000
H2 1050
H2-H1 50
(H2-H1)/2 25
H2- [(H2-H1)/2] 1025
Adjusting the Equalizer Bars with Air
Suspension 1. Adjust the vehicle air suspension to Normal height. See Air Suspension0211.
2. Position the truck so that the trailer is ready to connect. Keep the trailer
detached.
3. Enable Service Mode on the vehicle air suspension in the center infotainment
screen under Settings > Vehicle >
Suspension. 4. Measure the height of the top of the
front wheel opening at the fender to the
ground (H1).
5. Attach the vehicle to the trailer. Do not attach weight distribution bars at
this time.
6. Measure the height of the top of the front wheel opening on the fender to
the ground (H2). 7. Install and adjust the tension in the
weight distributing bars per the
manufacturer's recommendations so that
the height of the front fender is
approximately H1+[(H2-H1)/2] (1/2
between the two measured ride heights,
above the primary ride height {H1}).
8. Disable Service Mode on the vehicle air suspension.
9. Air suspension will automatically adjust ride height following Step 8.
10. Visually inspect the trailer and weight-distributing hitch to ensure that
the manufacturer’s recommendations
have been met.
Page 307 of 429
Chevrolet Silverado EV Owner Manual (GMNA-Localizing-U.S./Canada-
16702912) - 2024 - CRC - 1/17/23
306 Driving and Operating
This symbol is on the Trailer Brake Control
Panel on vehicles with an ITBC system. The
power output to the trailer brakes is
proportional to the amount of vehicle
braking. This available power output to the
trailer brakes can be adjusted to a wide
range of trailering situations.
The ITBC system is integrated with the
vehicle brakes, Antilock Brake System (ABS),
and StabiliTrak/Electronic Stability Control
(ESC) systems. In trailering conditions that
cause the vehicle’s anti-lock brake or
StabiliTrak/ESC systems to activate, power
sent to the trailer's brakes will be
automatically adjusted to minimize trailer
wheel lock-up. This does not imply that the
trailer has StabiliTrak/ESC.
If the vehicle brakes, ABS, or StabiliTrak/ESC
systems are not functioning properly, the
ITBC system may not function fully or at all.
Make sure all of these systems are fully
operational to allow the ITBC system to
function properly.
The ITBC system is powered through the
vehicle's electrical system. Turning the
vehicle off will also turn off the ITBC
system. The ITBC system is fully functional
only when the vehicle is in ON/RUN.{Warning
Connecting a trailer that has an air brake
system may result in reduced or
complete loss of trailer braking, including
increased stopping distance or trailer
instability which could result in serious
injury, death, or property damage. Only
use the ITBC system with electric or
electric over hydraulic trailer brake
systems.
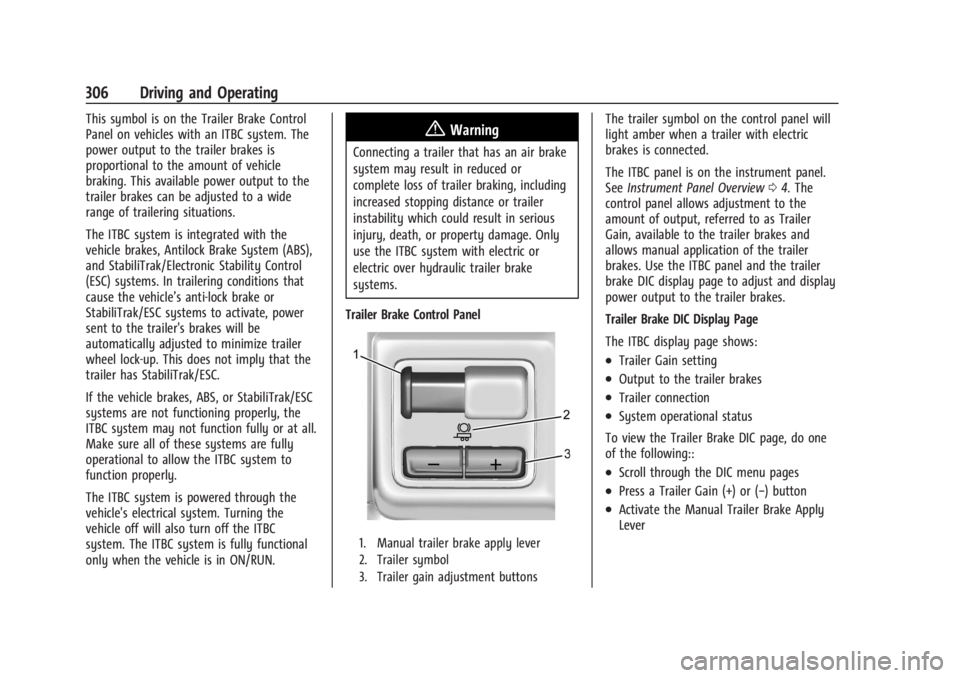
Trailer Brake Control Panel
1. Manual trailer brake apply lever
2. Trailer symbol
3. Trailer gain adjustment buttons
The trailer symbol on the control panel will
light amber when a trailer with electric
brakes is connected.
The ITBC panel is on the instrument panel.
See Instrument Panel Overview 04. The
control panel allows adjustment to the
amount of output, referred to as Trailer
Gain, available to the trailer brakes and
allows manual application of the trailer
brakes. Use the ITBC panel and the trailer
brake DIC display page to adjust and display
power output to the trailer brakes.
Trailer Brake DIC Display Page
The ITBC display page shows:
.Trailer Gain setting
.Output to the trailer brakes
.Trailer connection
.System operational status
To view the Trailer Brake DIC page, do one
of the following::
.Scroll through the DIC menu pages
.Press a Trailer Gain (+) or (−) button
.Activate the Manual Trailer Brake Apply
Lever