2023 TOYOTA YARIS CROSS warning light
[x] Cancel search: warning lightPage 213 of 698

211
4
Owners Manual_Europe_M52N75_en
4-3. Operating the lights and wipers
Driving
■Vehicle Information
Vehicle Information, such as model, etc.,
can be checked on the label. If there are any uncertainties, contact your Toyota dealer.*: If equipped
Adjusts the brightness and illumi-
nated area of the high beams
according to the vehicle speed.
Adjusts the intensity of the high
beams, while driving on a curve,
so that the area in the direction
that the vehicle is turning will be
illuminated more brightly than
other areas.
Operates the shaded high
beams so that the area around
AHS (Adaptive High-
beam System)*
The Adaptive High-beam Sys-
tem uses a front camera
located behind the upper por-
tion of the windshield to
assess the brightness of the
lights of vehicles ahead, street-
lights, etc., and automatically
controls the headlight light dis-
tribution as necessary.
WARNING
■Limitations of the Adaptive High-
beam System
Do not overly rely on the Adaptive High-beam System. Always drive
safely, taking care to observe your surroundings and turning the high beams on or off manually if neces-
sary.
■To prevent incorrect operation of the Adaptive High-beam System
Do not overload the vehicle.
System functions
Page 217 of 698

215
4
Owners Manual_Europe_M52N75_en
4-3. Operating the lights and wipers
Driving
■Temporarily switching to the low beams
It is recommended to switch to the low beams when the high beam may cause problems or distress to other drivers or
pedestrians nearby.
*: If equipped
1 Press the Automatic High Beam
switch.
AHB (Automatic High
Beam)*
The Automatic High Beam
uses a front camera located
behind the upper portion of the
windshield to assess the
brightness of the lights of vehi-
cles ahead, streetlights, etc.,
and automatically turns the
high beams on or off as neces-
sary.
WARNING
■Limitations of the Automatic
High Beam
Do not overly rely on the Automatic High Beam. Always drive safely, tak-
ing care to observe your surroundings and turning the high beams on or off manually if necessary.
■To prevent incorrect operation of
the Automatic High Beam system
Do not overload the vehicle.
Activating the Automatic
High Beam
Page 223 of 698

221
4
Owners Manual_Europe_M52N75_en
4-3. Operating the lights and wipers
Driving
5Increases the rain-sensing wind-
shield wiper sensitivity
6 Decreases the rain-sensing
windshield wiper sensitivity
7 Washer/wiper dual oper-
ation
Pulling the lever operates the wipers
and washer.
Wipers will automatically operate a cou-
ple of times after the washer squirts.
■The windshield wiper and washer can be operated when
The power switch is in ON.
■Effects of vehicle speed on wiper operation (vehicles with rain-sens-ing windshield wipers)
Vehicle speed affects the Intermittent wiper interval.
■Raindrop sensor (vehicles with rain-sensing windshield wipers)
●The raindrop sensor judges the amount of raindrops.
An optical sensor is adopted. It may
not operate properly when sunlight from the rising or setting of the sun intermittently strikes the windshield, or
if bugs etc. are present on the wind- shield.
●If the wiper is turned to AUTO mode while the power switch is in ON, the wipers will operate once to show that
AUTO mode is activated.
●If the temperature of the raindrop sen-
sor is 85°C (185°F) or higher, or -15°C (5°F) or lower, automatic operation may not occur. In this case, operate
the wipers in any mode other than AUTO mode.
■If no windshield washer fluid sprays
Check that the washer nozzles are not blocked if there is washer fluid in the windshield washer fluid reservoir.
WARNING
■Caution regarding the use of windshield wipers in AUTO mode (vehicles with rain-sensing wind-
shield wipers)
The windshield wipers may operate unexpectedly if the sensor is touched
or the windshield is subject to vibra- tion in AUTO mode. Take care that your fingers or anything else do not
become caught in the windshield wip- ers.
Page 224 of 698

222
Owners Manual_Europe_M52N75_en
4-3. Operating the lights and wipers
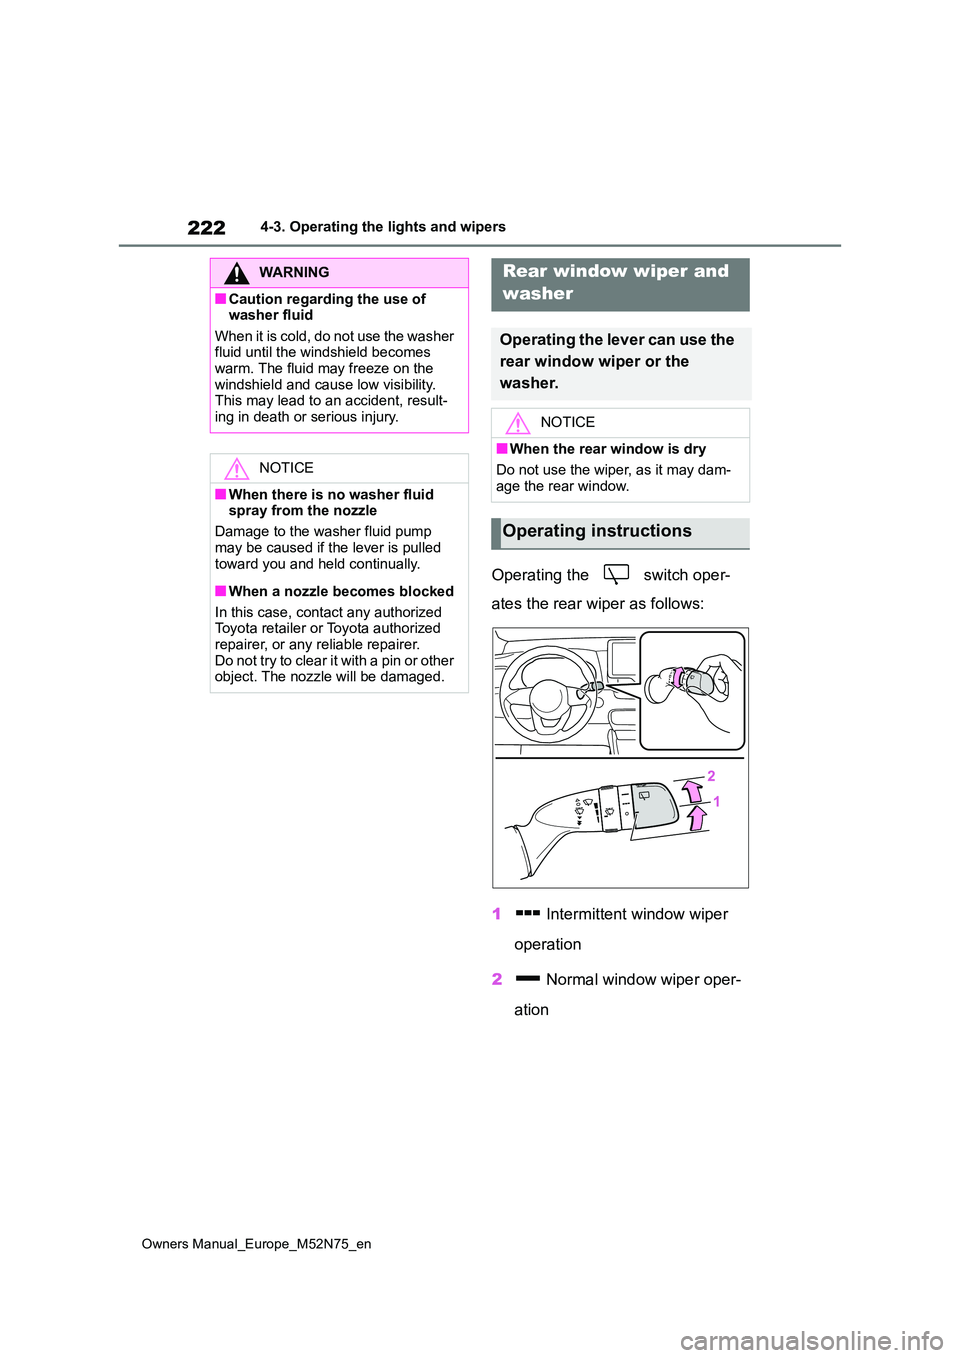
Operating the switch oper-
ates the rear wiper as follows:
1 Intermittent window wiper
operation
2 Normal window wiper oper-
ation
WARNING
■Caution regarding the use of washer fluid
When it is cold, do not use the washer fluid until the windshield becomes warm. The fluid may freeze on the
windshield and cause low visibility. This may lead to an accident, result-ing in death or serious injury.
NOTICE
■When there is no washer fluid spray from the nozzle
Damage to the washer fluid pump
may be caused if the lever is pulled toward you and held continually.
■When a nozzle becomes blocked
In this case, contact any authorized Toyota retailer or Toyota authorized
repairer, or any reliable repairer. Do not try to clear it with a pin or other object. The nozzle will be damaged.
Rear window wiper and
washer
Operating the lever can use the
rear window wiper or the
washer.
NOTICE
■When the rear window is dry
Do not use the wiper, as it may dam-
age the rear window.
Operating instructions
Page 227 of 698

225
4
Owners Manual_Europe_M52N75_en
4-4. Refueling
Driving
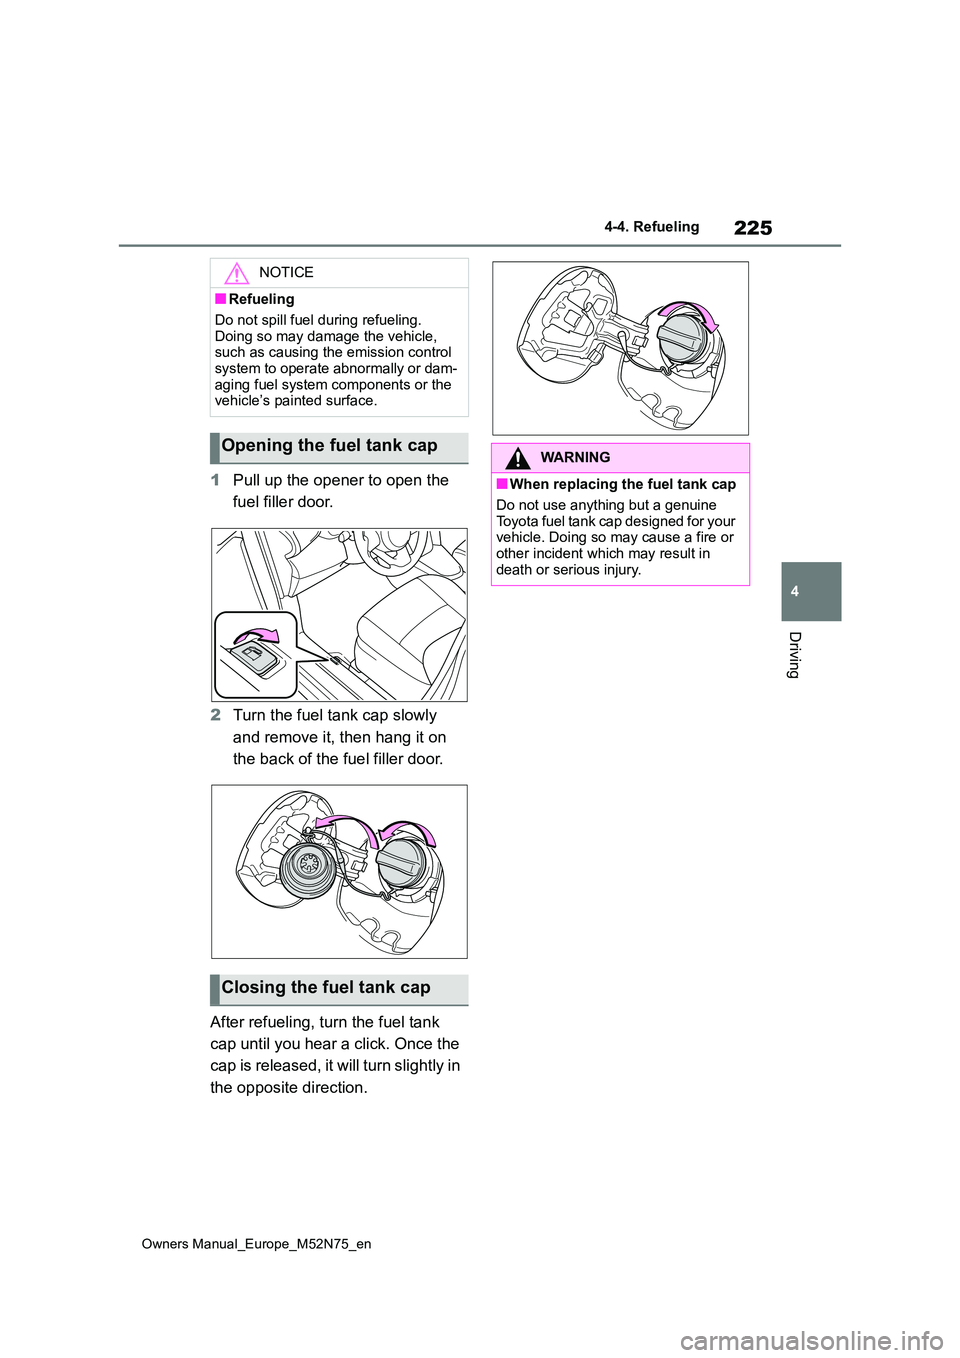
1Pull up the opener to open the
fuel filler door.
2 Turn the fuel tank cap slowly
and remove it, then hang it on
the back of the fuel filler door.
After refueling, turn the fuel tank
cap until you hear a click. Once the
cap is released, it will turn slightly in
the opposite direction.
NOTICE
■Refueling
Do not spill fuel during refueling.
Doing so may damage the vehicle, such as causing the emission control system to operate abnormally or dam-
aging fuel system components or the vehicle’s painted surface.
Opening the fuel tank cap
Closing the fuel tank cap
WARNING
■When replacing the fuel tank cap
Do not use anything but a genuine
Toyota fuel tank cap designed for your vehicle. Doing so may cause a fire or other incident which may result in
death or serious injury.
Page 230 of 698

228
Owners Manual_Europe_M52N75_en
4-5. Using the driving support systems
WARNING
●Do not attach objects, such as stickers, transparent stickers, etc.,
to the outer side of the windshield in front of the front camera (shaded area in the illustration).
From the top of the windshield to
approximately 1 cm (0.4 in.) below
the bottom of the front camera
Approximately 20 cm (7.9 in.)
(Approximately 10 cm [4.0 in.] to
the right and left from the center of
the front camera)
●If the part of the windshield in front
of the front camera is fogged up or covered with condensation or ice, use the windshield defogger to
remove the fog, condensation or ice. ( P.344)
●If water droplets cannot be properly removed from the area of the wind-shield in front of the front camera by
the windshield wipers, replace the wiper insert or wiper blade.
●Do not attach window tint to the windshield.
●Replace the windshield if it is dam-aged or cracked.After replacing the windshield, the
front camera must be recalibrated. Contact any authorized Toyota retailer or Toyota authorized
repairer, or any reliable repairer for details.
●Do not allow liquids to contact the front camera.
●Do not allow bright lights to shine into the front camera.
●Do not dirty or damage the front camera.When cleaning the inside of the
windshield, do not allow glass cleaner to contact the lens of the front camera. Also, do not touch the
lens. If the lens is dirty or damaged, con-tact any authorized Toyota retailer
or Toyota authorized repairer, or any reliable repairer.
●Do not subject the front camera to a strong impact.
●Do not change the installation posi-tion or direction of the front camera or remove it.
●Do not disassemble the front cam-era.
●Do not modify any components of the vehicle around the front camera
(inside rear view mirror, etc.) or ceil- ing.
●Do not attach any accessories to the hood, front grille or front bumper that may obstruct the front camera.
Contact any authorized Toyota retailer or Toyota authorized repairer, or any reliable repairer for
details.
●If a surfboard or other long object is
to be mounted on the roof, make sure that it will not obstruct the front camera.
●Do not modify the headlights or other lights.
Page 231 of 698

229
4
Owners Manual_Europe_M52N75_en
4-5. Using the driving support systems
Driving
■If a warning message is displayed on the multi-information display
A system may be temporarily unavailable or there may be a malfu nction in the sys-
tem.
●In the following situations, perform the actions specified in t he table. When the nor-
mal operating conditions are detected, the message will disappe ar and the system will become operational.
If the message does not disappear, contact any authorized Toyot a retailer or Toyota
authorized repairer, or any reliable repairer.
●In the following situations, if the situation has changed (or t he vehicle has been
driven for some time) and the normal operating conditions are d etected, the mes- sage will disappear and the system will become operational.
SituationActions
When the area around a camera is cov-
ered with dirt, moisture (fogged up, cov-
ered with condensation, ice, etc.), or
other foreign matter
Using the wiper and A/C function,
remove the dirt and other attached mat-
ter. ( P.344)
When the temperature around the front
camera is outside of the operational
range, such as when the vehicle is in the
sun or in an extremely cold environment
If the front camera is hot, such as after
the vehicle had been parked in the sun,
use the air conditioning system to
decrease the temperature around the
front camera.
If a sunshade was used when the vehicle
was parked, depending on its type, the
sunlight reflected from the surface of the
sunshade may cause the temperature of
the front camera to become excessively
high.
If the front camera is cold, such after the
vehicle is parked in an extremely cold
environment, use the air conditioning
system to increase the temperature
around the front camera.
The area in front of the front camera is
obstructed, such as when the hood is
open or a sticker is attached to the part of
the windshield in front of the front cam-
era.
Close the hood, remove the sticker, etc.,
to clear the obstruction.
When “Pre-Collision System Radar In
Self Calibration Unavailable See
Owner’s Manual” is displayed.
Check whether there is attached materi-
als on the radar sensor and radar sensor
cover, and if there is, remove it.
Page 237 of 698

235
4
Owners Manual_Europe_M52N75_en
4-5. Using the driving support systems
Driving
■Enabling/disabling the pre-col-
lision system
The pre-collision system can be
enabled/disabled on ( P.494)
of the multi-information display.
The system is automatically enabled
each time the power switch is turned to
ON.
If the system is disabled, the PCS
warning light will turn on and a
message will be displayed on the
multi-information display.
“Pre-Collision System OFF”
■Changing the pre-collision
warning timing
The pre-collision warning timing
can be changed on ( P.494) of
the multi-information display.
The warning timing setting is retained
when the power switch is turned off.
However, if the pre-collision system is
disabled and re-enabled, the operation
timing will return to the default setting
(middle).
For region A: If the pre-collision
warning timing is changed, emer-
gency steering assist timing will
also be changed accordingly.
If late is selected, emergency steer-
ing assist would not operate in case
of an emergency.
1 Early
2 Middle
This is the default setting.
3Late
■Operational conditions for each pre-collision function
The pre-collision system is enabled and the system determines t hat the possibility of
WARNING
●When a compact spare tire or an emergency tire puncture repair kit is
used
●If equipment (snow plow, etc.) that
may obstruct the radar sensor or front camera is temporarily installed to the vehicle
Changing settings of the
pre-collision system