2023 TOYOTA YARIS CROSS height
[x] Cancel search: heightPage 52 of 698

50
Owners Manual_Europe_M52N75_en
1-2. Child safety
■When installing a child
restraint system to a front pas-
senger seat
For the safety of a child, install a
child restraint system to a rear seat.
When installing a child restraint
system to a front passenger seat is
unavoidable, adjust the seat as fol-
lows and install the child restraint
system:
Move the front seat fully rear-
ward.
Adjust the seat height to the
upper most position.
Adjust the seatback angle to the
most upright position.
When installing a forward-facing child
WARNING
●For effective protection in automo- bile accidents and sudden stops, a
child must be properly restrained, using a seat belt or child restraint system which is correctly installed.
For installation details, refer to the operation manual enclosed with the child restraint system. General
installation instruction is provided in this manual.
●Toyota strongly urges the use of a proper child restraint system that conforms to the weight and size of
the child, installed on the rear seat. According to accident statistics, the child is safer when properly
restrained in the rear seat than in the front seat.
●Holding a child in your or someone else’s arms is not a substitute for a child restraint system. In an acci-
dent, the child can be crushed against the windshield or between the holder and the interior of the
vehicle.
■Handling the child restraint sys-
tem
If the child restraint system is not properly fixed in place, the child or
other passengers may be seriously injured or even killed in the event of sudden braking, sudden swerving, or
an accident.
●If the vehicle were to receive a
strong impact from an accident, etc., it is possible that the child restraint system has damage that is
not readily visible. In such cases, do not reuse the restraint system.
●Depending on the child restraint system, installation may be difficult or impossible. In those cases,
check whether the child restraint system is suitable for installment in the vehicle. ( P.53) Be sure to
install and observe the usage rules after carefully reading the child restraint system fixing method in
this manual, as well as the opera- tion manual enclosed with the child restraint system.
●Keep the child restraint system properly secured on the seat even if
it is not in use. Do not store the child restraint system unsecured in the passenger compartment.
●If it is necessary to detach the child restraint system, remove it from the
vehicle or store it securely in the luggage compartment.
When using a child restraint
system
Page 56 of 698

54
Owners Manual_Europe_M52N75_en
1-2. Child safety
indicated.
UN (ECE) R129 approval
mark*3
The height range of the child
who is applicable as well as
available weights for an UN
(ECE) R129 approval mark is
indicated.
2 Checking the category of the
child restraint system.
Check the approval mark of the
child restraint system for which
of the following categories the
child restraint system is suitable.
Also, if there are any uncertain-
ties, check the user’s guide
included with the child restraint
system or contact the retailer of
the child restraint system.
•“universal”
• “semi-universal”
• “restricted”
• “vehicle specific”
*1: UN (ECE) R44 and UN (ECE) R129
are U.N. regulations for child
restraint systems.
*2: The child restraint systems men-
tioned in the table may not be avail-
able outside of the EU area.
*3: The displayed mark may differ
depending on the product.
■Compatibility of each seating
position with child restraint
systems
Left-hand drive vehicles
Page 57 of 698

55
1
Owners Manual_Europe_M52N75_en
1-2. Child safety
For safety and security
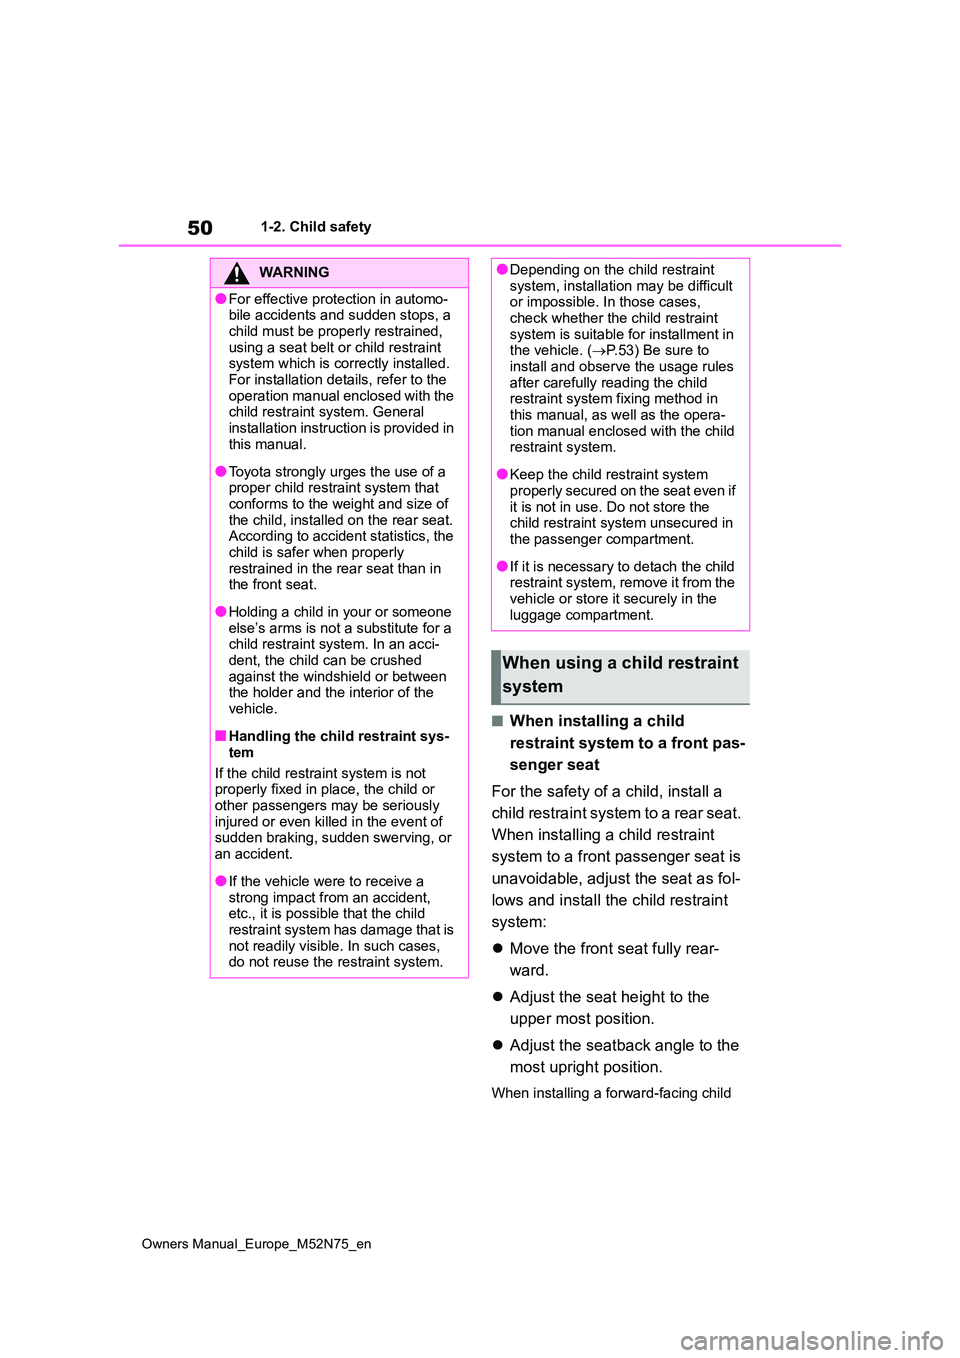
Right-hand drive vehicles*1: Move the front seat fully rearward. If
the passenger seat height can be
adjusted, move it to the upper most
position.
*2: Adjust the seatback angle to the
most upright position. When install-
ing a forward-facing child seat, if
there is a gap between the child seat
and the seatback, adjust the
seatback angle until good contact is
achieved.
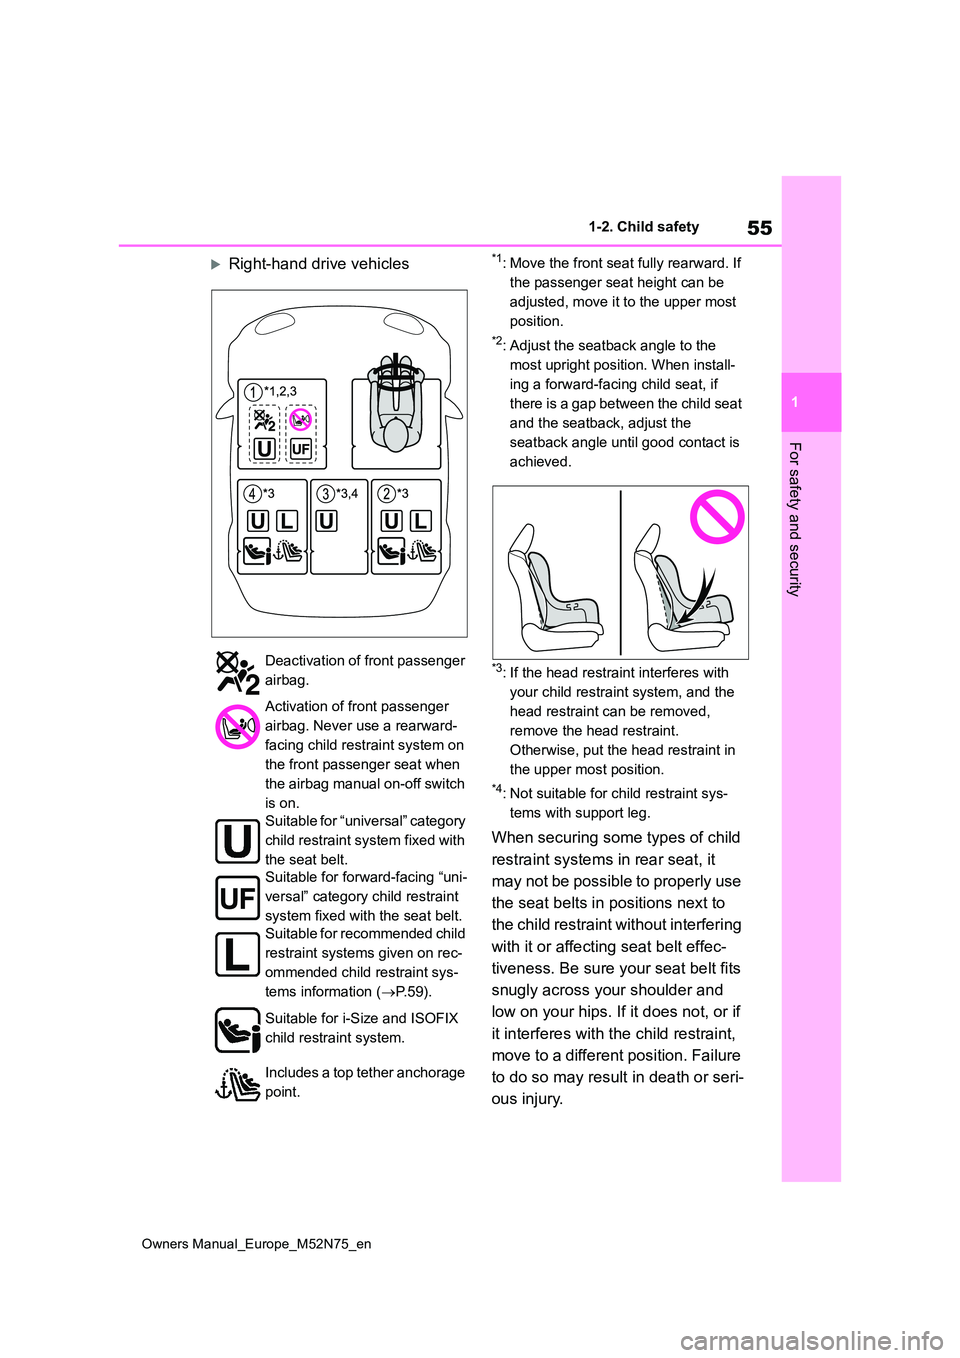
*3: If the head restraint interferes with
your child restraint system, and the
head restraint can be removed,
remove the head restraint.
Otherwise, put the head restraint in
the upper most position.
*4: Not suitable for child restraint sys-
tems with support leg.
When securing some types of child
restraint systems in rear seat, it
may not be possible to properly use
the seat belts in positions next to
the child restraint without interfering
with it or affecting seat belt effec-
tiveness. Be sure your seat belt fits
snugly across your shoulder and
low on your hips. If it does not, or if
it interferes with the child restraint,
move to a different position. Failure
to do so may result in death or seri-
ous injury.
Deactivation of front passenger
airbag.
Activation of front passenger
airbag. Never use a rearward-
facing child restraint system on
the front passenger seat when
the airbag manual on-off switch
is on.
Suitable for “universal” category
child restraint system fixed with
the seat belt.
Suitable for forward-facing “uni-
versal” category child restraint
system fixed with the seat belt.
Suitable for recommended child
restraint systems given on rec-
ommended child restraint sys-
tems information ( P. 5 9 ) .
Suitable for i-Size and ISOFIX
child restraint system.
Includes a top tether anchorage
point.
Page 60 of 698

58
Owners Manual_Europe_M52N75_en
1-2. Child safety
“vehicle list” for compatibility information or ask the retailer of your child
seat.
Mass
groupsChild weightSize classFixtureDescription
0up to 10 kg
(22 lb.)
ER1Rearward-facing infant seat
FL1Left lateral-facing infant seat
(Carrycot)
GL2Right lateral-facing infant seat
(Carrycot)
0+up to 13 kg
(28 lb.)
CR3Full-size, rearward-facing child
restraint systems
DR2Reduced-size, rearward-facing
child restraint systems
—R2XReduced-size, rearward-facing
child restraint systems
ER1Rearward-facing infant seat
I9 to 18 kg
(20 to 39 lb.)
AF3Full-height, forward-facing child
restraint systems
BF2Reduced-height, forward-facing
child restraint systems
B1F2XReduced-height, forward-facing
child restraint systems
CR3Full-size, rearward-facing child
restraint systems
DR2Reduced-size, rearward-facing
child restraint systems
II15 to 25 kg
(34 to 55 lb.)—B2, B3Junior seat
III22 to 36 kg
(49 to 79 lb.)
Page 159 of 698

157
3
Owners Manual_Europe_M52N75_en
3-3. Adjusting the seats
Before driving
3-3.Adjusting the sea ts
Seat position adjustment lever
Seatback angle adjustment
lever
Vertical height adjustment lever
(if equipped)
Lumber support switch (if
equipped)
Front seats
Adjustment procedure
WARNING
■When adjusting the seat position
●Take care when adjusting the seat position to ensure that other pas-sengers are not injured by the mov-
ing seat.
●Do not put your hands under the
seat or near the moving parts to avoid injury.Fingers or hands may become
jammed in the seat mechanism.
●Make sure to leave enough space
around the feet so they do not get stuck.
■Seat adjustment
●Be careful that the seat does not hit passengers or luggage.
●To reduce the risk of sliding under the lap belt during a collision, do not
recline the seat more than neces- sary.If the seat is too reclined, the lap
belt may slide past the hips and apply restraint forces directly to the abdomen, or your neck may contact
the shoulder belt, increasing the risk of death or serious injury in the event of an accident.
Adjustments should not be made while driving as the seat may unex-pectedly move and cause the driver
to lose control of the vehicle.
●After adjusting the seat, make sure
that the seat is locked in position.
NOTICE
■When adjusting a front seat
When adjusting a front seat, make
sure that the head restraint does not contact the headliner. Otherwise, the head restraint and headliner may be
damaged.
Page 163 of 698

161
3
Owners Manual_Europe_M52N75_en
3-3. Adjusting the seats
Before driving
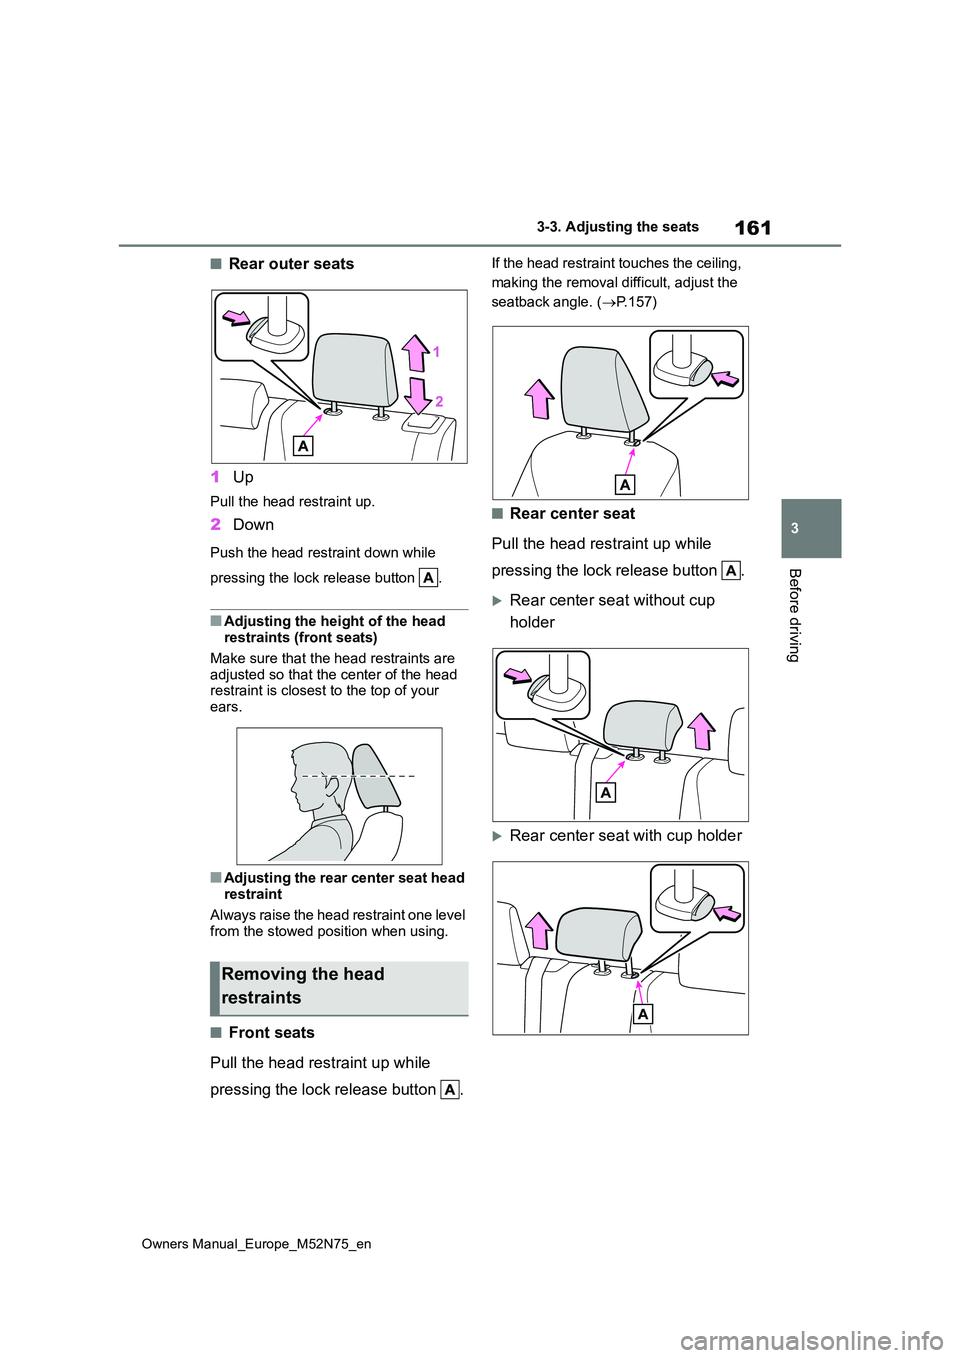
■Rear outer seats
1 Up
Pull the head restraint up.
2Down
Push the head restraint down while
pressing the lock release button .
■Adjusting the height of the head restraints (front seats)
Make sure that the head restraints are adjusted so that the center of the head restraint is closest to the top of your
ears.
■Adjusting the rear center seat head
restraint
Always raise the head restraint one level
from the stowed position when using.
■Front seats
Pull the head restraint up while
pressing the lock release button .
If the head restraint touches the ceiling,
making the removal difficult, adjust the
seatback angle. ( P.157)
■Rear center seat
Pull the head restraint up while
pressing the lock release button .
Rear center seat without cup
holder
Rear center seat with cup holder
Removing the head
restraints
Page 167 of 698

165
3
Owners Manual_Europe_M52N75_en
3-4. Adjusting the steering wheel and mirrors
Before driving
The height of the rear view mirror
can be adjusted to suit your driving
posture.
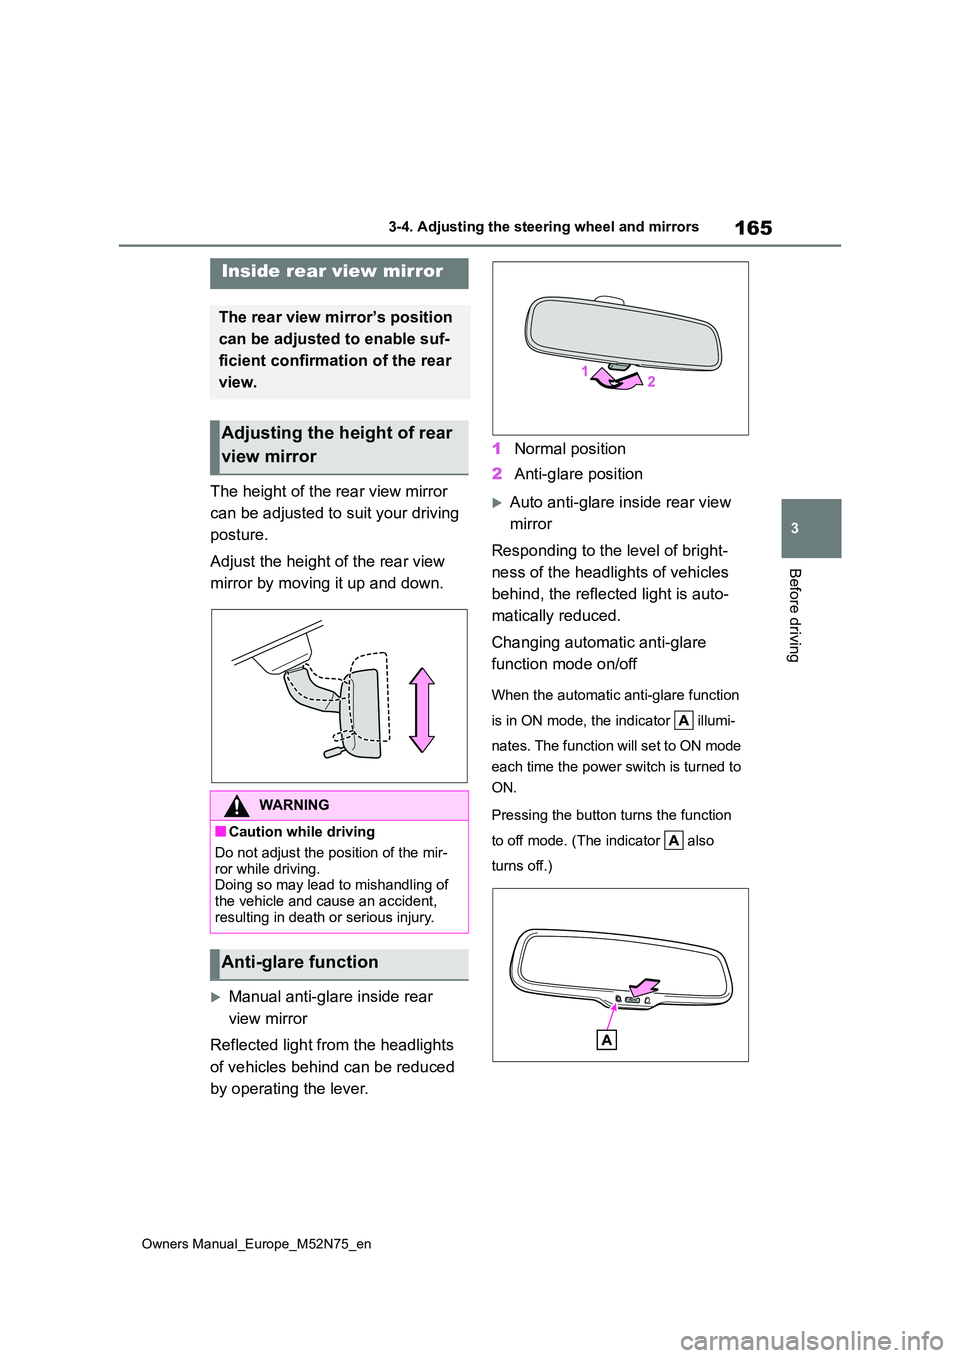
Adjust the height of the rear view
mirror by moving it up and down.
Manual anti-glare inside rear
view mirror
Reflected light from the headlights
of vehicles behind can be reduced
by operating the lever.
1 Normal position
2 Anti-glare position
Auto anti-glare inside rear view
mirror
Responding to the level of bright-
ness of the headlights of vehicles
behind, the reflected light is auto-
matically reduced.
Changing automatic anti-glare
function mode on/off
When the automatic anti-glare function
is in ON mode, the indicator illumi-
nates. The function will set to ON mode
each time the power switch is turned to
ON.
Pressing the button turns the function
to off mode. (The indicator also
turns off.)
Inside rear view mirror
The rear view mirror’s position
can be adjusted to enable suf-
ficient confirmation of the rear
view.
Adjusting the height of rear
view mirror
WARNING
■Caution while driving
Do not adjust the position of the mir-
ror while driving. Doing so may lead to mishandling of the vehicle and cause an accident,
resulting in death or serious injury.
Anti-glare function
Page 242 of 698

240
Owners Manual_Europe_M52N75_en
4-5. Using the driving support systems
• When there are many things which
can reflect the radio waves of the radar in the vicinity (tunnels, truss bridges, gravel roads, snow covered
road that have tracks, etc.) • When there is an effect on the radio waves to the radar that is installed on
another vehicle • When multiple detectable objects are close together
• If the sun or other light is shining directly on a detectable object• When a detectable object is a shade
of white and looks extremely bright • When a detectable object appears to be nearly the same color or brightness
as its surroundings • If a detectable object cuts or suddenly emerges in front of your vehicle
• When the front of your vehicle is hit by water, snow, dust, etc.• When a very bright light ahead, such
as the sun or the headlights of oncom- ing traffic, shines directly into the front camera
• When approaching the side or front of a vehicle ahead• If a vehicle ahead is a motorcycle or
bicycle (for region C) • If a vehicle ahead is narrow, such as a personal mobility vehicle
• If a preceding vehicle has a small rear end, such as an unloaded truck• If a preceding vehicle has a low rear
end, such as a low bed trailer
• If a vehicle ahead has extremely high
ground clearance
• If a vehicle ahead is carrying a load
which protrudes past its rear bumper • If a vehicle ahead is irregularly shaped, such as a tractor or side car
• For region A and B: If a vehicle ahead is a child sized bicycle, a bicycle that is carrying a large load, a bicycle rid-
den by more than one person, or a uniquely shaped bicycle (bicycle with a child seat, tandem bicycle, etc.)
• For region A and B: If a pedestrian/or the riding height of a bicyclist ahead is shorter than approximately 1 m (3.2
ft.) or taller than approximately 2 m (6.5 ft.)• For region A and B: If a pedes-
trian/bicyclist is wearing oversized clothing (a rain coat, long skirt, etc.), making their silhouette obscure
• For region A and B: If a pedestrian is bending forward or squatting or bicy-clist is bending forward
• For region A and B: If a pedes- trian/bicyclist is moving fast• For region A and B: If a pedestrian is
pushing a stroller, wheelchair, bicycle or other vehicle• When driving in inclement weather
such as heavy rain, fog, snow or a sandstorm• When driving through steam or smoke
• When the surrounding area is dim, such as at dawn or dusk, or while at night or in a tunnel, making a detect-
able object appear to be nearly the same color as its surroundings• When driving in a place where the sur-
rounding brightness changes sud- denly, such as at the entrance or exit of a tunnel
• After the hybrid system has started the vehicle has not been driven for a certain amount of time