Page 92 of 698
90
Owners Manual_Europe_M52N75_en
2-1. Instrument cluster
2-1.In strument clu ste r
For the purpose of explanation, the following illustrations display all warning
lights and indicators illuminated.
Vehicles with 4.2-inch display
Vehicles with 7-inch display (when analog speedometer is displa yed)
Warning lights and indicators
The warning lights and indicators on the instrument cluster, center
panel and outside rear view mirrors inform the driver of the st atus of
the vehicle’s various systems.
Warning lights and indicators displayed on the instrument
cluster
Page 93 of 698

91
2
Owners Manual_Europe_M52N75_en
2-1. Instrument cluster
Vehicle status information and indicators
Vehicles with 7-inch display (when digital speedometer is displayed)
Warning lights inform the driver of
malfunctions in the indicated vehi-
cle’s systems.
Warning lights
(Red)
Brake system warning light*1
( P.435)
(Yellow)
Brake system warning light*1
( P.435)
High coolant temperature
warning light*2 ( P.435)
Hybrid system overheat
warning light*2 ( P.436)
Charging system warning
light*2 ( P.436)
Low engine oil pressure
warning light*2 ( P.436)
Malfunction indicator lamp*1,
3 ( P.436)
SRS warning light*1
( P.437)
ABS warning light*1
( P.437)
Inappropriate pedal opera-
tion warning light*2 ( P. 4 3 7 )
(Red)
Electric power steering sys-
tem warning light*1, 3
( P.438)
(Yellow)
Electric power steering sys-
tem warning light*1, 3
( P.438)
Low fuel level warning light
( P.438)
Driver’s and front passen-
ger’s seat belt reminder light
( P.438)
Rear passengers’ seat
belt reminder lights*2
( P.438)
Tire pressure warning light*1,
3 ( P.439)
(Orange)
LTA i n d i c a t o r*2 (if equipped)
( P.439)
(Flashes)
Toyota parking assist-sensor
OFF indicator*1, 3 (if
equipped) ( P.440)
Page 94 of 698

92
Owners Manual_Europe_M52N75_en
2-1. Instrument cluster
*1: These lights come on when the
power switch is turned to ON to indi-
cate that a system check is being
performed. They will turn off after the
hybrid system is started, or after a
few seconds. There may be a mal-
function in a system if the lights do
not come on, or turn off. Have the
vehicle inspected by any authorized
Toyota retailer or Toyota authorized
repairer, or any reliable repairer.
*2: This light illuminates on the multi-
information display.
*3: This light illuminates on the multi-
information display (with 7-inch dis-
play only).
The indicators inform the driver of
the operating state of the vehicle’s
various systems.
(Flashes)
RCTA OFF indicator*1, 3 (if
equipped) ( P.440)
PKSB OFF indicator*1, 3 (if
equipped) ( P.441)
(Flashes or illuminates)
PCS warning light*1 (if
equipped) ( P.441)
Slip indicator*1 ( P.442)
(Flashes)
Parking brake indicator
( P.442)
(Flashes)
Brake hold operated indica-
tor*1 ( P.442)
WARNING
■If a safety system warning light does not come on
Should a safety system light such as the ABS and SRS warning light not come on when you start the hybrid
system, this could mean that these systems are not available to help pro-tect you in an accident, which could
result in death or serious injury. Have the vehicle inspected by any autho-rized Toyota retailer or Toyota autho-
rized repairer, or any reliable repairer immediately if this occurs.
Indicators
Turn signal indicator
( P.200)
Tail light indicator*1 ( P.206)
Headlight high beam indica-
tor ( P.208)
AHS indicator*1 (if equipped)
( P.212)
AHB indicator*1 (if equipped)
( P.215)
Front fog light indicator*1 (if
equipped) ( P.218)
Rear fog light indicator*1
( P.218)
PCS warning light*2, 3 (if
equipped) ( P.235)
Cruise control indicator*4 (if
equipped) ( P.252)
Dynamic radar cruise control
indicator*4 (if equipped)
( P.252)
Page 167 of 698

165
3
Owners Manual_Europe_M52N75_en
3-4. Adjusting the steering wheel and mirrors
Before driving
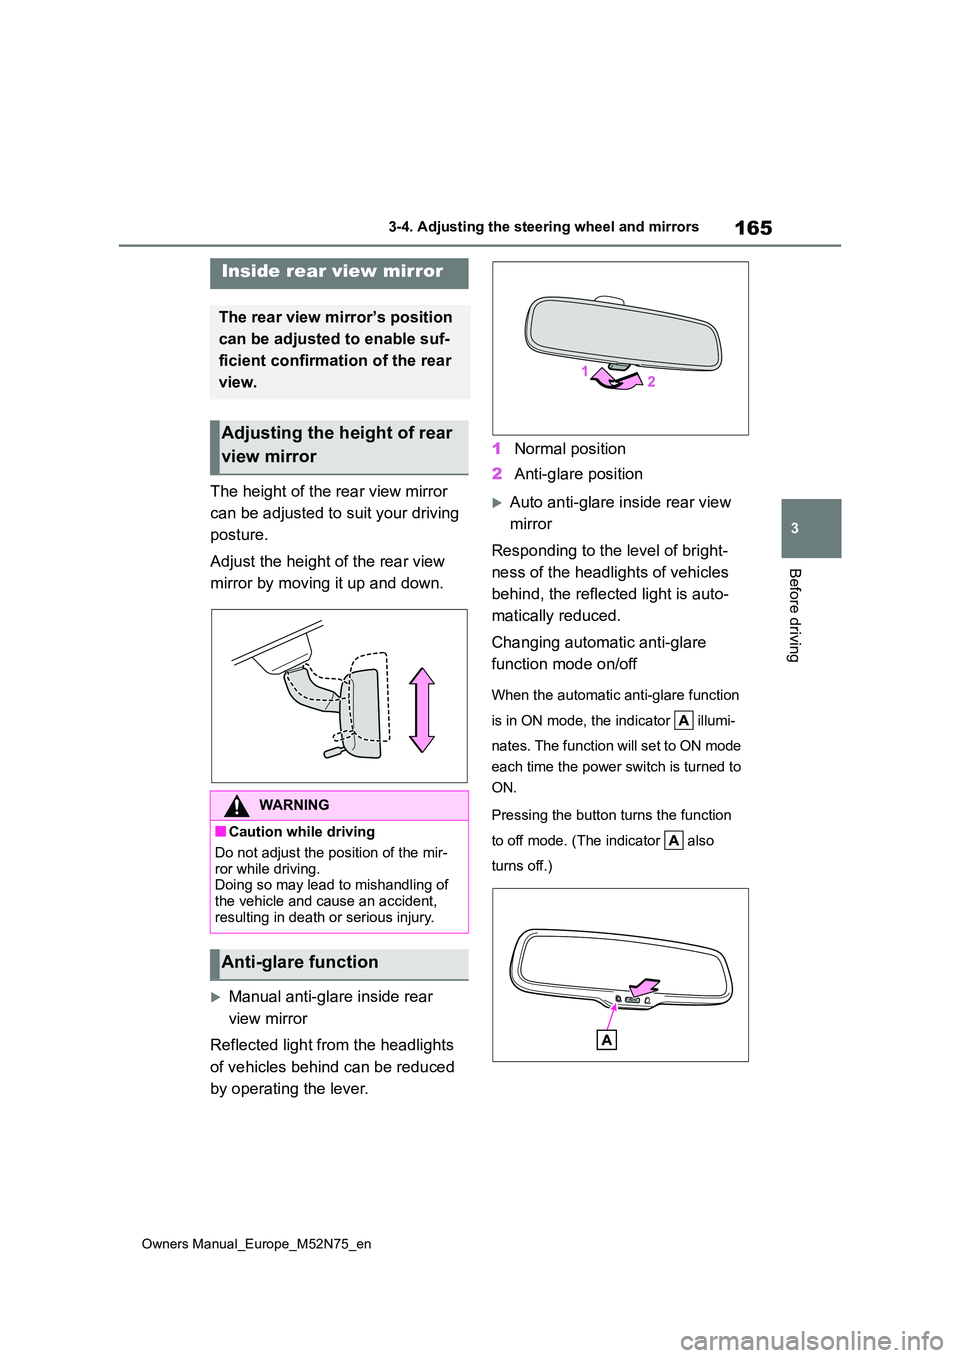
The height of the rear view mirror
can be adjusted to suit your driving
posture.
Adjust the height of the rear view
mirror by moving it up and down.
Manual anti-glare inside rear
view mirror
Reflected light from the headlights
of vehicles behind can be reduced
by operating the lever.
1 Normal position
2 Anti-glare position
Auto anti-glare inside rear view
mirror
Responding to the level of bright-
ness of the headlights of vehicles
behind, the reflected light is auto-
matically reduced.
Changing automatic anti-glare
function mode on/off
When the automatic anti-glare function
is in ON mode, the indicator illumi-
nates. The function will set to ON mode
each time the power switch is turned to
ON.
Pressing the button turns the function
to off mode. (The indicator also
turns off.)
Inside rear view mirror
The rear view mirror’s position
can be adjusted to enable suf-
ficient confirmation of the rear
view.
Adjusting the height of rear
view mirror
WARNING
■Caution while driving
Do not adjust the position of the mir-
ror while driving. Doing so may lead to mishandling of the vehicle and cause an accident,
resulting in death or serious injury.
Anti-glare function
Page 190 of 698

188
Owners Manual_Europe_M52N75_en
4-1. Before driving
WARNING
Follow all the instructions described in this section. Failure to do so could
cause an accident resulting in death or serious injury.
■Trailer towing precautions
When towing, make sure that none of the weight limits are exceeded.
( P.183)
■Vehicle speed in towing
Observe the legal maximum speeds for trailer towing.
■Before descending hills or long declines
Reduce speed and downshift. How-
ever, never downshift suddenly while descending steep or long downhill grades.
■Operation of the brake pedal
Do not hold the brake pedal
depressed often or for long periods of time. Doing so may result in the brake overheating or reduce braking effects.
■To avoid accident or injury
●Vehicles with a compact spare tire:
Do not tow a trailer when the com- pact spare tire is installed on your vehicle.
●Vehicles with the emergency tire puncture repair kit: Do not tow a
trailer when the tire installed is repaired with the emergency tire puncture repair kit.
●Vehicles with a Dynamic radar cruise control with full-speed range:
Do not use dynamic radar cruise control when you are towing.
NOTICE
■Do not directly splice trailer lights
Directly splicing trailer lights may damage your vehicle’s electrical sys-tem and cause a malfunction.
Page 213 of 698

211
4
Owners Manual_Europe_M52N75_en
4-3. Operating the lights and wipers
Driving
■Vehicle Information
Vehicle Information, such as model, etc.,
can be checked on the label. If there are any uncertainties, contact your Toyota dealer.*: If equipped
Adjusts the brightness and illumi-
nated area of the high beams
according to the vehicle speed.
Adjusts the intensity of the high
beams, while driving on a curve,
so that the area in the direction
that the vehicle is turning will be
illuminated more brightly than
other areas.
Operates the shaded high
beams so that the area around
AHS (Adaptive High-
beam System)*
The Adaptive High-beam Sys-
tem uses a front camera
located behind the upper por-
tion of the windshield to
assess the brightness of the
lights of vehicles ahead, street-
lights, etc., and automatically
controls the headlight light dis-
tribution as necessary.
WARNING
■Limitations of the Adaptive High-
beam System
Do not overly rely on the Adaptive High-beam System. Always drive
safely, taking care to observe your surroundings and turning the high beams on or off manually if neces-
sary.
■To prevent incorrect operation of the Adaptive High-beam System
Do not overload the vehicle.
System functions
Page 217 of 698
215
4
Owners Manual_Europe_M52N75_en
4-3. Operating the lights and wipers
Driving
■Temporarily switching to the low beams
It is recommended to switch to the low beams when the high beam may cause problems or distress to other drivers or
pedestrians nearby.
*: If equipped
1 Press the Automatic High Beam
switch.
AHB (Automatic High
Beam)*
The Automatic High Beam
uses a front camera located
behind the upper portion of the
windshield to assess the
brightness of the lights of vehi-
cles ahead, streetlights, etc.,
and automatically turns the
high beams on or off as neces-
sary.
WARNING
■Limitations of the Automatic
High Beam
Do not overly rely on the Automatic High Beam. Always drive safely, tak-
ing care to observe your surroundings and turning the high beams on or off manually if necessary.
■To prevent incorrect operation of
the Automatic High Beam system
Do not overload the vehicle.
Activating the Automatic
High Beam
Page 223 of 698

221
4
Owners Manual_Europe_M52N75_en
4-3. Operating the lights and wipers
Driving
5Increases the rain-sensing wind-
shield wiper sensitivity
6 Decreases the rain-sensing
windshield wiper sensitivity
7 Washer/wiper dual oper-
ation
Pulling the lever operates the wipers
and washer.
Wipers will automatically operate a cou-
ple of times after the washer squirts.
■The windshield wiper and washer can be operated when
The power switch is in ON.
■Effects of vehicle speed on wiper operation (vehicles with rain-sens-ing windshield wipers)
Vehicle speed affects the Intermittent wiper interval.
■Raindrop sensor (vehicles with rain-sensing windshield wipers)
●The raindrop sensor judges the amount of raindrops.
An optical sensor is adopted. It may
not operate properly when sunlight from the rising or setting of the sun intermittently strikes the windshield, or
if bugs etc. are present on the wind- shield.
●If the wiper is turned to AUTO mode while the power switch is in ON, the wipers will operate once to show that
AUTO mode is activated.
●If the temperature of the raindrop sen-
sor is 85°C (185°F) or higher, or -15°C (5°F) or lower, automatic operation may not occur. In this case, operate
the wipers in any mode other than AUTO mode.
■If no windshield washer fluid sprays
Check that the washer nozzles are not blocked if there is washer fluid in the windshield washer fluid reservoir.
WARNING
■Caution regarding the use of windshield wipers in AUTO mode (vehicles with rain-sensing wind-
shield wipers)
The windshield wipers may operate unexpectedly if the sensor is touched
or the windshield is subject to vibra- tion in AUTO mode. Take care that your fingers or anything else do not
become caught in the windshield wip- ers.