2023 TOYOTA YARIS CROSS remove seats
[x] Cancel search: remove seatsPage 64 of 698

62
Owners Manual_Europe_M52N75_en
1-2. Child safety
■ISOFIX lower anchorages
(ISOFIX child restraint system)
Lower anchorages are provided for
the outboard rear seats. (Marks dis-
playing the location of the anchor-
ages are attached to the seats.)
■Installation with ISOFIX lower
anchorage (ISOFIX child
restraint system)
Install the child restraint system in
accordance to the operation man-
ual enclosed with the child restraint
system.
If the child restraint system on hand
is not within the “universal” cate-
gory (or the necessary information
is not in the table), refer to the
“Vehicle List” provided by the child
restraint system maker for various
possible installation positions, or
check the compatibility after asking
the retailer of the child seat.
( P.53, 54)
1 If the head restraint interferes
with your child restraint system,
and the head restraint can be
removed, remove the head
restraint. Otherwise, put the
head restraint in the upper most
position. ( P.160)
2 Remove the anchorage covers,
and install the child restraint
system to the seat.
WARNING
■When installing a child restraint system
Observe the following precautions. Failure to do so may result in death or serious injury.
●Do not allow children to play with the seat belt. If the seat belt
becomes twisted around a child’s neck, it may lead to choking or other serious injuries that could
result in death. If this occurs and the buckle cannot be unfastened, scissors should be used to cut the
belt.
●Ensure that the belt and plate are
securely locked and the seat belt is not twisted.
●Shake the child restraint system left and right, and forward and back-ward to ensure that it has been
securely installed.
●After securing a child restraint sys-
tem, never adjust the seat.
●When a junior seat is installed,
always ensure that the shoulder belt is positioned across the center of the child’s shoulder. The belt
should be kept away from the child’s neck, but not so that it could fall off the child’s shoulder.
●Follow all installation instructions provided by the child restraint sys-
tem manufacturer.
Child restraint system fixed
with an ISOFIX lower
anchorage
Page 65 of 698
63
1
Owners Manual_Europe_M52N75_en
1-2. Child safety
For safety and security
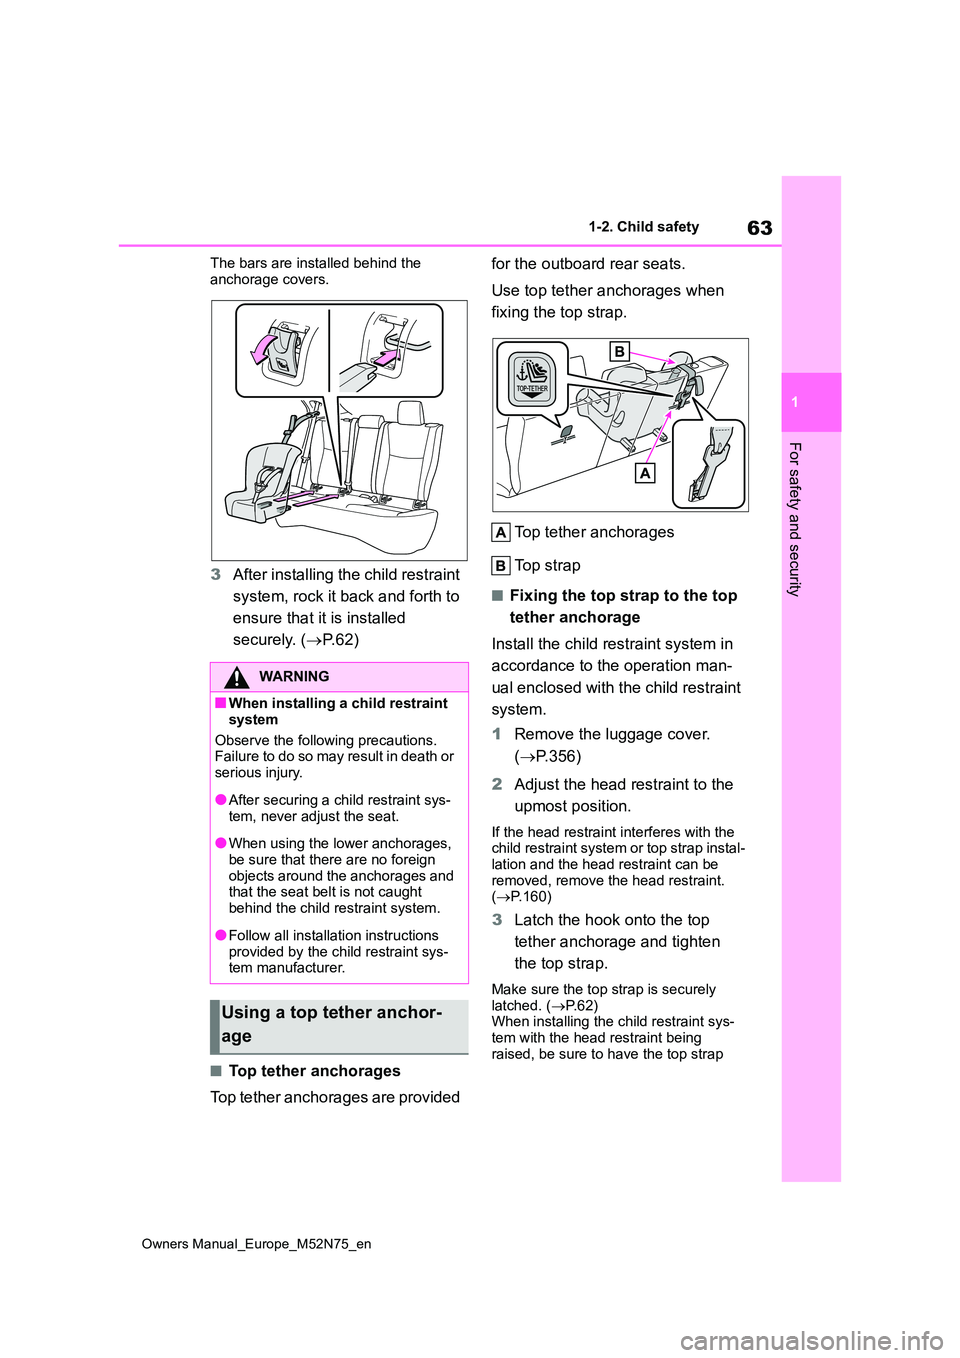
The bars are installed behind the
anchorage covers.
3 After installing the child restraint
system, rock it back and forth to
ensure that it is installed
securely. ( P. 6 2 )
■Top tether anchorages
Top tether anchorages are provided
for the outboard rear seats.
Use top tether anchorages when
fixing the top strap.
Top tether anchorages
Top strap
■Fixing the top strap to the top
tether anchorage
Install the child restraint system in
accordance to the operation man-
ual enclosed with the child restraint
system.
1 Remove the luggage cover.
( P.356)
2 Adjust the head restraint to the
upmost position.
If the head restraint interferes with the child restraint system or top strap instal-
lation and the head restraint can be removed, remove the head restraint. ( P.160)
3Latch the hook onto the top
tether anchorage and tighten
the top strap.
Make sure the top strap is securely latched. ( P. 6 2 ) When installing the child restraint sys-
tem with the head restraint being raised, be sure to have the top strap
WARNING
■When installing a child restraint
system
Observe the following precautions. Failure to do so may result in death or
serious injury.
●After securing a child restraint sys-
tem, never adjust the seat.
●When using the lower anchorages,
be sure that there are no foreign objects around the anchorages and that the seat belt is not caught
behind the child restraint system.
●Follow all installation instructions
provided by the child restraint sys- tem manufacturer.
Using a top tether anchor-
age
Page 79 of 698

77
1
Owners Manual_Europe_M52N75_en
1-4. Hybrid system
For safety and security
slowly discharge. For this reason, be
sure to drive the vehicle at least once every few months for at least 30 minutes or 16 km (10 miles). If the hybrid battery
(traction battery) becomes fully dis- charged and you are unable to start the hybrid system, contact any authorized
Toyota retailer or Toyota authorized repairer, or any reliable repairer.
■Charging the 12-volt battery
P. 4 7 4
■After the 12-volt battery has dis-
charged or when the terminal has been removed and installed during exchange, etc.
The gasoline engine may not stop even if the vehicle is being driven by the hybrid battery (traction battery). If this
continues for a few days, contact any authorized Toyota retailer or Toyota authorized repairer, or any reliable
repairer.
■Sounds and vibrations specific to a hybrid electric vehicle
There may be no engine sound or vibra-
tion even though the vehicle is able to move with the “READY” indicator is illu-minated. For safety, apply the parking
brake and make sure to shift the shift lever to P when parked.
The following sounds or vibrations may
occur when the hybrid system is operat- ing and are not a malfunction:
●Motor sounds may be heard from the engine compartment.
●Sounds may be heard from the hybrid battery (traction battery) under the rear seats when the hybrid system
starts or stops.
●Relay operating sounds such as a
snap or soft clank will be emitted from the hybrid battery (traction battery), under the rear seats, when the hybrid
system is started or stopped.
●Sounds from the hybrid system may
be heard when the back door is open.
●Sounds may be heard from the trans-
mission when the gasoline engine
starts or stops, when driving at low
speeds, or during idling.
●Engine sounds may be heard when
accelerating sharply.
●Sounds may be heard due to regener-
ative braking when the brake pedal is depressed or as the accelerator pedal is released.
●Vibration may be felt when the gaso-line engine starts or stops.
●Cooling fan sounds may be heard from the air intake vent on the side of
the lower part of the rear left seat.
■Maintenance, repair, recycling, and disposal
Contact any authorized Toyota retailer
or Toyota authorized repairer, or any reli- able repairer regarding maintenance, repair, recycling and disposal. Do not
dispose of the vehicle yourself.
■Customization
Some functions can be customized. ( P.494)
When the gasoline engine is off
while driving, a sound is produced
to warn pedestrians, people riding
bicycles or other people and vehi-
cles in the surrounding area that
the vehicle is approaching. The
pitch of the sound adjusts accord-
ing to vehicle speed. When vehicle
speed is approximately 25 km/h (16
mph) or more, the warning system
turns off.
■Acoustic vehicle alerting system
In the following cases, the acoustic vehi- cle alerting system sound may be diffi-cult for pedestrians, people riding
bicycles or other people and vehicles in
Acoustic vehicle alerting
system
Page 162 of 698
160
Owners Manual_Europe_M52N75_en
3-3. Adjusting the seats
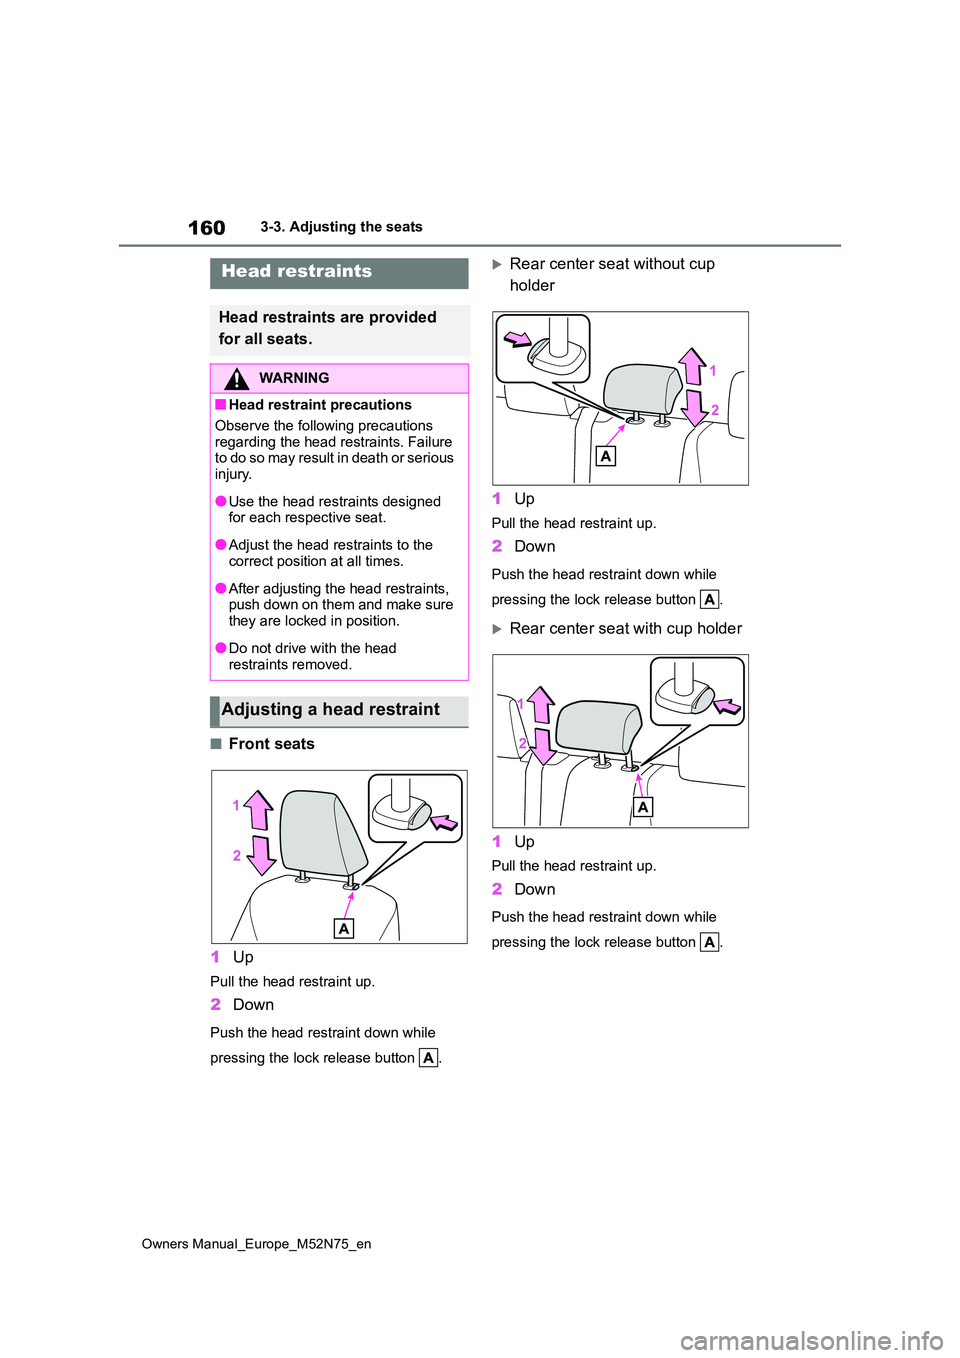
■Front seats
1 Up
Pull the head restraint up.
2Down
Push the head restraint down while
pressing the lock release button .
Rear center seat without cup
holder
1 Up
Pull the head restraint up.
2Down
Push the head restraint down while
pressing the lock release button .
Rear center seat with cup holder
1 Up
Pull the head restraint up.
2Down
Push the head restraint down while
pressing the lock release button .
Head restraints
Head restraints are provided
for all seats.
WARNING
■Head restraint precautions
Observe the following precautions
regarding the head restraints. Failure t o d o so ma y r e su lt i n d ea t h o r s e ri o us injury.
●Use the head restraints designed for each respective seat.
●Adjust the head restraints to the correct position at all times.
●After adjusting the head restraints, push down on them and make sure
they are locked in position.
●Do not drive with the head
restraints removed.
Adjusting a head restraint
Page 164 of 698
162
Owners Manual_Europe_M52N75_en
3-3. Adjusting the seats
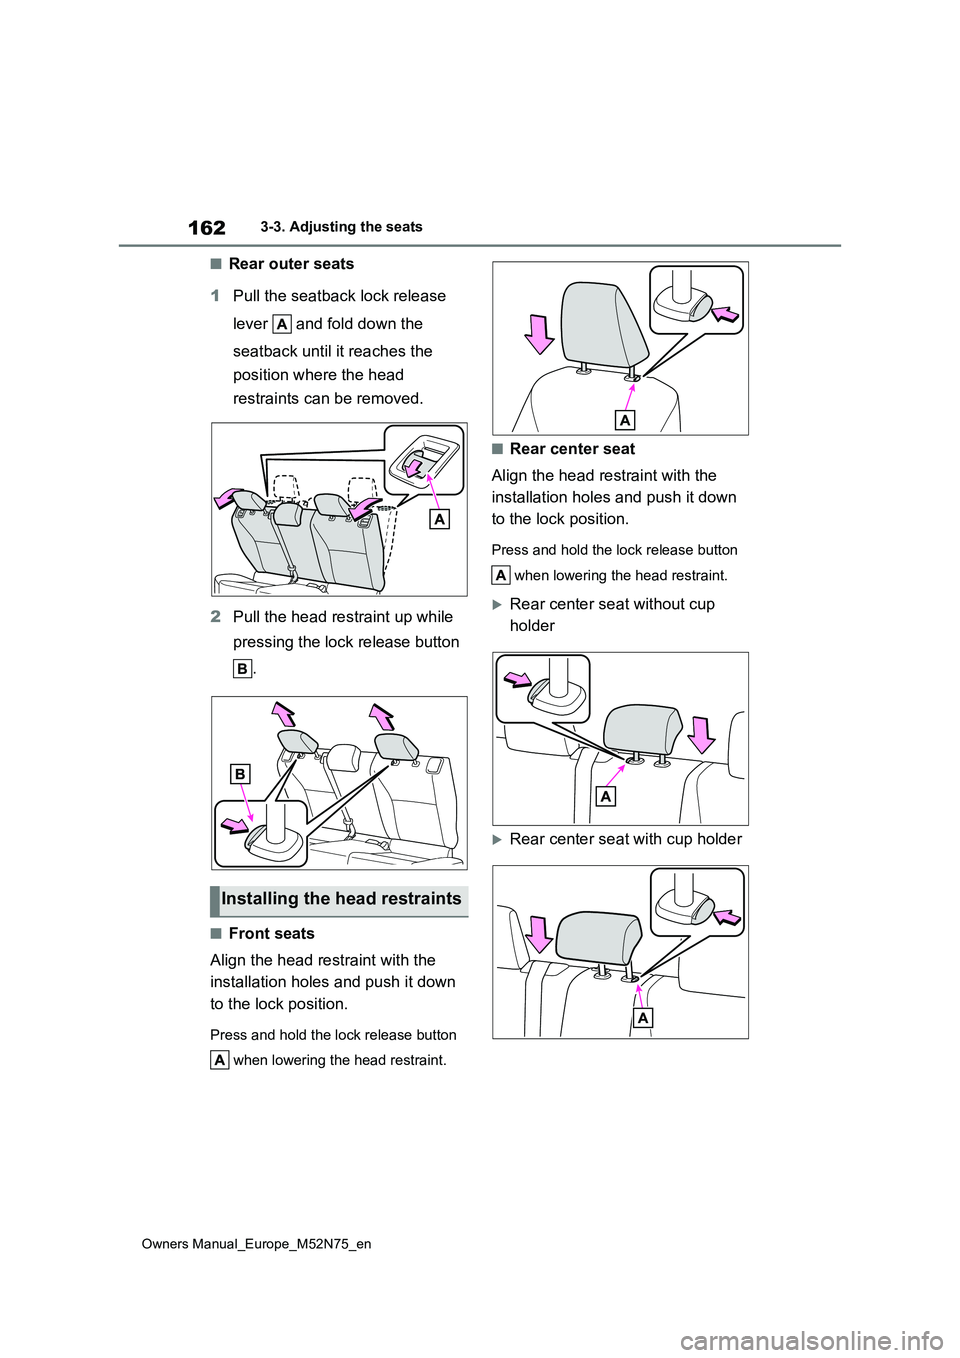
■Rear outer seats
1 Pull the seatback lock release
lever and fold down the
seatback until it reaches the
position where the head
restraints can be removed.
2 Pull the head restraint up while
pressing the lock release button
.
■Front seats
Align the head restraint with the
installation holes and push it down
to the lock position.
Press and hold the lock release button
when lowering the head restraint.
■Rear center seat
Align the head restraint with the
installation holes and push it down
to the lock position.
Press and hold the lock release button
when lowering the head restraint.
Rear center seat without cup
holder
Rear center seat with cup holder
Installing the head restraints
Page 374 of 698
372
Owners Manual_Europe_M52N75_en
6-1. Maintenance and care
WARNING
■Water in the vehicle
●Do not splash or spill liquid in the
vehicle, such as on the floor, in the hybrid battery (traction battery) air intake vent, and in the luggage
compartment. ( P.371) Doing so may cause the hybrid bat-tery, electrical components, etc. to
malfunction or catch fire.
●Do not get any of the SRS compo-
nents or wiring in the vehicle interior wet. ( P. 3 8 ) An electrical malfunction may
cause the airbags to deploy or not function properly, resulting in death or serious injury.
●Vehicles with wireless charger:Do not let the wireless charger
( P.359) get wet. Failure to do so may cause the charger to become hot and cause burns or could cause
electric shock resulting in death or serious injury.
■Cleaning the interior (especially instrument panel)
Do not use a polish wax or polish
cleaner. The instrument panel may reflect off the windshield, obstructing the driver’s view and leading to an
accident, resulting in death or serious injury.
NOTICE
■Cleaning detergents
●Do not use the following types of
detergent, as they may discolor the vehicle interior or cause streaks or damage to painted surfaces:
• Non-seat portions: Organic sub- stances such as benzene or gaso-
line, alkaline or acidic solutions, dye, and bleach
• Seats: Alkaline or acidic solutions, such as thinner, benzene, and alco-hol
●Do not use a polish wax or polish cleaner. The instrument panel’s or
other interior part’s painted surface may be damaged.
■Preventing damage to leather surfaces
Observe the following precautions to
avoid damage to and deterioration of leather surfaces:
●Remove any dust or dirt from
leather surfaces immediately.
●Do not expose the vehicle to direct
sunlight for extended periods of time. Park the vehicle in the shade, especially during summer.
●Do not place items made of vinyl, plastic, or containing wax on the
upholstery, as they may stick to the leather surface if the vehicle interior heats up significantly.
■Water on the floor
Do not wash the vehicle floor with
water. Vehicle systems such as the audio system may be damaged if water
comes into contact with electrical components such as the audio sys-tem above or under the floor of the
vehicle. Water may also cause the body to rust.
■When cleaning the inside of the windshield (vehicles with Toyota Safety Sense)
Do not allow glass cleaner to contact the lens. Also, do not touch the lens. ( P.226)
Page 390 of 698
388
Owners Manual_Europe_M52N75_en
6-3. Do-it-yourself maintenance
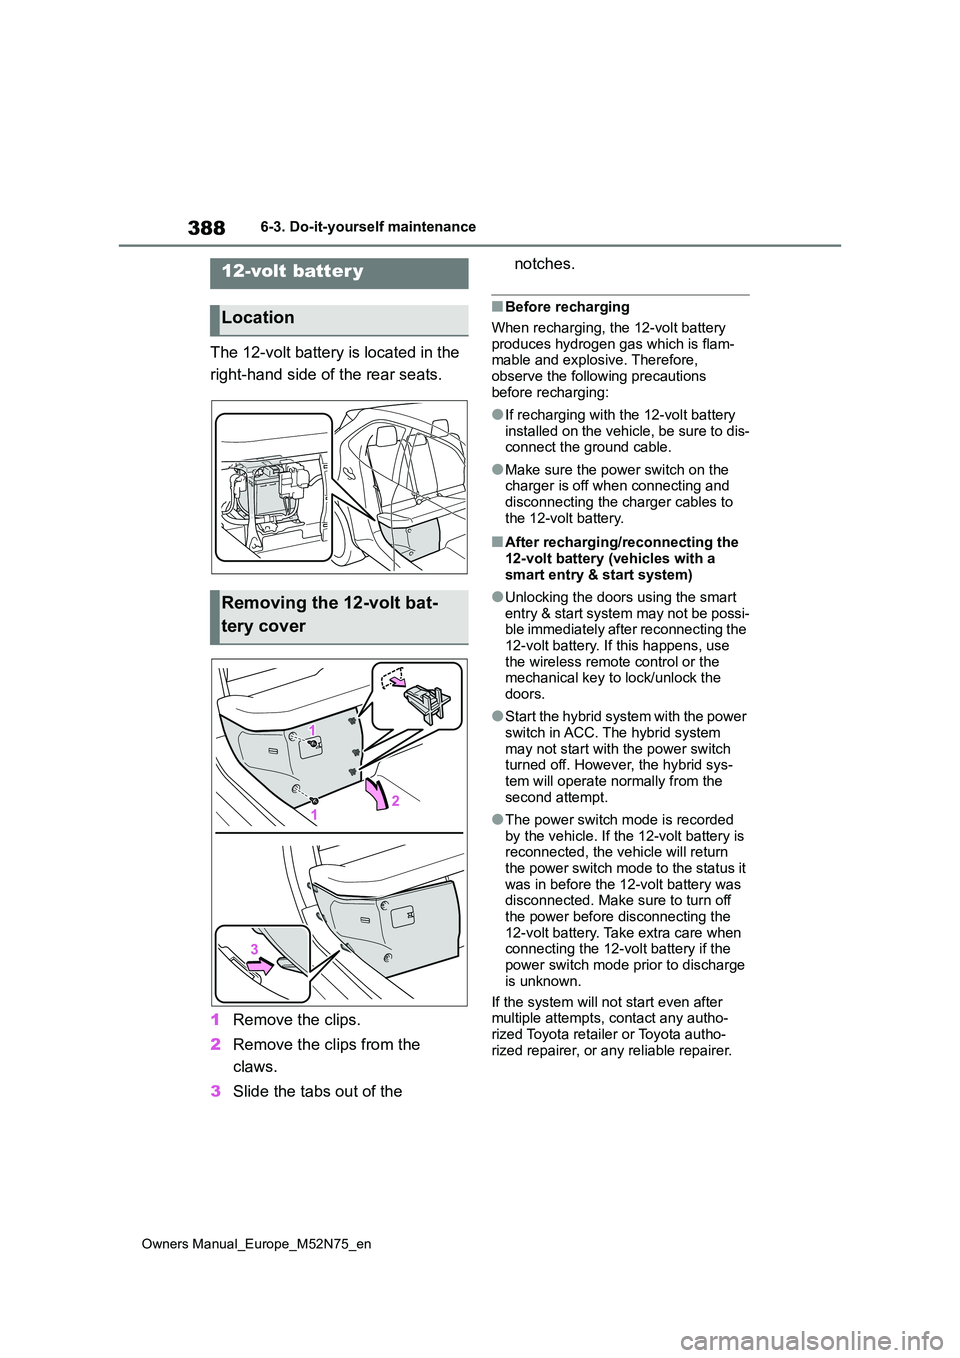
The 12-volt battery is located in the
right-hand side of the rear seats.
1 Remove the clips.
2 Remove the clips from the
claws.
3 Slide the tabs out of the
notches.
■Before recharging
When recharging, the 12-volt battery produces hydrogen gas which is flam-mable and explosive. Therefore,
observe the following precautions before recharging:
●If recharging with the 12-volt battery installed on the vehicle, be sure to dis-connect the ground cable.
●Make sure the power switch on the charger is off when connecting and
disconnecting the charger cables to the 12-volt battery.
■After recharging/reconnecting the 12-volt battery (vehicles with a
smart entry & start system)
●Unlocking the doors using the smart
entry & start system may not be possi- ble immediately after reconnecting the 12-volt battery. If this happens, use
the wireless remote control or the mechanical key to lock/unlock the doors.
●Start the hybrid system with the power switch in ACC. The hybrid system
may not start with the power switch turned off. However, the hybrid sys-tem will operate normally from the
second attempt.
●The power switch mode is recorded
by the vehicle. If the 12-volt battery is reconnected, the vehicle will return the power switch mode to the status it
was in before the 12-volt battery was disconnected. Make sure to turn off the power before disconnecting the
12-volt battery. Take extra care when connecting the 12-volt battery if the power switch mode prior to discharge
is unknown.
If the system will not start even after multiple attempts, contact any autho-
rized Toyota retailer or Toyota autho- rized repairer, or any reliable repairer.
12-volt batter y
Location
Removing the 12-volt bat-
tery cover