2023 TOYOTA VENZA HYBRID ECU
[x] Cancel search: ECUPage 437 of 560
4377-2. Steps to take in an emergency
7
When trouble arises
When using a flat-bed truck to
transport the vehicle, use tire
strapping belts. Refer to the
owner’s manual of the flat-bed
truck for the tire strapping
method.
In order to suppress vehicle move-
ment during transp ortation, set the
parking brake and turn the power
switch off.
If a tow truck is not available in
an emergency, your vehicle may
be temporarily towed using
cables or chains secured to the
emergency towing eyelets.
This should only be attempted
on hard surfaced roads for short
distances at under 18 mph (30
km/h).
A driver must be in the vehicle to
steer and operate the brakes.
The vehicle’s wheels, drive
train, axles, steering and brakes
WARNING
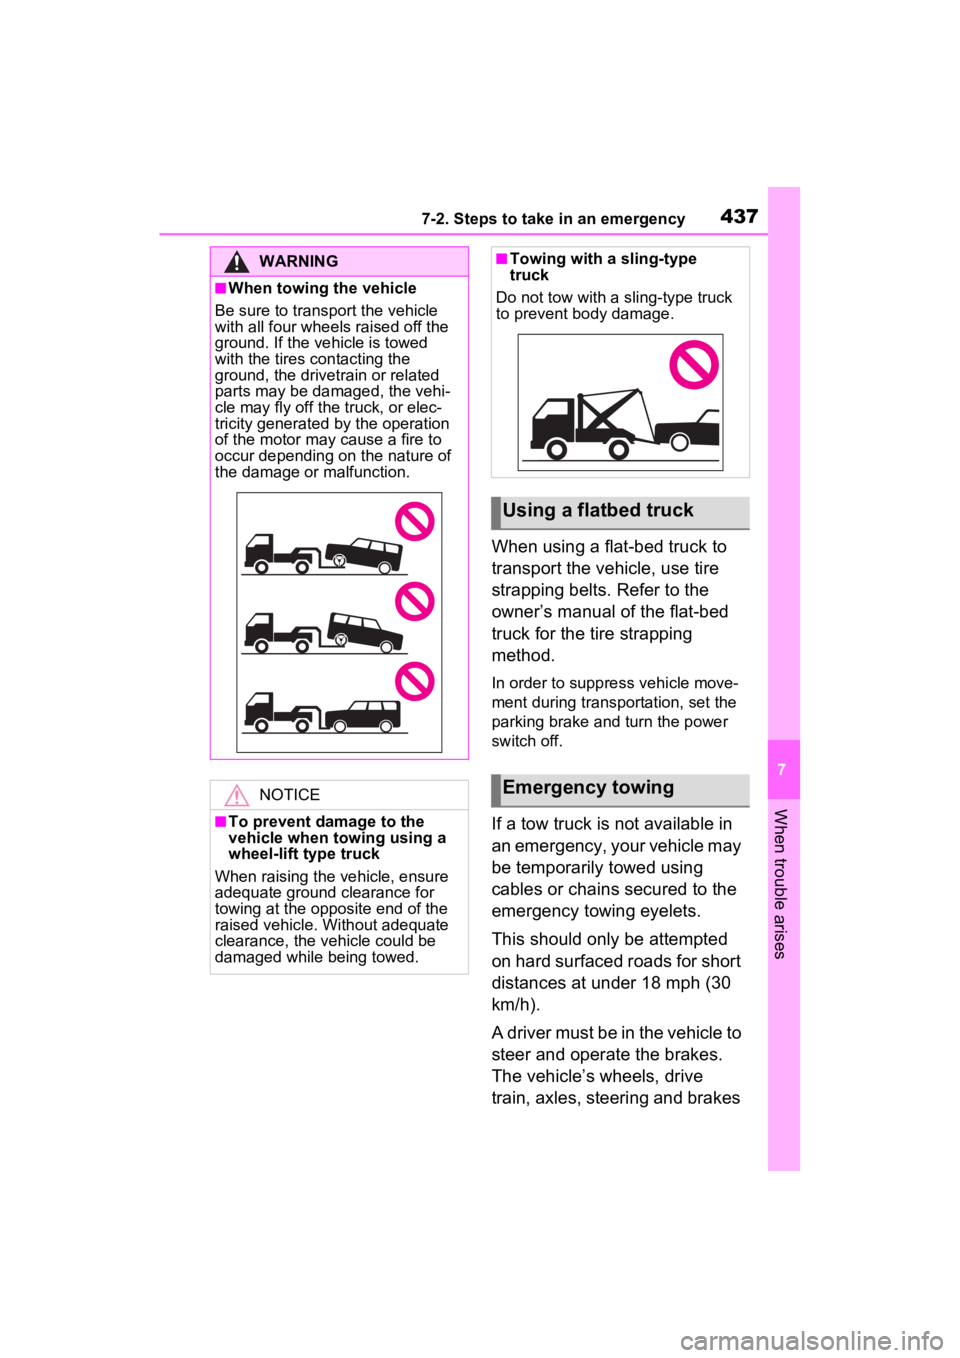
■When towing the vehicle
Be sure to transport the vehicle
with all four wheels raised off the
ground. If the vehicle is towed
with the tires contacting the
ground, the drivetrain or related
parts may be damaged, the vehi-
cle may fly off the truck, or elec-
tricity generated by the operation
of the motor may cause a fire to
occur depending on the nature of
the damage or malfunction.
NOTICE
■To prevent damage to the
vehicle when towing using a
wheel-lift type truck
When raising the vehicle, ensure
adequate ground clearance for
towing at the opposite end of the
raised vehicle. Without adequate
clearance, the vehicle could be
damaged while being towed.
■Towing with a sling-type
truck
Do not tow with a sling-type truck
to prevent body damage.
Using a flatbed truck
Emergency towing
Page 438 of 560
4387-2. Steps to take in an emergency
must be in good condition.
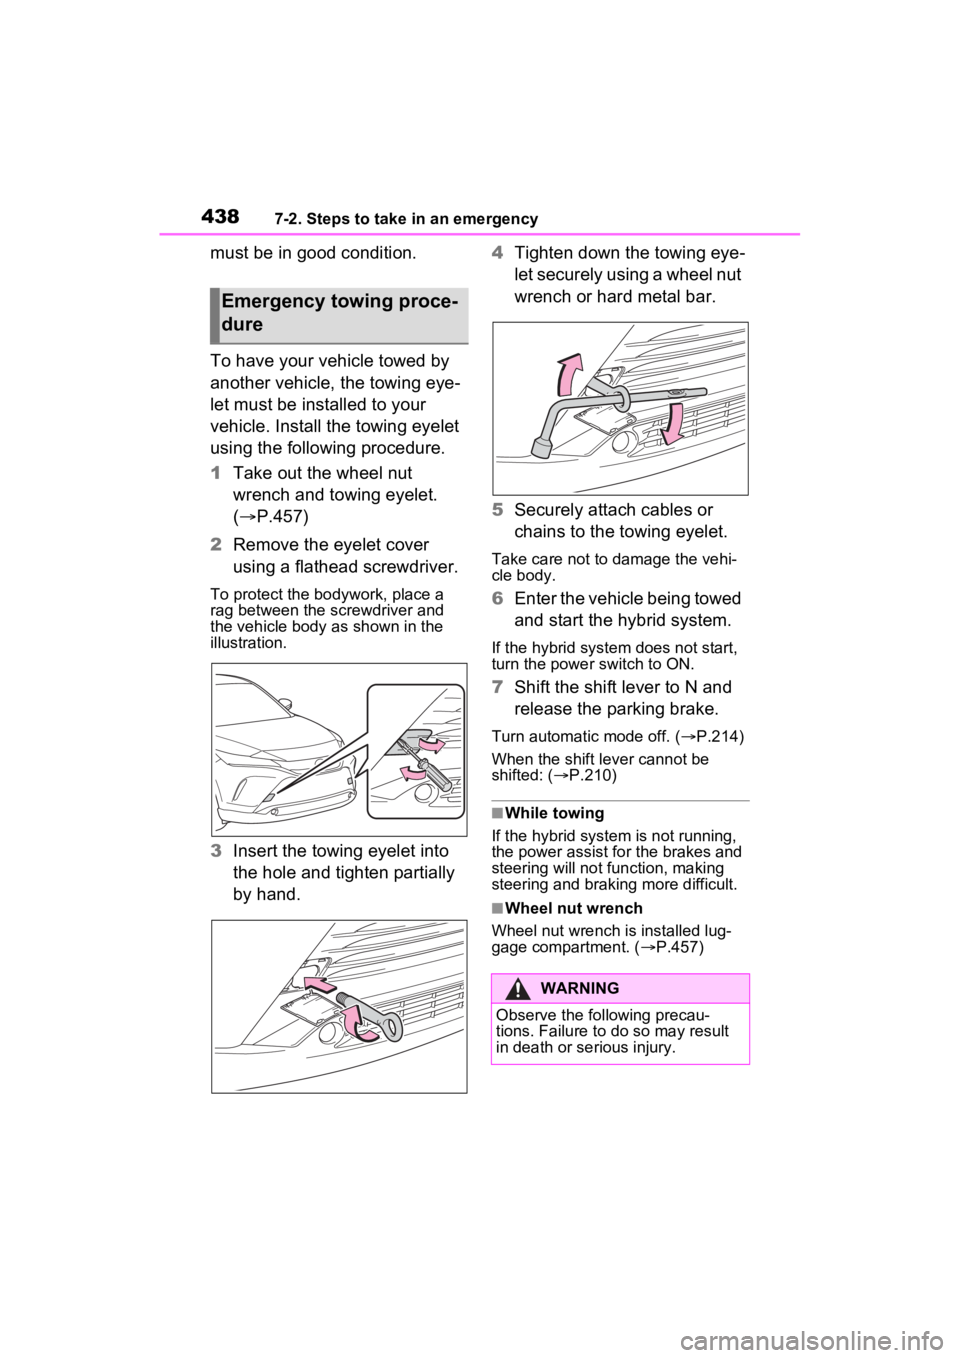
To have your vehicle towed by
another vehicle, the towing eye-
let must be installed to your
vehicle. Install the towing eyelet
using the following procedure.
1Take out the wheel nut
wrench and towing eyelet.
( P.457)
2 Remove the eyelet cover
using a flathead screwdriver.
To protect the bodywork, place a
rag between the screwdriver and
the vehicle body as shown in the
illustration.
3Insert the towing eyelet into
the hole and tighten partially
by hand. 4
Tighten down the towing eye-
let securely using a wheel nut
wrench or hard metal bar.
5 Securely attach cables or
chains to the towing eyelet.
Take care not to damage the vehi-
cle body.
6Enter the vehicle being towed
and start the hybrid system.
If the hybrid system does not start,
turn the power switch to ON.
7Shift the shift lever to N and
release the parking brake.
Turn automatic mode off. ( P.214)
When the shift lever cannot be
shifted: ( P.210)
■While towing
If the hybrid system is not running,
the power assist for the brakes and
steering will not function, making
steering and braking more difficult.
■Wheel nut wrench
Wheel nut wrench is installed lug-
gage compartment. ( P.457)
Emergency towing proce-
dure
WARNING
Observe the following precau-
tions. Failure to do so may result
in death or serious injury.
Page 439 of 560
4397-2. Steps to take in an emergency
7
When trouble arises
Fluid leaks under the vehicle
(Water dripping from the air
conditioning after use is nor-
mal.)
Flat-looking tires or uneven
tire wear
Engine coolant temperature
gauge needle continually
points higher than normal.
Changes in exhaust sound
Excessive tire squeal when
cornering
Strange noises related to the
suspension system
Pinging or other noises
related to the hybrid system
Engine missing, stumbling or
running roughly
Appreciable loss of power
Vehicle pulls heavily to one
WARNING
■While towing
When towing using cables or
chains, avoid sudden starts, etc.
which place excessive stress on
the towing eyelets, cables or
chains. The towing eyelets,
cables or chains may become
damaged, broken debris may hit
people, and cause serious dam-
age.
■Installing towi ng eyelets to
the vehicle
Make sure that towing eyelets are
installed securely. If not securely
installed, towing eyelets may
come loose during towing.
NOTICE
■To prevent damage to the
vehicle during emergency
towing
Do not secure cables or chains to
the suspension components.
If you think something
is wrong
If you notice any of the fol-
lowing symptoms, your
vehicle probably needs
adjustment or repair. Con-
tact your Toyota dealer as
soon as possible.
Visible symptoms
Audible symptoms
Operational symptoms
Page 448 of 560

4487-2. Steps to take in an emergency
an audio sound.
■Front passenger detection sen-
sor, seat belt reminder and
warning buzzer
●If luggage is placed on the front
passenger seat, the front passen-
ger detection sensor may cause
the warning light to flash and the
warning buzzer to sound even if a
passenger is not sitting in the
seat.
●If a cushion is placed on the seat,
the sensor may n ot detect a pas-
senger, and the warning light may
not operate properly.
■SRS warning light
This warning light system monitors
the airbag sensor assembly, front
impact sensors, side impact sensors
(front door), side impact sensors
(front), driver’s seat position sen-
sor, front passeng er occupant clas-
sification sensors, “AIR BAG ON”
indicator light, “AIR BAG OFF” indi-
cator light, front passenger’s seat
belt buckle switch, d river’s seat belt
pretensioner, front passenger’s seat
belt pretensioner and force limiter,
outboard rear seat belt pretension-
ers, airbags, interconnecting wiring
and power sources. ( P.34)
■If the malfunction indicator
lamp comes on while driving
First check the following:
●Is the fuel t ank empty?
If it is, fill the fuel tank immediately.
●Is the fuel tank cap loose?
If it is, tighten it securely.
The light will go o ff after several
driving trips.
If the light does not go off even after
several trips, contact your Toyota
dealer as soon as possible.
■Electric power steering system
warning light (warning buzzer)
When the 12-volt battery charge
becomes insufficien t or the voltage temporarily drops, the electric power
steering system warning light may
come on and the warning buzzer
may sound.
At this time, the functions of the air
conditioning, etc. may be partially
limited in order to reduce the power
consumption of the
12-volt battery.
■When the tire pressure warning
light comes on
Inspect the tires to check if a tire is
punctured.
If a tire is punctured: P.456
If none of the tires are punctured:
Turn the power switch to OFF then
turn it to ON.
Check if the tire pressure warning
light comes on or blinks.
If the tire pressur e warning light
blinks for approximately 1 minute
then stays on
There may be a malfunction in the
tire pressure warning system. Have
the vehicle inspected by your
Toyota dealer immediately.
If the tire pressur e warning light
comes on
1 After the temperature of the tires
has lowered sufficiently, check
the inflation pressure of each tire
and adjust them to the specified
level.
2 If the warning light does not turn
off even after several minutes
have elapsed, check that the
inflation pressure of each tire is
at the specified level and perform
initialization. ( P.406)
■The tire pressure warning light
may come on due to natural
causes
The tire pressure warning light may
come on due to natural causes such
as natural air leaks and tire inflation
pressure changes caused by tem-
perature. In this ca se, adjusting the
tire inflation pressure will turn off the
warning ligh t (after a few minutes).
Page 458 of 560
4587-2. Steps to take in an emergency
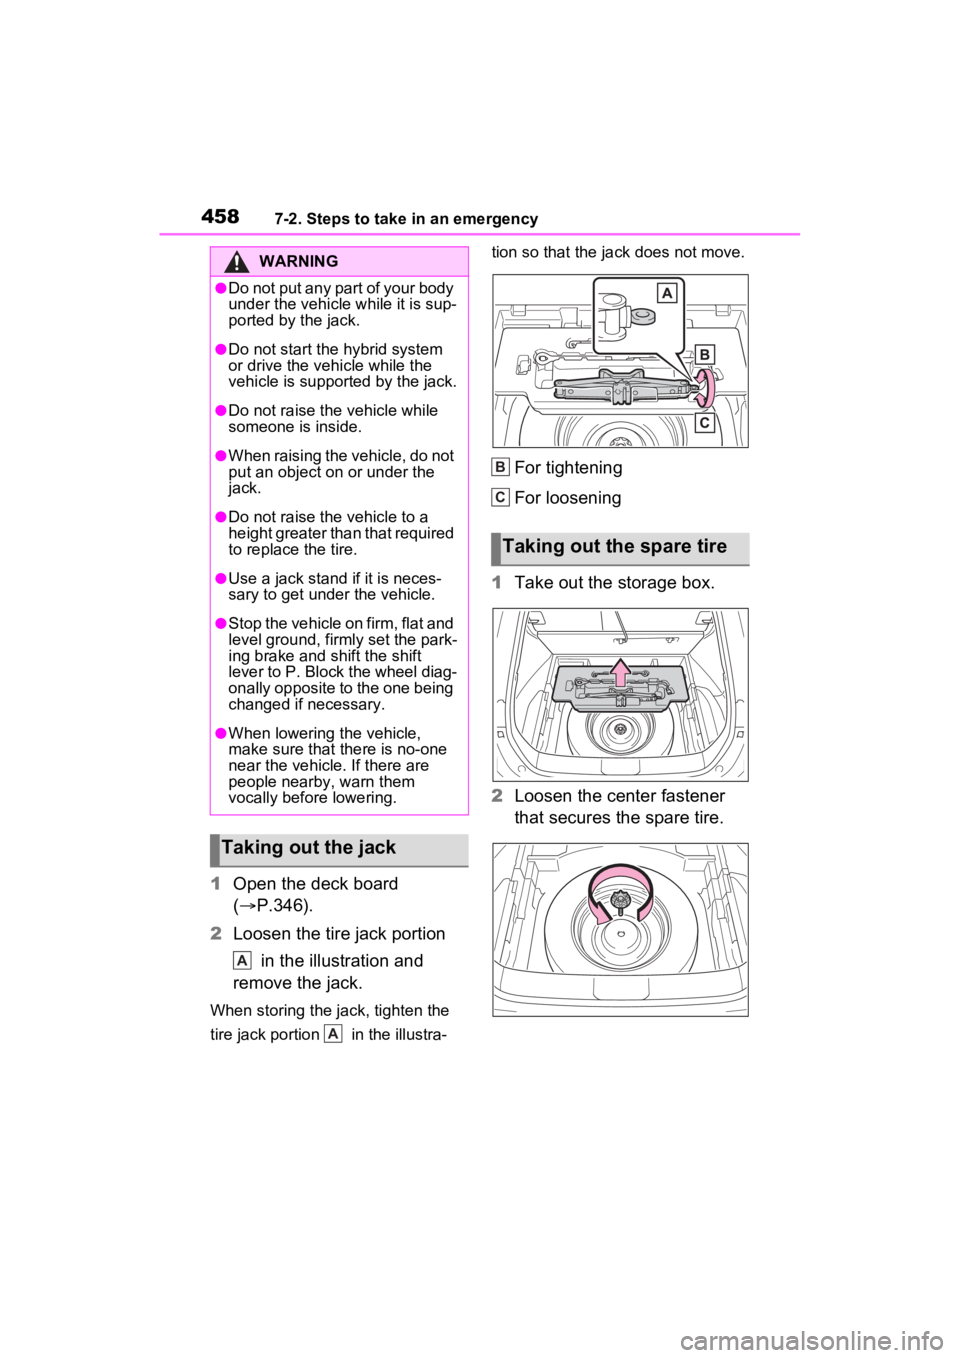
1Open the deck board
( P.346).
2 Loosen the tire jack portion
in the illustration and
remove the jack.
When storing the jack, tighten the
tire jack portion in the illustra- tion so that the ja
ck does not move.
For tightening
For loosening
1 Take out the storage box.
2 Loosen the center fastener
that secures the spare tire.
WARNING
●Do not put any part of your body
under the vehicle while it is sup-
ported by the jack.
●Do not start the hybrid system
or drive the vehicle while the
vehicle is suppor ted by the jack.
●Do not raise the vehicle while
someone is inside.
●When raising the vehicle, do not
put an object on or under the
jack.
●Do not raise the vehicle to a
height greater than that required
to replace the tire.
●Use a jack stand if it is neces-
sary to get under the vehicle.
●Stop the vehicle on firm, flat and
level ground, firm ly set the park-
ing brake and shift the shift
lever to P. Block the wheel diag-
onally opposite to the one being
changed if necessary.
●When lowering the vehicle,
make sure that there is no-one
near the vehicle. If there are
people nearby, warn them
vocally before lowering.
Taking out the jack
A
A
Taking out the spare tire
B
C
Page 462 of 560
4627-2. Steps to take in an emergency
1Replace a rear tire with the com-
pact spare tire.
2 Replace the flat front tire with the
tire removed from the rear of the
vehicle.
3 Fit tire chains to the front tires.
WARNING
■When using the compact
spare tire
●Remember that the compact
spare tire provided is specifi-
cally designed for use with your
vehicle. Do not use your com-
pact spare tire on another vehi-
cle.
●Do not use more than one com-
pact spare tire simultaneously.
●Replace the compact spare tire
with a standard tire as soon as
possible.
●Avoid sudden acceleration,
abrupt steering, sudden brak-
ing and shifting operations that
cause sudden engine braking.
■When the compact spare tire
is attached
The vehicle speed may not be
correctly detecte d, and the follow-
ing systems may not operate cor-
rectly:
• ABS & Brake assist
• VSC
• TRAC
• Dynamic radar cruise control with full-speed range
• PCS (Pre-Collision System)
• EPS
• LTA (Lane Tracing Assist)
• Tire pressure warning system
• AHB (Automatic High Beam)
• BSM
• RCTA
• Panoramic view monitor (if equipped)
• Toyota parking assist monitor (if equipped)
• Intuitive parking assist (if equipped)
• PKSB (if equipped)
• Navigation system (if equipped)
Also, not only c an the following
systems not be ut ilized fully, but
they may actually negatively
affect the drive-train components:
• E-Four (Electronic On-Demand AWD system)
■Speed limit when using the
compact spare tire
Do not drive at speeds in excess
of 50 mph (80 km /h) when a com-
pact spare tire is installed on the
vehicle.
The compact spare tire is not
designed for driving at high
speeds. Failure to observe this
precaution may lead to an acci-
dent causing death or serious
injury.
■After using the tools and jack
Before driving, ma ke sure all the
tools and jack are securely in
place in their storage location to
reduce the possibility of personal
injury during a collision or sudden
braking.
Page 470 of 560

4707-2. Steps to take in an emergency
recharge the 12-volt battery
of your vehicle.
6 Maintain the engine speed of
the second vehicle and start
the hybrid system of your
vehicle by turning the power
switch to ON.
7 Make sure the “READY” indi-
cator comes on. If the indica-
tor light does not come on,
contact your Toyota dealer.
8 Once the hybrid system has
started, remove the jumper
cables in the exact reverse
order from which they were
connected.
9 Close the exclusive jump
starting terminal cover, and
reinstall the fuse box cover to
its original position.
Once the hybrid system starts,
have the vehicle inspected at
your Toyota dealer as soon as
possible.
■Starting the hybrid system
when the 12-volt battery is dis-
charged
The hybrid system cannot be
started by push-starting.
■To prevent 12-vol t battery dis-
charge
●Turn off the headlights and the
audio system while the hybrid sys-
tem is off.
●Turn off any unnec essary electri-
cal components when the vehicle
is running at a low speed for an
extended period, such as in heavy
traffic.
■When the 12-volt battery is
removed or discharged
●Information stored in the ECU is
cleared. When the 12-volt battery
is depleted, have the vehicle
inspected at you r Toyota dealer.
●Some systems may require initial-
ization. (P.515)
■When removing the 12-volt bat-
tery terminals
When the 12-volt battery terminals
are removed, the information stored
in the ECU is cleared. Before
removing the 12-vo lt battery termi-
nals, contact your Toyota dealer.
■Charging the 12-volt battery
The electricity stored in the 12-volt
battery will discha rge gradually even
when the vehicle i s not in use, due
to natural dischar ge and the drain-
ing effects of certain electrical appli-
ances. If the vehicle is left for a long
time, the 12-volt battery may dis-
charge, and the hybrid system may
be unable to start. (The 12-volt bat-
tery recharges automatically while
the hybrid system is operating.)
■When recharging or replacing
the 12-volt battery
●In some cases, it may not be pos-
sible to unlock the doors using the
smart key system when the 12-
volt battery is discharged. Use the
wireless remote c ontrol or the
mechanical key to lock or unlock
the doors.
●The hybrid syste m may not start
on the first attemp t after reinstall-
ing the 12-volt battery. In that
case, start the hybrid system in
the same manner as when the
electronic key does not operate
properly ( P.467). This is not a
malfunction, as the hybrid system
will start normally on the second
attempt.
●The power switch mode is memo-
rized by the vehicle. When the 12-
volt battery is reconnected, the
system will return to the mode it
Page 471 of 560
4717-2. Steps to take in an emergency
7
When trouble arises
was in before the 12-volt battery
was discharged. Before discon-
necting the 12-volt battery, turn
the power switch off.
If you are unsure what mode the
power switch was in before the
12-volt battery discharged, be
especially careful when recon-
necting the 12-volt battery.
●Some systems may require initial-
ization. (P.515)
■When replacing the 12-volt bat-
tery
●Use a 12-volt battery that con-
forms to European regulations.
●Use a battery that the case size is
same as the previous one (LN2),
20 hour rate capacity (20HR) is
equivalent (55Ah) or greater, and
performance rating (CCA) is
equivalent (345A) or greater.
• If the sizes differ, the 12-volt bat-
tery cannot be properly secured.
• If the 20 hour rate capacity is low,
even if the time period where the
vehicle is not used is a short time,
the 12-volt battery may discharge
and hybrid system may not be
able to start.
●Use a ventilation t ype calcium bat-
tery
●Use a 12-volt battery with a han-
dle. If a 12-volt b attery without a
handle is used, removal is more
difficult.
●When removing the 12-volt bat-
tery: P.398
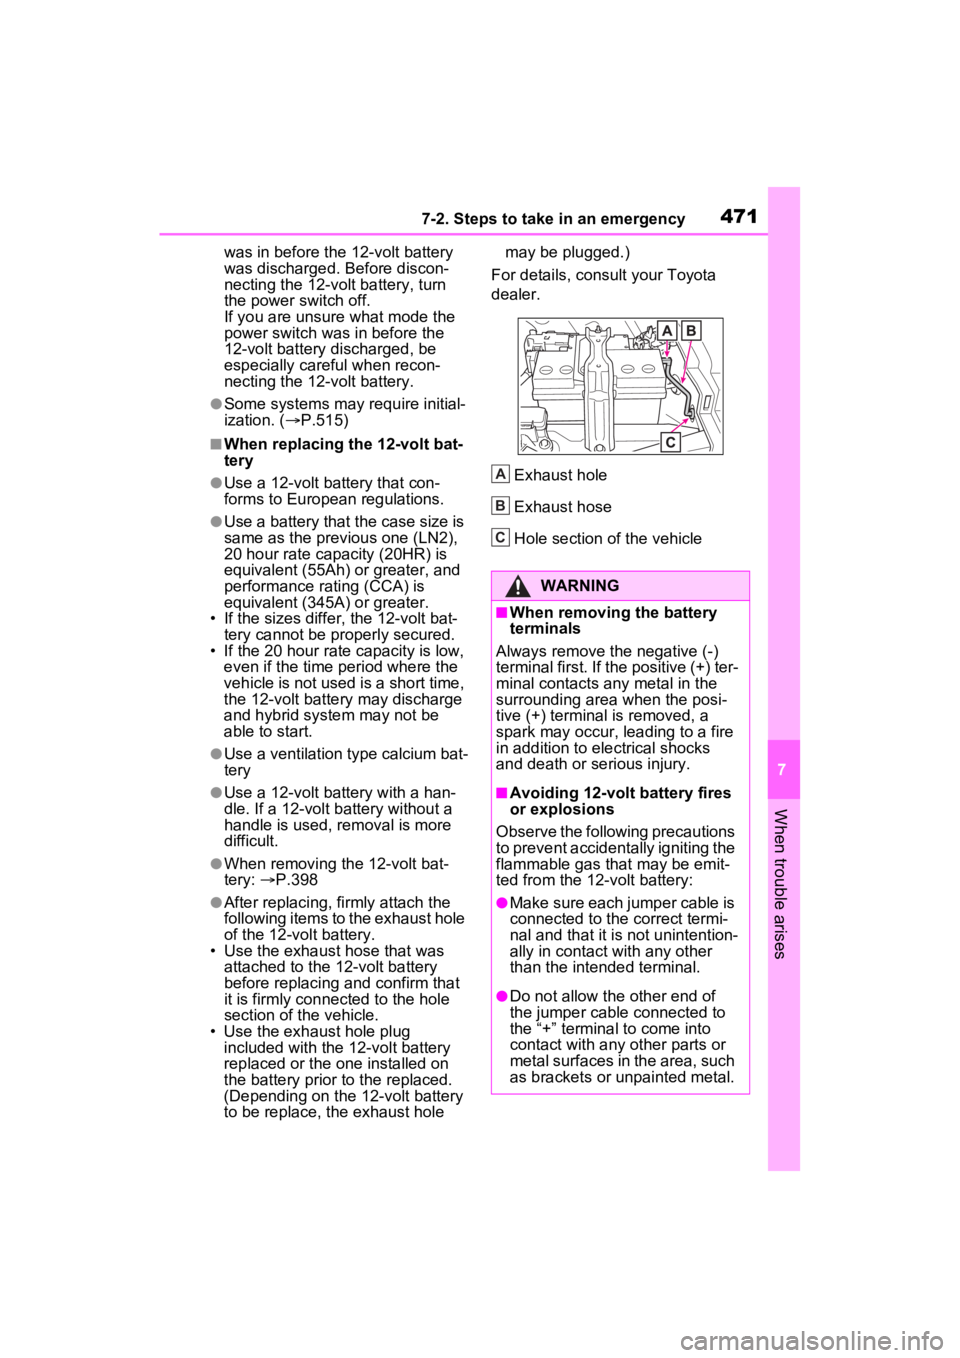
●After replacing, firmly attach the
following items to the exhaust hole
of the 12-volt battery.
• Use the exhaust hose that was attached to the 12-volt battery
before replacing an d confirm that
it is firmly connected to the hole
section of t he vehicle.
• Use the exhaust hole plug
included with the 12-volt battery
replaced or the one installed on
the battery prior to the replaced.
(Depending on the 12-volt battery
to be replace, the exhaust hole may be plugged.)
For details, consu lt your Toyota
dealer.
Exhaust hole
Exhaust hose
Hole section of the vehicle
WARNING
■When removing the battery
terminals
Always remove the negative (-)
terminal first. If the positive (+) ter-
minal contacts any metal in the
surrounding area when the posi-
tive (+) terminal is removed, a
spark may occur, leading to a fire
in addition to ele ctrical shocks
and death or serious injury.
■Avoiding 12-volt battery fires
or explosions
Observe the following precautions
to prevent accidentally igniting the
flammable gas that may be emit-
ted from the 12-volt battery:
●Make sure each jumper cable is
connected to the correct termi-
nal and that it is not unintention-
ally in contact with any other
than the intended terminal.
●Do not allow the other end of
the jumper cable connected to
the “+” terminal to come into
contact with any other parts or
metal surfaces in the area, such
as brackets or unpainted metal.
A
B
C