2023 TOYOTA VENZA HYBRID lock
[x] Cancel search: lockPage 233 of 560
2334-4. Refueling
4
Driving
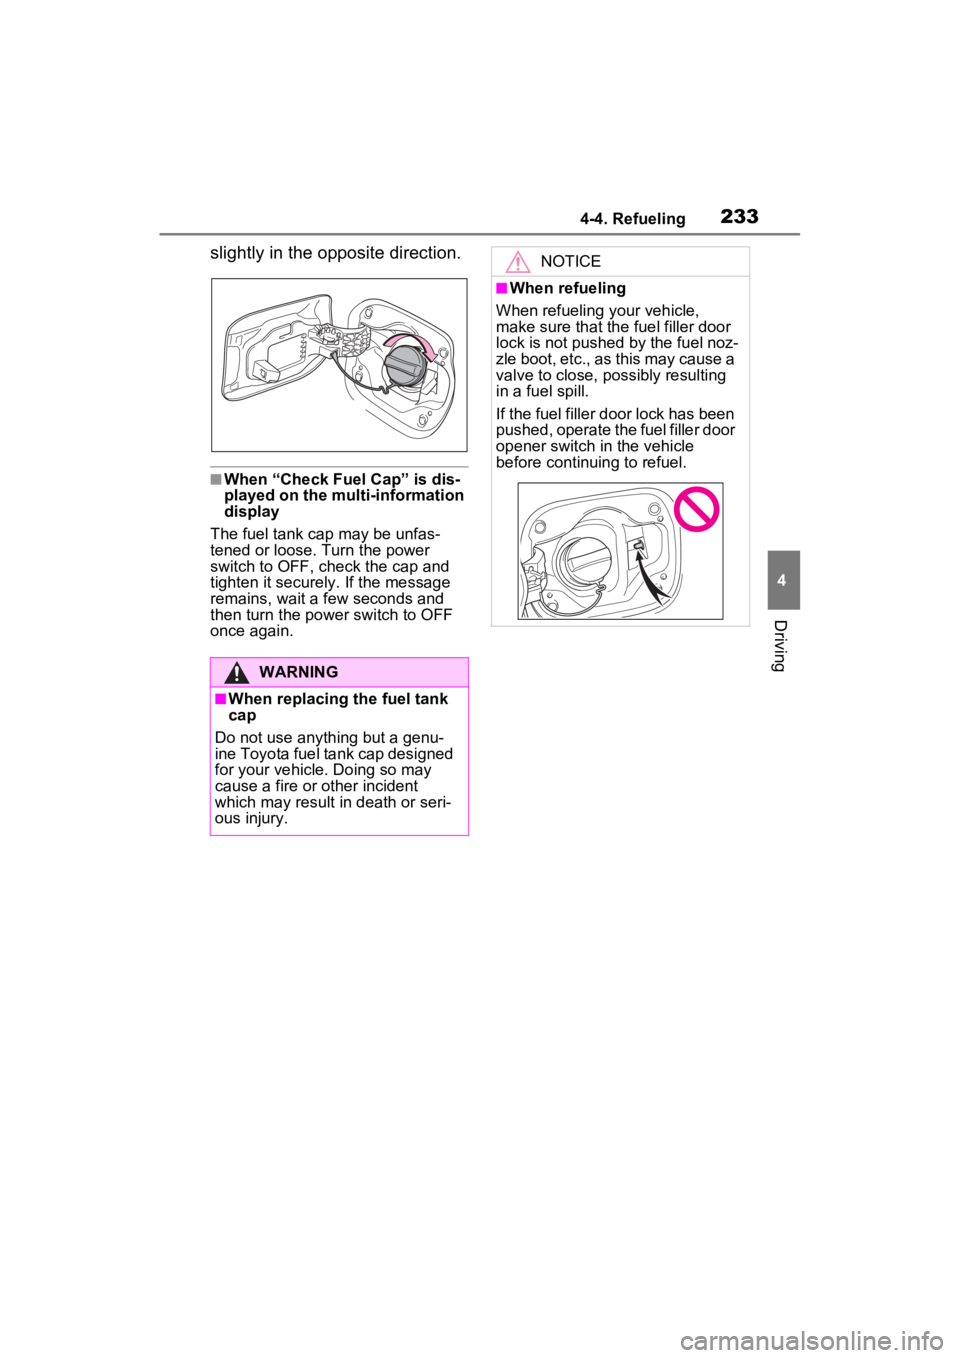
slightly in the opposite direction.
■When “Check Fuel Cap” is dis-
played on the multi-information
display
The fuel tank cap may be unfas-
tened or loose. Turn the power
switch to OFF, check the cap and
tighten it securely. If the message
remains, wait a few seconds and
then turn the power switch to OFF
once again.
WARNING
■When replacing the fuel tank
cap
Do not use anything but a genu-
ine Toyota fuel tank cap designed
for your vehicle. Doing so may
cause a fire or other incident
which may result in death or seri-
ous injury.
NOTICE
■When refueling
When refueling your vehicle,
make sure that the fuel filler door
lock is not pushed by the fuel noz-
zle boot, etc., as this may cause a
valve to close, possibly resulting
in a fuel spill.
If the fuel filler door lock has been
pushed, operate the fuel filler door
opener switch in the vehicle
before continuing to refuel.
Page 249 of 560
2494-5. Using the driving support systems
4
Driving
started the vehicle has not been
driven for a certain amount of time
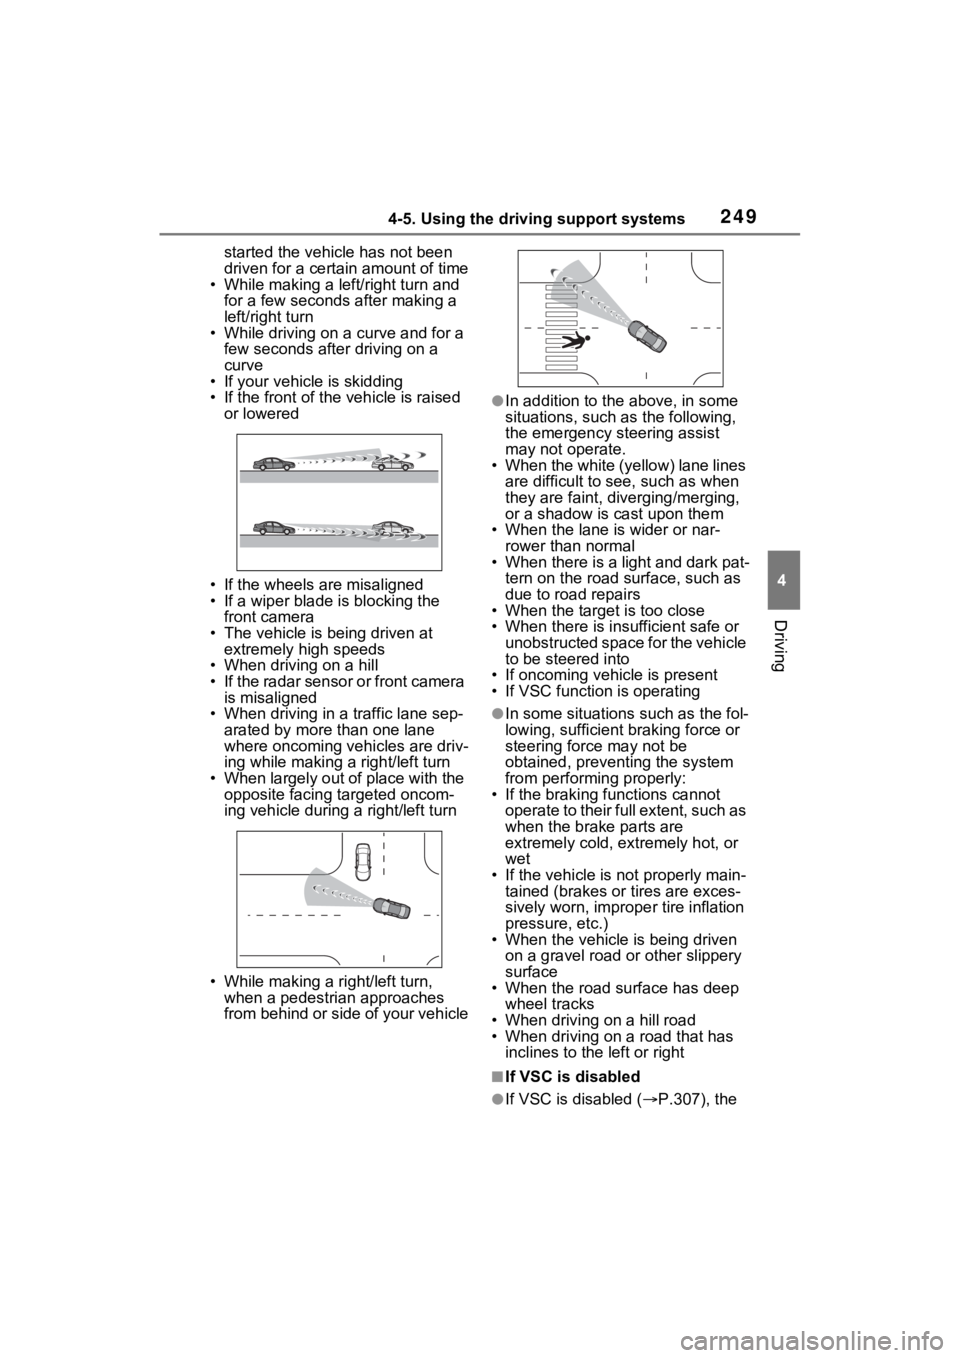
• While making a left/right turn and
for a few seconds after making a
left/right turn
• While driving on a curve and for a
few seconds after driving on a
curve
• If your vehicle is skidding
• If the front of the vehicle is raised
or lowered
• If the wheels are misaligned
• If a wiper blade is blocking the front camera
• The vehicle is being driven at extremely high speeds
• When driving on a hill
• If the radar sensor or front camera
is misaligned
• When driving in a traffic lane sep-
arated by more t han one lane
where oncoming vehicles are driv-
ing while making a right/left turn
• When largely out of place with the opposite facing targeted oncom-
ing vehicle during a right/left turn
• While making a right/left turn, when a pedestrian approaches
from behind or side of your vehicle
●In addition to the above, in some
situations, such as the following,
the emergency steering assist
may not operate.
• When the white (yellow) lane lines are difficult to see, such as when
they are faint, diverging/merging,
or a shadow is cast upon them
• When the lane is wider or nar-
rower than normal
• When there is a light and dark pat- tern on the road surface, such as
due to road repairs
• When the target is too close
• When there is insufficient safe or unobstructed space for the vehicle
to be steered into
• If oncoming vehicle is present
• If VSC function is operating
●In some situations such as the fol-
lowing, sufficient braking force or
steering force may not be
obtained, preventing the system
from performing properly:
• If the braking functions cannot operate to their full extent, such as
when the brake parts are
extremely cold, ext remely hot, or
wet
• If the vehicle is not properly main- tained (brakes or tires are exces-
sively worn, imprope r tire inflation
pressure, etc.)
• When the vehicle is being driven on a gravel road or other slippery
surface
• When the road surface has deep wheel tracks
• When driving on a hill road
• When driving on a road that has inclines to the left or right
■If VSC is disabled
●If VSC is disabled ( P.307), the
Page 305 of 560
3054-5. Using the driving support systems
4
Driving
vated.)
■ECB (Electronically Con-
trolled Brake System)
The electronically controlled
system generates braking force
corresponding to the brake
operation
■ABS (Anti-lock Brake Sys-
tem)
Helps to prevent wheel lock
when the brakes are applied
suddenly, or if the brakes are
applied while driving on a slip-
pery road surface
■Brake assist
Generates an increased level of
braking force after the brake
pedal is depressed when the
system detects a panic stop sit-
uation
Driving assist systems
To keep driving safety and
performance, the following
systems operate automati-
cally in response to various
driving situations. Be
aware, however, that these
systems are supplementary
and should not be relied
upon too heavily when oper-
ating the vehicle.
Summary of the driving
assist systems
Page 314 of 560
3144-6. Driving tips
Perform the following according
to the driving conditions:
Do not try to forcibly open a
window or move a wiper that
is frozen. Pour warm water
over the frozen area to melt
the ice. Wipe away the water
immediately to prevent it from
freezing.
To ensure proper operation of
the climate control system
fan, remove any snow that
has accumulated on the air
inlet vents in front of the wind-
shield.
Check for and remove any
excess ice or snow that may
have accumulated on the
exterior lights, outside rear
view mirrors, windows, vehi-
cle’s roof, chassis, around the
tires or on the brakes.
Remove any snow or mud
from the bottom of your shoes
before getting in the vehicle.
Accelerate the vehicle slowly,
keep a safe distance between
you and the vehicle ahead, and
drive at a reduced speed suit-
able to road conditions.
Turn automatic mode of the parking brake off.
Otherwise, the parking brake
may freeze and not be able to
be released automatically.
Also, avoid using the following as
the parking brake may operate
automatically, even if automatic
mode is off.
• Brake hold system
Park the vehicle and shift the
shift lever to P without setting
the parking brake. The park-
ing brake may freeze up, pre-
venting it from being released.
If the vehicle is parked without
setting the parking brake,
make sure to block the
wheels. Failure to do so may
be dangerous because it may
cause the vehicle to move
unexpectedly, possibly lead-
ing to an accident.
When the parking brake is in
automatic mode, release the
parking brake after shifting
the shift lever to P. ( P.214)
Turn off the power switch
while pulling the parking
brake switch.
If the vehicle is parked without
setting the parking brake,
confirm that the shift lever
cannot be moved out of P.
If the vehicle is left parked
with the brakes damp in cold
temperatures, there is a pos-
sibility of the brakes freezing.
Before driving the vehicle
When driving the vehicle
When parking the vehicle
Page 320 of 560
3205-1. Using the air conditioning system and defogger
5-1.Using the air conditioning system and defogger
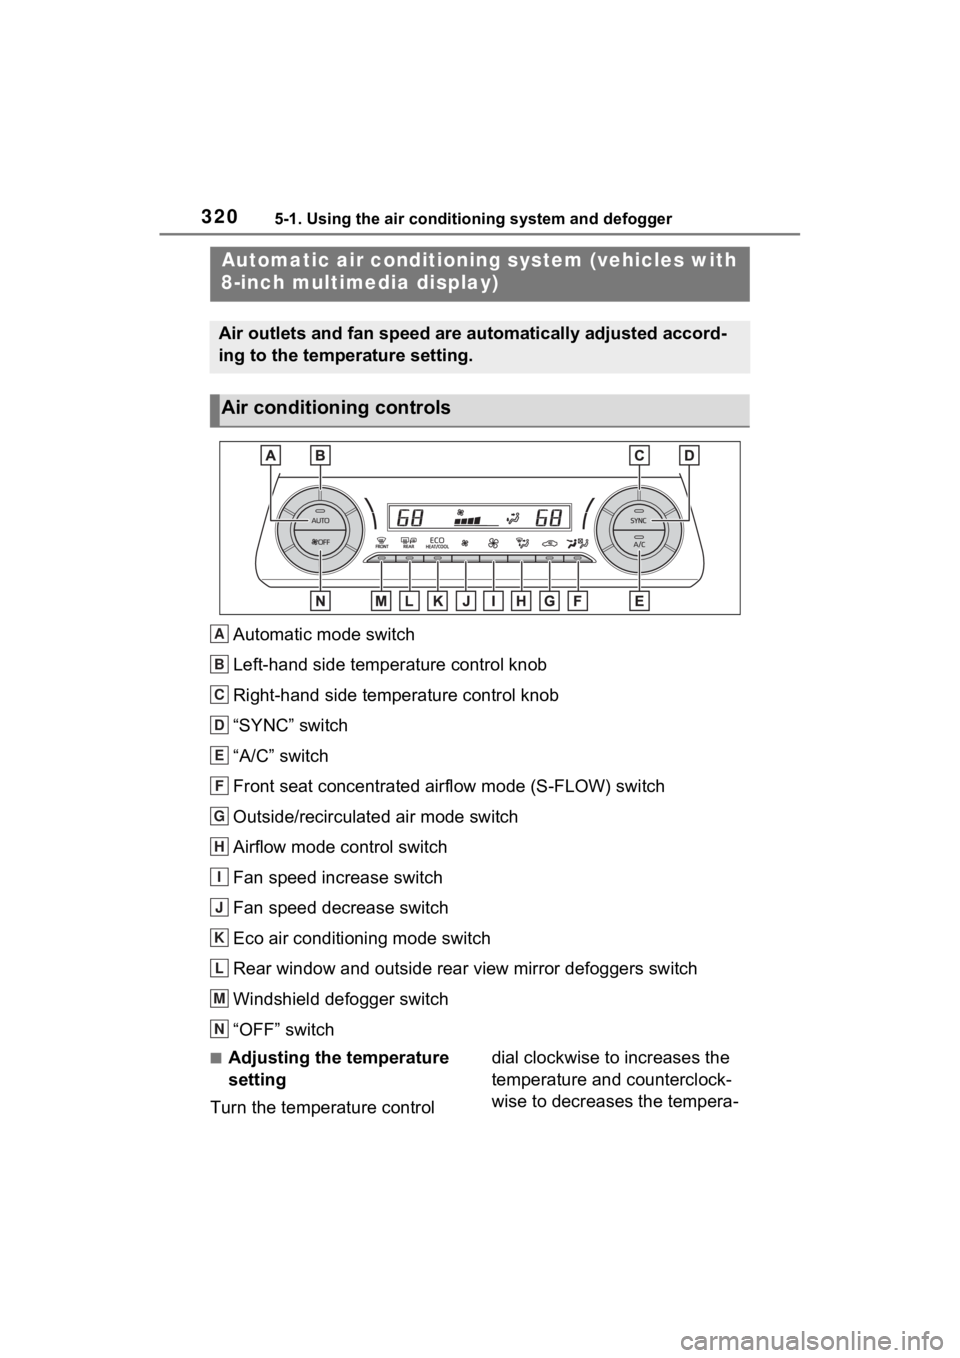
Automatic mode switch
Left-hand side temperature control knob
Right-hand side temperature control knob
“SYNC” switch
“A/C” switch
Front seat concentrated airflow mode (S-FLOW) switch
Outside/recirculated air mode switch
Airflow mode control switch
Fan speed increase switch
Fan speed decrease switch
Eco air conditioning mode switch
Rear window and outside rear view mirror defoggers switch
Windshield defogger switch
“OFF” switch
■Adjusting the temperature
setting
Turn the temperature control dial clockwise to increases the
temperature and counterclock-
wise to decreases the tempera-
Automatic air c
onditioning system (vehicles with
8-inch multimedia display)
Air outlets and fan speed are automatically adjusted accord-
ing to the temperature setting.
Air conditioning controls
A
B
C
D
E
F
G
H
I
J
K
L
M
N
Page 324 of 560
3245-1. Using the air conditioning system and defogger
1Press the “AUTO” switch.
2 Adjust the temperature set-
ting.
3 To stop the operation, press
the “OFF” switch.
If the fan speed setting or air flow modes are operated, the
automatic mode indicator goes
off. However, automatic mode
for functions other than that
operated is maintained.
■Using automatic mode
Fan speed is adjusted automati-
cally according to the temperature
setting and the ambient conditions.
Therefore, the fan may stop for a
while until warm or cool air is ready
to flow immediately after the auto-
matic mode switch is pressed.
To turn on the “SYNC” mode,
press the “SYNC” switch.
The driver’s side temperature con-
trol dial can be used to adjust the
temperature for the driver’s and
passenger’s side. To enter individ-
ual mode, operate the passenger’s
side temperature control dial or
press the “SYNC” switch again.
When the “SYNC” mode is on, the
indicator illuminates on the “SYNC”
switch.
This function automatically con-
trols the air conditioning airflow
so that priority is given to the
front seats. When the front pas-
senger seat is not occupied, air-
flow may switch to only the
WARNING
■To prevent the windshield
from fogging up
Do not use the windshield defog-
ger switch during cool air opera-
tion in extremely humid weather.
The difference between the tem-
perature of the outside air and
that of the windshield can cause
the outer surface of the wind-
shield to fog up, blocking your
vision.
■When the outside rear view
mirror defoggers are operat-
ing
Do not touch the rear view mirror
surfaces when the outside rear
view mirror defoggers are on.
NOTICE
■To prevent 12-volt battery dis-
charge
Do not leave the air conditioning
system on longer than necessary
when the hybrid system is off.
■When repairing/replacing
parts of the air conditioning
system
Have repair/replacement per-
formed by your Toyota dealer.
When a part of th e air condition-
ing system, such as the evapora-
tor, is to be replaced, it must be
replaced with a new one.
Using automatic mode
Adjusting the temperature
for driver and passenger
seats simultaneously
(“SYNC” mode)
Front seat concentrated
airflow mode (S-FLOW)
Page 333 of 560
3335-1. Using the air conditioning system and defogger
5
Interior features
■Changing the air conditioning
control panel touch switch
response
The amount of time takes for a
switch to respond can be changed
through the following operations:
The air conditioning system cannot
be operated while these operations
are performed.
1 Press and hold both the fan
speed decrease switch and auto-
matic mode switch at the same
time for approximately 3 sec-
onds.
A number from “01” to “05” will
be displayed on the driver’s side
temperature section in the
screen.
2 Each time rear window and out-
side rear view mirror defoggers
switch is pressed, the response
time changes as follows:
01 0203 04 05
The smaller the number the quicker
the response time becomes, and
the larger the number the slower the
response time becomes. If touch
operations are not performed for
approximately 5 seconds with the
desired setting displayed, the
screen returns to the normal driver’s
side temperature display and the
setting change completes. After the
setting change completes, all dis-
plays in the monitor section will illu-
minate for a short time. Do not turn
off the power switch during this time.
Setting contents will be erased.
■Turning the air conditioning
control panel touch switch
operation sounds on or off
Operation sounds produced when a
switch is touched can be turned on
or off through the following opera-
tions:
The air conditioning system cannot
be operated while these operations
are performed. 1
Press and hold both the fan
speed increase switch and
“OFF” switch at the same time
for approximately 3 seconds.
“On” or “OFF” will be displayed
on the driver’s side temperature
section in the screen.
2 Each time rear window and out-
side rear view mirror defoggers
switch is pressed, the function
switches between on and off.
If touch operations are not per-
formed for approximately 5 sec-
onds with “On” or “OFF” displayed,
the screen returns to the normal
driver’s side temperature display
and the setting change completes.
After the setting change completes,
all displays in the monitor section
will illuminate for a short time. Do
not turn off the power switch during
this time. Setti ng contents will be
erased.
■Customization
Some functions can be customized.
(Customizable features: P.513)
WARNING
■To prevent the windshield
from fogging up
Do not use the windshield defog-
ger switch during cool air opera-
tion in extremely humid weather.
The difference between the tem-
perature of the outside air and
that of the windshield can cause
the outer surface of the wind-
shield to fog up, blocking your
vision.
■When the outside rear view
mirror defoggers are operat-
ing
Do not touch the rear view mirror
surfaces when the outside rear
view mirror def oggers are on.
Page 340 of 560
3405-2. Using the interior lights
tronic key, whether the doors are
locked/unlocked, and whether the
doors are opened/closed.
●If the interior lights remain on
when the power switch is turned to
OFF, the lights will go off automat-
ically after 20 minutes.
■Interior lights brightness reduc-
tion
The brightness of the following
lights will be reduc ed when shifting
the shift lever to any position other
than P.
●Instrument panel lower illumina-
tion (if equipped)
●Footwell lights (if equipped)
●Upper console lights (if equipped)
●Front console light
●Inside door handle lights (if
equipped)
■The interior lights may turn on
automatically when
If any of the SRS airbags deploy
(inflate) or in the event of a strong
rear impact, the interior lights will
turn on automatically.
The interior lights will turn off auto-
matically after approximately 20
minutes.
The interior lights can be turned off
manually. However, in order to help
prevent further collisions, it is rec-
ommended that they be left on until
safety can be ensured.
(The interior lights may not turn on
automatically depending on the
force of the impact and conditions of
the collision.)
■When the illuminated entry sys-
tem do not turn on
The electronic key battery-saving
function may be activated.( P.155)
■Customization
Setting (e.g. the time elapsed before
the lights turn off) can be changed.
(Customizable features: P.513)
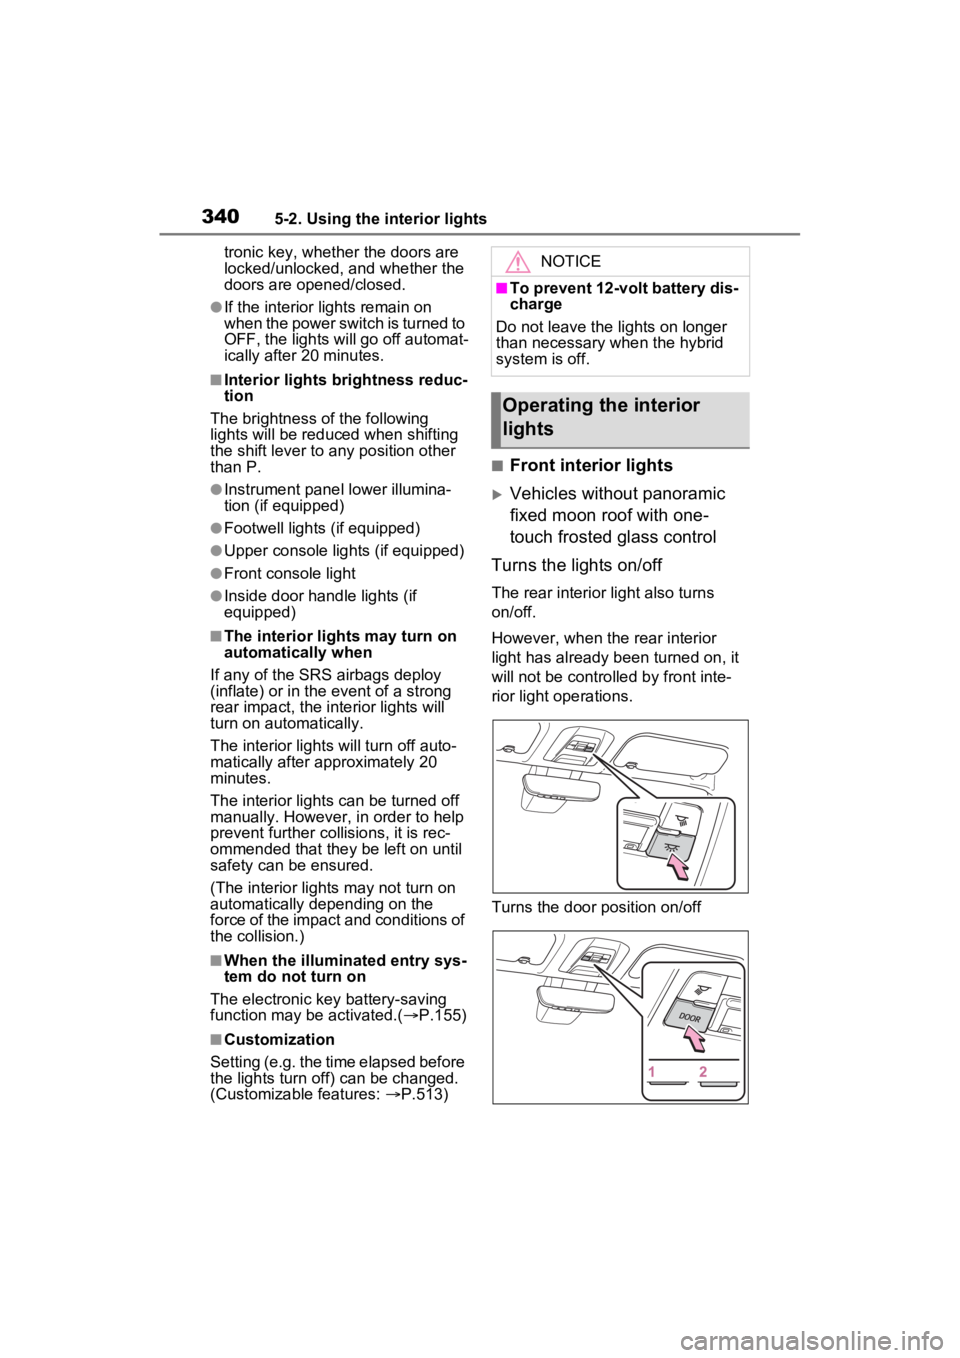
■Front interior lights
Vehicles without panoramic
fixed moon roof with one-
touch frosted glass control
Turns the lights on/off
The rear interior light also turns
on/off.
However, when the rear interior
light has already been turned on, it
will not be controlle d by front inte-
rior light operations.
Turns the door position on/off
NOTICE
■To prevent 12-volt battery dis-
charge
Do not leave the lights on longer
than necessary when the hybrid
system is off.
Operating the interior
lights