2023 TOYOTA VENZA HYBRID lock
[x] Cancel search: lockPage 397 of 560
3976-3. Do-it-yourself maintenance
6
Maintenance and care
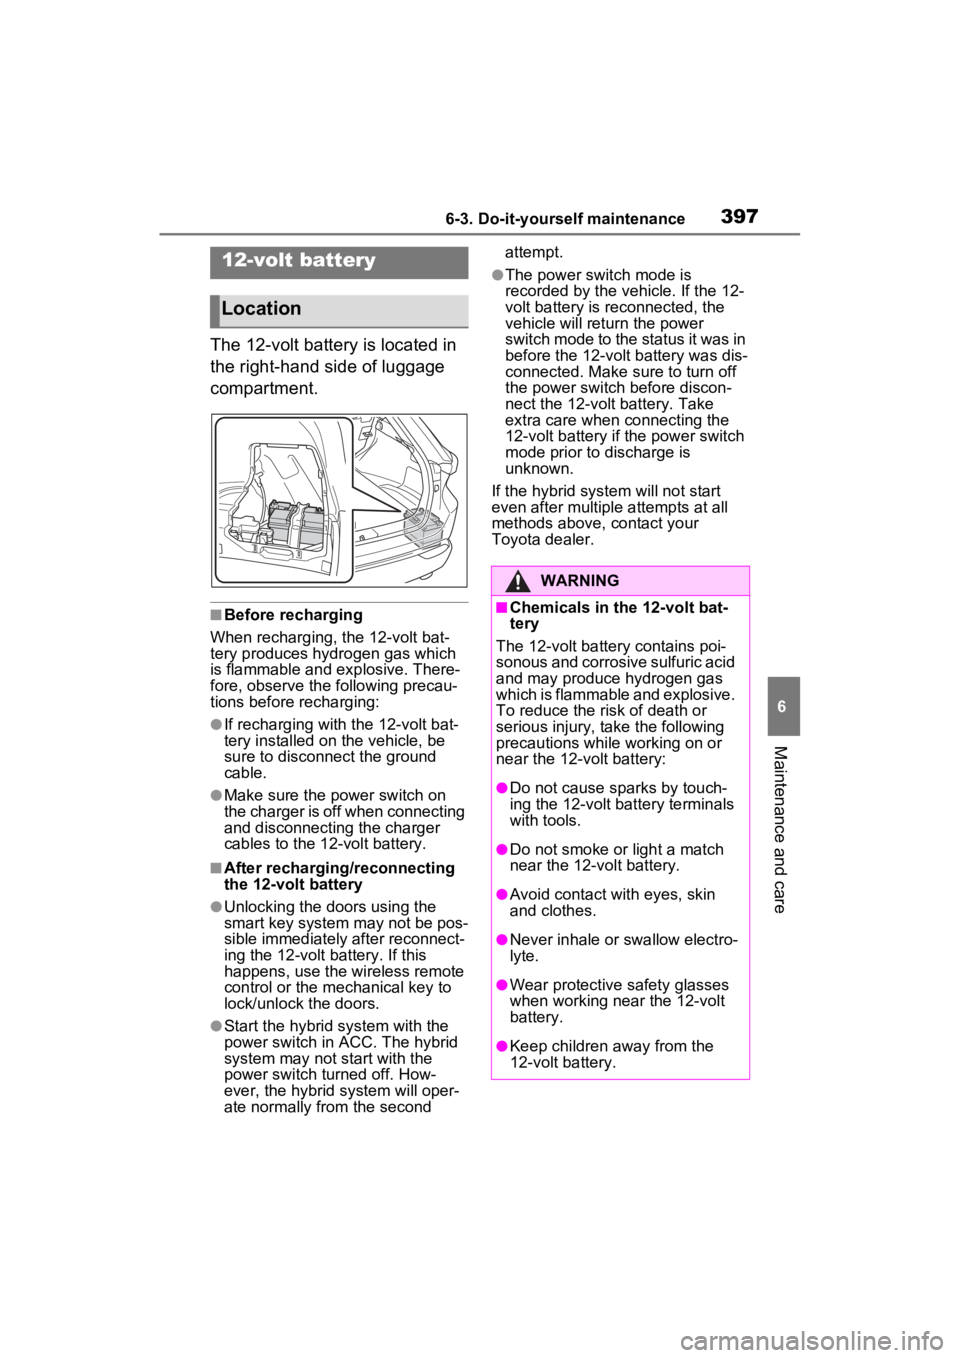
The 12-volt battery is located in
the right-hand side of luggage
compartment.
■Before recharging
When recharging, the 12-volt bat-
tery produces hydrogen gas which
is flammable and explosive. There-
fore, observe the following precau-
tions before recharging:
●If recharging with the 12-volt bat-
tery installed on the vehicle, be
sure to disconnect the ground
cable.
●Make sure the power switch on
the charger is off when connecting
and disconnecting the charger
cables to the 12-volt battery.
■After recharging/reconnecting
the 12-volt battery
●Unlocking the doors using the
smart key system may not be pos-
sible immediately after reconnect-
ing the 12-volt battery. If this
happens, use the wireless remote
control or the mechanical key to
lock/unlock the doors.
●Start the hybrid system with the
power switch in ACC. The hybrid
system may not start with the
power switch turned off. How-
ever, the hybrid system will oper-
ate normally from the second attempt.
●The power switch mode is
recorded by the vehicle. If the 12-
volt battery is reconnected, the
vehicle will return the power
switch mode to the status it was in
before the 1
2-volt battery was dis-
connected. Make sure to turn off
the power switch before discon-
nect the 12-volt battery. Take
extra care when connecting the
12-volt battery if the power switch
mode prior to discharge is
unknown.
If the hybrid system will not start
even after multiple attempts at all
methods above, contact your
Toyota dealer.12-volt battery
Location
WARNING
■Chemicals in the 12-volt bat-
tery
The 12-volt battery contains poi-
sonous and corrosive sulfuric acid
and may produce hydrogen gas
which is flammable and explosive.
To reduce the risk of death or
serious injury, take the following
precautions while working on or
near the 12-volt battery:
●Do not cause sparks by touch-
ing the 12-volt battery terminals
with tools.
●Do not smoke or light a match
near the 12-volt battery.
●Avoid contact with eyes, skin
and clothes.
●Never inhale or swallow electro-
lyte.
●Wear protective safety glasses
when working near the 12-volt
battery.
●Keep children away from the
12-volt battery.
Page 416 of 560
4166-3. Do-it-yourself maintenance
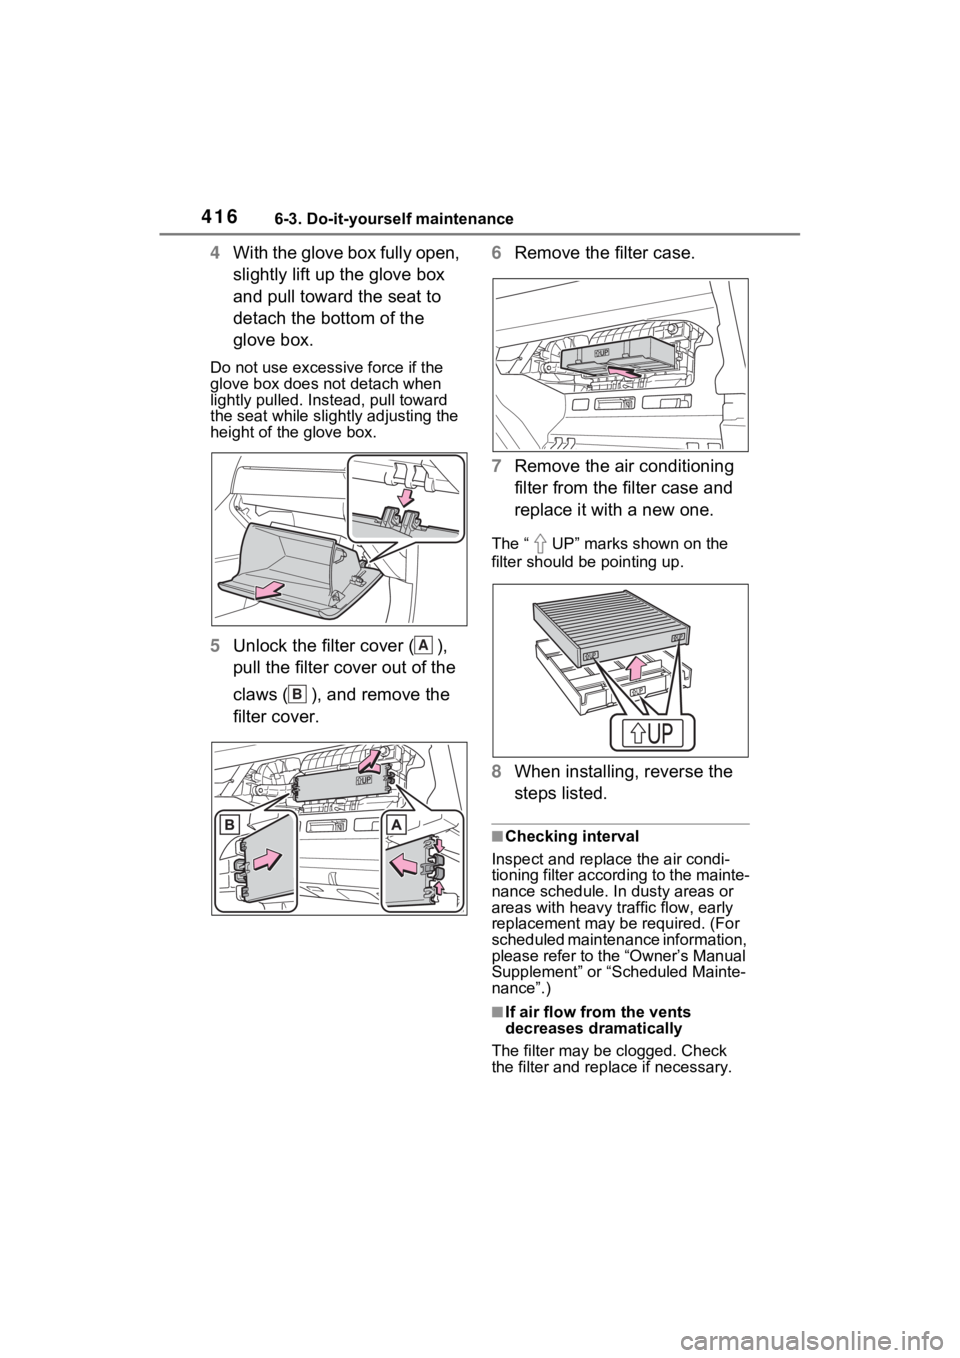
4With the glove box fully open,
slightly lift up the glove box
and pull toward the seat to
detach the bottom of the
glove box.
Do not use excessive force if the
glove box does not detach when
lightly pulled. Ins tead, pull toward
the seat while slightly adjusting the
height of the glove box.
5 Unlock the filter cover ( ),
pull the filter cover out of the
claws ( ), and remove the
filter cover. 6
Remove the filter case.
7 Remove the air conditioning
filter from the filter case and
replace it with a new one.
The “ UP” marks shown on the
filter should be pointing up.
8When installing, reverse the
steps listed.
■Checking interval
Inspect and replace the air condi-
tioning filter according to the mainte-
nance schedule. In dusty areas or
areas with heavy traffic flow, early
replacement may be required. (For
scheduled maintenance information,
please refer to the “Owner’s Manual
Supplement” or “Scheduled Mainte-
nance”.)
■If air flow from the vents
decreases dramatically
The filter may be clogged. Check
the filter and rep lace if necessary.
A
B
Page 423 of 560
4236-3. Do-it-yourself maintenance
6
Maintenance and care
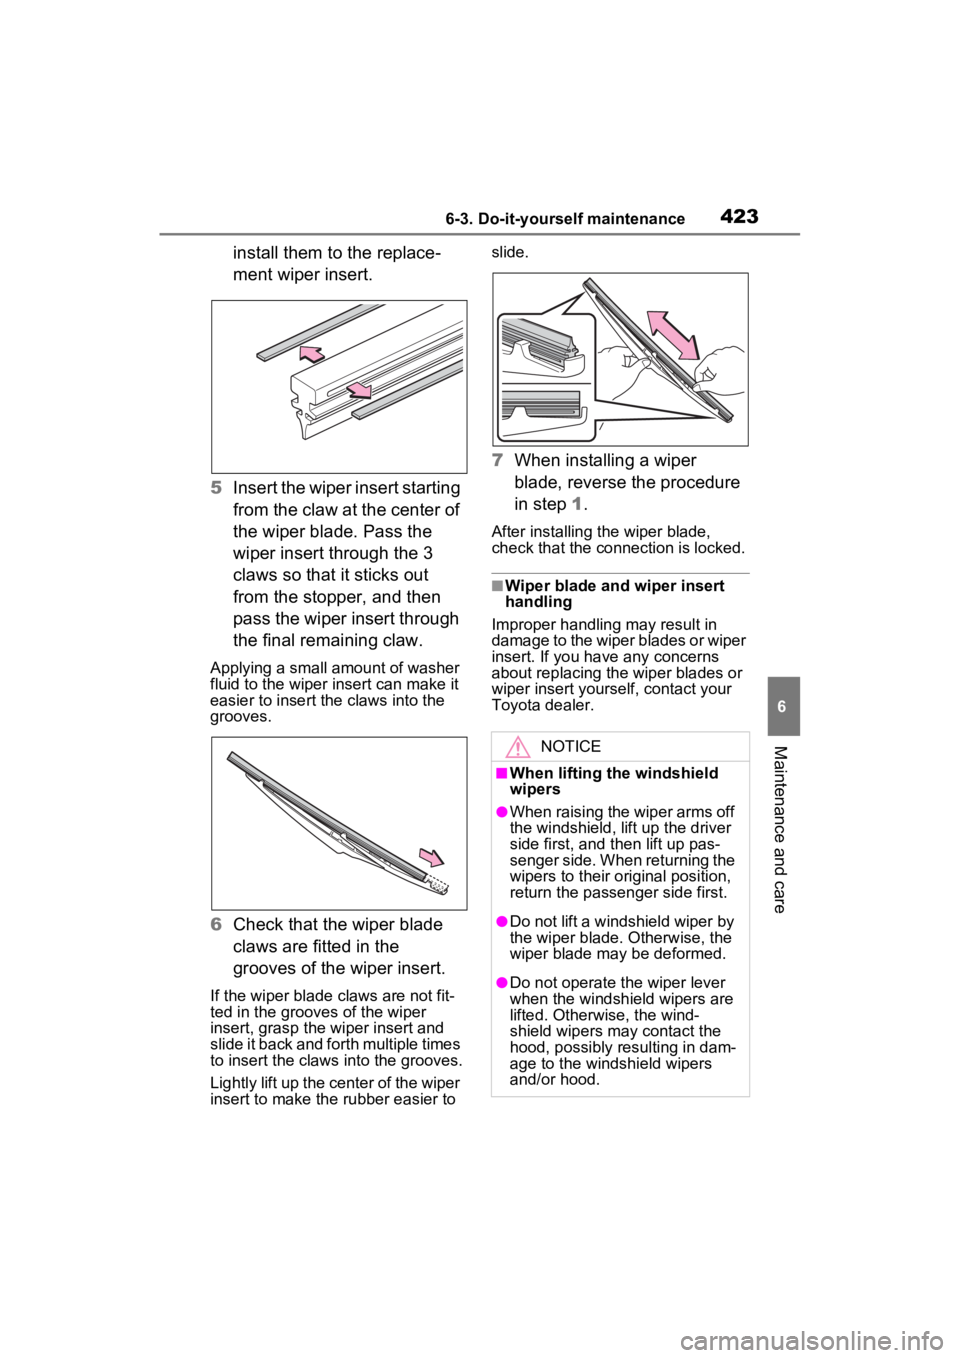
install them to the replace-
ment wiper insert.
5 Insert the wiper insert starting
from the claw at the center of
the wiper blade. Pass the
wiper insert through the 3
claws so that it sticks out
from the stopper, and then
pass the wiper insert through
the final remaining claw.
Applying a small amount of washer
fluid to the wiper insert can make it
easier to insert the claws into the
grooves.
6Check that the wiper blade
claws are fitted in the
grooves of the wiper insert.
If the wiper blade claws are not fit-
ted in the grooves of the wiper
insert, grasp the wiper insert and
slide it back and fo rth multiple times
to insert the claws into the grooves.
Lightly lift up the center of the wiper
insert to make the rubber easier to slide.
7
When installing a wiper
blade, reverse the procedure
in step 1.
After installing the wiper blade,
check that the connection is locked.
■Wiper blade and wiper insert
handling
Improper handling may result in
damage to the wiper blades or wiper
insert. If you have any concerns
about replacing the wiper blades or
wiper insert yourself, contact your
Toyota dealer.
NOTICE
■When lifting the windshield
wipers
●When raising the wiper arms off
the windshield, lift up the driver
side first, and then lift up pas-
senger side. When returning the
wipers to their original position,
return the passenger side first.
●Do not lift a windshield wiper by
the wiper blade. Otherwise, the
wiper blade may be deformed.
●Do not operate the wiper lever
when the windshield wipers are
lifted. Otherwise, the wind-
shield wipers may contact the
hood, possibly resulting in dam-
age to the windshield wipers
and/or hood.
Page 425 of 560
4256-3. Do-it-yourself maintenance
6
Maintenance and care
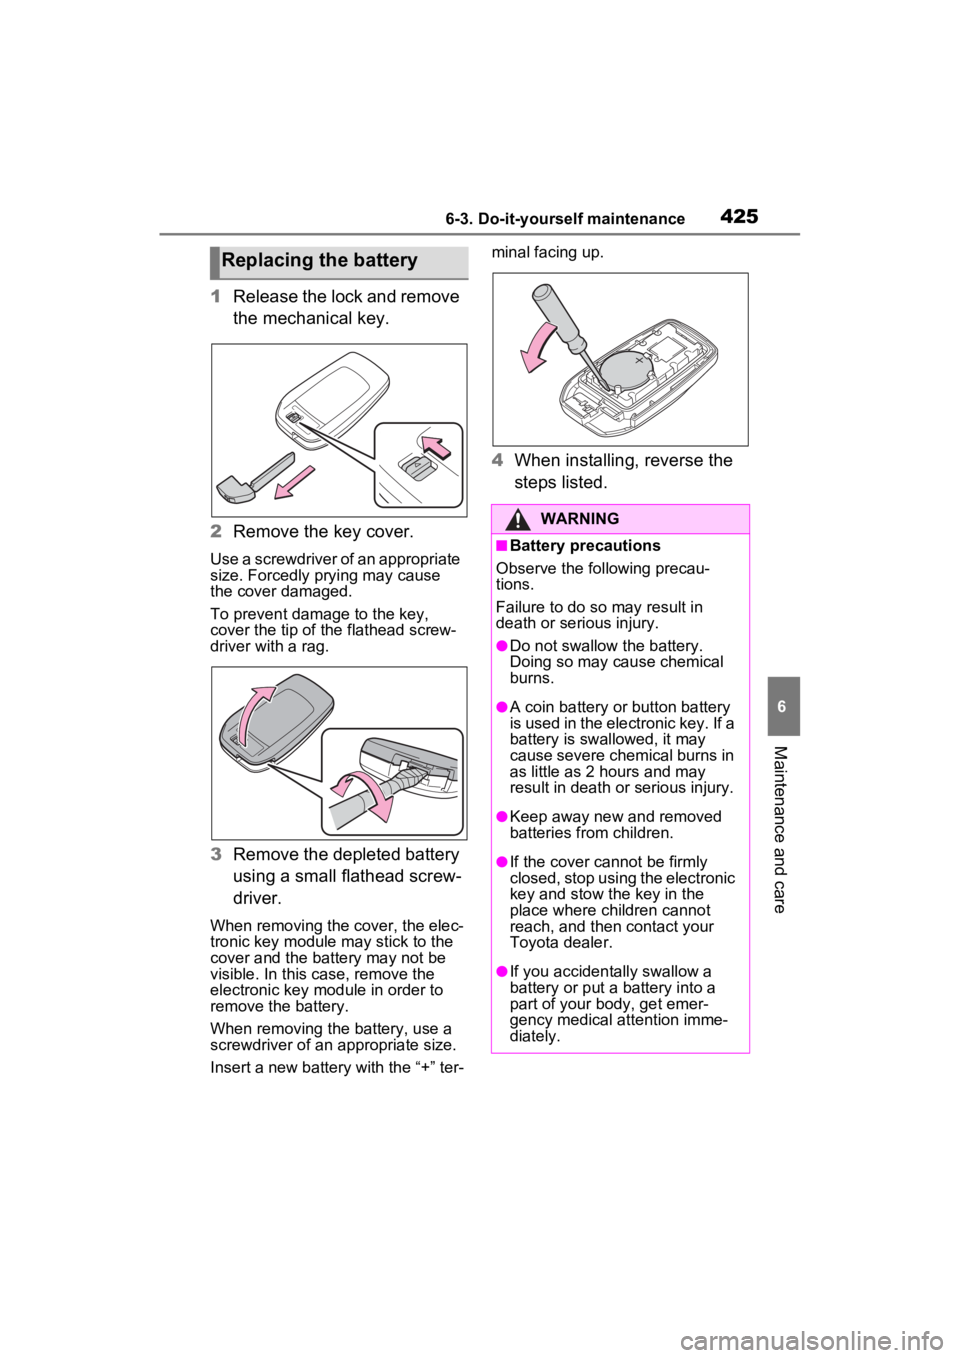
1Release the lock and remove
the mechanical key.
2 Remove the key cover.
Use a screwdriver of an appropriate
size. Forcedly prying may cause
the cover damaged.
To prevent damag e to the key,
cover the tip of the flathead screw-
driver with a rag.
3 Remove the depleted battery
using a small flathead screw-
driver.
When removing the cover, the elec-
tronic key module may stick to the
cover and the battery may not be
visible. In this case, remove the
electronic key module in order to
remove the battery.
When removing the battery, use a
screwdriver of an appropriate size.
Insert a new battery with the “+” ter- minal facing up.
4
When installing, reverse the
steps listed.
Replacing the battery
WARNING
■Battery precautions
Observe the following precau-
tions.
Failure to do so may result in
death or serious injury.
●Do not swallow the battery.
Doing so may cause chemical
burns.
●A coin battery or button battery
is used in the electronic key. If a
battery is swa llowed, it may
cause severe chemical burns in
as little as 2 hours and may
result in death or serious injury.
●Keep away new and removed
batteries from children.
●If the cover cannot be firmly
closed, stop using the electronic
key and stow the key in the
place where children cannot
reach, and then contact your
Toyota dealer.
●If you accidentally swallow a
battery or put a battery into a
part of your b ody, get emer-
gency medical attention imme-
diately.
Page 426 of 560
4266-3. Do-it-yourself maintenance
1Turn the power switch off.
2 Open the fuse box cover.
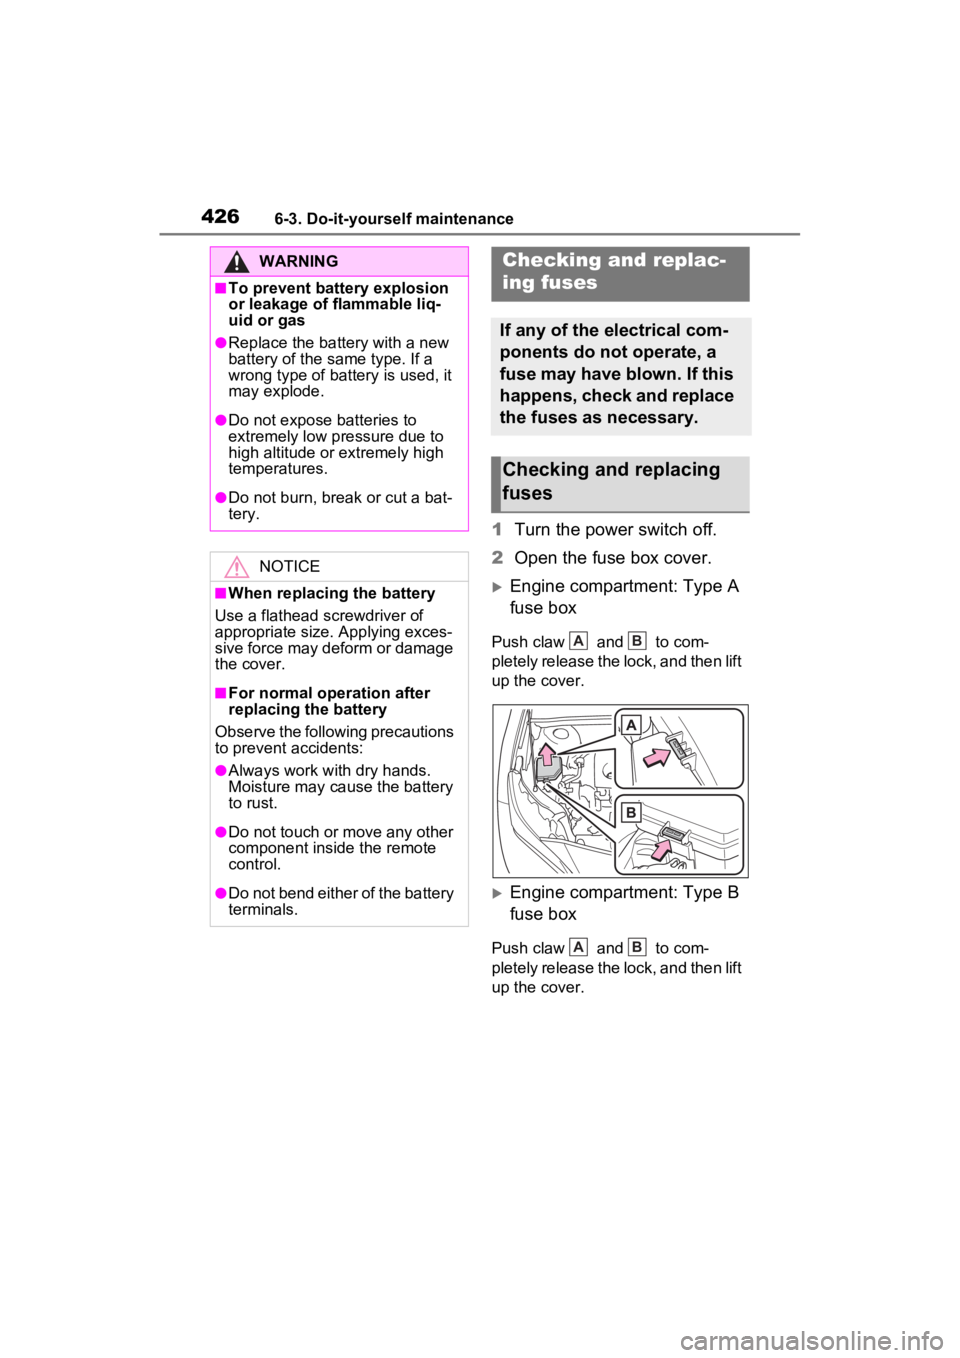
Engine compartment: Type A
fuse box
Push claw and to com-
pletely release the lock, and then lift
up the cover.
Engine compartment: Type B
fuse box
Push claw and to com-
pletely release the lock, and then lift
up the cover.
WARNING
■To prevent battery explosion
or leakage of flammable liq-
uid or gas
●Replace the battery with a new
battery of the same type. If a
wrong type of battery is used, it
may explode.
●Do not expose batteries to
extremely low pressure due to
high altitude or extremely high
temperatures.
●Do not burn, bre ak or cut a bat-
tery.
NOTICE
■When replacing the battery
Use a flathead screwdriver of
appropriate size. Applying exces-
sive force may deform or damage
the cover.
■For normal operation after
replacing the battery
Observe the following precautions
to prevent accidents:
●Always work with dry hands.
Moisture may cau se the battery
to rust.
●Do not touch or move any other
component inside the remote
control.
●Do not bend either of the battery
terminals.
Checking and replac-
ing fuses
If any of the electrical com-
ponents do not operate, a
fuse may have blown. If this
happens, check and replace
the fuses as necessary.
Checking and replacing
fuses
AB
AB
Page 429 of 560
4296-3. Do-it-yourself maintenance
6
Maintenance and care
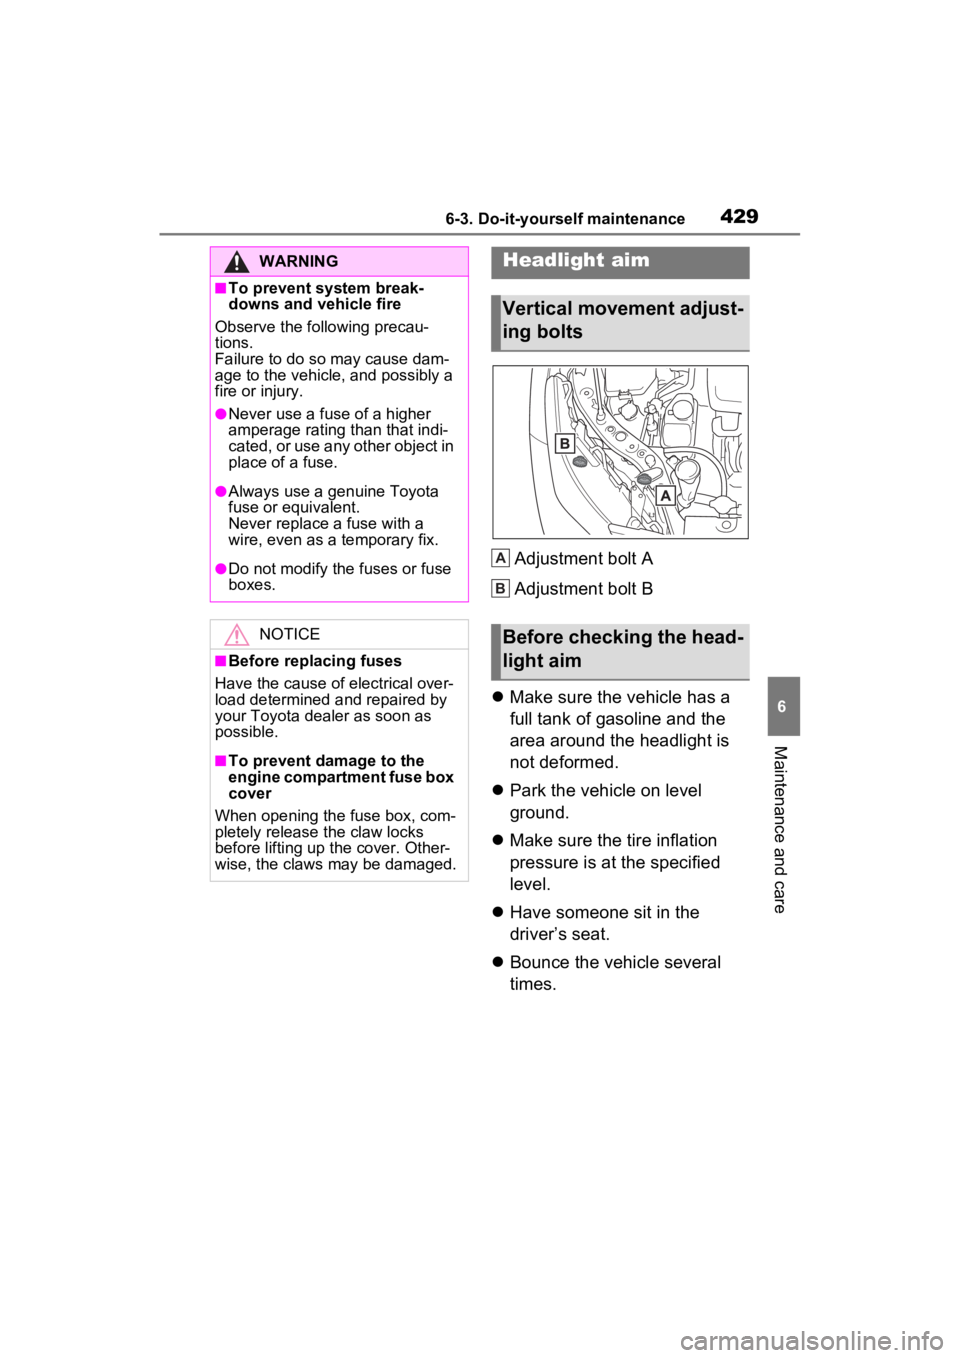
Adjustment bolt A
Adjustment bolt B
Make sure the vehicle has a
full tank of gasoline and the
area around the headlight is
not deformed.
Park the vehicle on level
ground.
Make sure the tire inflation
pressure is at the specified
level.
Have someone sit in the
driver’s seat.
Bounce the vehicle several
times.
WARNING
■To prevent system break-
downs and vehicle fire
Observe the following precau-
tions.
Failure to do so may cause dam-
age to the vehicle, and possibly a
fire or injury.
●Never use a fuse of a higher
amperage rating than that indi-
cated, or use any other object in
place of a fuse.
●Always use a genuine Toyota
fuse or equivalent.
Never replace a fuse with a
wire, even as a temporary fix.
●Do not modify the fuses or fuse
boxes.
NOTICE
■Before replacing fuses
Have the cause of electrical over-
load determined and repaired by
your Toyota dealer as soon as
possible.
■To prevent damage to the
engine compartment fuse box
cover
When opening the fuse box, com-
pletely release the claw locks
before lifting up the cover. Other-
wise, the claws may be damaged.
Headlight aim
Vertical movement adjust-
ing bolts
Before checking the head-
light aim
A
B
Page 458 of 560
4587-2. Steps to take in an emergency
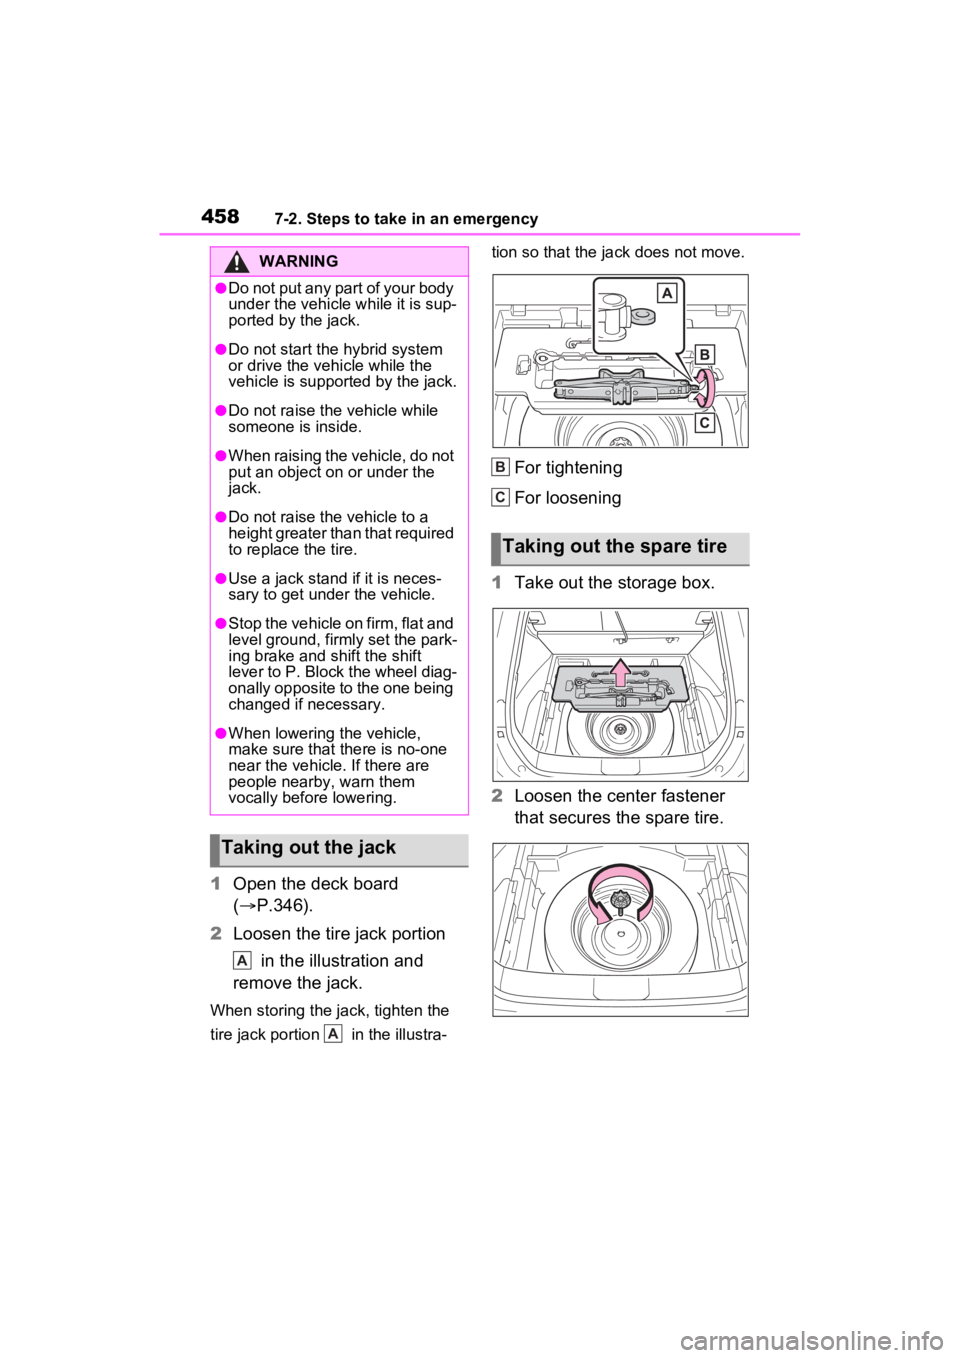
1Open the deck board
( P.346).
2 Loosen the tire jack portion
in the illustration and
remove the jack.
When storing the jack, tighten the
tire jack portion in the illustra- tion so that the ja
ck does not move.
For tightening
For loosening
1 Take out the storage box.
2 Loosen the center fastener
that secures the spare tire.
WARNING
●Do not put any part of your body
under the vehicle while it is sup-
ported by the jack.
●Do not start the hybrid system
or drive the vehicle while the
vehicle is suppor ted by the jack.
●Do not raise the vehicle while
someone is inside.
●When raising the vehicle, do not
put an object on or under the
jack.
●Do not raise the vehicle to a
height greater than that required
to replace the tire.
●Use a jack stand if it is neces-
sary to get under the vehicle.
●Stop the vehicle on firm, flat and
level ground, firm ly set the park-
ing brake and shift the shift
lever to P. Block the wheel diag-
onally opposite to the one being
changed if necessary.
●When lowering the vehicle,
make sure that there is no-one
near the vehicle. If there are
people nearby, warn them
vocally before lowering.
Taking out the jack
A
A
Taking out the spare tire
B
C
Page 467 of 560
4677-2. Steps to take in an emergency
7
When trouble arises
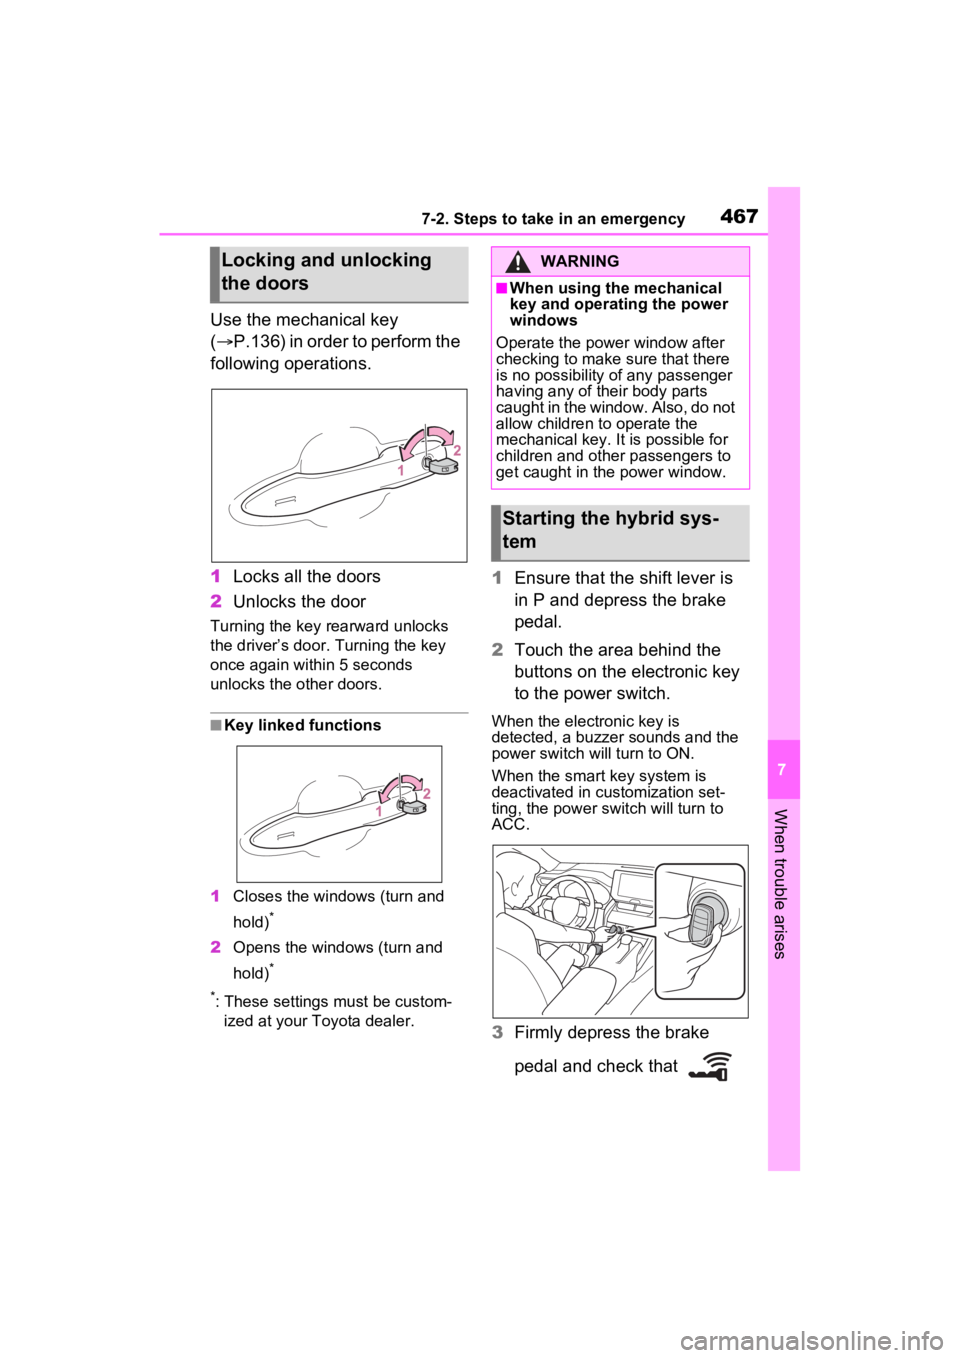
Use the mechanical key
(P.136) in order to perform the
following operations.
1 Locks all the doors
2 Unlocks the door
Turning the key rearward unlocks
the driver’s door. Turning the key
once again within 5 seconds
unlocks the other doors.
■Key linked functions
1 Closes the windo ws (turn and
hold)
*
2 Opens the windows (turn and
hold)
*
*
: These settings must be custom- ized at your To yota dealer.
1Ensure that the shift lever is
in P and depress the brake
pedal.
2 Touch the area behind the
buttons on the electronic key
to the power switch.
When the electronic key is
detected, a buzzer sounds and the
power switch will turn to ON.
When the smart key system is
deactivated in customization set-
ting, the power switch will turn to
ACC.
3Firmly depress the brake
pedal and check that
Locking and unlocking
the doorsWARNING
■When using the mechanical
key and operating the power
windows
Operate the power window after
checking to make sure that there
is no possibility of any passenger
having any of their body parts
caught in the window. Also, do not
allow children to operate the
mechanical key. It is possible for
children and other passengers to
get caught in the power window.
Starting the hybrid sys-
tem