Page 57 of 470
55
1
Owner's Manual_Europe_M52P63_en
1-2. Child safety
For safety and security
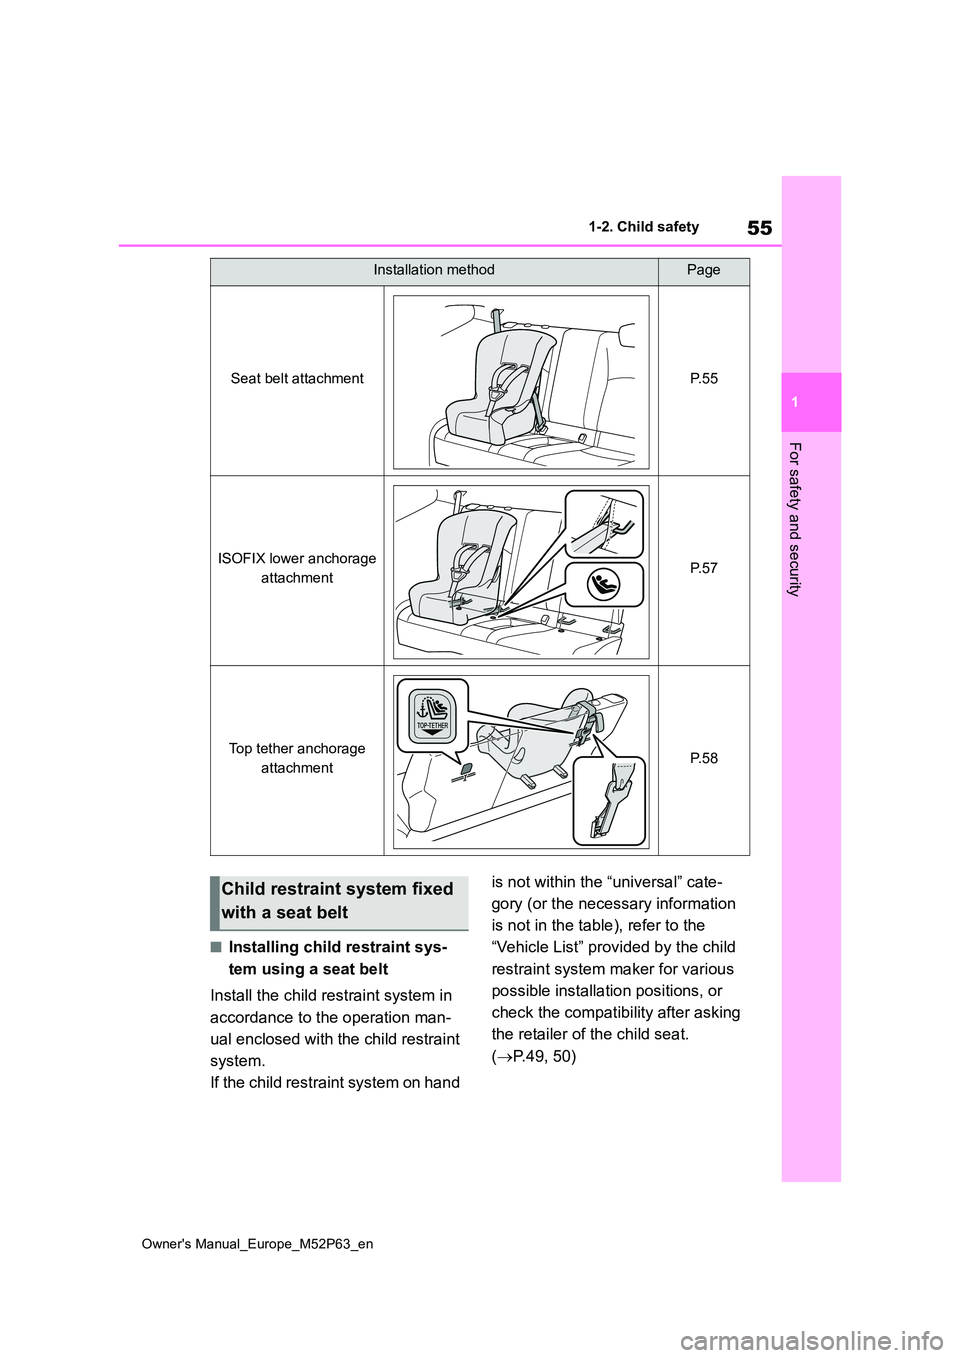
■Installing child restraint sys-
tem using a seat belt
Install the child restraint system in
accordance to the operation man-
ual enclosed with the child restraint
system.
If the child restraint system on hand
is not within the “universal” cate-
gory (or the necessary information
is not in the table), refer to the
“Vehicle List” provided by the child
restraint system maker for various
possible installation positions, or
check the compatibility after asking
the retailer of the child seat.
( P.49, 50)
Installation methodPage
Seat belt attachmentP. 5 5
ISOFIX lower anchorage
attachmentP. 5 7
Top tether anchorage
attachmentP. 5 8
Child restraint system fixed
with a seat belt
Page 58 of 470

56
Owner's Manual_Europe_M52P63_en
1-2. Child safety
1If installing the child restraint
system to the front passenger
seat is unavoidable, refer to
P.46 for the front passenger seat
adjustment.
2 If the head restraint interferes
with your child restraint system,
and the head restraint can be
removed, remove the head
restraint. Otherwise, put the
head restraint in the upper most
position. ( P. 1 1 6 )
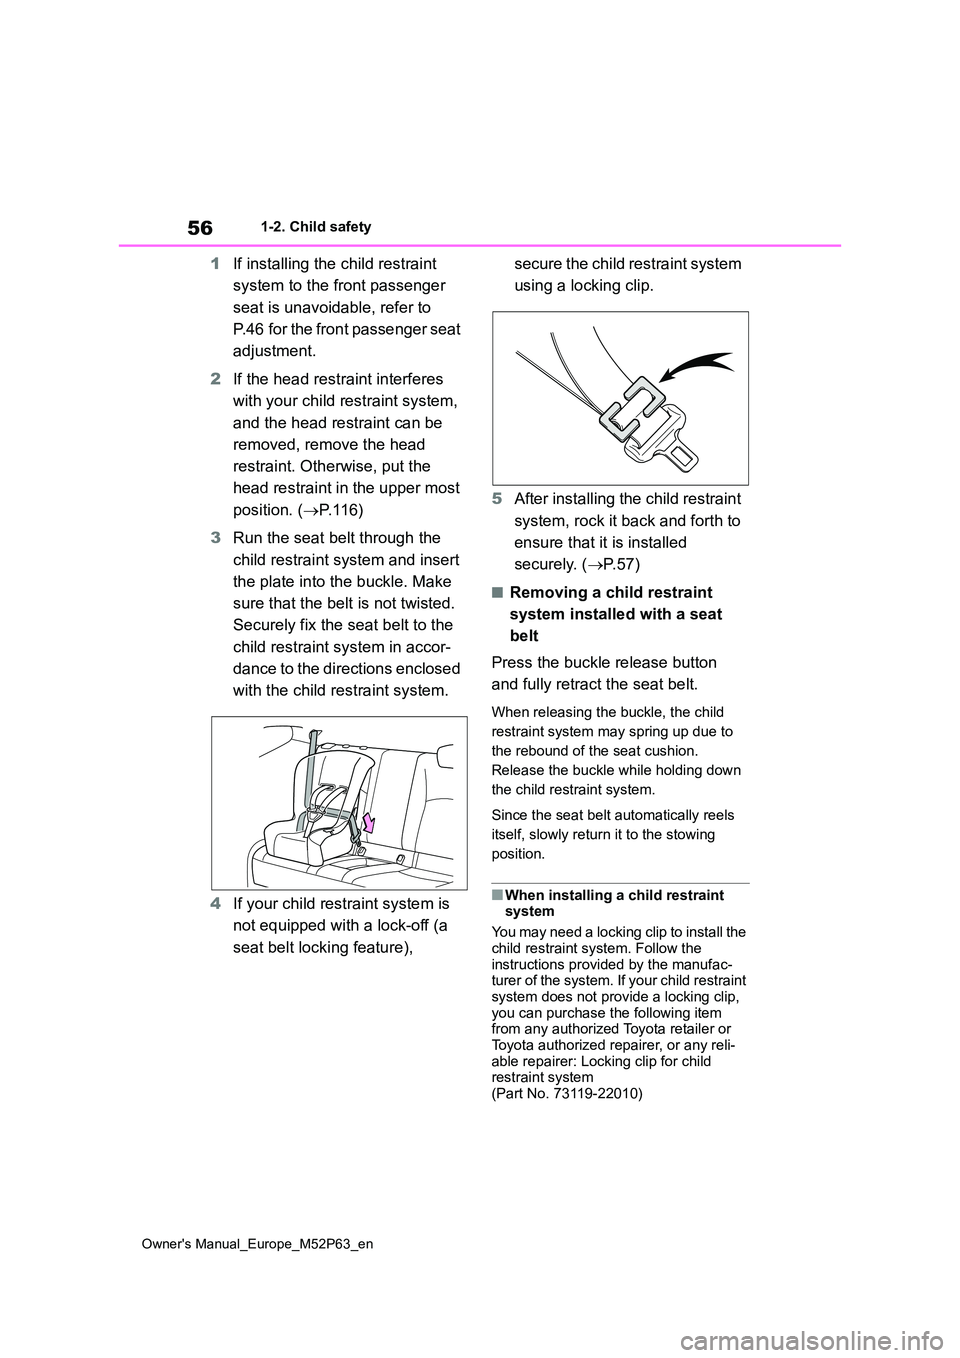
3 Run the seat belt through the
child restraint system and insert
the plate into the buckle. Make
sure that the belt is not twisted.
Securely fix the seat belt to the
child restraint system in accor-
dance to the directions enclosed
with the child restraint system.
4 If your child restraint system is
not equipped with a lock-off (a
seat belt locking feature),
s e c u r e t h e c h i l d r e s t r a i n t s y s t e m
using a locking clip.
5 After installing the child restraint
system, rock it back and forth to
ensure that it is installed
securely. ( P. 5 7 )
■Removing a child restraint
system installed with a seat
belt
Press the buckle release button
and fully retract the seat belt.
When releasing the buckle, the child
restraint system may spring up due to
the rebound of the seat cushion.
Release the buckle while holding down
the child restraint system.
Since the seat belt automatically reels
itself, slowly return it to the stowing
position.
■When installing a child restraint system
You may need a locking clip to install the
child restraint system. Follow the instructions provided by the manufac-turer of the system. If your child restraint
system does not provide a locking clip, you can purchase the following item from any authorized Toyota retailer or
Toyota authorized repairer, or any reli- able repairer: Locking clip for child restraint system
(Part No. 73119-22010)
Page 59 of 470

57
1
Owner's Manual_Europe_M52P63_en
1-2. Child safety
For safety and security
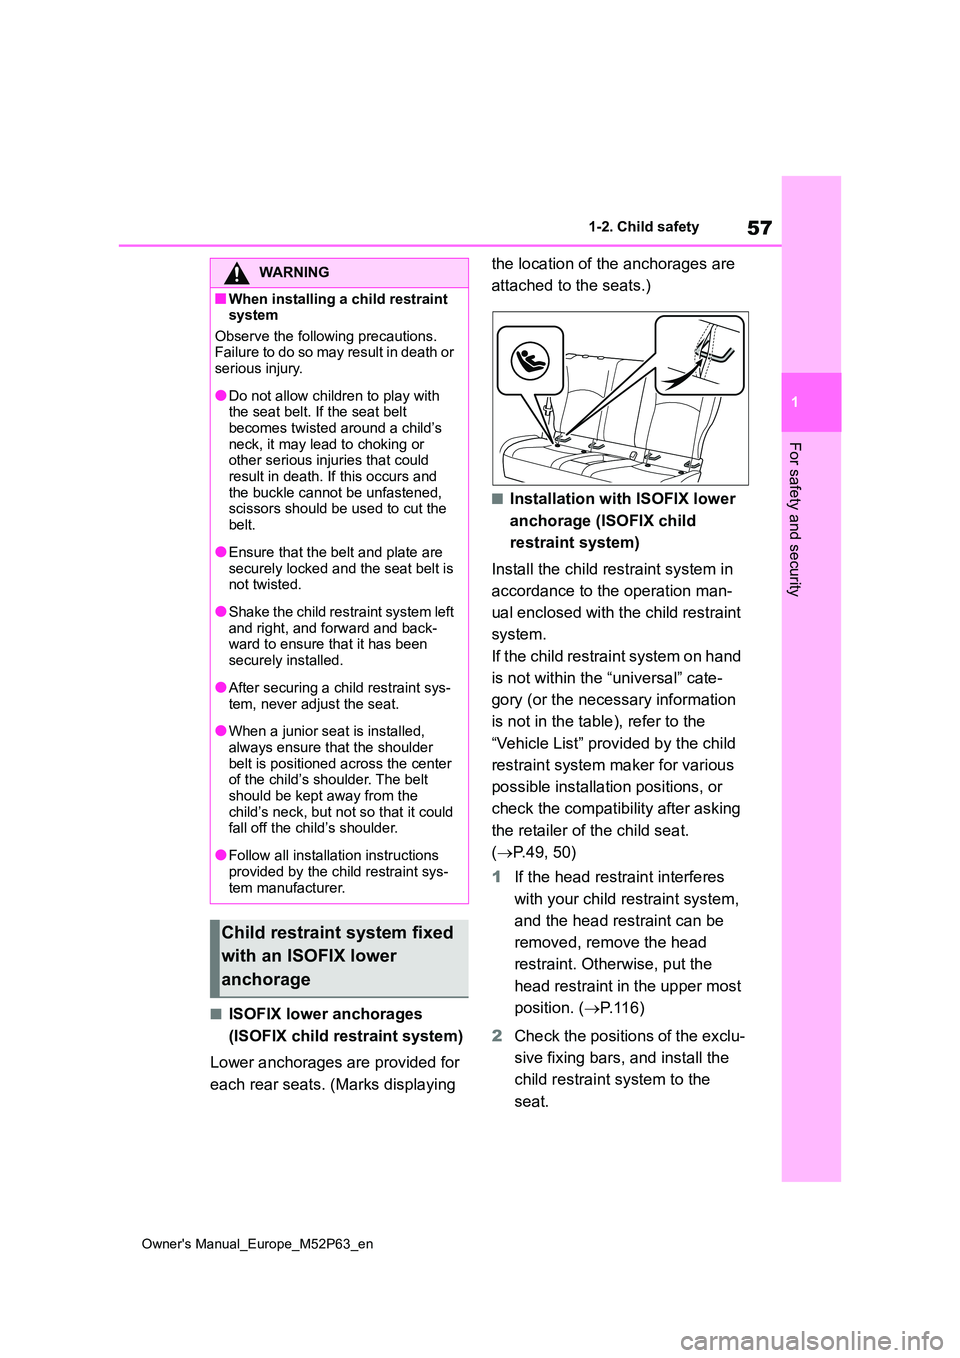
■ISOFIX lower anchorages
(ISOFIX child restraint system)
Lower anchorages are provided for
each rear seats. (Marks displaying
the location of the anchorages are
attached to the seats.)
■Installation with ISOFIX lower
anchorage (ISOFIX child
restraint system)
Install the child restraint system in
accordance to the operation man-
ual enclosed with the child restraint
system.
If the child restraint system on hand
is not within the “universal” cate-
gory (or the necessary information
is not in the table), refer to the
“Vehicle List” provided by the child
restraint system maker for various
possible installation positions, or
check the compatibility after asking
the retailer of the child seat.
( P.49, 50)
1 If the head restraint interferes
with your child restraint system,
and the head restraint can be
removed, remove the head
restraint. Otherwise, put the
head restraint in the upper most
position. ( P. 1 1 6 )
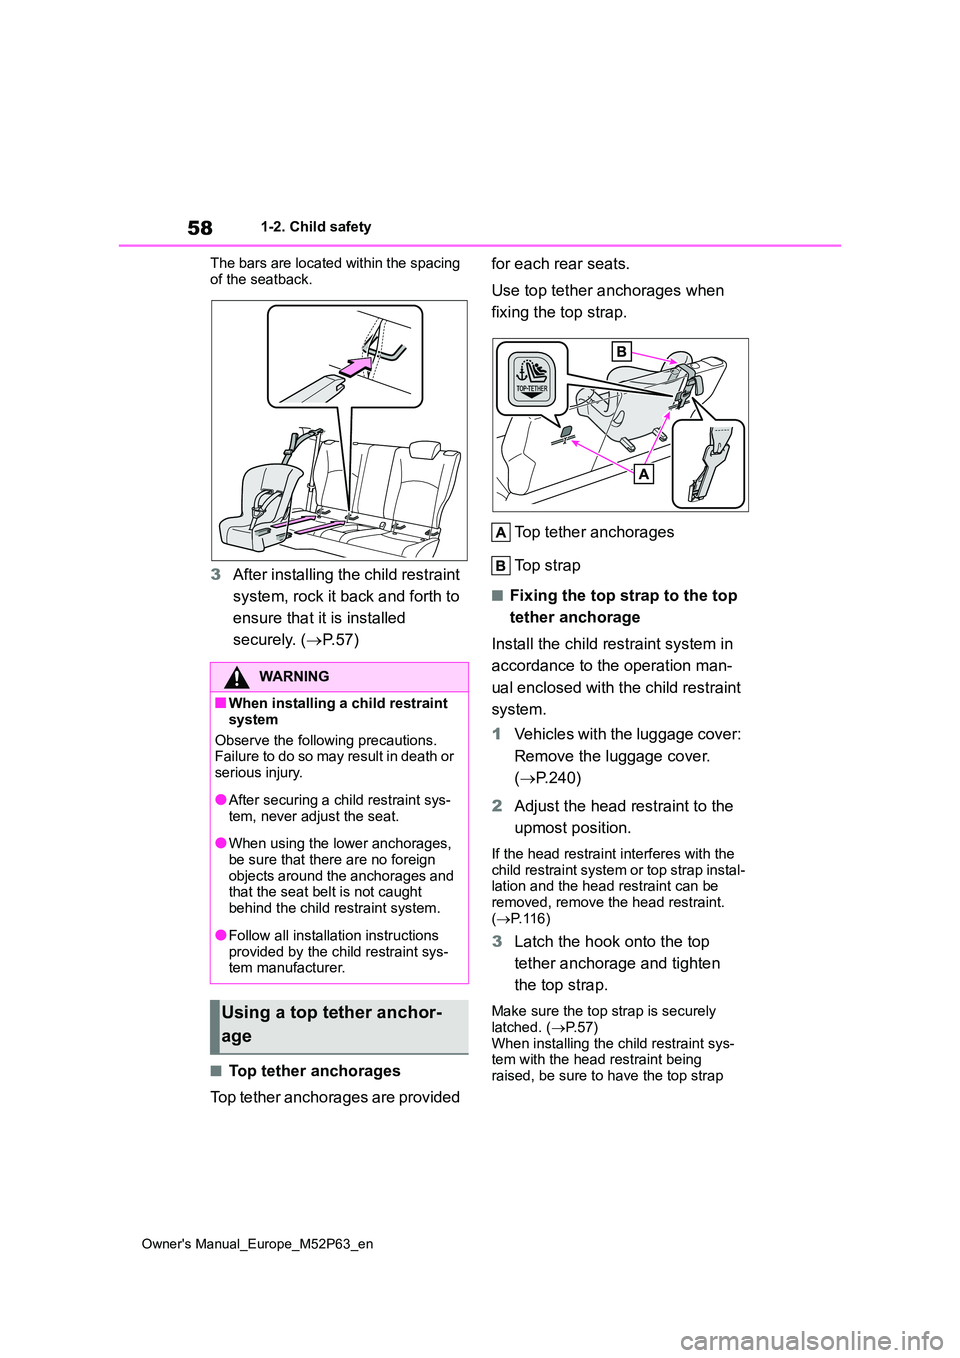
2 Check the positions of the exclu-
sive fixing bars, and install the
child restraint system to the
seat.
WARNING
■When installing a child restraint system
Observe the following precautions. Failure to do so may result in death or serious injury.
●Do not allow children to play with the seat belt. If the seat belt
becomes twisted around a child’s neck, it may lead to choking or other serious injuries that could
result in death. If this occurs and the buckle cannot be unfastened, scissors should be used to cut the
belt.
●Ensure that the belt and plate are
securely locked and the seat belt is not twisted.
●Shake the child restraint system left and right, and forward and back-ward to ensure that it has been
securely installed.
●After securing a child restraint sys-
tem, never adjust the seat.
●When a junior seat is installed,
always ensure that the shoulder belt is positioned across the center of the child’s shoulder. The belt
should be kept away from the child’s neck, but not so that it could fall off the child’s shoulder.
●Follow all installation instructions provided by the child restraint sys-
tem manufacturer.
Child restraint system fixed
with an ISOFIX lower
anchorage
Page 60 of 470

58
Owner's Manual_Europe_M52P63_en
1-2. Child safety
The bars are located within the spacing
of the seatback.
3 After installing the child restraint
system, rock it back and forth to
ensure that it is installed
securely. ( P. 5 7 )
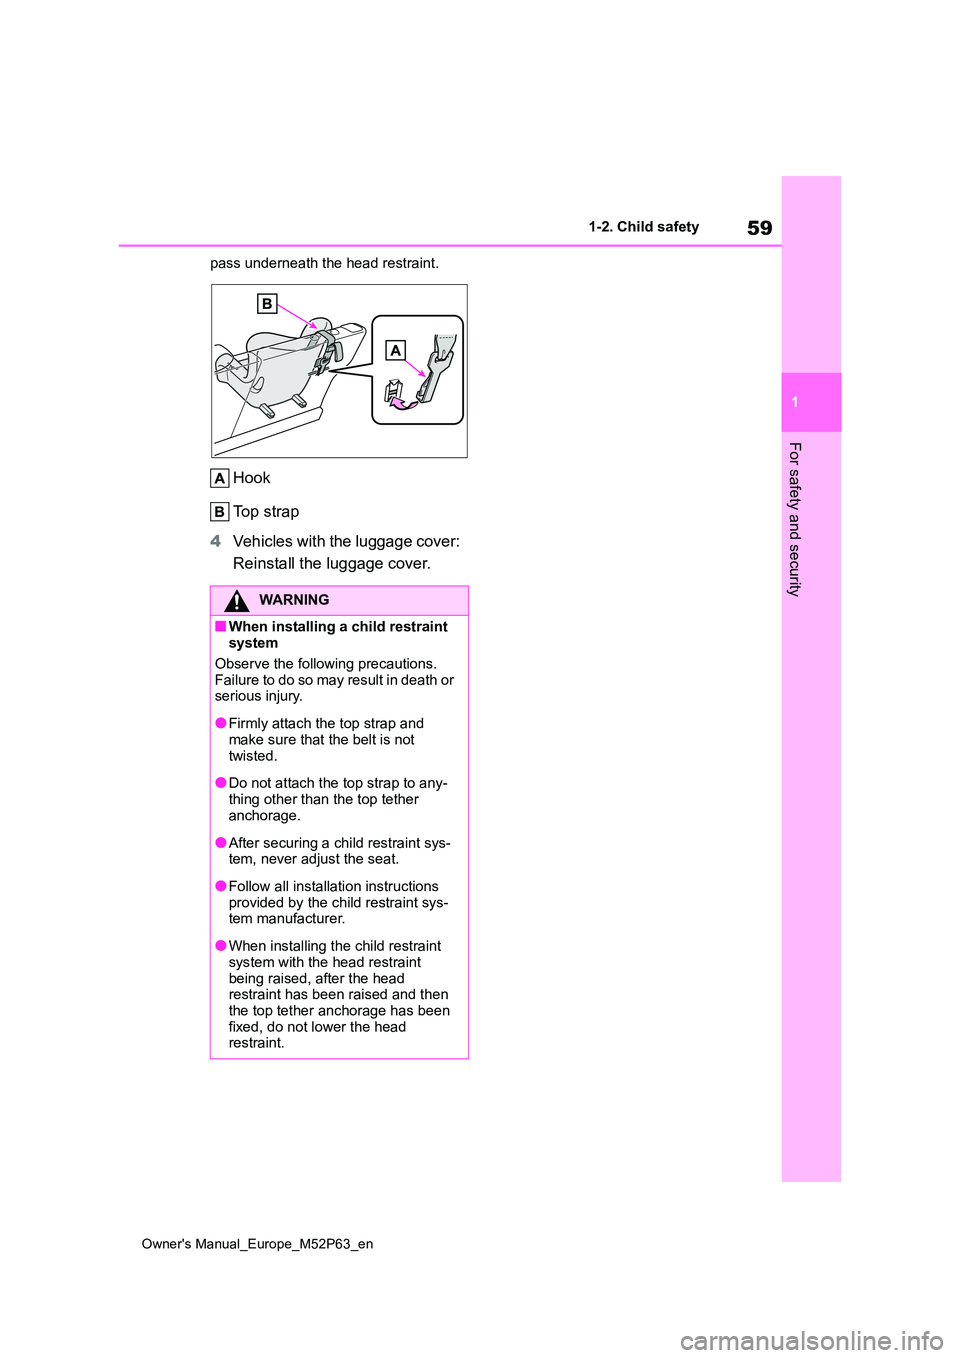
■Top tether anchorages
Top tether anchorages are provided
for each rear seats.
Use top tether anchorages when
fixing the top strap.
Top tether anchorages
Top strap
■Fixing the top strap to the top
tether anchorage
Install the child restraint system in
accordance to the operation man-
ual enclosed with the child restraint
system.
1 Vehicles with the luggage cover:
Remove the luggage cover.
( P.240)
2 Adjust the head restraint to the
upmost position.
If the head restraint interferes with the child restraint system or top strap instal-lation and the head restraint can be
removed, remove the head restraint. ( P. 1 1 6 )
3Latch the hook onto the top
tether anchorage and tighten
the top strap.
Make sure the top strap is securely
latched. ( P. 5 7 ) When installing the child restraint sys-tem with the head restraint being
raised, be sure to have the top strap
WARNING
■When installing a child restraint
system
Observe the following precautions. Failure to do so may result in death or
serious injury.
●After securing a child restraint sys-
tem, never adjust the seat.
●When using the lower anchorages,
be sure that there are no foreign objects around the anchorages and that the seat belt is not caught
behind the child restraint system.
●Follow all installation instructions
provided by the child restraint sys- tem manufacturer.
Using a top tether anchor-
age
Page 61 of 470
59
1
Owner's Manual_Europe_M52P63_en
1-2. Child safety
For safety and security
pass underneath the head restraint.
Hook
Top strap
4 Vehicles with the luggage cover:
Reinstall the luggage cover.
WARNING
■When installing a child restraint system
Observe the following precautions. Failure to do so may result in death or serious injury.
●Firmly attach the top strap and make sure that the belt is not
twisted.
●Do not attach the top strap to any-
thing other than the top tether anchorage.
●After securing a child restraint sys-tem, never adjust the seat.
●Follow all installation instructions provided by the child restraint sys-tem manufacturer.
●When installing the child restraint system with the head restraint
being raised, after the head restraint has been raised and then the top tether anchorage has been
fixed, do not lower the head restraint.
Page 62 of 470

60
Owner's Manual_Europe_M52P63_en
1-3. Emergency assistance
1-3.Emerg ency as sista nce
*1: If equipped
*2: Operates within the eCall coverage.
The system name differs depending
on the country.
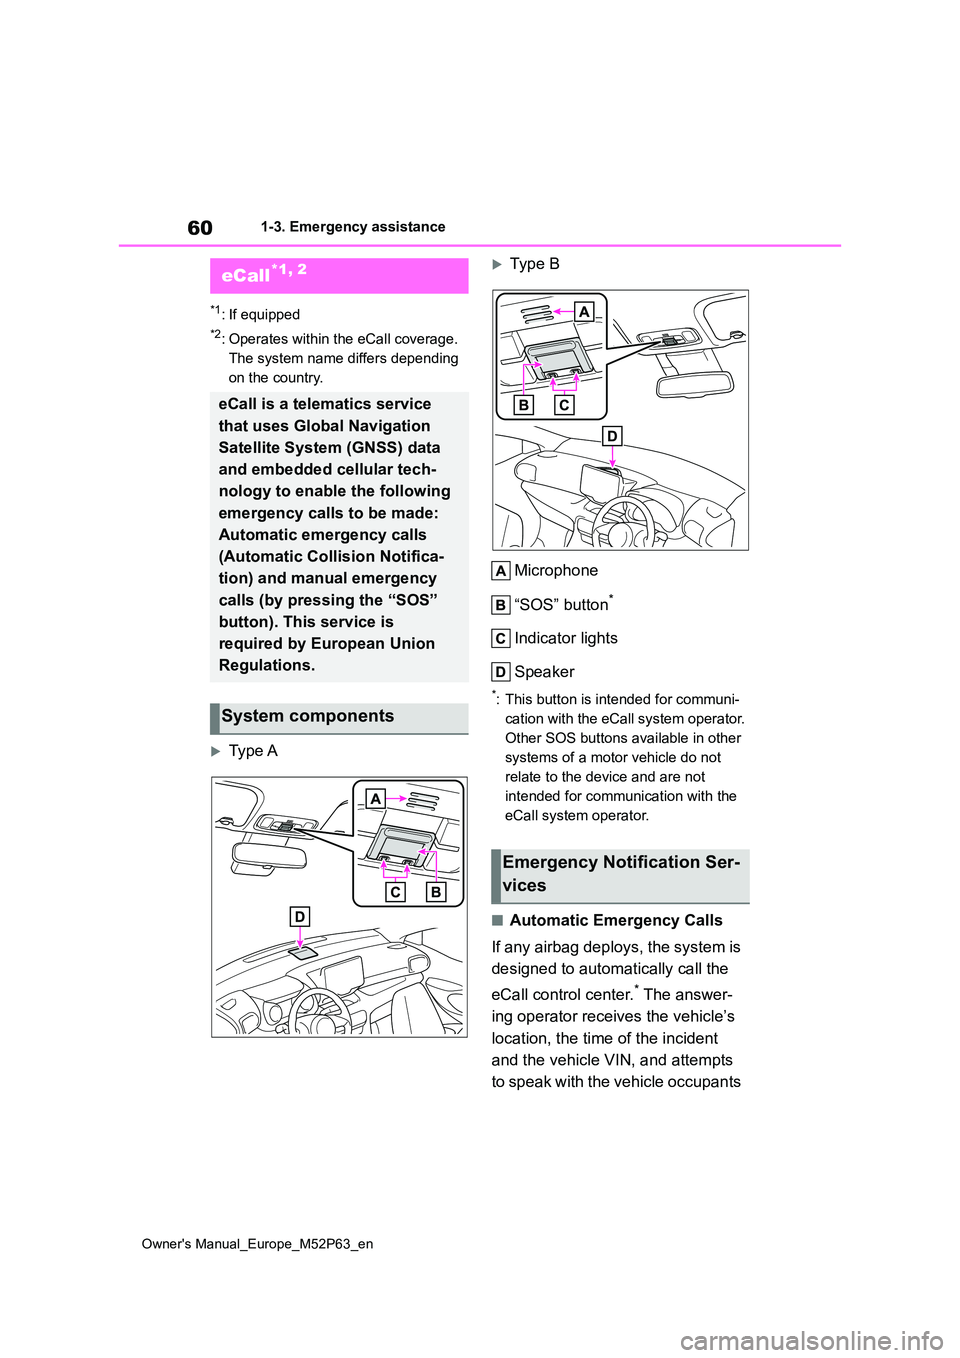
Type A
Typ e B
Microphone
“SOS” button*
Indicator lights
Speaker
*: This button is intended for communi-
cation with the eCall system operator.
Other SOS buttons available in other
systems of a motor vehicle do not
relate to the device and are not
intended for communication with the
eCall system operator.
■Automatic Emergency Calls
If any airbag deploys, the system is
designed to automatically call the
eCall control center.* The answer-
ing operator receives the vehicle’s
location, the time of the incident
and the vehicle VIN, and attempts
to speak with the vehicle occupants
eCall*1, 2
eCall is a telematics service
that uses Global Navigation
Satellite System (GNSS) data
and embedded cellular tech-
nology to enable the following
emergency calls to be made:
Automatic emergency calls
(Automatic Collision Notifica-
tion) and manual emergency
calls (by pressing the “SOS”
button). This service is
required by European Union
Regulations.
System components
Emergency Notification Ser-
vices
Page 63 of 470

61
1
Owner's Manual_Europe_M52P63_en
1-3. Emergency assistance
For safety and security
to assess the situation. If the occu-
pants are unable to communicate,
the operator automatically treats
the call as an emergency and con-
tacts the nearest emergency ser-
vices provider (112 system etc.) to
describe the situation and request
that assistance be sent to the loca-
tion.
*: In some cases, the call cannot be
made. ( P. 6 2 )
■Manual Emergency Calls
In the event of an emergency, press
the “SOS” button to call the eCall
control center.* The answering
operator will determine your vehi-
cle’s location, assess the situation,
and dispatch the necessary assis-
tance required.
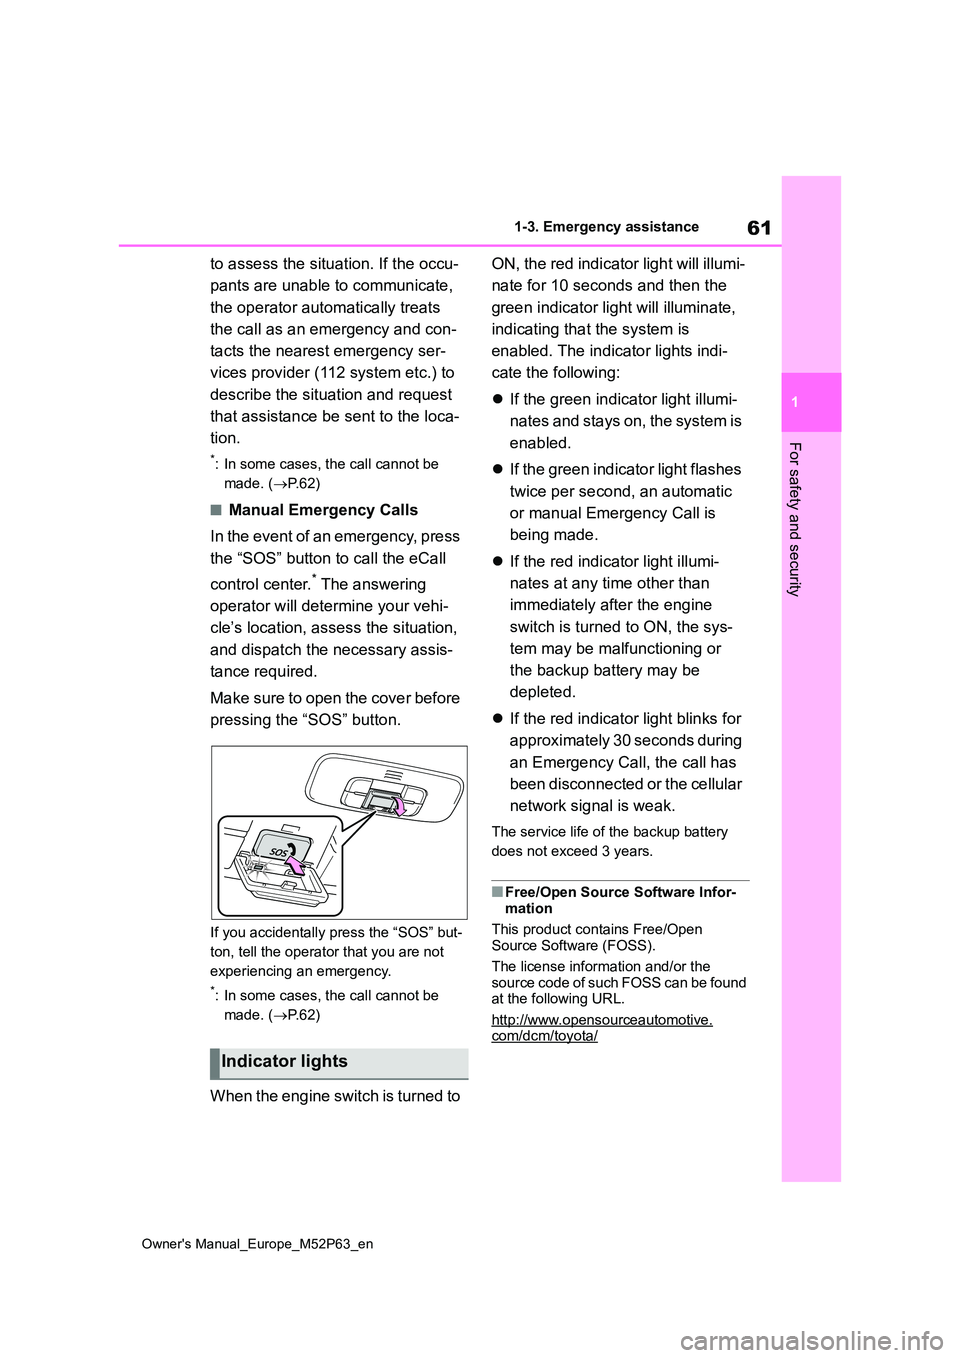
Make sure to open the cover before
pressing the “SOS” button.
If you accidentally press the “SOS” but-
ton, tell the operator that you are not
experiencing an emergency.
*: In some cases, the call cannot be
made. ( P. 6 2 )
When the engine switch is turned to
ON, the red indicator light will illumi-
nate for 10 seconds and then the
green indicator light will illuminate,
indicating that the system is
enabled. The indicator lights indi-
cate the following:
If the green indicator light illumi-
n a t e s a n d s t a y s o n , t h e s y s t e m i s
enabled.
If the green indicator light flashes
twice per second, an automatic
or manual Emergency Call is
being made.
If the red indicator light illumi-
nates at any time other than
immediately after the engine
switch is turned to ON, the sys-
tem may be malfunctioning or
the backup battery may be
depleted.
If the red indicator light blinks for
approximately 30 seconds during
an Emergency Call, the call has
been disconnected or the cellular
network signal is weak.
The service life of the backup battery
does not exceed 3 years.
■Free/Open Source Software Infor-
mation
This product contains Free/Open Source Software (FOSS).
The license information and/or the source code of such FOSS can be found at the following URL.
http://www.opensourceautomotive.com/dcm/toyota/
Indicator lights
Page 64 of 470

62
Owner's Manual_Europe_M52P63_en
1-3. Emergency assistance
WARNING
■When the Emergency Call may not be made
●It may not be possible to make Emergency Calls in any of the fol-lowing situations. In such cases,
report to emergency services pro- vider (112 system etc.) by other means such as nearby public
phones.
• Even when the vehicle is in the cel-
lular phone service area, it may be difficult to connect to the eCall con-trol center if the reception is poor or
the line is busy. In such cases, even though the system attempts to con-nect to the eCall control center, you
may not be able to connect to the eCall control center to make Emer-gency Calls and contact emergency
services.
• When the vehicle is out of the cellu-
lar phone service area, the Emer- gency Calls cannot be made.
• When any related equipment (such as the “SOS” button panel, indicator lights, microphone, speaker, DCM,
antenna, or any wires connecting the equipment) is malfunctioning, damaged or broken, the Emer-
gency Call cannot be made.
• During an Emergency Call, the sys-
tem makes repeated attempts to connect to the eCall control center. However, if it cannot connect to the
eCall control center due to poor radio wave reception, the system may not be able to connect to the
cellular network and the call may finish without connecting. The red indicator light will blink for approxi-
mately 30 seconds to indicate this disconnection.
●If t he b at t er y ’s vo lt a g e d ec r ea se s o r there is a disconnection, the system may not be able to connect to the
eCall control center.
●The Emergency Call system might not work outside of EU area, depending on the available infra-
structure in the country.
■When the Emergency Call sys-
tem is replaced with a new one
The Emergency Call system should be registered. Contact any authorized
Toyota retailer or Toyota authorized repairer, or any reliable repairer.
■For your safety
●Please drive safely.The function of this system is to
assist you in making the Emer- gency Call in case of accidents such as traffic accidents or sudden
medical emergencies, and it does not protect the driver or passengers in any way. Please drive safely and
fasten your seatbelts at all times for your safety.
●In case of an emergency, make lives the top priority.
●If you smell anything burning or other unusual smells, leave the vehicle and evacuate to a safe area
immediately.
●If the airbags deploy when the sys-
tem is operating normally, the sys- tem makes emergency call. The system also makes emergency call
when the vehicle is struck from the r e a r o r r ol l s ov er, ev e n i f t h e a ir b a gs do not deploy.
●For safety, do not make the Emer-gency Call while driving.
Making calls during driving may cause mishandling of the steering wheel, which may lead to unex-
pected accidents. Stop the vehicle and confirm the safety of your surroundings before
making the Emergency Call.