2023 TOYOTA COROLLA HYBRID ABS
[x] Cancel search: ABSPage 270 of 496
2704-5. Using the driving support systems
WARNING
●When driving over roads with
potholes or uneven surfaces
■TRAC/VSC may not operate
effectively when
Directional control and power may
not be achievable while driving on
slippery road surfaces, even if the
TRAC/VSC system is operating.
Drive the vehicle carefully in con-
ditions where stability and power
may be lost.
■Active Cornering Assist does
not operate effectively when
●Do not overly rely on Active
Cornering Assist. Active Corner-
ing Assist may not operate
effectively when accelerating
down slopes or driving on slip-
pery road surfaces.
●When Active Cornering Assist
frequently operates, Active Cor-
nering Assist may temporarily
stop operating to ensure proper
operation of the brakes, TRAC
and VSC.
■Hill-start assist control does
not operate effectively when
●Do not overly rely on hill-start
assist control. Hill-start assist
control may not operate effec-
tively on steep inclines and
roads covered with ice.
●Unlike the parking brake,
hill-start assist control is not
intended to hold the vehicle sta-
tionary for an extended period
of time. Do not attempt to use
hill-start assist control to hold
the vehicle on an incline, as
doing so may lead to an acci-
dent.
■When the TRAC/ABS/VSC is
activated
The slip indicator light flashes.
Always drive carefully. Reckless
driving may cause an accident.
Exercise particula r care when the
indicator light flashes.
■When the TRAC/VSC systems
are turned off
Be especially careful and drive at
a speed appropriate to the road
conditions. As these are the sys-
tems to help ensure vehicle stabil-
ity and driving force, do not turn
the TRAC/VSC systems off
unless necessary.
■Replacing tires
Make sure that all tires are of the
specified size, brand, tread pat-
tern and total load capacity. In
addition, make sure that the tires
are inflated to the recommended
tire inflation p ressure level.
The ABS, TRAC and VSC sys-
tems will not functi on correctly if
different tires are installed on the
vehicle.
Contact your Toyota dealer for fur-
ther information when replacing
tires or wheels.
■Handling of tires and the sus-
pension
Using tires with any kind of prob-
lem or modifying the suspension
will affect the driving assist sys-
tems, and may cause a system to
malfunction.
■Secondary Collision Brake
Do not rely solely upon the Sec-
ondary Collision Brake. This sys-
tem is designed to help reduce
the possibility of further damage
due to a secondary collision, how-
ever, that effect changes accord-
ing to various conditions. Overly
relying on the system may result
in death or serious injury.
Page 322 of 496
3226-3. Do-it-yourself maintenance
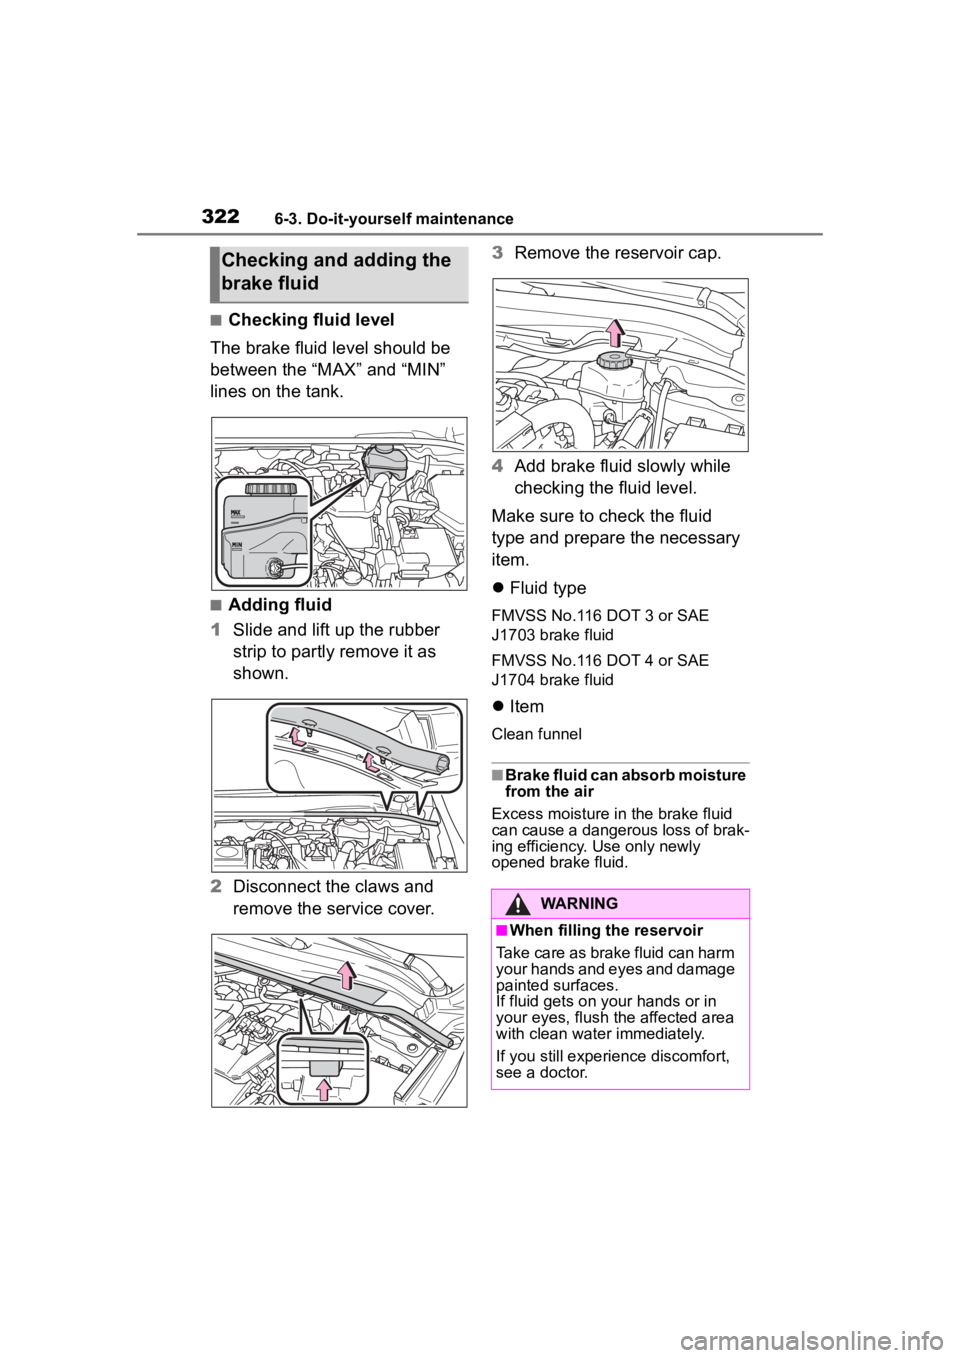
■Checking fluid level
The brake fluid level should be
between the “MAX” and “MIN”
lines on the tank.
■Adding fluid
1 Slide and lift up the rubber
strip to partly remove it as
shown.
2 Disconnect the claws and
remove the service cover. 3
Remove the reservoir cap.
4 Add brake fluid slowly while
checking the fluid level.
Make sure to check the fluid
type and prepare the necessary
item.
Fluid typeFMVSS No.116 DOT 3 or SAE
J1703 brake fluid
FMVSS No.116 DOT 4 or SAE
J1704 brake fluid
Item
Clean funnel
■Brake fluid can absorb moisture
from the air
Excess moisture in the brake fluid
can cause a dangerous loss of brak-
ing efficiency. Use only newly
opened brake fluid.
Checking and adding the
brake fluid
WARNING
■When filling the reservoir
Take care as brake fluid can harm
your hands and eyes and damage
painted surfaces.
If fluid gets on your hands or in
your eyes, flush the affected area
with clean water immediately.
If you still experi ence discomfort,
see a doctor.
Page 348 of 496
3486-3. Do-it-yourself maintenance
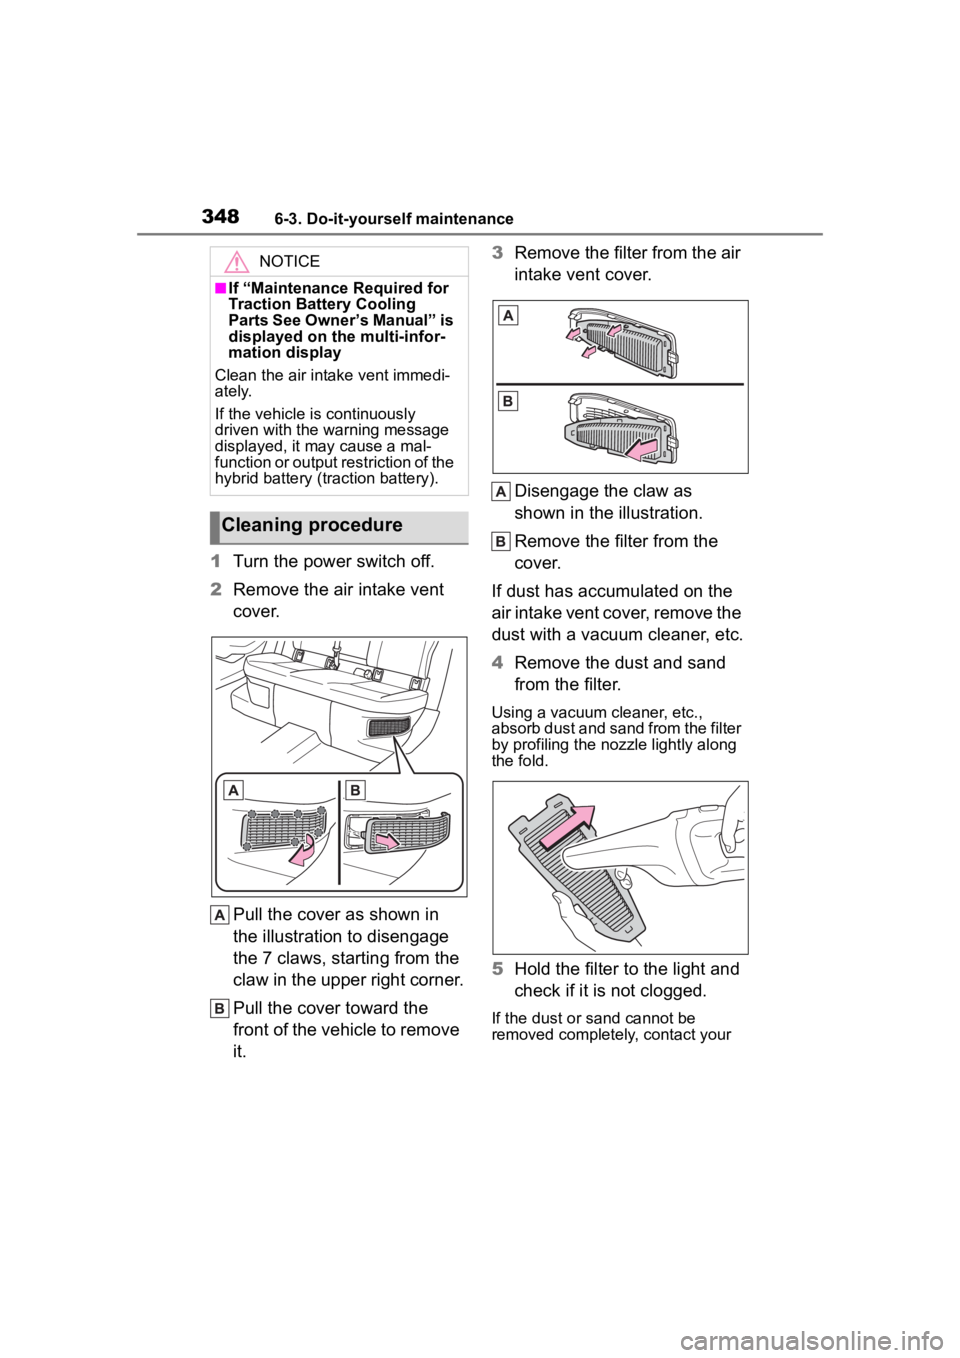
1Turn the power switch off.
2 Remove the air intake vent
cover.
Pull the cover as shown in
the illustration to disengage
the 7 claws, starting from the
claw in the upper right corner.
Pull the cover toward the
front of the vehicle to remove
it. 3
Remove the filter from the air
intake vent cover.
Disengage the claw as
shown in the illustration.
Remove the filter from the
cover.
If dust has accumulated on the
air intake vent cover, remove the
dust with a vacuum cleaner, etc.
4 Remove the dust and sand
from the filter.
Using a vacuum cleaner, etc.,
absorb dust and sand from the filter
by profiling the nozzle lightly along
the fold.
5Hold the filter to the light and
check if it is not clogged.
If the dust or sand cannot be
removed completely, contact your
NOTICE
■If “Maintenance Required for
Traction Battery Cooling
Parts See Owner’s Manual” is
displayed on the multi-infor-
mation display
Clean the air intake vent immedi-
ately.
If the vehicle is continuously
driven with the warning message
displayed, it may cause a mal-
function or output restriction of the
hybrid battery (tr action battery).
Cleaning procedure
Page 354 of 496

3546-3. Do-it-yourself maintenance
1Turn the power switch off.
2 Open the fuse box cover.
Engine compartment: type A
fuse box
Push the tabs in and lift the lid off.
Engine compartment: type B
fuse box
Push the tabs in and lift the lid off.
Under the driver’s side instru-
ment panel
Remove the lid.
Make sure to push the claw when
removing/installing the lid.
3Remove the fuse with the
pullout tool.
Only type A fuse can be
removed using the pullout
tool.
4 Check if the fuse is blown.
Replace the blown fuse with a new
fuse of an appropriate amperage
rating. The amperage rating can be
found on the fuse box lid.
Checking and replac-
ing fuses
If any of the electrical com-
ponents do not operate, a
fuse may have blown. If this
happens, check and replace
the fuses as necessary.
Checking and replacing
fuses
Page 374 of 496
3747-2. Steps to take in an emergency
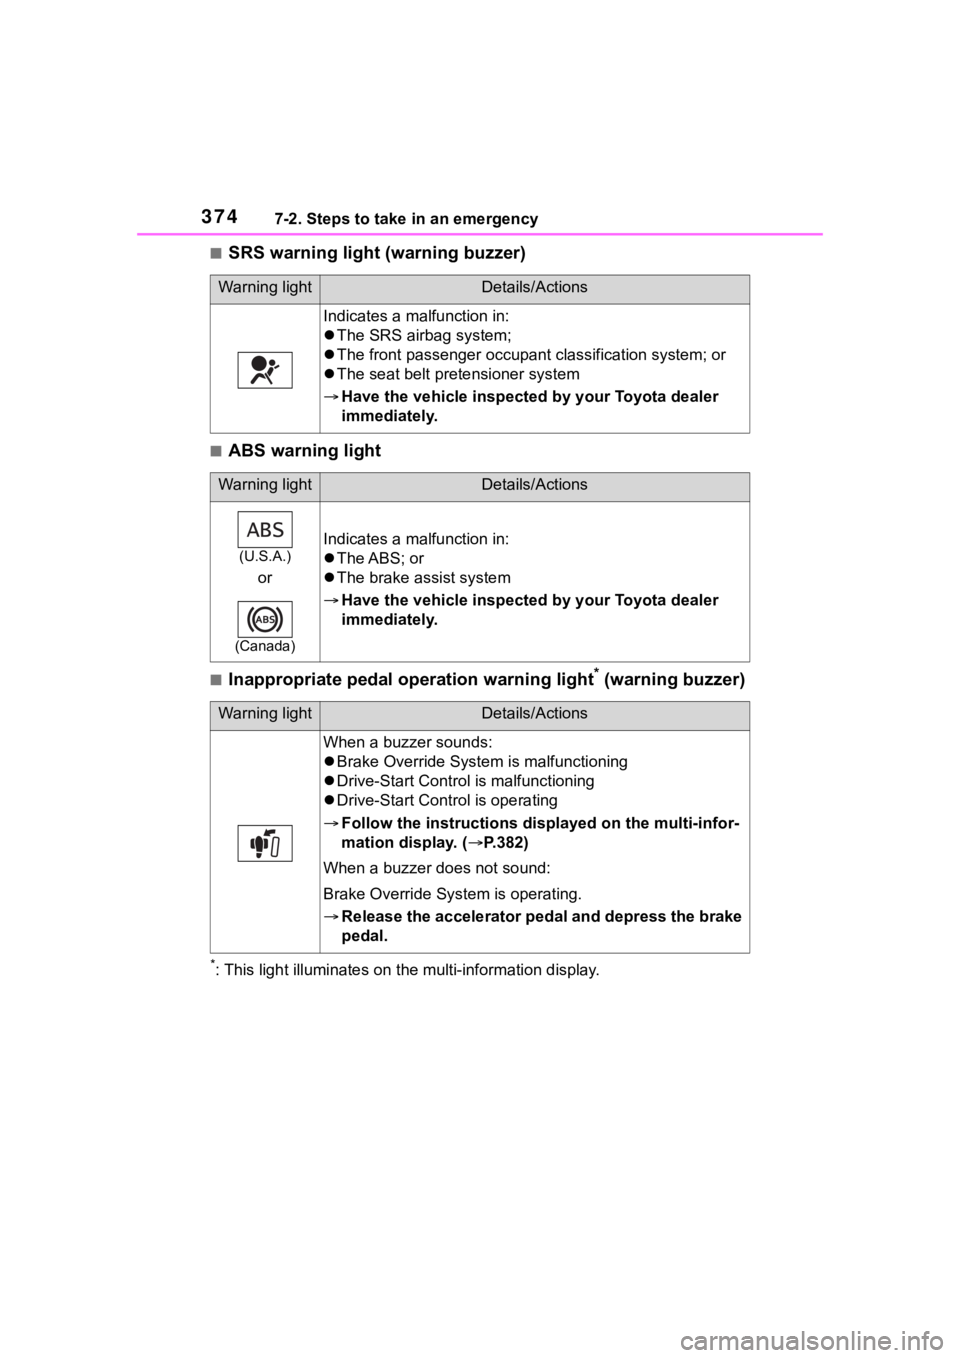
■SRS warning light (warning buzzer)
■ABS warning light
■Inappropriate pedal operation warning light* (warning buzzer)
*: This light illuminat es on the multi-information display.
Warning lightDetails/Actions
Indicates a malfunction in:
The SRS airb ag system;
The front passenger occupan t classification system; or
The seat belt pretensioner system
Have the vehicle inspected by your Toyota dealer
immediately.
Warning lightDetails/Actions
(U.S.A.)
or
(Canada)
Indicates a malfunction in:
The ABS; or
The brake assist system
Have the vehicle inspected by your Toyota dealer
immediately.
Warning lightDetails/Actions
When a buzzer sounds:
Brake Override System is malfunctioning
Drive-Start Control is malfunctioning
Drive-Start Cont rol is operating
Follow the instructions di splayed on the multi-infor-
mation display. ( P.382)
When a buzzer does not sound:
Brake Override System is operating.
Release the accelerator pedal and depress the brake
pedal.
Page 380 of 496
3807-2. Steps to take in an emergency
steering system warning light may
come on and the warning buzzer
may sound.
■When the tire pressure warning
light comes on
Inspect the tires to check if a tire is
punctured.
If a tire is punctured: P.387, 398
If none of the tires are punctured:
Turn the power switch off then turn it
to ON. Check if the tire pressure
warning light comes on or blinks.
If the tire pressure warning light
blinks for approximately 1 minute
then stays on
There may be a malfunction in the
tire pressure warning system. Have
the vehicle inspected by your Toyota
dealer immediately.
If the tire pressure warning light
comes on
1 After the temperature of the tires
has lowered sufficiently, check
the inflation pressure of each tire
and adjust them to the specified
level.
2 If the warning light does not turn
off even after several minutes
have elapsed, check that the
inflation pressure of each tire is
at the specified level and perform
initialization. ( P.333)
■The tire pressure warning light
may come on due to natural
causes
The tire pressure warning light may
come on due to natural causes such
as natural air leaks and tire inflation
pressure changes caused by tem-
perature. In this case, adjusting the
tire inflation pressure will turn off the
warning light (after a few minutes).
■When a tire is replaced with a
spare tire
Vehicles with a compact spare tire:
The compact spare tire is not
equipped with a tire pressure warn-
ing valve and transmitter. If a tire
goes flat, the tire pressure warning light will not turn off even though the
flat tire has been replaced with the
spare tire. Replace the spare tire
with the repaired tire and adjust the
tire inflation pressure. The tire pres-
sure warning light will go off after a
few minutes.
■Conditions that the tire pres-
sure warning system may not
function properly
P.329
WARNING
■If both the ABS and the brake
system warning lights remain
on
Stop your vehicle in a safe place
immediately and contact your Toy-
ota dealer.
The vehicle will become
extremely unstable during brak-
ing, and the ABS system may fail,
which could cause an accident
resulting in death o r serious injury.
■When the electric power
steering system warning light
comes on
When the light comes on yellow,
the assist to the power steering is
restricted. When the light comes
on red, the assis t to the power
steering is lost and handling oper-
ations of the steering wheel
become extremely heavy.
When steering wheel operations
are heavier than usual, grip the
steering wheel firmly and operate
it using more fo rce than usual.
■If the tire pressure warning
light comes on
Be sure to observe the following
precautions.
Failure to do so could cause a
loss of vehicle control and result
in death or serious injury.
Page 404 of 496
4047-2. Steps to take in an emergency
USE ONLY” on the tire sidewall.
Use the compact spare tire tempo-
rarily, and only in an emergency.
●Make sure to check the tire infla-
tion pressure of the compact
spare tire. (P.426)
■When the compact spare tire is
equipped
The vehicle becomes lower when
driving with the compact spare tire
compared to when driving with stan-
dard tires.
■After completing the tire
change
The tire pressure warning system
must be reset. ( P.333)
■When using the compact spare
tire
As the compact sp are tire is not
equipped with a tire pressure warn-
ing valve and transmitter, low infla-
tion pressure of the spar e tire will
not be indicated by the tire pressure
warning system. Also, if you replace
the compact spare tire after the tire
pressure warning light comes on,
the light remains on.
■If you have a flat front tire on a
road covered with snow or ice
Install the compact spare tire on one
of the rear wheels of the vehicle.
Perform the following steps and fit
tire chains to the front tires:
1 Replace a rear tire with the com-
pact spare tire.
2 Replace the flat front tire with the
tire removed from the rear of the
vehicle.
3 Fit tire chains to the front tires.
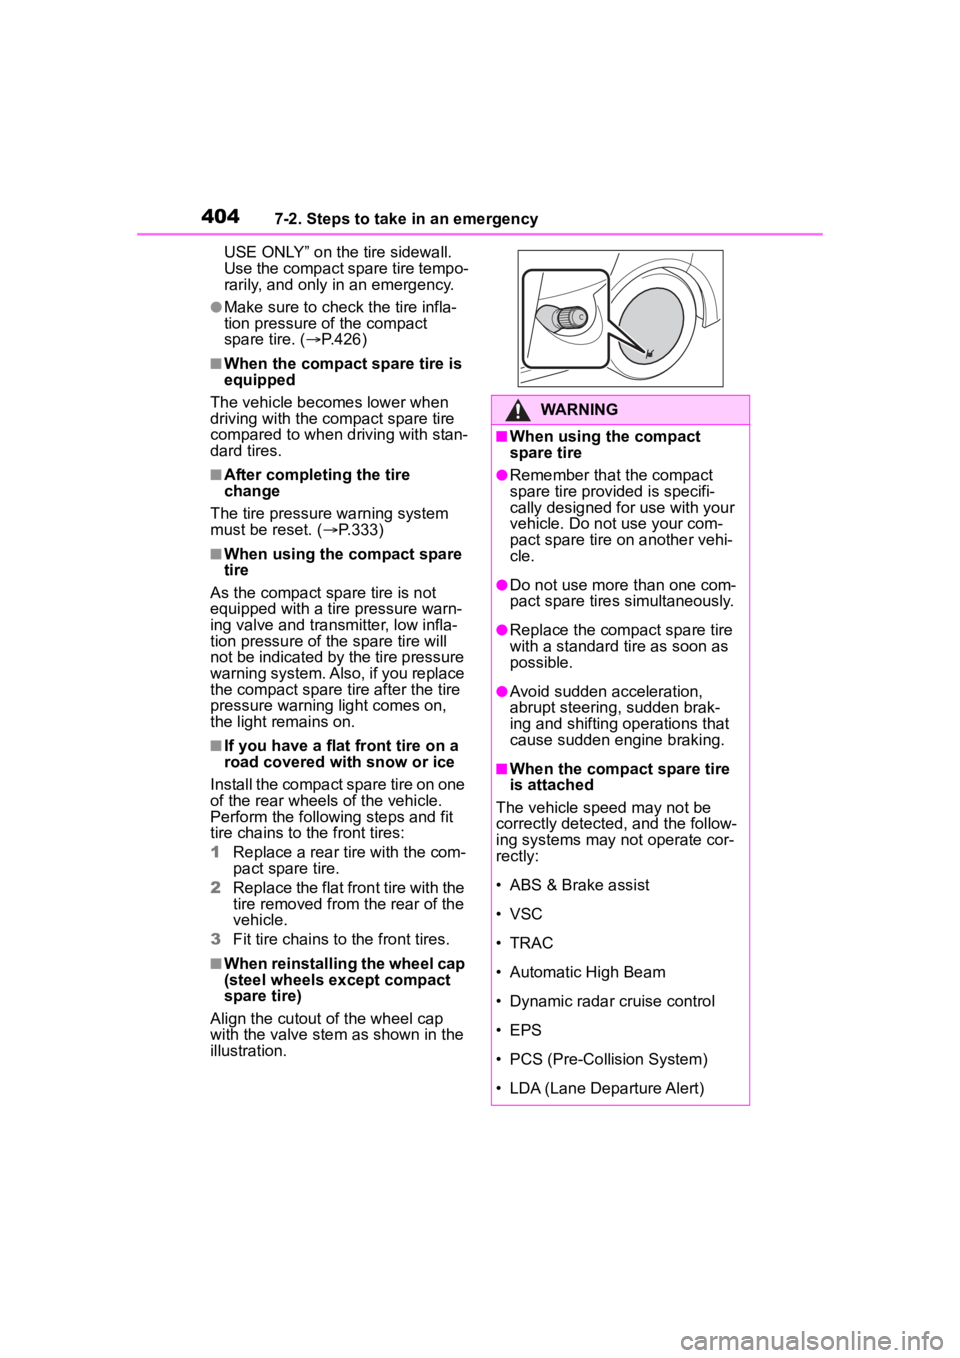
■When reinstallin g the wheel cap
(steel wheels except compact
spare tire)
Align the cutout of the wheel cap
with the valve stem as shown in the
illustration.
WARNING
■When using the compact
spare tire
●Remember that the compact
spare tire provided is specifi-
cally designed for use with your
vehicle. Do not use your com-
pact spare tire on another vehi-
cle.
●Do not use more than one com-
pact spare tires simultaneously.
●Replace the comp act spare tire
with a standard tire as soon as
possible.
●Avoid sudden acceleration,
abrupt steering, sudden brak-
ing and shifting operations that
cause sudden engine braking.
■When the compact spare tire
is attached
The vehicle speed may not be
correctly detected, and the follow-
ing systems may not operate cor-
rectly:
• ABS & Brake assist
• VSC
• TRAC
• Automatic High Beam
• Dynamic radar cruise control
• EPS
• PCS (Pre-Collision System)
• LDA (Lane Departure Alert)
Page 455 of 496
4559-1. For owners
9
For owners
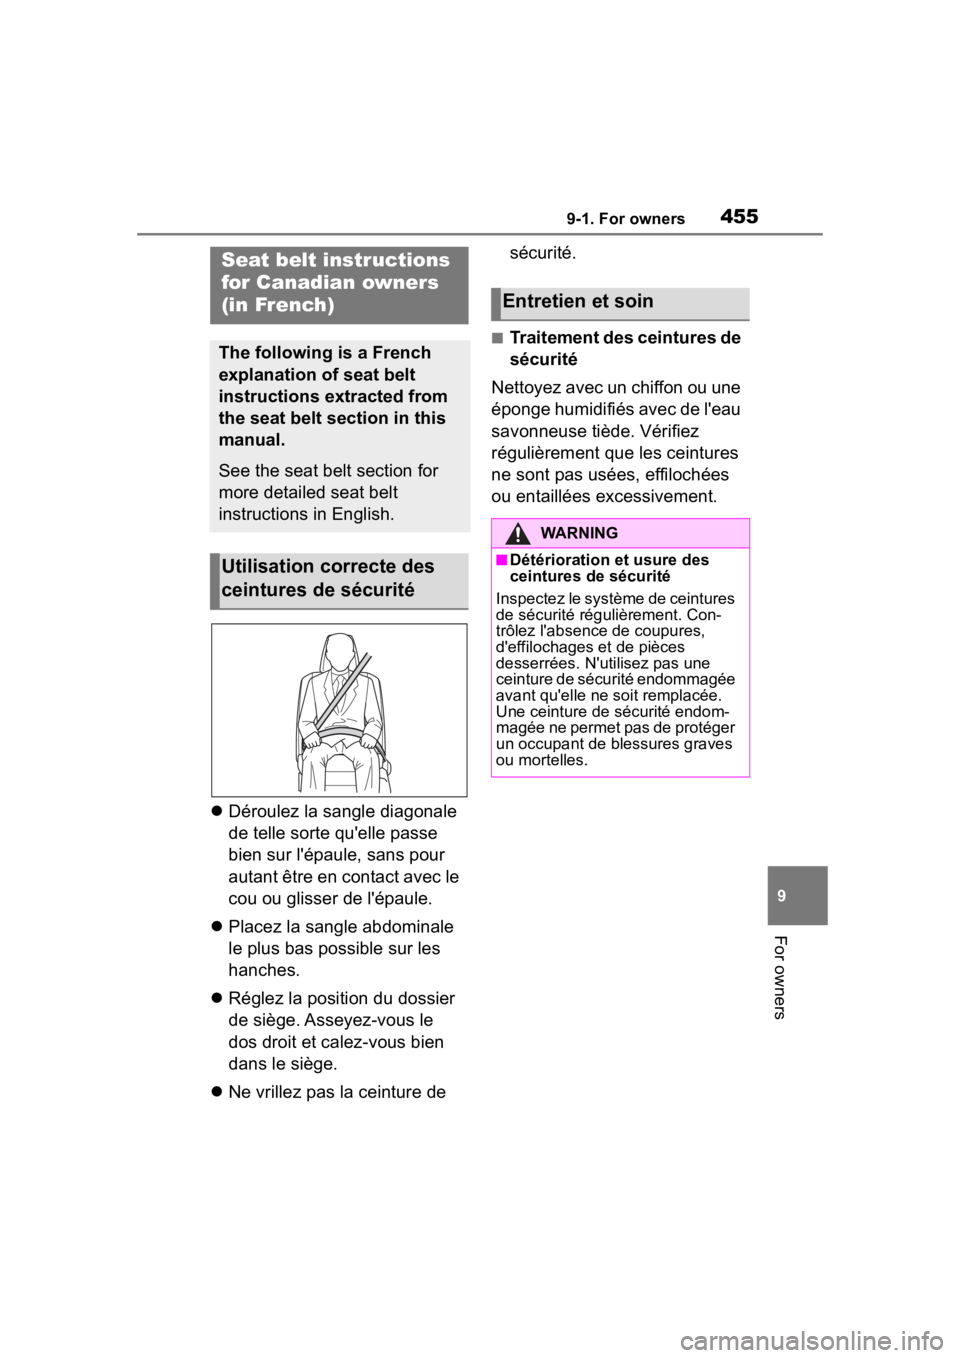
Déroulez la sangle diagonale
de telle sorte qu'elle passe
bien sur l'épaule, sans pour
autant être en contact avec le
cou ou glisser de l'épaule.
Placez la sangle abdominale
le plus bas possible sur les
hanches.
Réglez la position du dossier
de siège. Asseyez-vous le
dos droit et calez-vous bien
dans le siège.
Ne vrillez pas la ceinture de sécurité.
■Traitement des ceintures de
sécurité
Nettoyez avec un chiffon ou une
éponge humidifiés avec de l'eau
savonneuse tiède. Vérifiez
régulièrement que les ceintures
ne sont pas usées, effilochées
ou entaillées excessivement.
Seat belt instructions
for Canadian owners
(in French)
The following is a French
explanation of seat belt
instructions extracted from
the seat belt section in this
manual.
See the seat belt section for
more detailed seat belt
instructions in English.
Utilisation correcte des
ceintures de sécurité
Entretien et soin
WARNING
■Détérioration et usure des
ceintures de sécurité
Inspectez le système de ceintures
de sécurité régulièrement. Con-
trôlez l'absence de coupures,
d'effilochages et de pièces
desserrées. N'ut ilisez pas une
ceinture de sécurité endommagée
avant qu'elle ne soit remplacée.
Une ceinture de sécurité endom-
magée ne permet pas de protéger
un occupant de blessures graves
ou mortelles.