2023 TOYOTA COROLLA HYBRID high beam
[x] Cancel search: high beamPage 3 of 496

3TABLE OF CONTENTS
1
2
3
4
5
6
7
8
9
10
Power (ignition) switch (vehicles with a smart key system) . 172
EV drive mode ................... 178
Hybrid transmission............ 180
Turn signal lever................. 182
Parking brake ..................... 183
Brake Hold ......................... 187
4-3. Operating the lights and wip- ers
Headlight switch ................. 189
AHB (Automatic High Beam) ......................................... 191
Windshield wipers and washer ......................................... 194
4-4. Refueling Opening the fuel tank cap .. 196
4-5. Using the driving support sys- tems
Toyota Safety Sense 3.0 soft-ware update ..................... 199
Toyota Safety Sense 3.0 .... 201
PCS (Pre-Collision System) ......................................... 207
LTA (Lane Tracing Assist)... 218
LDA (Lane Departure Alert) ......................................... 223
PDA (Proactive driving assist) ......................................... 228
RSA (Road Sign Assist) ..... 234
Dynamic radar cruise control ......................................... 236
Cruise control ..................... 244
Emergency Driving Stop System ......................................... 247
BSM (Blind Spot Monitor)... 249
RCTA (Rear Cross Traffic Alert) function ............................ 254
Safe Exit Assist .................. 260
Driving mode select switch ......................................... 264
Driving assist systems........ 2664-6. Driving tips
Hybrid vehicle driving tips .. 271
Winter driving tips .............. 273
5-1. Using the air conditioning system and defogger
Automatic air conditioning sys-
tem ................................... 278
Heated steering wheel/seat heaters ............................. 284
5-2. Using the interior lights Interior lights list ................. 286
5-3. Using the storage features List of storage features ...... 288
5-4. Other interior features Other interior features ........ 291
6-1. Maintenance and care Cleaning and protecting the vehicle exterior................. 302
Cleaning and protecting the vehicle interior.................. 305
6-2. Maintenance Maintenance requirements......................................... 308
General maintenance......... 310
Emission inspection and mainte- nance (I/M) programs
......312
6-3. Do-it-yourself maintenance Do-it-yourself service precau-tions ................................. 314
Hood .................................. 316
Positioning a floor jack ....... 317
Engine compartment .......... 318
Tires ................................... 325
Tire inflation pressure......... 342
Wheels ............................... 344
5Interior features
6Maintenance and care
Page 17 of 496
17Pictorial index
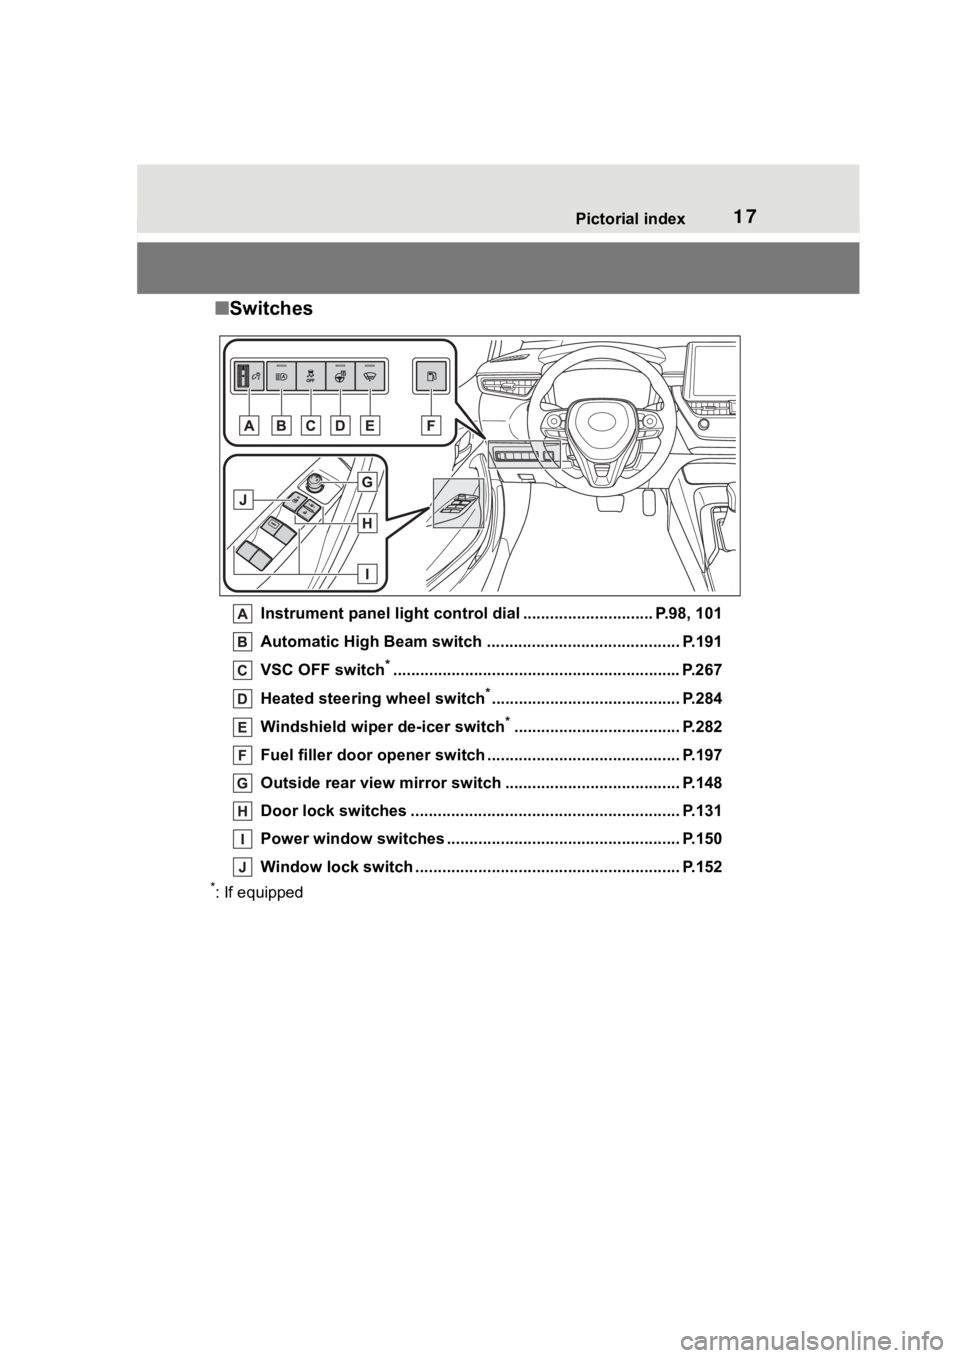
■Switches
Instrument panel light cont rol dial ............................. P.98, 101
Automatic High Beam switch ..................................... ...... P.191
VSC OFF switch
*............................................................... .P.267
Heated steering wheel switch
*.......................................... P.284
Windshield wiper de-icer switch
*..................................... P.282
Fuel filler door opener swi tch ........................................... P.197
Outside rear view mirror s witch ....................................... P.148
Door lock switches ............................................................ P.131
Power window switches ....... ............................................. P.150
Window lock switch ............................................. .............. P.152
*: If equipped
Page 94 of 496
942-1. Instrument cluster
*1: These lights come on when the power switch is turned to ON to
indicate that a system check is
being performed. They will turn
off after the hybrid system is on,
or after a few seconds. There
may be a malfunction in a sys-
tem if the lights do not come on,
or turn off. Have the vehicle
inspected by your Toyota dealer.
*2: This light illuminates on the multi-information display.
*3: 4.2-inch display.
*4: 7-inch display.
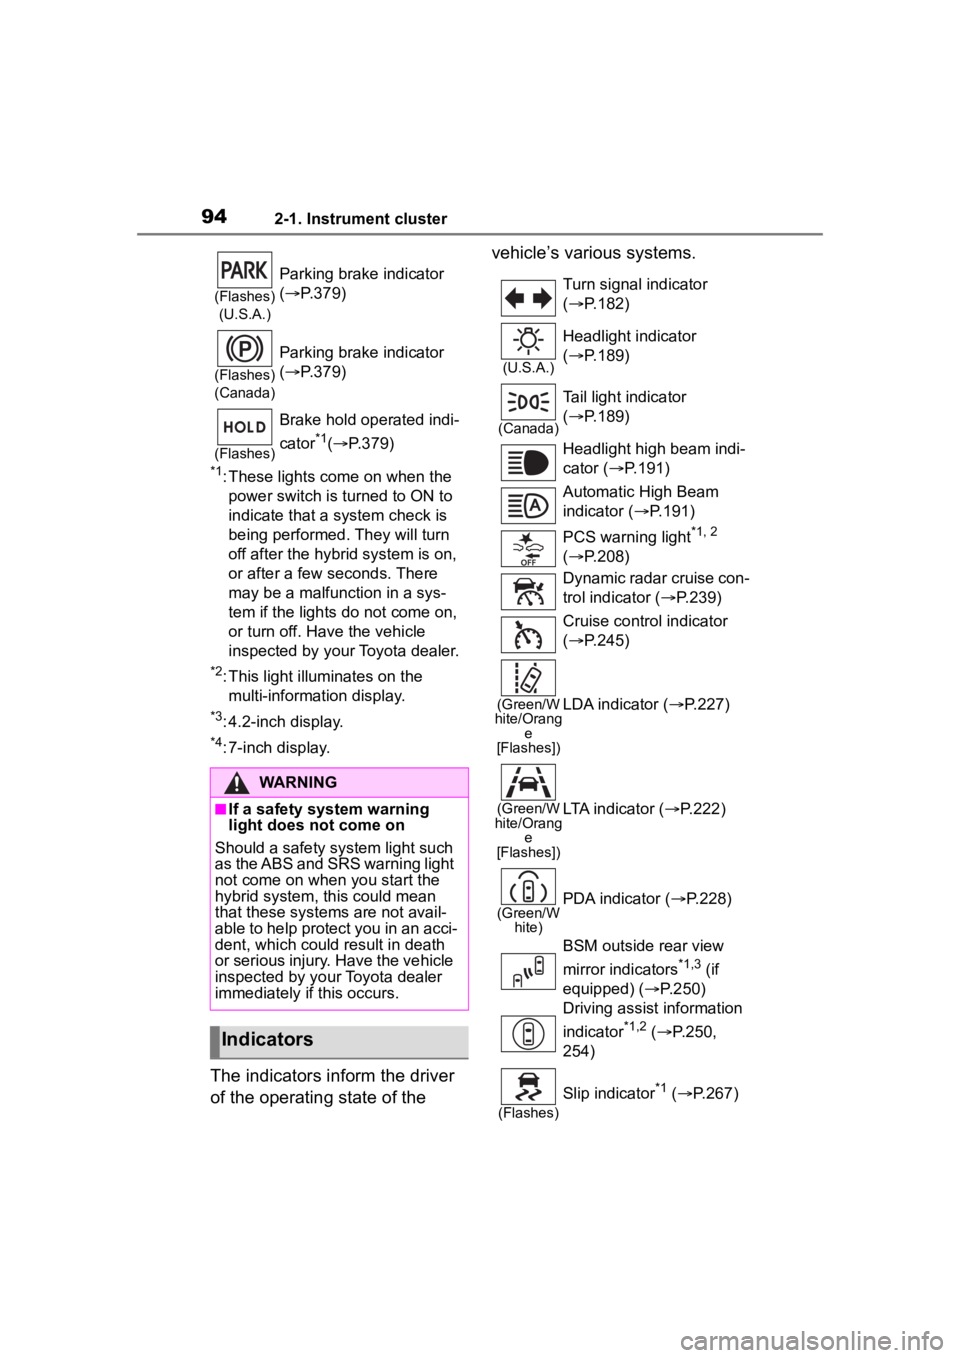
The indicators inform the driver
of the operating state of the vehicle’s various systems.
(Flashes)
(U.S.A.)
Parking brake indicator
( P.379)
(Flashes)
(Canada)
Parking brake indicator
( P.379)
(Flashes)
Brake hold operated indi-
cator
*1( P.379)
WARNING
■If a safety system warning
light does not come on
Should a safety system light such
as the ABS and SRS warning light
not come on when you start the
hybrid system, this could mean
that these systems are not avail-
able to help protect you in an acci-
dent, which could result in death
or serious injury. Have the vehicle
inspected by your Toyota dealer
immediately if this occurs.
Indicators
Turn signal indicator
( P.182)
(U.S.A.)
Headlight indicator
( P.189)
(Canada)
Tail light indicator
( P.189)
Headlight high beam indi-
cator ( P.191)
Automatic High Beam
indicator ( P.191)
PCS warning light
*1, 2
( P.208)
Dynamic radar cruise con-
trol indicator ( P.239)
Cruise control indicator
( P.245)
(Green/W
hite/Orang e
[Flashes])LDA indicator ( P.227)
(Green/W
hite/Orang e
[Flashes])LTA indicator ( P.222)
(Green/W
hite)PDA indicator ( P.228)
BSM outside rear view
mirror indicators
*1,3 (if
equipped) ( P.250)
Driving assist information
indicator
*1,2 ( P.250,
254)
(Flashes)
Slip indicator*1 ( P.267)
Page 157 of 496
157
4
4
Driving
Driving
.4-1. Before drivingDriving the vehicle....... 159
Cargo and luggage ..... 166
Vehicle load limits ....... 168
Trailer towing............... 169
Dinghy towing ............. 169
4-2. Driving procedures Power (ignition) switch (vehicles without a smart
key system) ............... 170
Power (ignition) switch (vehicles with a smart key
system)...................... 172
EV drive mode ............ 178
Hybrid transmission .... 180
Turn signal lever.......... 182
Parking brake .............. 183
Brake Hold .................. 187
4-3. Operating the lights and wipers
Headlight switch .......... 189
AHB (Automatic High Beam)........................ 191
Windshield wipers and washer....................... 194
4-4. Refueling Opening the fuel tank cap.................................. 1964-5. Using the dr
iving support
systems
Toyota Safety Sense 3.0 software update ......... 199
Toyota Safety Sense 3.0 .................................. 201
PCS (Pre-Collision System) .................................. 207
LTA (Lane Tracing Assist) .................................. 218
LDA (Lane Departure Alert) .................................. 223
PDA (Proactive driving assist) ........................ 228
RSA (Road Sign Assist) .................................. 234
Dynamic radar cruise con- trol ............................. 236
Cruise control .............. 244
Emergency Driving Stop System ...................... 247
BSM (Blind Spot Monitor) .................................. 249
RCTA (Rear Cross Traffic Alert) function ............ 254
Safe Exit Assist ........... 260
Driving mode select switch .................................. 264
Driving assist systems .................................. 266
4-6. Driving tips Hybrid vehicle driving tips.................................. 271
Page 191 of 496
1914-3. Operating the lights and wipers
4
Driving
■Customization
Some functions can be customized.
( P.442)
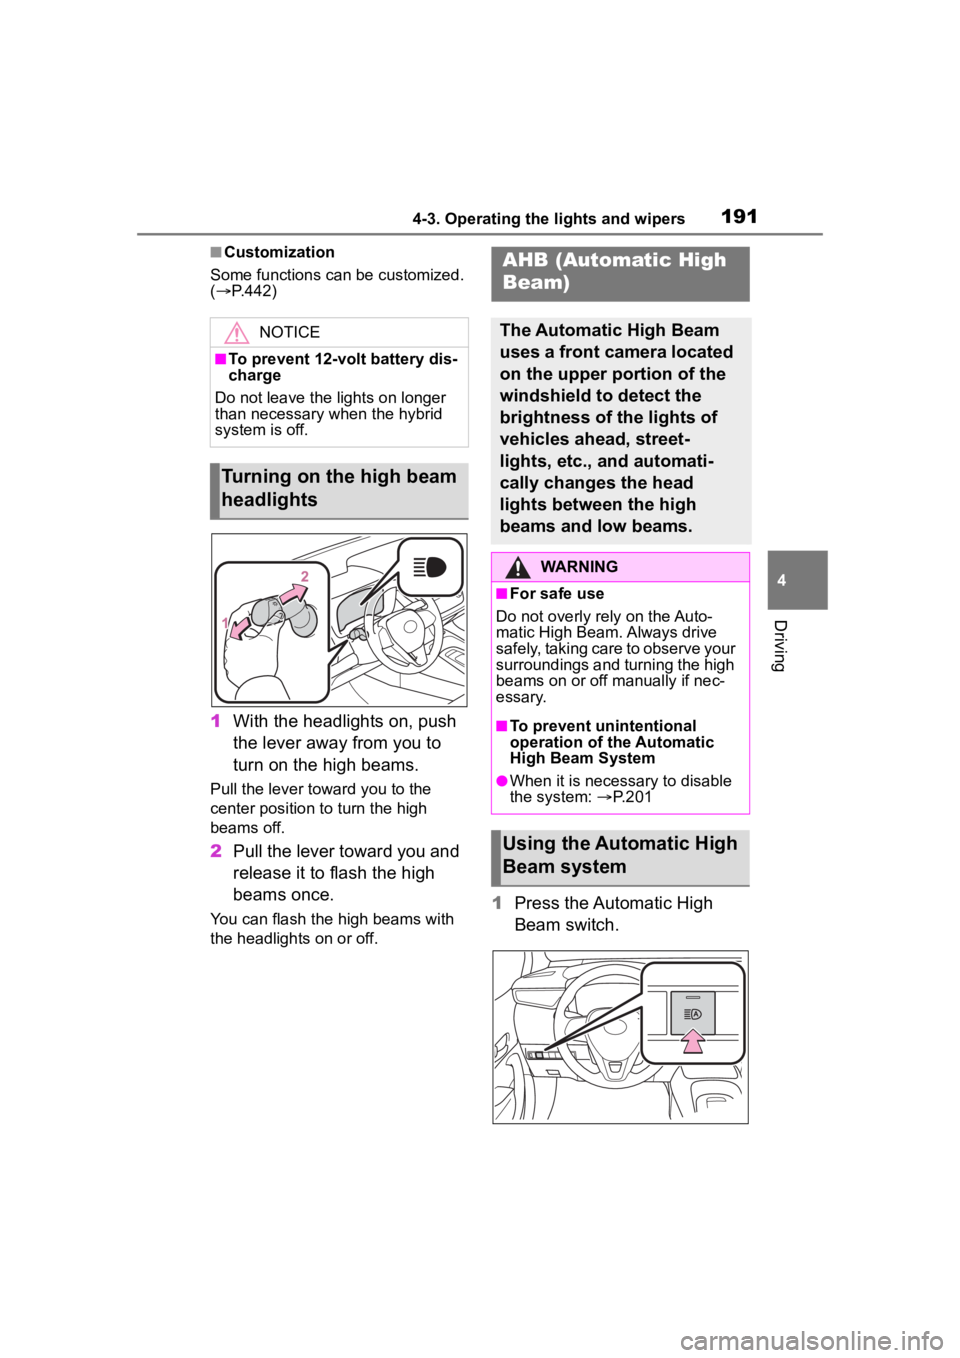
1 With the headlights on, push
the lever away from you to
turn on the high beams.
Pull the lever toward you to the
center position to turn the high
beams off.
2Pull the lever toward you and
release it to flash the high
beams once.
You can flash the high beams with
the headlights on or off.1Press the Automatic High
Beam switch.
NOTICE
■To prevent 12-volt battery dis-
charge
Do not leave the lights on longer
than necessary when the hybrid
system is off.
Turning on the high beam
headlights
AHB (Automatic High
Beam)
The Automatic High Beam
uses a front camera located
on the upper portion of the
windshield to detect the
brightness of the lights of
vehicles ahead, street-
lights, etc., and automati-
cally changes the head
lights between the high
beams and low beams.
WARNING
■For safe use
Do not overly rely on the Auto-
matic High Beam. Always drive
safely, taking care to observe your
surroundings and turning the high
beams on or off manually if nec-
essary.
■To prevent unintentional
operation of the Automatic
High Beam System
●When it is necessary to disable
the system: P.201
Using the Automatic High
Beam system
Page 192 of 496

1924-3. Operating the lights and wipers
2Turn the headlight switch to
the or position.
When the headlight switch lever is
in the low beam position, the AHB
system will be enabled and the
AHB indicator will illuminate.
■Automatic operating condi-
tions of the high beams
●When all of the following condi-
tions are met, the high beams will
illuminate automatically:
• The vehicle speed is approxi-
mately 21 mph (34 km/h) or more.
• The area ahead of the vehicle is dark.
• There are no vehicles ahead with lights on.
• There are few streetlights or other
lights on the road ahead.
●If any of the following conditions
are met, the headlights will
change to the low beams:
• Vehicle speed drops below
approximately 17 mph (27 km/h).
• The area ahead of the vehicle is not dark.
• There is a vehi cle ahead with
lights on.
• There are many streetlights or
other lights on the road ahead.
■Front camera detection
●In the following situations, the high
beams may not be automatically
changed to the low beams:
• When a vehicle cuts in front of your vehicle
• When another vehicle crosses in front of the vehicle • When vehicles ahead are repeat-
edly detected and then hidden
due to repeated curves, road
dividers or roadside trees
• When a vehicle ahead approaches from a far lane
• When a vehicle ahead is far away
• When a vehicle ahead has no lights
• When the lights of a vehicle ahead are dim
• When a vehicle ahead is reflecting
strong light, such as own head-
lights
• Situations in which the sensors
may not operate properly: P. 2 0 5
●The headlights may change to the
low beams if a vehicle ahead that
is using fog lights without its head-
lights turned on is detected.
●House lights, street lights, traffic
signals, and illuminated billboards
or signs may cause the high
beams to change to the low
beams, or the low beams to
remain on.
●The following may change the tim-
ing at which the headlights
change to the low beams:
• The brightness o f lights of vehi-
cles ahead
• The movement and direction of vehicles ahead
• The distance between the vehicle and a vehicle ahead
• When a vehicle ahead only has
lights illuminate d on one side
• When a vehicle ahead is a two-wheeled vehicle
• The condition of the road (gradi- ent, curve, condition of the road
surface, etc.)
• The number of passengers and amount of luggage
●The headlights may change
between the high beams and low
beams unexpectedly.
●Bicycles and other small vehicles
may not be detected.
●In the following situations, the sys-
tem may not be able to correctly
detect the brightness of the sur-
Page 193 of 496
1934-3. Operating the lights and wipers
4
Driving
roundings. This may cause the
low beams to remain on or the
high beams to flash or dazzle
pedestrians or vehicles ahead. In
such a case, it is necessary to
manually change between the
high beams and low beams.
• When there are lights similar to headlights or tail li ghts in the sur-
rounding area
• When headlights or tail lights of vehicles ahead are turned off,
dirty, changing color, or not aimed
properly
• When the headlights are repeat-
edly changing between the high
beams and low beams.
• When use of the high beams is
inappropriate or when the high
beams may be flashing or daz-
zling pedestrians or other drivers.
• When the vehicle is used in an area in which vehicles travel on
the opposite side of the road of
the country for wh ich the vehicle
was designed, for example using
a vehicle designed for right-hand
traffic in a left-hand traffic area, or
vice versa
• When it is necessary to disable
the system: P. 2 0 1
• Situations in which the sensors may not operate properly: P. 2 0 5
■Temporarily reducing front
camera sensitivity (for the
U.S.A.)
The sensitivity o f the front camera
can be temporarily reduced.
1 Press the power switch off with
the following conditions met.
• The headlight switch is in the
or position.
• The headlight switch lever is in the low beam position.
• The automatic High Beam switch is on.
2 Press the power switch to ON.
3 Within 60 seconds after perform-
ing step 2, push the headlight
switch lever to the high beam
position then pull it to the original position quickly 10 times, then
leave the lever in its original posi-
tion.
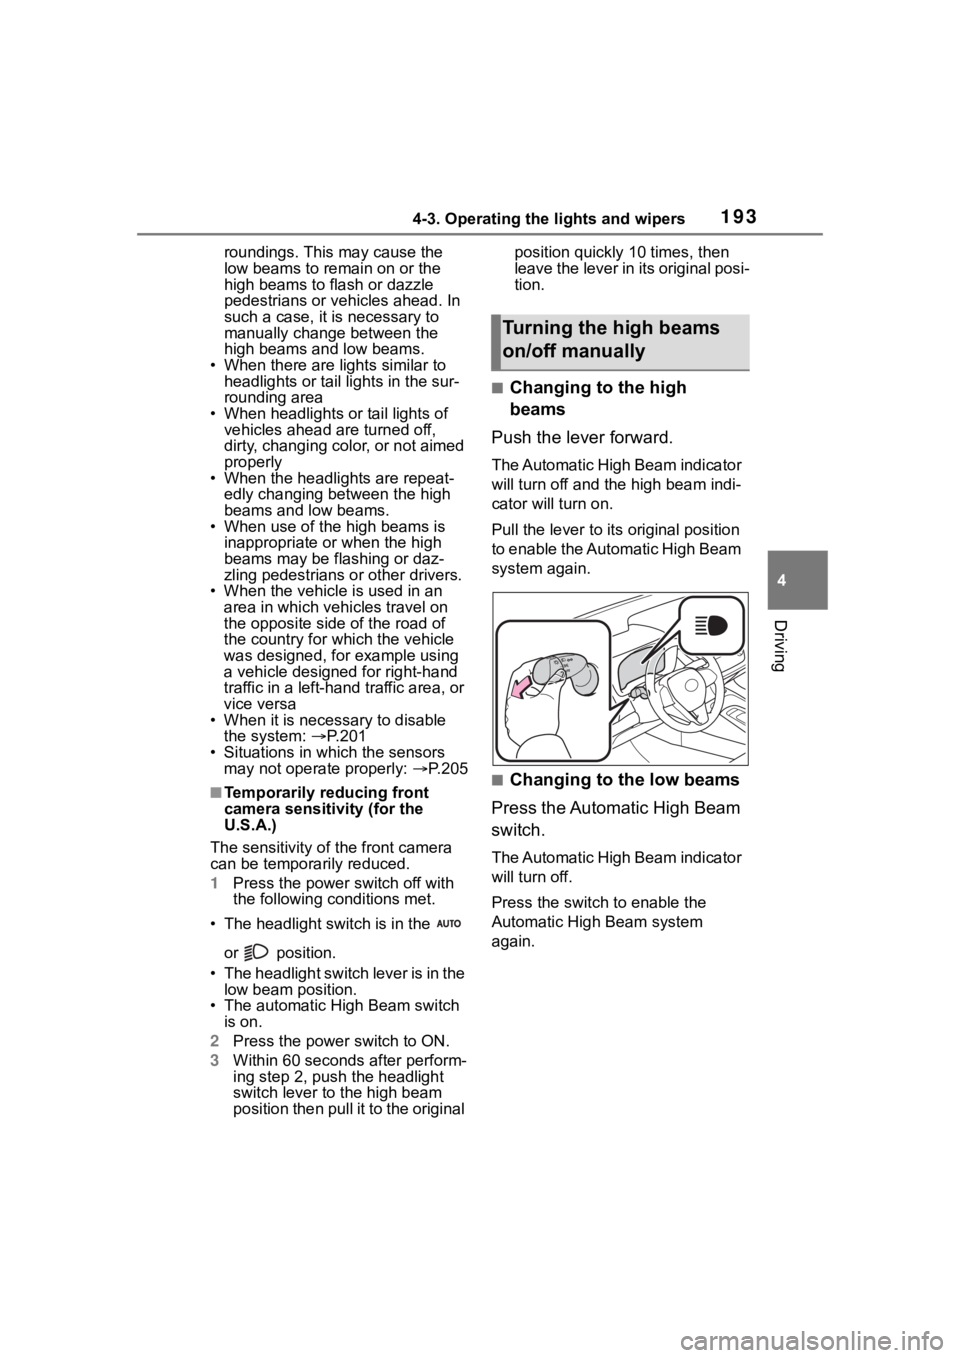
■Changing to the high
beams
Push the lever forward.
The Automatic High Beam indicator
will turn off and the high beam indi-
cator will turn on.
Pull the lever to its original position
to enable the Automatic High Beam
system again.
■Changing to the low beams
Press the Automatic High Beam
switch.
The Automatic High Beam indicator
will turn off.
Press the switch to enable the
Automatic High Beam system
again.
Turning the high beams
on/off manually
Page 194 of 496
1944-3. Operating the lights and wipers
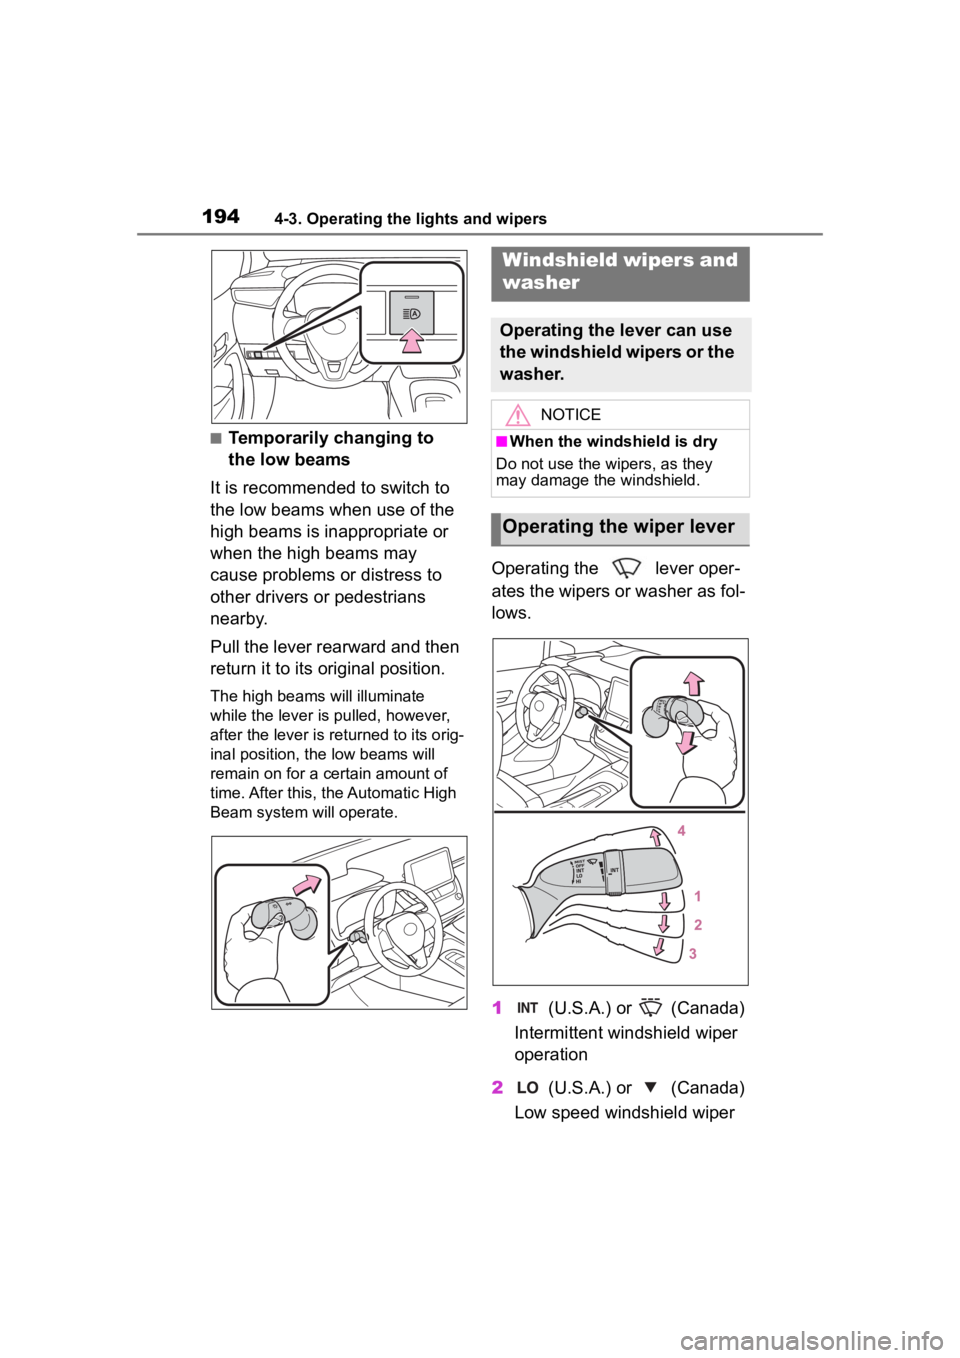
■Temporarily changing to
the low beams
It is recommended to switch to
the low beams when use of the
high beams is inappropriate or
when the high beams may
cause problems or distress to
other drivers or pedestrians
nearby.
Pull the lever rearward and then
return it to its original position.
The high beams will illuminate
while the lever is pulled, however,
after the lever is returned to its orig-
inal position, t he low beams will
remain on for a certain amount of
time. After this, the Automatic High
Beam system will operate.
Operating the lever oper-
ates the wipers or washer as fol-
lows.
1 (U.S.A.) or (Canada)
Intermittent windshield wiper
operation
2 (U.S.A.) or (Canada)
Low speed windshield wiper
Windshield wipers and
washer
Operating the lever can use
the windshield wipers or the
washer.
NOTICE
■When the windshield is dry
Do not use the wipers, as they
may damage the windshield.
Operating the wiper lever