2023 TOYOTA COROLLA CROSS mirror
[x] Cancel search: mirrorPage 295 of 500
2955-1. Using the air conditioning system and defogger
5
Interior features
To defog the windshield and the
side windows quickly, turn the air
flow and temperature up.
To return to the previous mode,
press the windshield defogger
switch again when the windshield is
defogged.
When the windshield defogger
switch is on, the indicator illumi-
nates on the windshield defogger
switch.
■Defogging the rear window
and outside rear view mir-
rors
Defoggers are used to defog the
rear window, and to remove
raindrops, dew and frost from
the outside rear view mirrors.
Press the rear window and out-
side rear view mirror defoggers
switch.
The defoggers will automatically
turn off after a while.
When the rear window and outside
rear view mirror defoggers switch is
on, the indicator illuminates on the
rear window and ou tside rear view
mirror defoggers switch.
■Eco air conditioning mode
The air conditioning is controlled
with low fuel consumption priori-
tized such as reducing fan
speed, etc.
Press the eco air conditioning
mode switch.
When the eco air conditioning
mode is on, the indicator illumi-
nates on the eco air conditioning
mode switch.
■When the outside temperature
exceeds 75°F (24°C) and the air
conditioning system is on
●In order to reduce the air condi-
tioning power consumption, the air
conditioning system may switch to
recirculated air mode automati-
cally. This may also reduce fuel
consumption.
●Recirculated air mode is selected
as a default mode when the
engine switch is turned to ON.
●It is possible to switch to outside
air mode at any time by pressing
the outside air mode switch.
■Fogging up of the windows
●The windows will easily fog up
when the humidity in the vehicle is
high. Turning “A/C” on will dehu-
midify the air from the outlets and
defog the windshield effectively.
●If you turn “A/C” off, the windows
may fog up more easily.
●The windows may fog up if the
recirculated air mode is used.
■When driving on dusty roads
Close all windows. If dust thrown up
by the vehicle is still drawn into the
vehicle after closing the windows, it
is recommended that the air intake
mode be set to outside air mode and
the fan speed to a ny setting except
off.
■Outside/recirculated air mode
●Setting to the recirculated air
mode temporarily is recom-
mended in preventing dirty air
from entering the vehicle interior
and helping to c ool the vehicle
when the outside air temperature
is high.
●Outside/recirculated air mode may
automatically switch depending on
the temperature setting or the
inside temperature.
Page 297 of 500
2975-1. Using the air conditioning system and defogger
5
Interior features
1Press the automatic mode
switch.
2 Adjust the temperature set-
ting.
3 To stop the operation, press
the off switch.
If the fan speed setting or air
flow modes are operated, the
automatic mode indicator goes
off. However, automatic mode
for functions other than that
operated is maintained.
■Using automatic mode
Fan speed is adjusted automati-
cally according to the temperature
setting and the ambient conditions. Therefore, the fan may stop for a
while until warm or
cool air is ready
to flow immediately after the auto-
matic mode switch pressed.
This function automatically con-
trols the air conditioning airflow
so that priority is given to the
front seats. Unnecessary air
conditioning is suppressed, con-
tributing to increased fuel effi-
ciency.
Front seat concentrated airflow
mode operates in the following
situations.
No passengers are detected
in the rear seats
The windshield defogger is
not operating
While operating, illumi-
nates.
■Manually turning front seat
concentrated airflow mode
on/off
In front seat concentrated air-
flow mode, directing airflow to
the front seats only and to all
seats can be switched via switch
operation. When the mode has
been switched manually, auto-
matic airflow control stops oper-
ating.
Press on the air condi-
tioning operation panel and
switch the airflow.
WARNING
■When the outside rear view
mirror defoggers are operat-
ing
Do not touch the outside rear view
mirror surfaces, as they can
become very hot and burn you.
NOTICE
■To prevent battery discharge
Do not leave the air conditioning
system on longer than necessary
when the engine is off.
■When repairing/replacing
parts of the air conditioning
system
Have repair/replacement per-
formed by your Toyota dealer.
When a part of the air conditioning
system, such as the evaporator, is
to be replaced, it must be
replaced with a new one.
Using automatic mode
Front seat concentrated
airflow mode (S-FLOW)
Page 318 of 500
3185-4. Other interior features
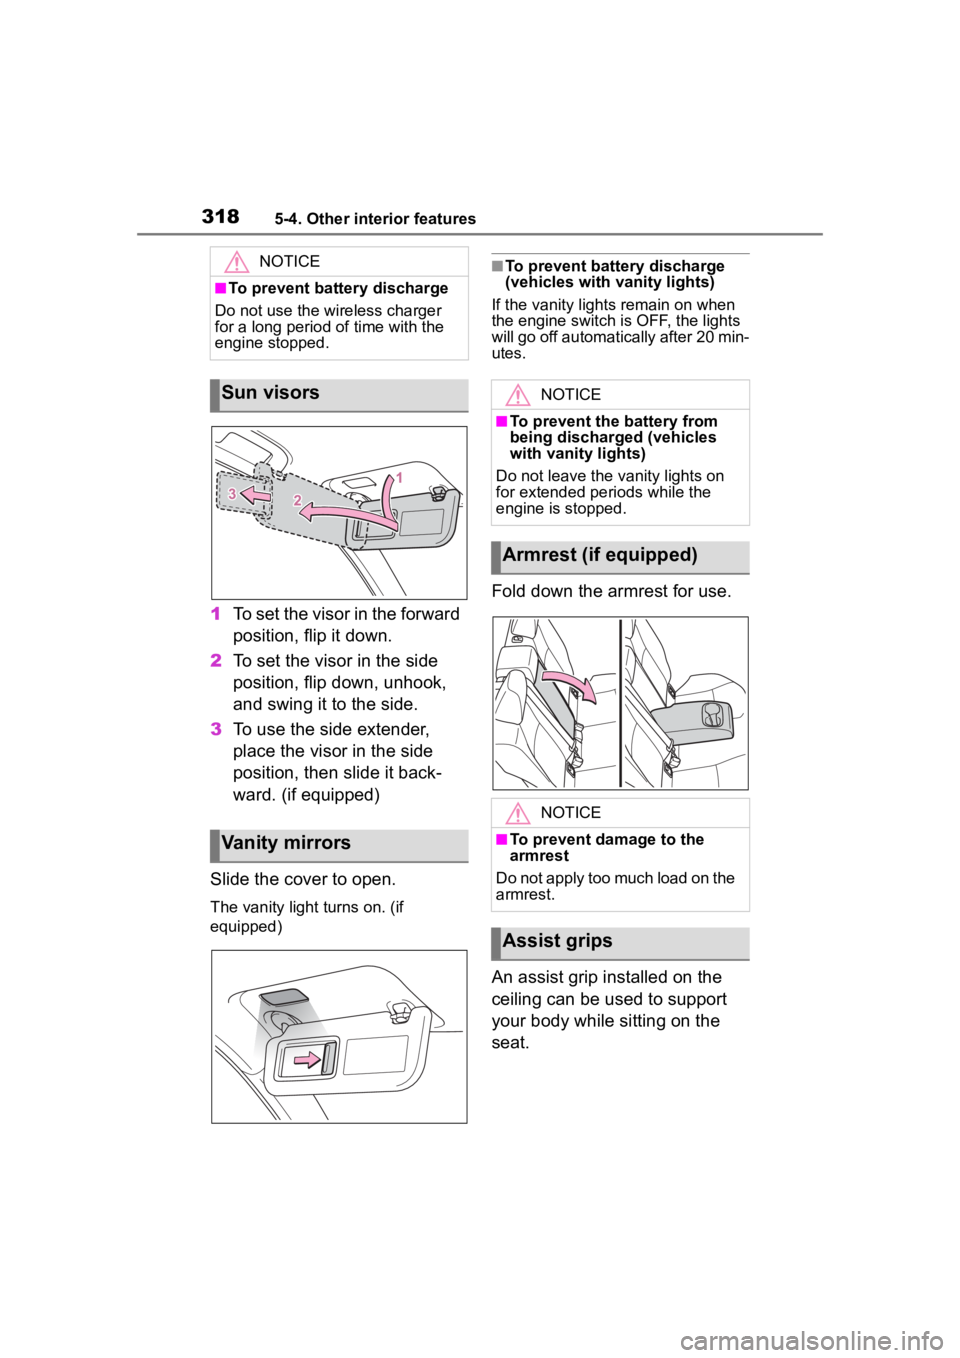
1To set the visor in the forward
position, flip it down.
2 To set the visor in the side
position, flip down, unhook,
and swing it to the side.
3 To use the side extender,
place the visor in the side
position, then slide it back-
ward. (if equipped)
Slide the cover to open.
The vanity light turns on. (if
equipped)
■To prevent battery discharge
(vehicles with vanity lights)
If the vanity lights remain on when
the engine switch is OFF, the lights
will go off automatically after 20 min-
utes.
Fold down the armrest for use.
An assist grip installed on the
ceiling can be used to support
your body while sitting on the
seat.
NOTICE
■To prevent battery discharge
Do not use the wireless charger
for a long period of time with the
engine stopped.
Sun visors
Vanity mirrors
NOTICE
■To prevent the battery from
being discharged (vehicles
with vanity lights)
Do not leave the vanity lights on
for extended periods while the
engine is stopped.
Armrest (if equipped)
NOTICE
■To prevent damage to the
armrest
Do not apply too much load on the
armrest.
Assist grips
Page 321 of 500
3215-4. Other interior features
5
Interior features
■Before programming Home-
Link
®
During programming, it is pos-
sible that garage doors,
gates, or other devices may
operate. For this reason,
make sure that people and
objects are clear of the
garage door or other devices
to prevent injury or other
potential harm.
It is recommended that a new
battery be placed in the
remote control transmitter for
more accurate programming.
Garage door opener motors
manufactured after 1995 may
be equipped with rolling code protection. If this is the case,
you may need a stepladder or
other sturdy, safe device to
reach the “Learn” or “Smart”
button on the garage door
opener motor.
■Programming HomeLink®
Steps
1 through 3 must be per-
formed within 60 seconds, oth-
erwise the indicator light will
stop flashing and programming
will not be able to be completed.
1 Press and release the Home-
Link
® button you want to pro-
gram and check that the
HomeLink
® indicator light
flashes (orange).
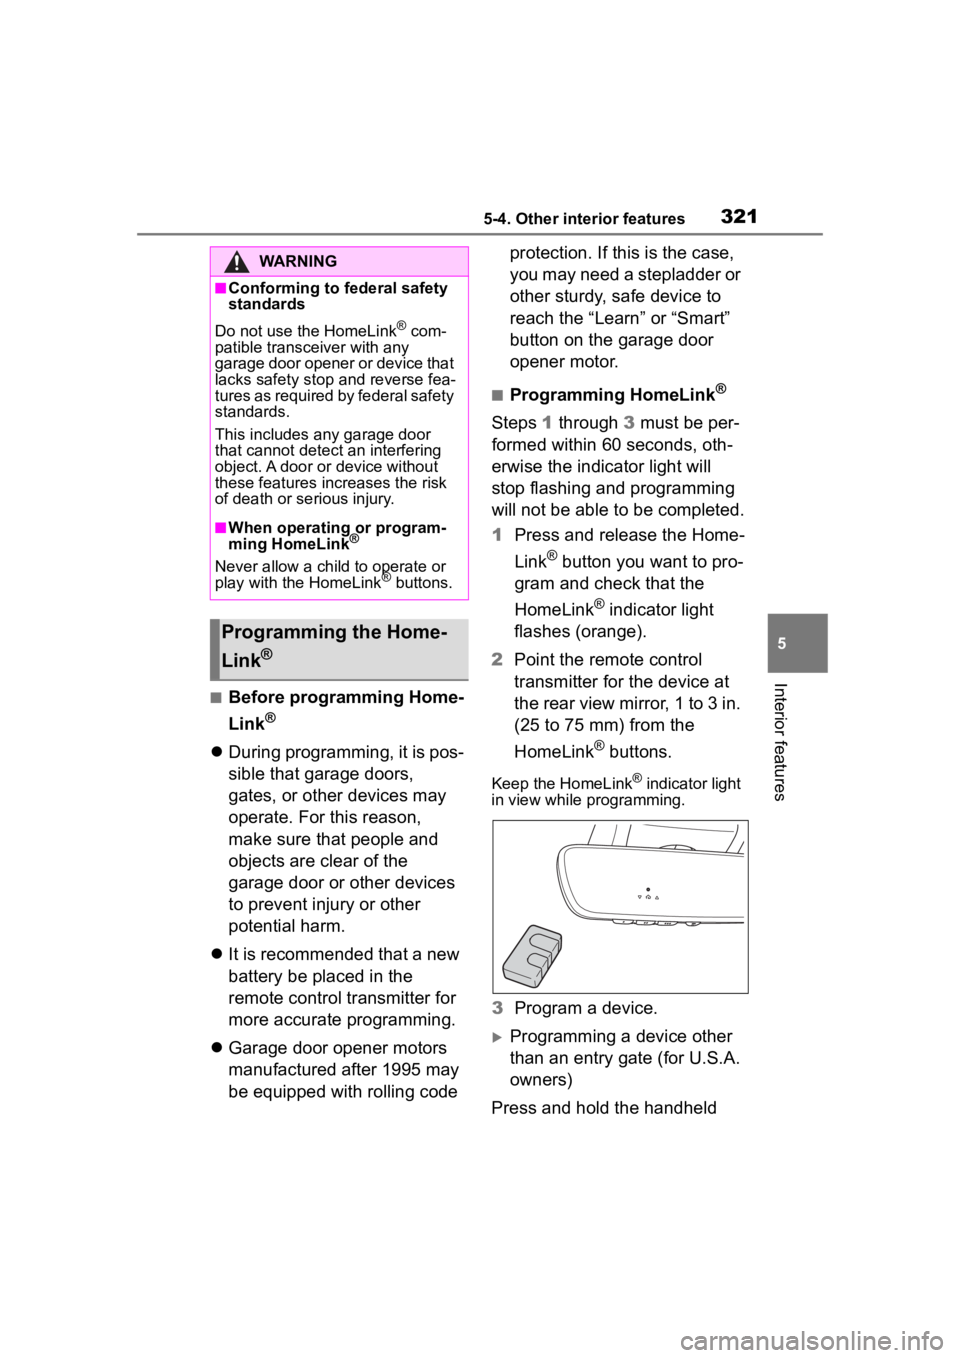
2 Point the remote control
transmitter for the device at
the rear view mirror, 1 to 3 in.
(25 to 75 mm) from the
HomeLink
® buttons.
Keep the HomeLink® indicator light
in view while programming.
3 Program a device.
Programming a device other
than an entry gate (for U.S.A.
owners)
Press and hold the handheld
WARNING
■Conforming to federal safety
standards
Do not use the HomeLink
® com-
patible transceiver with any
garage door opener or device that
lacks safety stop and reverse fea-
tures as required by federal safety
standards.
This includes any garage door
that cannot detect an interfering
object. A door or device without
these features increases the risk
of death or se rious injury.
■When operating or program-
ming HomeLink®
Never allow a child to operate or
play with the HomeLink® buttons.
Programming the Home-
Link
®
Page 328 of 500
3286-1. Maintenance and care
6-1.Maintenance and care
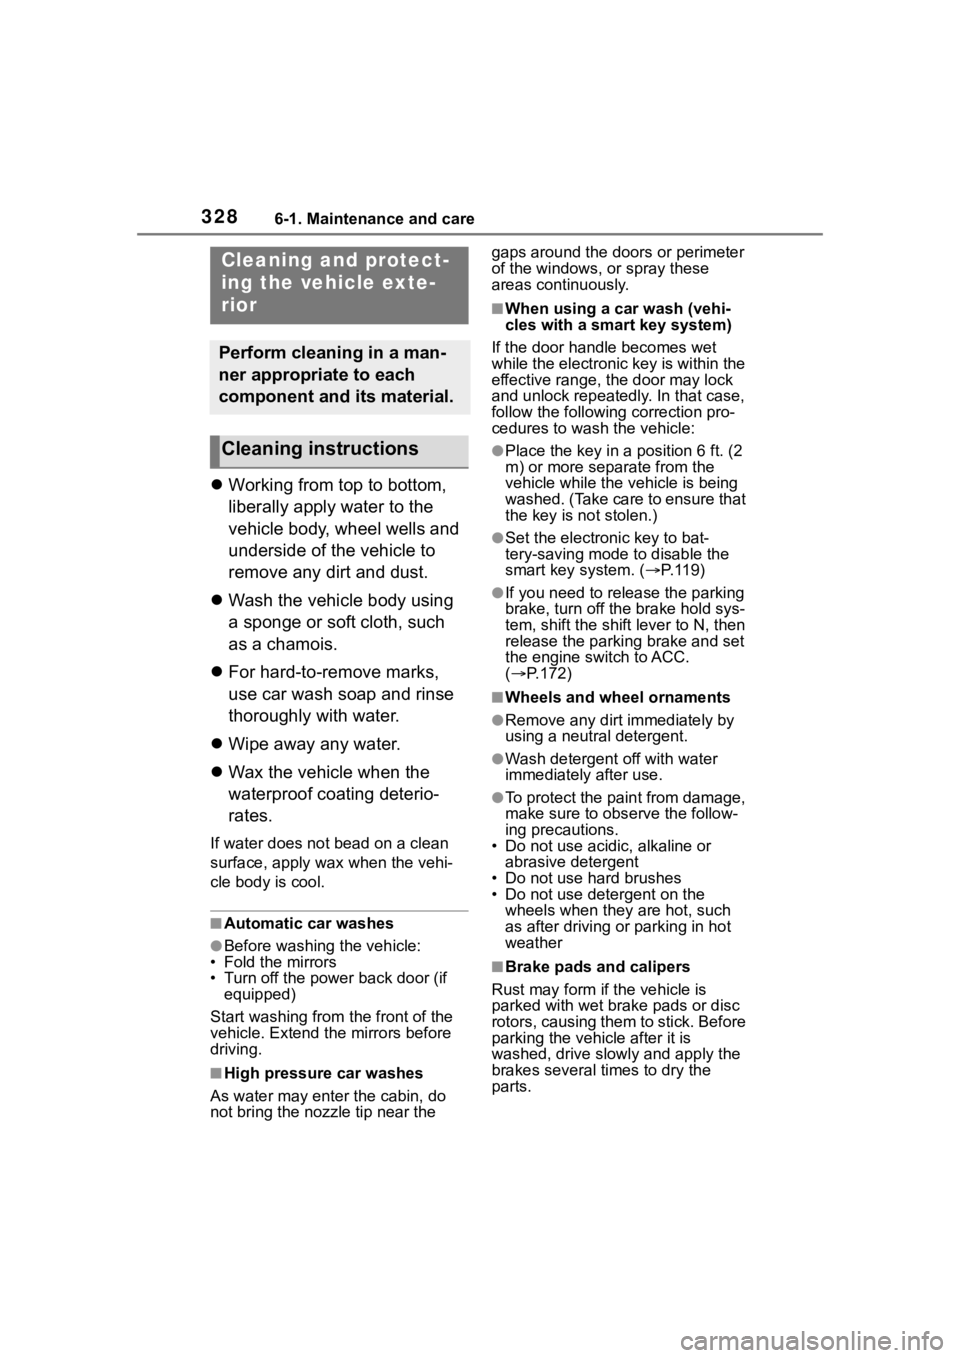
Working from top to bottom,
liberally apply water to the
vehicle body, wheel wells and
underside of the vehicle to
remove any dirt and dust.
Wash the vehicle body using
a sponge or soft cloth, such
as a chamois.
For hard-to-remove marks,
use car wash soap and rinse
thoroughly with water.
Wipe away any water.
Wax the vehicle when the
waterproof coating deterio-
rates.
If water does not bead on a clean
surface, apply wax when the vehi-
cle body is cool.
■Automatic car washes
●Before washing the vehicle:
• Fold the mirrors
• Turn off the power back door (if equipped)
Start washing from the front of the
vehicle. Extend the mirrors before
driving.
■High pressure car washes
As water may ent er the cabin, do
not bring the nozzle tip near the gaps around the doors or perimeter
of the windows, or spray these
areas continuously.
■When using a car wash (vehi-
cles with a smart key system)
If the door handle becomes wet
while the electronic key is within the
effective range, the door may lock
and unlock repeatedly. In that case,
follow the following correction pro-
cedures to wash the vehicle:
●Place the key in a position 6 ft. (2
m) or more separate from the
vehicle while the vehicle is being
washed. (Take care to ensure that
the key is not stolen.)
●Set the electronic key to bat-
tery-saving mode to disable the
smart key system. ( P.119)
●If you need to release the parking
brake, turn off the brake hold sys-
tem, shift the shift lever to N, then
release the parking brake and set
the engine switch to ACC.
( P.172)
■Wheels and wheel ornaments
●Remove any dirt immediately by
using a neutral detergent.
●Wash detergent off with water
immediately after use.
●To protect the paint from damage,
make sure to obs erve the follow-
ing precautions.
• Do not use acidic, alkaline or
abrasive detergent
• Do not use hard brushes
• Do not use detergent on the wheels when they are hot, such
as after driving or parking in hot
weather
■Brake pads and calipers
Rust may form if the vehicle is
parked with wet brake pads or disc
rotors, causing them to stick. Before
parking the vehicle after it is
washed, drive slo wly and apply the
brakes several times to dry the
parts.
Cleaning and protect-
ing the vehicle exte-
rior
Perform cleaning in a man-
ner appropriate to each
component and its material.
Cleaning instructions
Page 456 of 500
4568-2. Customization
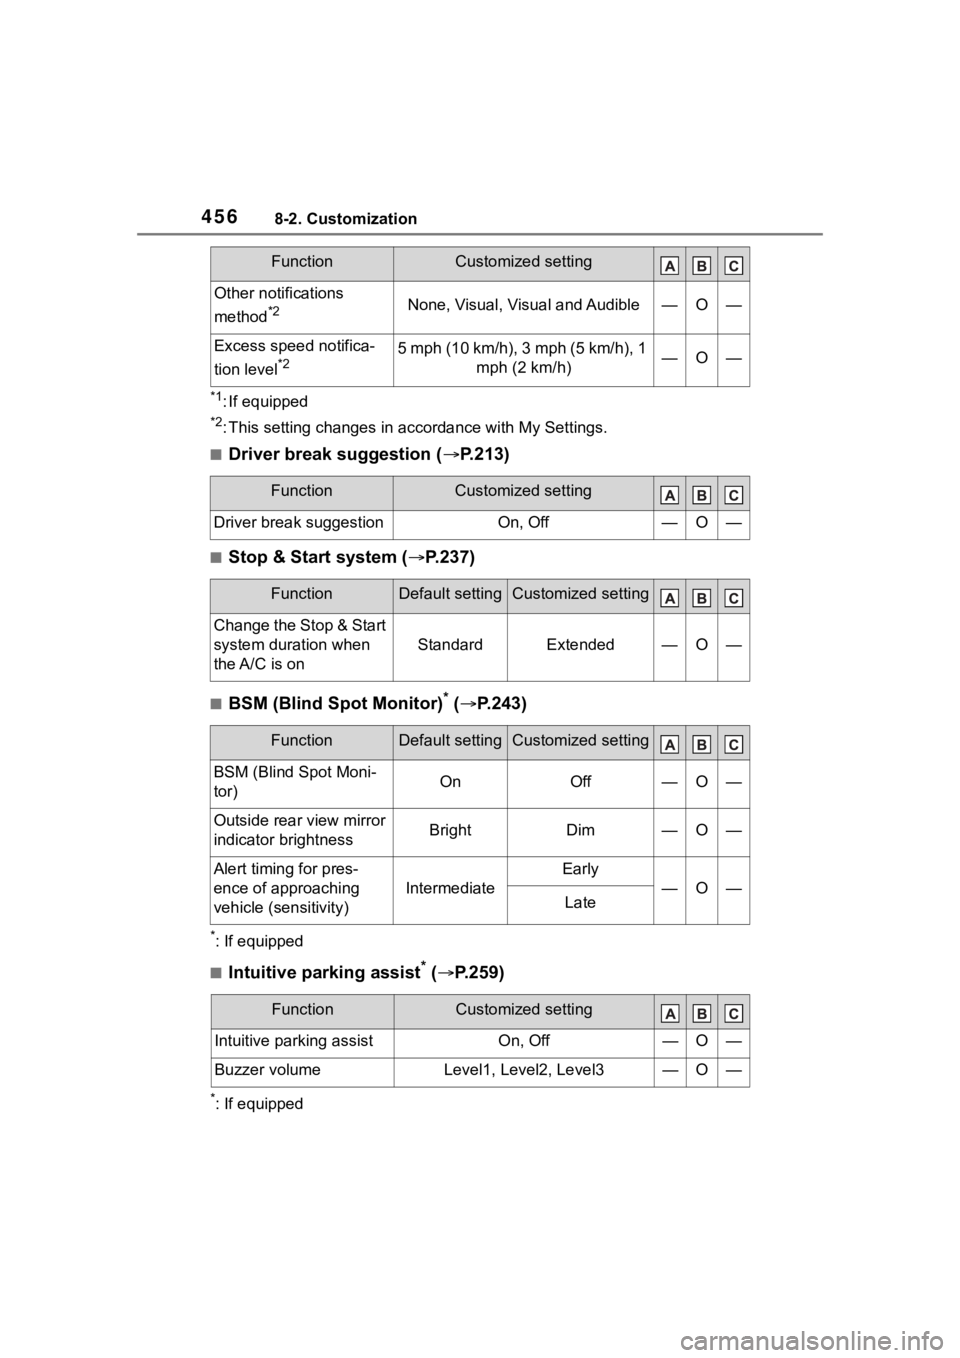
*1: If equipped
*2: This setting changes in accordance with My Settings.
■Driver break suggestion ( P.213)
■Stop & Start system ( P.237)
■BSM (Blind Spot Monitor)* ( P.243)
*: If equipped
■Intuitive parking assist* ( P.259)
*: If equipped
Other notifications
method
*2None, Visual, Visual and Audible—O—
Excess speed notifica-
tion level
*25 mph (10 km/h), 3 mph (5 km/h), 1
mph (2 km/h)—O—
FunctionCustomized setting
Driver break suggestionOn, Off—O—
FunctionDefault settingCustomized setting
Change the Stop & Start
system duration when
the A/C is on
StandardExtended—O—
FunctionDefault settingCustomized setting
BSM (Blind Spot Moni-
tor)OnOff—O—
Outside rear view mirror
indicator brightnessBrightDim—O—
Alert timing for pres-
ence of approaching
vehicle (sensitivity)
Intermediate
Early
—O—Late
FunctionCustomized setting
Intuitive parking assistOn, Off—O—
Buzzer volumeLevel1, Level2, Level3—O—
FunctionCustomized setting
Page 477 of 500

477Alphabetical Index
Daytime running lights/parking lightsReplacing light bulbs ............ 375
Defogger Outside rear view mirrors ... 288, 295
Rear window ................ 288, 295
Windshield.................... 287, 294
Differential Rear differential oil ............... 433
Dimensions ............................. 428
Dinghy towing ........................ 161
Display Cruise control ....................... 231
Dynamic radar cruise control 223
Intuitive parking assist .......... 259
Multi-information display .. 82, 89
RCTA .................................... 249
Warning message ................ 401
Display change button ....... 77, 80
Do-it-yourself maintenance ... 335
Door lock Back door ............................. 108
Key ....................................... 104
Side doors ............................ 103
Smart key system................. 118
Wireless remote control ....... 100
Doors Automatic door locking and unlocking system................ 107
Back door ............................. 108
Door glasses ........................ 132
Door lock .............................. 108
Open door warning buzzer . 105, 107
Outside rear view mirrors ..... 130
Rear door child-protectors.... 107
Drive distance ..................... 85, 92
Drive information ............... 85, 92
Drive-Start Control (DSC) Sudden start restraint control147 Driving
Break-in tips .........................142
Correct driving posture ...........23
Procedures ...........................141
Winter drive tips....................279
Driving information display83, 90
Driving range ................83, 84, 90
Driving support system informa- tion display........................85, 91
DSC (Drive-Start Control) Sudden start restraint control147
Dynamic radar cruise control 220
Dynamic Torque Control AWD system ...................................274
E
Eco Driving Indicator .........84, 90
Eco Driving Indicator Light84, 90
EDR (Event data recorder) .........8
Elapsed time .......................85, 92
Electric Power Steering (EPS) ...............................................274Warning light.........................393
Electronic key ...........................98 Battery-saving function ......... 119
If the electronic key does not operate properly .................417
Replacing the battery ...........368
Emergency Driving Stop System ...............................................235
Emergency flashers ...............382
Emergency, in case of If a warning buzzer sounds ..391
If a warning light turns on .....391
If a warning message is dis-played .................................401
If the battery is d ischarged ...419
If the electronic key does not operate properly .................417
If the engine will not start......415
If the vehicle is submerged or water on the road is rising ..384
Page 479 of 500

479Alphabetical Index
Fuel gauge ....................... 76, 79
Fuel pump shut off system ... 390
Information ........................... 436
Refueling .............................. 188
Type ..................................... 430
Warning light ........................ 394
Fuel consumption Average fuel economy ..... 83, 90
Current fuel consumption . 83, 90
Fuel economy ......... ............ 83, 90
Fuel filler door Refueling .............................. 188
Fuel gauge .......................... 76, 79
Fuel pump shut off system.... 390
Fuses ....................................... 371
G
Garage door opener ............... 320
Gauges ................................ 76, 79
Glove box ................................ 305
Glove box light ....................... 305
H
Head restraints ....................... 126
Headlight aim .......................... 373
Headlights Adaptive Front-lighting System (AFS) .................................. 180
Automatic High Beam system ........................................... 181
Light switch .......................... 178
Replacing light bulbs ............ 375
Headlights/daytime running lightsReplacing light bulbs ............ 375
Heated steering wheel ........... 300
Heaters Automatic air conditioning sys-tem ..................................... 292
Heated steering wheel ......... 300 Manual air conditioning system
...........................................286
Outside rear view mirrors ...288, 295
Seat heaters ....... ..................300
High mounted stoplight Replacing light bulbs ............375
Hill-start assist control...........274
Hood Open.....................................342
Hooks Coat hooks ...........................319
Retaining hooks (floor mat) ....22
Horn .........................................128
I
I/M test .....................................338
Identification Engine ..................................429
Vehicle ..................................429
Ignition switch (engine switch) .......................................162, 163Auto power off fun ction .........167
Changing the engine switch modes.................................166
If your vehicle has to be stopped in an emergency .................382
Illuminated entry system .......303
Indicators ..................................74
Initialization Items to initialize ...................459
Maintenance .........................335
Power windows ....................132
Tire pressure w arning system
...........................................356
Inside rear view m irror ...........129
Instrument panel light control78, 81
Interior lights...........................302 Front interior light .................302
Rear interior light ..................302
Wattage ................................435