2023 TOYOTA COROLLA CROSS weight
[x] Cancel search: weightPage 316 of 500
3165-4. Other interior features
●When a portable device is not
centered on the charging area
●When a portable device is larger
than the charging tray
●When a foldable portable device is
placed outside of the charging
area
●When the vehicle is near a TV
tower, electric power plant, fuel
station, radio station, large dis-
play, airport, or other facility that
generates strong radio waves or
electrical noise
●When the any of the following
objects, with a thickness of 0.08
in. (2 mm) or more, are between
the charging surface of a portable
device and the charging are:
• Cases or covers a ttached with an
uneven or tilted surface, so that
the charging side is not flat
• Thick cases or covers
• Thick decorations
• Accessories, such as finger rings, straps, etc.
●When the portable device is in
contact with, or is covered by any
of the following metallic objects:
• Cases which have magnet in it on the charging side of the portable
device
• Cards covered with metal, such as aluminum foil
• Cigarette boxes that have alumi-
num foil inside
• Metallic wallets or bags
• Coins
• Heat packs
• Recorded media such as CDs and DVDs
• Metallic decorations
• Metallic cases or covers
●When wireless keys (that emit
radio waves) other than those of
your vehicle are being used
nearby
●When 2 or more portable devices
are placed on the charging tray at
the same time
In situations other than above, if the
wireless charger does not operate properly or the operation indicator
light blinks continuously, the wire-
less charger may be malfunctioning.
Contact your Toyota dealer.
■Cleaning the wireless charger
P.331
WARNING
■Caution while driving
When charging a portable device
while driving, for safety reasons,
the driver should not operate the
portable device.
■Precautions for when driving
Do not charge sma ll, lightweight
portable devices, such as wireless
earbuds, while driving. Light-
weight devices may fly off of the
charging tray, possibly leading to
an accident.
■Caution regarding interfer-
ence with electronic devices
People with implantable cardiac
pacemakers, cardiac resynchroni-
zation therapy pacemakers or
implantable cardioverter def ibrilla-
tors, as well as any other electri-
cal medical device, should consult
their physician about the usage of
the wireless charger.
Operations of th e wireless char-
ger may have an affect on medi-
cal devices.
■To prevent damage or burns
Observe the following precau-
tions.
Failure to do so may result in the
possibility of fire, equipment fail-
ure or damage, or burns due to
heat.
●Do not put any metallic objects
between the charging area and
the portable device while
charging.
Page 351 of 500
3516-3. Do-it-yourself maintenance
6
Maintenance and care
Check if the treadwear indica-
tors are showing on the tires.
Also check the tires for uneven
wear, such as excessive wear
on one side of the tread.
Check the spare tire condition
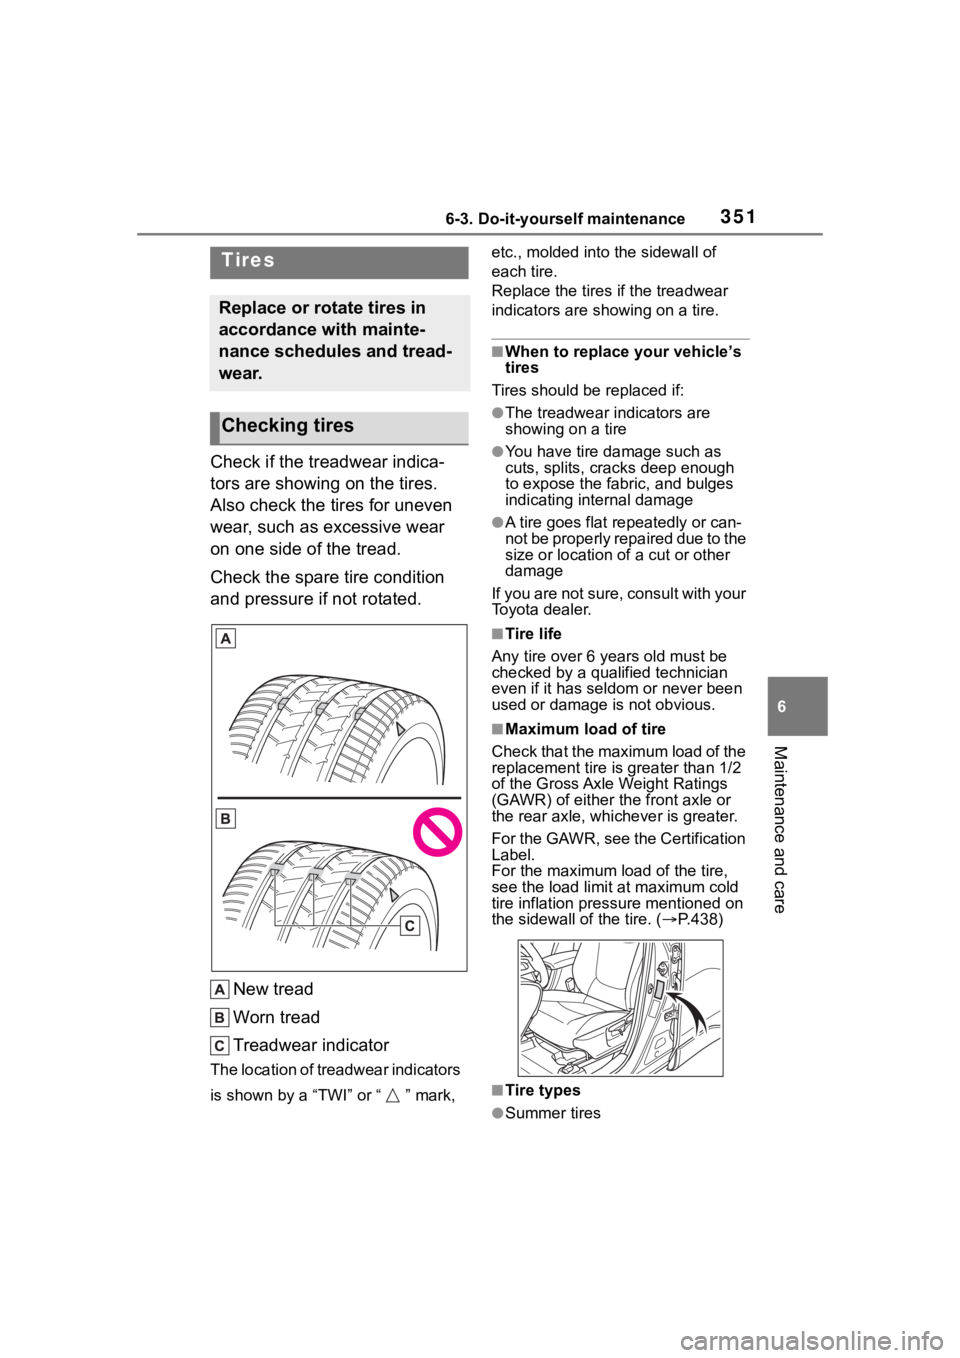
and pressure if not rotated.New tread
Worn tread
Treadwear indicator
The location of treadwear indicators
is shown by a “TWI” or “ ” mark, etc., molded into the sidewall of
each tire.
Replace the tires if the treadwear
indicators are s
howing on a tire.
■When to replace your vehicle’s
tires
Tires should be replaced if:
●The treadwear indicators are
showing on a tire
●You have tire damage such as
cuts, splits, cracks deep enough
to expose the fabric, and bulges
indicating internal damage
●A tire goes flat repeatedly or can-
not be properly repaired due to the
size or location of a cut or other
damage
If you are not sure, consult with your
Toyota dealer.
■Tire life
Any tire over 6 years old must be
checked by a qualified technician
even if it has seldom or never been
used or damage is not obvious.
■Maximum load of tire
Check that the maximum load of the
replacement tire is greater than 1/2
of the Gross Axle Weight Ratings
(GAWR) of either the front axle or
the rear axle, whi chever is greater.
For the GAWR, see the Certification
Label.
For the maximum load of the tire,
see the load limit at maximum cold
tire inflation pressure mentioned on
the sidewall of the tire. ( P.438)
■Tire types
●Summer tires
Tires
Replace or rotate tires in
accordance with mainte-
nance schedules and tread-
wear.
Checking tires
Page 364 of 500
3646-3. Do-it-yourself maintenance
■Instructions for checking tire
inflation pressure
When checking tire inflation pres-
sure, observe the following:
●Check only when the tires are
cold.
If your vehicle has been parked for
at least 3 hours or has not been
driven for more tha n 1 mile or 1.5
km, you will get an accurate cold
tire inflation pressure reading.
●Always use a tire pressure gauge.
It is difficult to judge if a tire is
properly inflated based only on its
appearance.
●It is normal for the tire inflation
pressure to be higher after driving
as heat is generated in the tire. Do
not reduce tire inflation pressure
after driving.
●Never exceed the vehicle capacity
weight.
Passengers and luggage weight
should be placed so that the vehi-
cle is balanced.
WARNING
■Proper inflation is critical to
save tire performance
Keep your tires properly inflated.
If the tires are not properly
inflated, the following conditions
may occur which could lead to an
accident resulting in death or seri-
ous injury:
●Excessive wear
●Uneven wear
●Poor handling
●Possibility of blowouts resulting
from overheated tires
●Air leaking from between tire
and wheel
●Wheel deformation and/or tire
damage
●Greater possibi lity of tire dam-
age while driving (due to road
hazards, expansion joints,
sharp edges in the road, etc.)
NOTICE
■When inspecting and adjust-
ing tire inflation pressure
Be sure to put the tire valve caps
back on.
If a valve cap is no t installed, dirt
or moisture may get into the valve
and cause an air leak, resulting in
decreased tire inflation pressure.
Page 366 of 500

3666-3. Do-it-yourself maintenance
Use only Toyota wheel nuts
and wheel nut wrenches
designed for use with your
aluminum wheels.
When rotating, repairing or
changing your tires, check
that the wheel nuts are still
tight after driving 1000 miles
(1600 km).
Use only Toyota genuine bal-
ance weights or equivalent
and a plastic or rubber ham-
mer when balancing your
wheels. 1
Turn the engine switch off.
2 Open the glove box. Slide off
the damper.
3 Push in the glove box on the
vehicle’s outer side to discon-
nect the claws. Then pull out
the glove box and disconnect
the lower claws.
4 Unlock the filter cover ( ),
pull the filter cover out of the
NOTICE
■Replacing tire pressure warn-
ing valves and transmitters
●Because tire repair or replace-
ment may affect the tire pres-
sure warning valves and
transmitters, make sure to have
tires serviced by your Toyota
dealer or other qualified service
shop. In addition, make sure to
purchase your tire pressure
warning valves and transmit-
ters at your Toyota dealer.
●Ensure that only genuine Toyota
wheels are used on your vehi-
cle.
Tire pressure warning valves
and transmitters may not work
properly with non-genuine
wheels.
Aluminum wheel precau-
tions (if equipped)
Air conditioning filter
The air conditioning filter
must be changed regularly
to maintain air conditioning
efficiency.
Removing the air condi-
tioning filter
Page 428 of 500

4288-1. Specifications
8-1.Specifications
*1: Unladen vehicles
*2: Vehicles with 215/65R17 tires
*3: Vehicles with 225/55R18 tires
Maintenance data (fuel, oil level, etc.)
Dimensions and weight
Overall length175.6 in. (4460 mm)
Overall width71.9 in. (1825 mm)
Overall height*164.8 in. (1645 mm)
Wheelbase103.9 in. (2640 mm)
Tread*1
Front
2WD models
61.6 in. (1565 mm)
*2
61.2 in. (1555 mm)*3
AWD models
61.7 in. (1566 mm)
*2
61.3 in. (1556 mm)*3
Rear
2WD models
62.2 in. (1580 mm)
*2
61.8 in. (1569 mm)*3
AWD models
61.6 in. (1564 mm)
*2
61.2 in. (1554 mm)*3
Vehicle capacity weight
(Occupants + luggage)940 lb. (425 kg)
Trailer Weight Rating
(Trailer weight + cargo weight)1500 lb. (680 kg)
Seating capacity
Seating capacity5 (Front 2, Rear 3)
Page 443 of 500
4438-1. Specifications
8
Vehicle specifications
Recommended inflation pres-
sureCold tire inflation pressure recommended
by a manufacturer
Accessory weight
The combined weight (in excess of those
standard items which may be replaced) of
automatic transmission, power steering,
power brakes, power windows, power
seats, radio and heater, to the extent that
these items are available as fac-
tory-installed equipment (whether installed
or not)
Curb weight
The weight of a motor vehicle with stan-
dard equipment, including the maximum
capacity of fuel, oil and coolant, and if so
equipped, air conditioning and additional
weight optional engine
Maximum loaded vehicle
weight
The sum of:
(a) Curb weight
(b) Accessory weight
(c) Vehicle capacity weight
(d) Production options weight
Normal occupant weight
150 lb. (68 kg) times the number of occu-
pants specified in the second column of
Table 1
* that follows
Occupant distribution
Distribution of occupan ts in a vehicle as
specified in the thi rd column of Table 1
*
below
Production options weight
The combined weight o f installed regular
production options weighing over 5 lb. (2.3
kg) in excess of the s tandard items which
they replace, not previously considered in
curb weight or accessory weight, including
heavy duty brakes, ride levelers, roof rack,
heavy duty battery, and special trim
Rim
A metal support for a tire or a tire and tube
assembly upon which the tire beads are
seated
Tire related termMeaning
Page 444 of 500
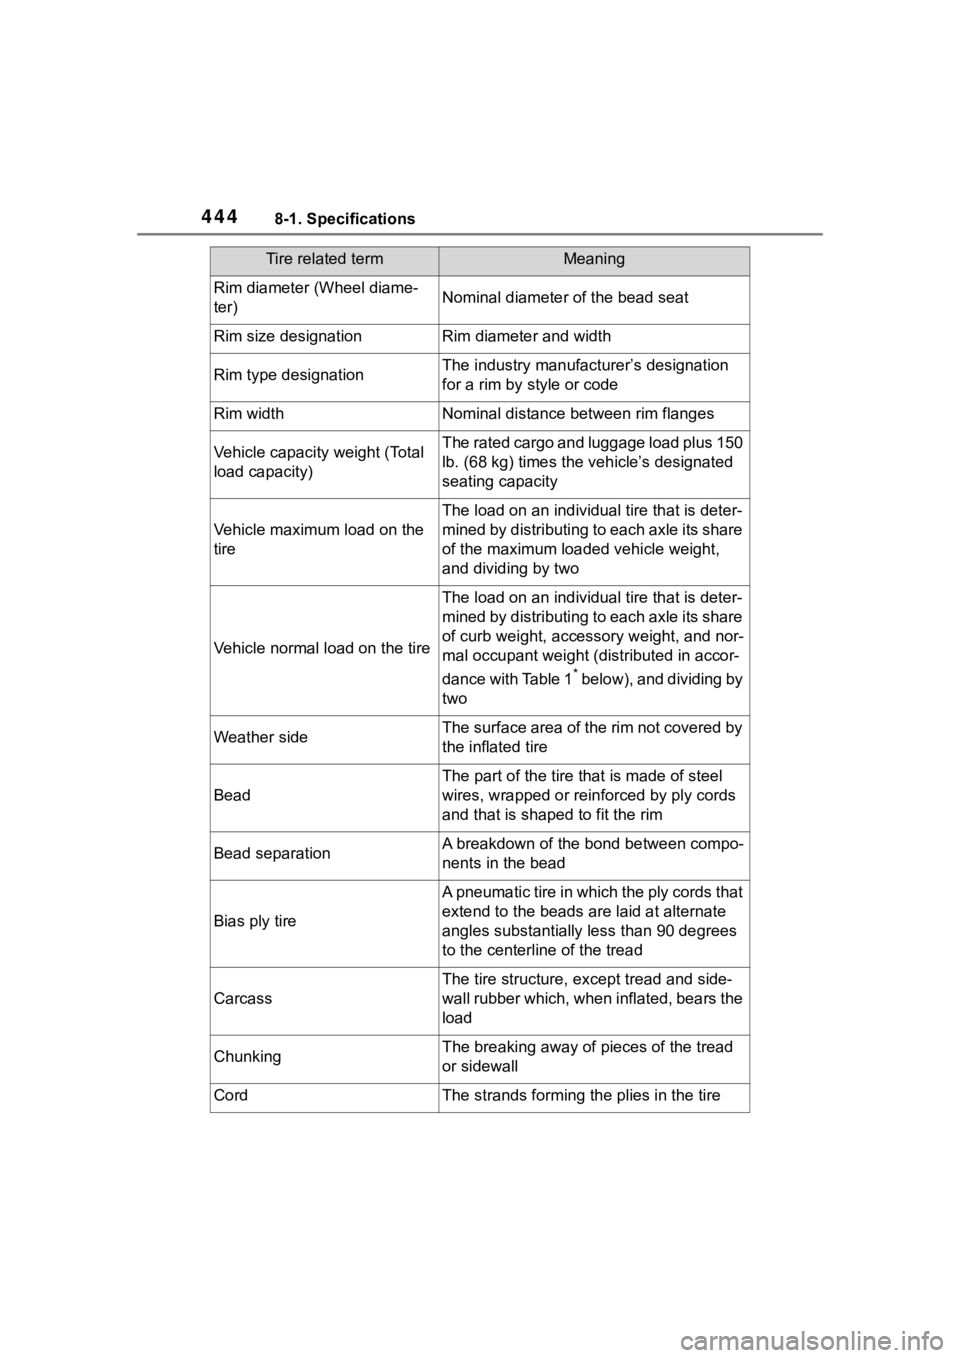
4448-1. Specifications
Rim diameter (Wheel diame-
ter)Nominal diameter of the bead seat
Rim size designationRim diameter and width
Rim type designationThe industry manufacturer’s designation
for a rim by style or code
Rim widthNominal distance between rim flanges
Vehicle capacity weight (Total
load capacity)The rated cargo and luggage load plus 150
lb. (68 kg) times the vehicle’s designated
seating capacity
Vehicle maximum load on the
tire
The load on an individual tire that is deter-
mined by distributing to each axle its share
of the maximum loaded vehicle weight,
and dividing by two
Vehicle normal load on the tire
The load on an individual tire that is deter-
mined by distributing to each axle its share
of curb weight, accessory weight, and nor-
mal occupant weight (distributed in accor-
dance with Table 1
* below), and dividing by
two
Weather sideThe surface area of the rim not covered by
the inflated tire
Bead
The part of the tire that is made of steel
wires, wrapped or rein forced by ply cords
and that is shaped to fit the rim
Bead separationA breakdown of the bond between compo-
nents in the bead
Bias ply tire
A pneumatic tire in which the ply cords that
extend to the beads are laid at alternate
angles substantially l ess than 90 degrees
to the centerlin e of the tread
Carcass
The tire structure, ex cept tread and side-
wall rubber which, when inflated, bears the
load
ChunkingThe breaking away of pieces of the tread
or sidewall
CordThe strands forming the plies in the tire
Tire related termMeaning
Page 445 of 500
4458-1. Specifications
8
Vehicle specifications
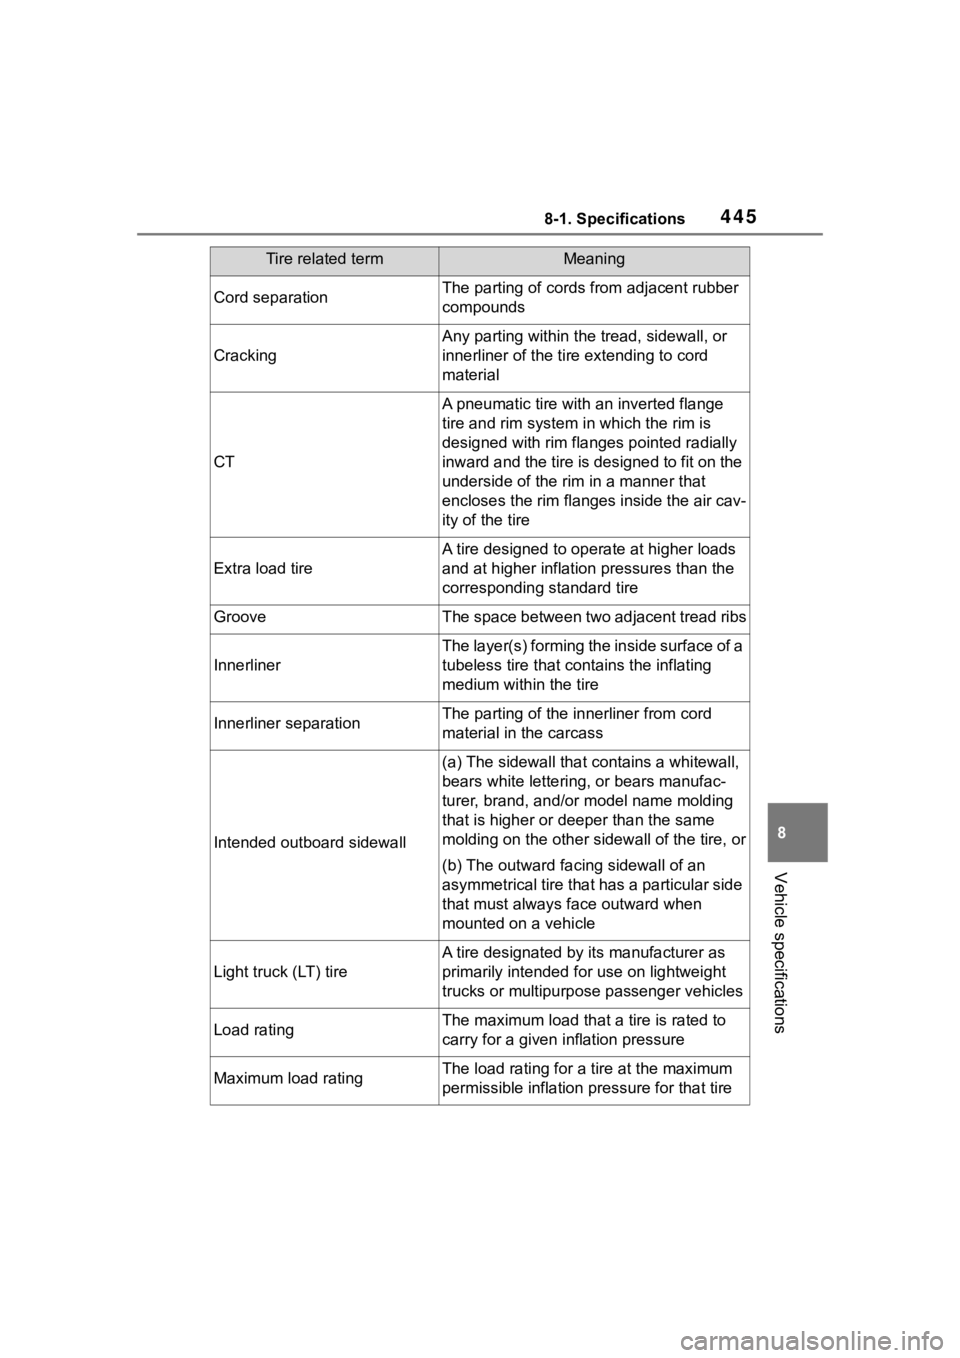
Cord separationThe parting of cords from adjacent rubber
compounds
Cracking
Any parting within the tread, sidewall, or
innerliner of the ti re extending to cord
material
CT
A pneumatic tire with an inverted flange
tire and rim system i n which the rim is
designed with rim flanges pointed radially
inward and the tire is designed to fit on the
underside of the rim in a manner that
encloses the rim flanges inside the air cav-
ity of the tire
Extra load tire
A tire designed to operate at higher loads
and at higher inflation pressures than the
corresponding standard tire
GrooveThe space between two adjacent tread ribs
Innerliner
The layer(s) forming th e inside surface of a
tubeless tire that contains the inflating
medium within the tire
Innerliner separationThe parting of the innerliner from cord
material in the carcass
Intended outboard sidewall
(a) The sidewall that contains a whitewall,
bears white lettering, or bears manufac-
turer, brand, and/or model name molding
that is higher or deeper than the same
molding on the other sidewall of the tire, or
(b) The outward facing sidewall of an
asymmetrical tire that has a particular side
that must always fa ce outward when
mounted on a vehicle
Light truck (LT) tire
A tire designated by i ts manufacturer as
primarily intended for use on lightweight
trucks or multipurpose passenger vehicles
Load ratingThe maximum load that a tire is rated to
carry for a given inflation pressure
Maximum load ratingThe load rating for a tire at the maximum
permissible inflation pressure for that tire
Tire related termMeaning