Page 9 of 296

7
INTRODUCTION
Dear Customer,
Congratulations on the purchase of your new Ram. Be assured that it represents precision workmanship, distinctive styling, and high quality.
This Owner’s Manual has been prepared with the assistance of service and engineering specialists to acquaint you with the operation and maintenance of your
vehicle. It is supplemented by customer-oriented documents. Within this information, you will find a description of the services that FCA US LLC offers to its
customers as well as the details of the terms and conditions for maintaining its validity. Please take the time to read all of these publications carefully before
driving your vehicle for the first time. Following the instructions, recommendations, tips, and important warnings in this manual will help ensure safe and
enjoyable operation of your vehicle. Be sure you are familiar with all vehicle controls, particularly those used for braking, steering, transmission, and transfer
case shifting (if equipped). Learn how your vehicle handles on different road surfaces. Your driving skills will improve with experience.
This Owner’s Manual describes all versions of this vehicle. Options and equipment dedicated to specific markets or versions are not expressly indicated in the
text. Therefore, you should only consider the information that is related to the trim level, engine, and version that you have purchased. Any content introduced
throughout the Owner’s Information, which may or may not be applicable to your vehicle, will be identified with the wording “If Equipped”. All data contained
in this publication are intended to help you use your vehicle in the best possible way. FCA US LLC aims at a constant improvement of the vehicles produced.
For this reason, it reserves the right to make changes to the model described for technical and/or commercial reasons. For further information, contact an
authorized dealer.
When it comes to service, remember that authorized dealers know your Ram best, have factory-trained technicians, genuine Mopar® parts, and care about your
satisfaction.1
23_VF_OM_EN_USC_t.book Page 7
Page 10 of 296

8
SYMBOLS KEY
If you do not read the entire Owner’s Manual, you may miss important
information. Observe all Cautions and Warnings.
VAN CONVERSIONS/CAMPERS
The New Vehicle Limited Warranty does not apply to body modifications or
special equipment installed by van conversion/camper manufacturers/body
builders. US residents refer to the Warranty Information, Section 2.1.C.
Canadian residents refer to the “What Is Not Covered” section of the Warranty
Information. Such equipment includes video monitors, DVD/Blu-Ray™,
heaters, stoves, refrigerators, etc. For warranty coverage and service on these
items, contact the applicable manufacturer.
Operating instructions for the special equipment installed by the conversion/
camper manufacturer should also be supplied with your vehicle. For any
additional instructions, please contact your conversion/camper manufacturer.
To obtain dimensional and technical specifications for your vehicle, refer to the
Body Builder’s Guide at
https://www.ramtrucks.com/ram-commercial/
body-builders-guide.html.
VEHICLE MODIFICATIONS/ALTERATIONS
WARNING! These statements apply to operating procedures
that could result in a collision, bodily injury and/or
death.
CAUTION! These statements apply to procedures that could
result in damage to your vehicle.
NOTE: A suggestion which will improve installation,
operation, and reliability. If not followed, may result
in damage.
TIP: General ideas/solutions/suggestions on easier
use of the product or functionality.
PAGE REFERENCE
ARROW
Follow this reference for additional information on
a particular feature.
FOOTNOTE Supplementary and relevant information
pertaining to the topic.
WARNING!
Any modifications or alterations to this vehicle could seriously affect its
roadworthiness and safety and may lead to a collision resulting in serious
injury or death.
23_VF_OM_EN_USC_t.book Page 8
Page 11 of 296

9
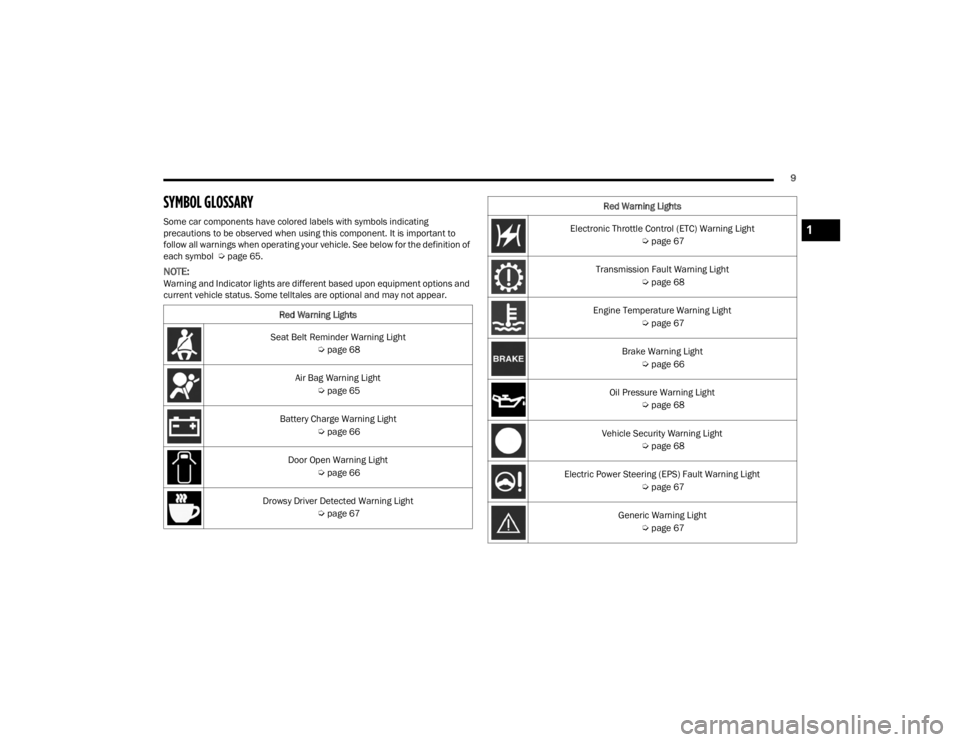
SYMBOL GLOSSARY
Some car components have colored labels with symbols indicating
precautions to be observed when using this component. It is important to
follow all warnings when operating your vehicle. See below for the definition of
each symbol Úpage 65.
NOTE:Warning and Indicator lights are different based upon equipment options and
current vehicle status. Some telltales are optional and may not appear.
Red Warning Lights
Seat Belt Reminder Warning Light Úpage 68
Air Bag Warning Light Úpage 65
Battery Charge Warning Light Úpage 66
Door Open Warning Light Úpage 66
Drowsy Driver Detected Warning Light Úpage 67
Electronic Throttle Control (ETC) Warning Light
Úpage 67
Transmission Fault Warning Light Úpage 68
Engine Temperature Warning Light Úpage 67
Brake Warning Light Úpage 66
Oil Pressure Warning Light Úpage 68
Vehicle Security Warning Light Úpage 68
Electric Power Steering (EPS) Fault Warning Light Úpage 67
Generic Warning Light Úpage 67
Red Warning Lights1
23_VF_OM_EN_USC_t.book Page 9
Page 12 of 296
10 Hood Open Warning Light Úpage 68
Rear Cargo Door Warning Light Úpage 68
Swivel Seat (Driver or Passenger) Unlocked Warning Light Úpage 68
Yellow Warning Lights
Immobilizer Fail / VPS Electrical Alarm Warning Light Úpage 69
Drowsy Driver Detected System Fault Warning Light Úpage 69
Tire Pressure Monitoring System (TPMS) Warning Light Úpage 70
Electronic Stability Control (ESC) Warning Light Úpage 69
Red Warning Lights
Electronic Stability Control (ESC) OFF Warning Light
Úpage 69
Engine Check/Malfunction Indicator Warning Light (MIL) Úpage 69
Anti-Lock Brake System (ABS) Warning Light Úpage 68
Service Forward Collision Warning (FCW) Light Úpage 70
Service Required/Call For Service Warning Light Úpage 70
Speed Limiter Fail Warning Light Úpage 70
Swivel Seat (Driver or Passenger) Fail Warning Light Úpage 70
Transmission Temperature Warning Light Úpage 71
Yellow Warning Lights
23_VF_OM_EN_USC_t.book Page 10
Page 13 of 296
11
Towing Hook Breakdown Warning Light Úpage 71
Adaptive Cruise Control (ACC) Fault Warning Light Úpage 68
Service Active Lane Management Warning Light Úpage 70
Low Fuel Warning Light Úpage 69
Yellow Indicator Lights
Forward Collision Warning (FCW) OFF Indicator Light Úpage 72
TOW/HAUL Indicator Light Úpage 72
Keyless System Failure Indicator Light Úpage 72
Yellow Warning Lights
Rain Sensor Failure Indicator Light
Úpage 72
Exterior Lights Failure Indicator Light Úpage 72
Fuel Cutoff Failure Indicator Light Úpage 72
Green Indicator Lights
Turn Signal/Hazard Warning Indicator Lights Úpage 73
Front Fog Indicator Light Úpage 72
Parking/Headlights On Indicator Light Úpage 73
Cruise Control Indicator Light Úpage 72
Yellow Indicator Lights1
23_VF_OM_EN_USC_t.book Page 11
Page 14 of 296
12 Active Lane Management Indicator Light Úpage 72
Active Speed Limiter Set Indicator Light Úpage 72
Automatic High Beam Indicator Light Úpage 72
Blue Indicator Lights High Beam Indicator Light Úpage 73
Green Indicator Lights
White Indicator Lights
Speed Warning Indicator Light Úpage 73
Adaptive Cruise Control (ACC) Set With Target Indicator Light Úpage 73
Active Lane Management Indicator Light Úpage 73
Active Speed Limiter Ready Indicator Light Úpage 73
23_VF_OM_EN_USC_t.book Page 12
Page 15 of 296

13
GETTING TO KNOW YOUR VEHICLE
KEYS
KEY FOB
Your vehicle is equipped with a key fob which
supports Passive Entry, Remote Keyless Entry
(RKE), Keyless Enter ‘n Go™ (if equipped), and
Remote Start (if equipped). The key fob allows you
to lock or unlock all doors, as well as activate the
Panic Alarm from distances up to approximately
66 ft (20 m). The key fob does not need to be
pointed at the vehicle to activate the system.
The key fob also contains an emergency key, which
can be used by pushing the emergency key release
button.
NOTE:
The key fob’s wireless signal may be blocked if
the key fob is located next to a mobile phone,
laptop, or other electronic device. This may
result in poor performance.
If your vehicle is equipped with a Wireless
Charging Pad, the key fob may not be detected
if it is placed within 6 inches (15 cm) of the pad
Úpage 48.
With the ignition in the ON position and the
vehicle moving at 2 mph (4 km/h), all RKE
commands are disabled.
Figure 1 - Keyless Ignition Key Fob Figure 2 - Keyless Ignition Key Fob
In case the ignition switch does not change with
the push of a button, the key fob may have a low or
fully depleted battery. A low key fob battery can be
verified by referring to the instrument cluster
display, which will display directions to follow
Ú page 280.
1 — Front Doors Unlock
2 — Cargo Unlock Button
3 — Emergency Key
4 — Lock
5 — Remote Start (If Equipped)
6 — Panic
1 — All Doors Unlock
2 — Emergency Key
3 — Lock
4 — Remote Start (If Equipped)
5 — Panic
2
23_VF_OM_EN_USC_t.book Page 13
Page 16 of 296

14GETTING TO KNOW YOUR VEHICLE
To Lock/Unlock The Doors
To lock all of the doors, push and release the lock
button once. Push and release the front unlock
button on key fob once to unlock only the front doors
(figure 1) or push and release the unlock button on
key fob once to unlock all doors (figure 2). Push and
release the cargo unlock button on key fob once to
unlock the cargo area (rear lateral sliding doors and
rear door). The doors can also be locked and
unlocked manually by using the mechanical key.
When the doors are unlocked, the turn signals
will flash. When the doors are locked, the turn
signals will flash and the horn will chirp (if equipped
and activated through the Uconnect Settings
Ú
page 134). If a door is open when the lock button
is pushed, the turn signal lights will flash at an
increased rate to indicate that a door is still open.
Key Left Vehicle Feature
If a valid key fob is no longer detected inside
the vehicle while the vehicle’s ignition system is
in the ON/RUN or START position, the message
“Key Fob Has Left The Vehicle” will be shown in the
instrument cluster display along with an interior
chime. An exterior audible and visual alert will also
be activated to warn the driver. The vehicle’s horn will rapidly chirp three times
along with a single flash of the vehicle’s exterior
lights.
NOTE:
The doors have to be open and then closed in
order for the vehicle to detect a key fob; the Key
Left Vehicle feature will not activate until all of
the doors are closed.
These alerts will not be activated in situations
where the vehicle’s engine is left running with
the key fob inside.
Replacing The Battery In The Key Fob
The replacement battery is one CR2032 battery.
NOTE:
Customers are recommended to use a battery
obtained from Mopar®. Aftermarket coin
battery dimensions may not meet the original
OEM coin battery dimensions.
Perchlorate Material — special handling may apply.
See
www.dtsc.ca.gov/hazardouswaste/
perchlorate
for further information.
Do not touch the battery terminals that are on
the back housing or the printed circuit board.
1. Remove the emergency key (2) by sliding the
emergency key release (1) on the back of the
key fob and pulling the emergency key out
with your other hand.
Emergency Key Removal
1 — Emergency Key Release Button
2 — Emergency Key
23_VF_OM_EN_USC_t.book Page 14