2023 PEUGEOT EXPERT roof
[x] Cancel search: roofPage 94 of 348

92
Lighting and visibility
► Then put the lighting control stalk ring in the
"AUT O" or "Dipped/main beam position".
Pause
If the situation requires a change of headlamp
beam, the driver can take over at any time.
► A "headlamp flash" pauses the
function and the lighting system switches
to "automatic illumination of lamps" mode:
–
If the "AUT
O" and "Dipped beam" indicator
lamps were on, the system changes to main
beam.
–
If the "AUT
O" and "Main beam"
indicator
lamps were on, the system changes to
dipped beam.
►
T
o reactivate the function, once again switch
the headlamps manually between dipped and
main beam.
Flashing the headlamps does not
deactivate the system.
The state of the system is stored when the
ignition is switched off.
The system may be disrupted or not work correctly:
–
When visibility conditions are poor
(snowfall, heavy rain, etc.).
–
If the windscreen in front of the camera is
dirty
, misted or obscured (for example, by a
sticker).
–
If the vehicle is facing highly reflective
signs.
When the system detects thick fog, it
temporarily deactivates the function.
The system is not able to detect:
–
Road users that do not have their own
lighting, such as pedestrians.
–
V
ehicles whose lighting is obscured (for
example, vehicles driving behind a safety
barrier on a motorway).
–
V
ehicles at the top or bottom of a steep
slope, on winding roads, on crossroads.
Clean the windscreen regularly,
particularly the area in front of the
camera.
The internal surface of the windscreen can
also become misted around the camera.
In humid and cold weather, demist the
windscreen regularly.
Do not allow snow to accumulate on the
bonnet or roof of the vehicle as this could
obstruct the detection camera.
Headlamp beam height
adjustment
To avoid inconvenience to other road users,
the height of the halogen headlamps must be
adjusted according to the load in the vehicle.
0 Empty (initial setting)
1 Partial load
2 Medium load
3 Maximum authorised load
4 5 6 Not used
01 or 2 people in the front seats (initial
setting)
1 5 people
2 6 to 9 people
3 Driver + maximum authorised load
4 5 6 Not used CarM an uals 2 .c o m
Page 95 of 348

93
Lighting and visibility
4Interior ambient lighting
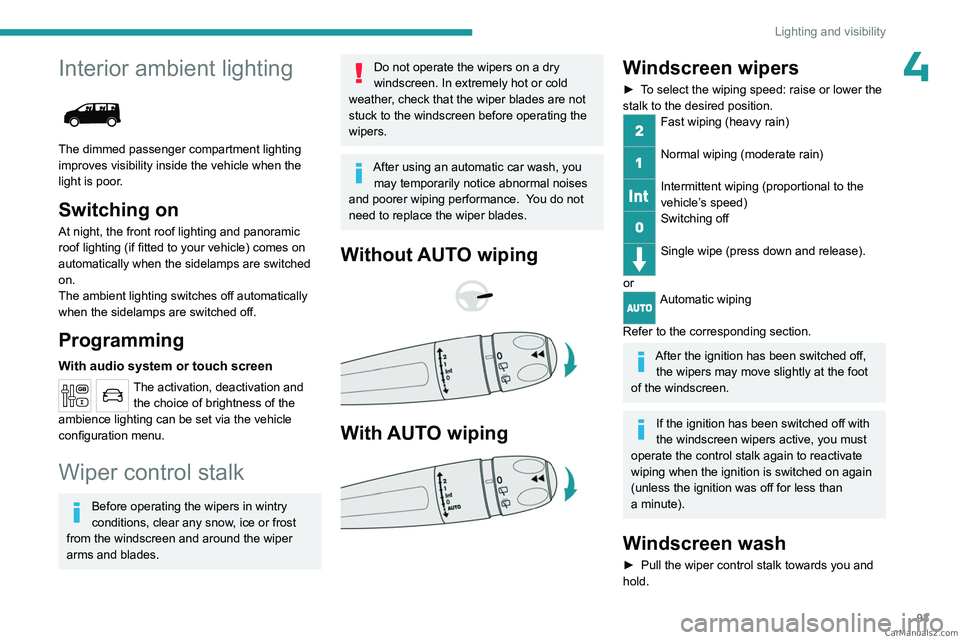
The dimmed passenger compartment lighting
improves visibility inside the vehicle when the
light is poor.
Switching on
At night, the front roof lighting and panoramic
roof lighting (if fitted to your vehicle) comes on
automatically when the sidelamps are switched
on.
The ambient lighting switches off automatically
when the sidelamps are switched off.
Programming
With audio system or touch screen
The activation, deactivation and the choice of brightness of the
ambience lighting can be set via the vehicle
configuration menu.
Wiper control stalk
Before operating the wipers in wintry
conditions, clear any snow, ice or frost
from the windscreen and around the wiper
arms and blades.
Do not operate the wipers on a dry
windscreen. In extremely hot or cold
weather, check that the wiper blades are not
stuck to the windscreen before operating the
wipers.
After using an automatic car wash, you may temporarily notice abnormal noises
and poorer wiping performance.
You do not
need to replace the wiper blades.
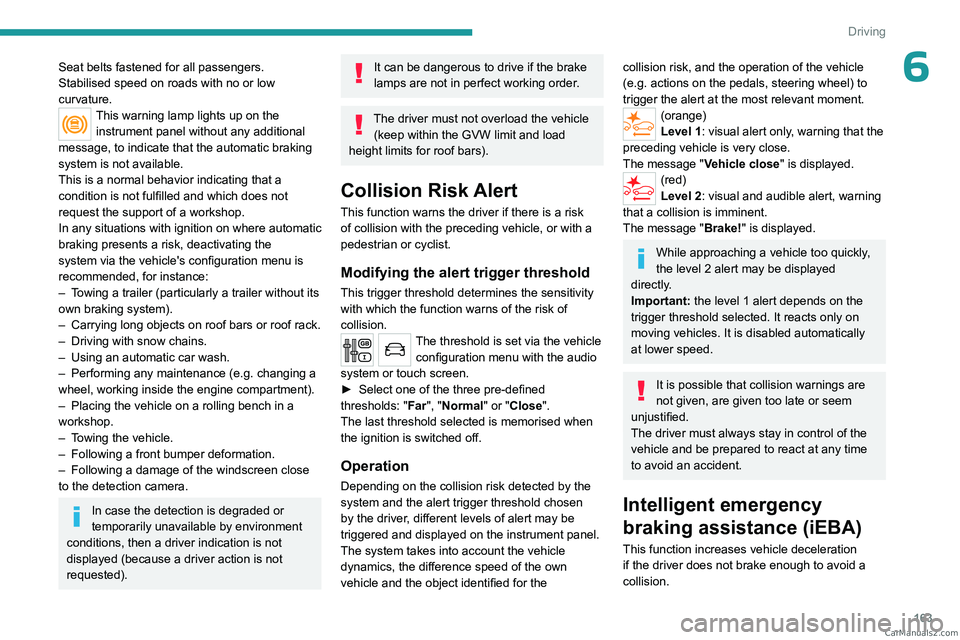
Without AUTO wiping
With AUTO wiping
Windscreen wipers
► To select the wiping speed: raise or lower the
stalk to the desired position.
Fast wiping (heavy rain)
Normal wiping (moderate rain)
Intermittent wiping (proportional to the
vehicle’s speed)
Switching off
Single wipe (press down and release).
or
Automatic wiping
Refer to the corresponding section.
After the ignition has been switched off, the wipers may move slightly at the foot
of the windscreen.
If the ignition has been switched off with
the windscreen wipers active, you must
operate the control stalk again to reactivate
wiping when the ignition is switched on again
(unless the ignition was off for less than
a
minute).
Windscreen wash
► Pull the wiper control stalk towards you and
hold. CarM an uals 2 .c o m
Page 111 of 348

109
Safety
5not fix or attach anything near or in the path of
the airbags, as this could cause injuries when
they are deployed.
Never modify the original definition of the
vehicle, particularly in the area directly around
the airbags.
Even if all of the precautions mentioned are
observed, a risk of injury or of minor burns to
the head, chest or arms cannot be ruled out
when an airbag is deployed. The bag inflates
almost instantly (within a few milliseconds)
then deflates within the same time,
discharging the hot gas via openings provided
for this purpose.
After an accident or if the vehicle has been
stolen, have the airbag systems checked.
All work must be carried out only by a
PEUGEOT dealer or a qualified workshop
Front airbags
Do not drive holding the steering wheel
by its spokes or resting your hands on the
centre part of the wheel.
Passengers must not place their feet on the
dashboard.
Do not smoke as deployment of the airbags
can cause burns or the risk of injury from a
cigarette or pipe.
Never remove or pierce the steering wheel or
hit it violently.
Do not fix or attach anything to the steering
wheel or dashboard, as this could cause
injuries when the airbags are deployed.
Lateral airbags
Use only approved seat covers
compatible with the deployment of these
airbags. For information on the range of seat
covers suitable for your vehicle, contact a
PEUGEOT dealer.
Do not fix or attach anything to the seat
backrests (e.g.
clothing) as this could cause
injuries to the chest or arm when the airbag is
deployed.
Do not sit with the upper part of the body any
nearer to the door than necessary.
The vehicle's front door panels include side
impact sensors.
A damaged door or any unauthorised or
incorrectly executed work (modification or
repair) on the front doors or their interior trim
could compromise the operation of these
sensors - risk of malfunction of the lateral
airbags!
All work must be carried out only by a
PEUGEOT dealer or a qualified workshop
Active, Allure, Business VIP
Curtain airbags
Do not fix or attach anything to the roof,
as this could cause head injuries when the
curtain airbag is deployed.
Do not remove the grab handles installed on
the roof, as these help to secure the curtain
airbags.
Child seats
The regulations on carrying children are specific to each country. Refer to the
legislation in force in your country.
For maximum safety, please observe the
following recommendations:
–
In accordance with European regulations,
all children under the age of 12 or less than
1.5 metres tall must travel in approved child
seats suited to their weight , on seats fitted with
a seat belt or ISOFIX mountings.
–
Statistically
, the safest seats in your
vehicle for carrying children are the rear
seats.
–
Children weighing less than 9 kg must
travel in the "rearward facing" position,
whether in the front or rear of the vehicle.
It is recommended that children travel
on the rear seats of the vehicle:
–
"rearward facing" up to the age of 3.
–
"forward facing" over the age of 3. CarM an uals 2 .c o m
Page 165 of 348

163
Driving
6Seat belts fastened for all passengers.
Stabilised speed on roads with no or low
curvature.
This warning lamp lights up on the instrument panel without any additional
message, to indicate that the automatic braking
system is not available.
This is a normal behavior indicating that a
condition is not fulfilled and which does not
request the support of a workshop.
In any situations with ignition on where automatic
braking presents a risk, deactivating the
system via the vehicle's configuration menu is
recommended, for instance:
–
T
owing a trailer (particularly a trailer without its
own braking system).
–
Carrying long objects on roof bars or roof rack.
–
Driving with snow chains.
–
Using an automatic car wash.
–
Performing any maintenance (e.g.
changing a
wheel, working inside the engine compartment).
–
Placing the vehicle on a rolling bench in a
workshop.
–
T
owing the vehicle.
–
Following a front bumper deformation.
–
Following a damage of the windscreen close
to the detection camera.
In case the detection is degraded or
temporarily unavailable by environment
conditions, then a driver indication is not
displayed (because a driver action is not
requested).
It can be dangerous to drive if the brake
lamps are not in perfect working order.
The driver must not overload the vehicle (keep within the GVW limit and load
height limits for roof bars).
Collision Risk Alert
This function warns the driver if there is a risk
of collision with the preceding vehicle, or with a
pedestrian or cyclist.
Modifying the alert trigger threshold
This trigger threshold determines the sensitivity
with which the function warns of the risk of
collision.
The threshold is set via the vehicle configuration menu with the audio
system or touch screen.
►
Select one of the three pre-defined
thresholds: "
Far", "Normal" or "Close".
The last threshold selected is memorised when
the ignition is switched off.
Operation
Depending on the collision risk detected by the
system and the alert trigger threshold chosen
by the driver, different levels of alert may be
triggered and displayed on the instrument panel.
The system takes into account the vehicle
dynamics, the difference speed of the own
vehicle and the object identified for the
collision risk, and the operation of the vehicle
(e.g. actions on the pedals, steering wheel) to
trigger the alert at the most relevant moment.
(orange)
Level 1: visual alert only, warning that the
preceding vehicle is very close.
The message "Vehicle close" is displayed.
(red)
Level 2: visual and audible alert, warning
that a collision is imminent.
The message "Brake! " is displayed.
While approaching a vehicle too quickly,
the level 2 alert may be displayed
directly.
Important: the level 1 alert depends on the
trigger threshold selected. It reacts only on
moving vehicles. It is disabled automatically
at lower speed.
It is possible that collision warnings are
not given, are given too late or seem
unjustified.
The driver must always stay in control of the
vehicle and be prepared to react at any time
to avoid an accident.
Intelligent emergency
braking assistance (iEBA)
This function increases vehicle deceleration
if the driver does not brake enough to avoid a
collision. CarM an uals 2 .c o m
Page 191 of 348

189
Practical information
7If using accessories attached to the
towing device (e.g. bicycle carriers, tow
boxes):
–
Comply with the maximum authorised nose
weight.
–
Do not transport more than 4 conventional
bicycles or 2 electric bicycles.
When loading bicycles onto a bicycle carrier
on a towball, be sure to place the heaviest
bicycles as close as possible to the vehicle.
Observe the legislation in force in the
country where you are driving.
Electric motor
An electric vehicle may be fitted with a
towing device.
It is therefore possible to tow a trailer or
caravan.
Contact a PEUGEOT dealer or qualified
workshop for more information and to obtain a
suitable towing device.
Roof bars/Roof rack
As a safety measure and to avoid damaging the roof, it is essential to use
the roof bars and roof racks approved for your
vehicle.
Observe the instructions on fitting and use
contained in the guide supplied with the roof
bars and racks.
Recommendations
Distribute the load uniformly, taking care
to avoid overloading one of the sides.
Arrange the heaviest part of the load as close
as possible to the roof.
Secure the load firmly.
Drive gently: the vehicle will be more
susceptible to the effects of side winds and its
stability may be affected.
Regularly check the security and tight
fastening of the roof bars, at least before each
trip.
Remove the roof bars once they are no longer
needed.
As this value may change, please verify the maximum load quoted in the guide
supplied with the roof bars.
If the height exceeds 40 cm, adapt the speed
of the vehicle to the profile of the road to
avoid damaging the roof bars and the fixings
on the vehicle.
Be sure to refer to national legislation in order
to comply with the regulations for transporting
objects that are longer than the vehicle.
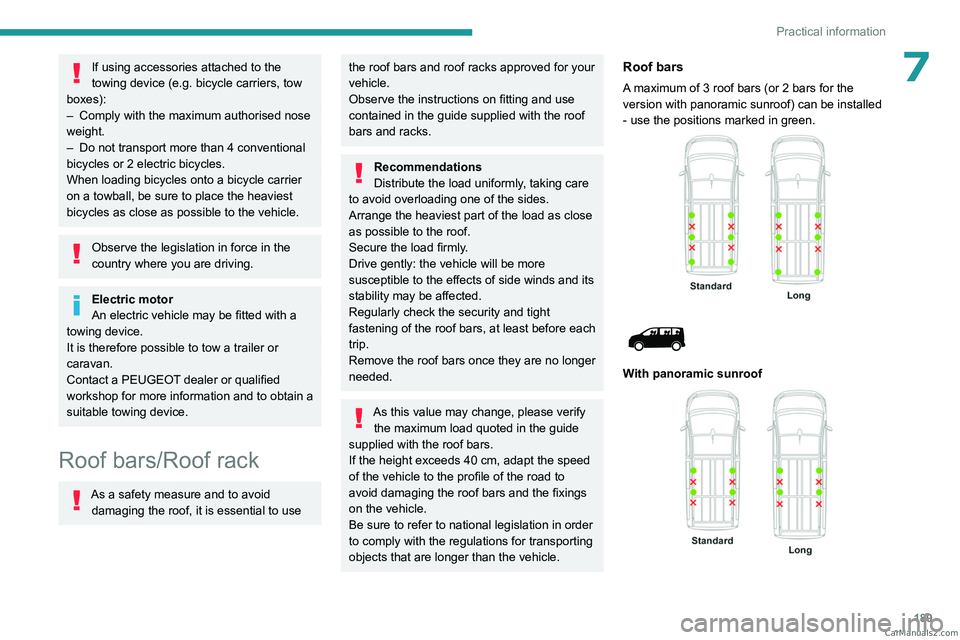
Roof bars
A maximum of 3 roof bars (or 2 bars for the
version with panoramic sunroof) can be installed
- use the positions marked in green.
With panoramic sunroof
CarM an uals 2 .c o m
Page 192 of 348

190
Practical information
Max. authorised load weight:
– over 2 roof bars: 100 kg,
–
distributed over 3 roof bars: 150
kg.
To install the transverse roof bars, use the fixing
points provided for this purpose:
►
Open the fixing covers on each bar
.
►
Put each fixing point in place and lock them
to the roof one by one.
►
Ensure that the roof bars are correctly fitted
(by shaking them).
►
Close the fixing covers on each bar
.
The bars can be interchanged and are adaptable
to each pair of fixing points.
Roof racks
Max. authorised load weight on the roof
racks: 170 kg.
To fit a roof rack, use the fixing points provided
for this purpose:
►
Place the roof rack on the roof aligned with
the fixing points and secure each one to the roof
in turn.
►
Ensure that the roof rack is correctly fitted (by
shaking it).
Bonnet
Stop & Start
Before doing anything under the bonnet,
you must switch off the ignition to avoid any
risk of the engine restarting automatically.
Take care with objects or clothing that could
be caught in the blades of the cooling fan
or in certain moving components - risk of
strangulation and serious injury!
Electric motor
Take care with objects or clothing that
could be caught in the blades of the cooling
fan or in certain moving components - risk of
strangulation and serious injury!
Before carrying out any work under the
bonnet, you must switch off the ignition, check
that the READY indicator lamp is off on the
instrument panel and disconnect the nozzle
from the charging connector if it is connected.
The location of the interior bonnet release lever prevents the bonnet being
opened when the left-hand front door is
closed.
When the engine is hot, handle the
exterior safety catch and the bonnet stay
with care (risk of burns), using the protected
area.
When the bonnet is open, take care not to
damage the safety catch.
Do not open the bonnet under very windy
conditions.
Cooling of the engine when stopped
The engine cooling fan may start after
the engine has been switched off.
Take care with objects or clothing that
could be caught in the blades of the fan!
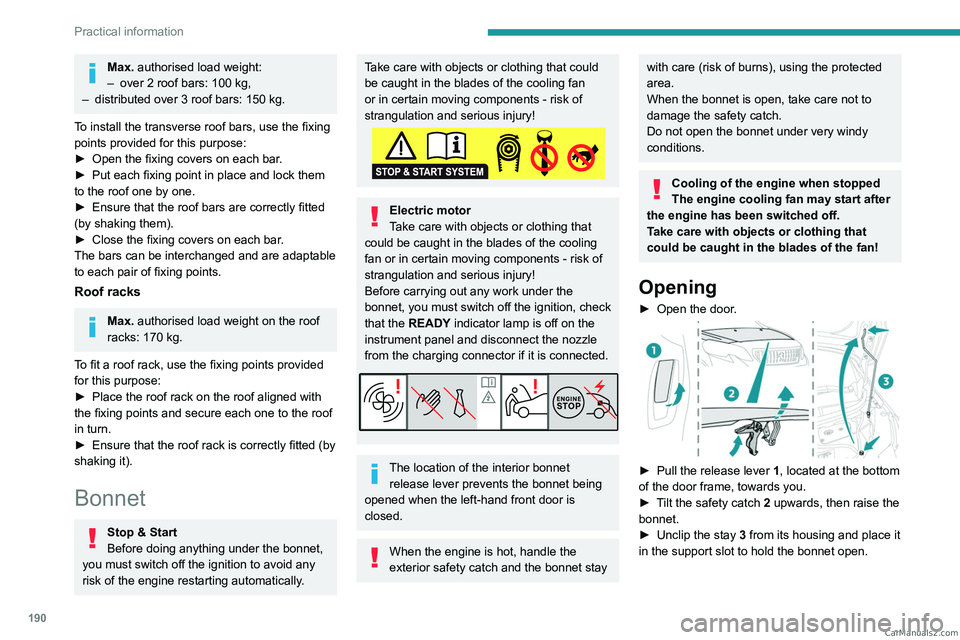
Opening
► Open the door .
► Pull the release lever 1 , located at the bottom
of the door frame, towards you.
►
T
ilt the safety catch 2 upwards, then raise the
bonnet.
►
Unclip the stay
3 from its housing and place it
in the support slot to hold the bonnet open. CarM an uals 2 .c o m
Page 262 of 348

260
3D Connected Navigation
Voice commands
Steering wheel-mounted
controls
Voice commands:
Voice commands can be issued from any
screen page after a short press on the "Voice
commands" button located on the steering
wheel or at the end of the lighting control stalk
(depending on equipment), as long as there is no
telephone call in progress.
To ensure that voice commands are always recognised by the system, please
follow these recommendations:
–
use natural language in a normal tone
without breaking up words or raising your
voice.
–
always wait for the "beep" (audible signal)
before speaking.
–
for best results, closing the windows and
sunroof is recommended, to avoid extraneous
interference (depending on version).
–
before issuing a voice command, ask any
other passengers to refrain from speaking.
First steps
Example of a "voice command" for
navigation:
"Navigate to address 11 regent street,
London"
Example of a "voice command" for the radio and
media:
"Play artist Madonna"
Example of a "voice command" for the
telephone:
"Call David Miller"
The voice commands, with a choice of 17 languages (Arabic, Brazilian, Czech,
Danish, Dutch, English, Farsi, French,
German, Italian, Norwegian, Polish,
Portuguese, Russian, Spanish, Swedish,
Turkish), are made using the language
previously chosen and set in the system.
For some voice commands, there are
alternative synonyms.
Example: Guide to / Navigate to / Go to / ...
The voice commands in Arabic for: "Navigate
to address" and "Display POI in the city", are
not available.
Information - Using the
system
When voice commands are activated, by
briefly pressing the button, help is
displayed on the touch screen, offering various
menus and enabling voice-based interaction with
the system.
A number of commands are available when a
menu is selected.
Press the Push To Talk button and tell me
what you'd like after the tone. Remember
you can interrupt me at any time by pressing this
button. If you press it again while I'm waiting for
you to speak, it'll end the conversation. If you
need to start over, say "cancel". If you want to
undo something, say "undo". And to get
information and tips at any time, just say "help".
If you ask to me do something and there's some
information missing that I need, I'll give you
some examples or take you through it step by CarM an uals 2 .c o m
Page 287 of 348

285
Alphabetical index
A
ABS 100
Accelerated charging unit (Wallbox)
179
Accessories
97
Access to the 3rd row
57, 59
Access to the spare wheel
208
Active Safety Brake
162, 164
AdBlue®
20, 196
AdBlue® tank
197
Additive, Diesel
193–194
Adjusting head restraints
49
Adjusting seat
48–49
Adjusting the air distribution
79–80
Adjusting the air flow
79–80
Adjusting the date
28, 255, 277
Adjusting the height and reach
of the steering wheel
51
Adjusting the lumbar support
48
Adjusting the seat angle
48–49
Adjusting the seat belt height
105
Adjusting the temperature
79–80
Adjusting the time
28, 254, 278
Advanced Grip Control
102
Advice on care and maintenance
177, 199
Advice on driving
7, 132–133
Airbags
107–109, 111
Airbags, curtain
108–109
Airbags, front
107, 109, 112
Airbags, lateral
108–109
Air conditioning
77, 79, 79–80, 82
Air conditioning, dual-zone
81
Air conditioning, dual-zone automatic 79–80
Air conditioning, manual
78–79, 81
Air intake
79–81
Air vents
77
Alarm
45–46
Anti-lock braking system (ABS)
100
Anti-pinch
74
Antitheft / Immobiliser
30
Applications
269
Area, loading
72
Armrest, front
50
Assistance call
98
Assistance, emergency braking
100, 163
Audio streaming (Bluetooth)
238, 250, 273
B
Battery, 12 V 187, 194, 216–219
Battery, ancillaries
216
Battery, charging
218–219
Battery, remote control
36, 84
Bench seat, heated
50
Bench seat, one-piece, fixed
57–58
Blind, panoramic roof
74
Blind spot monitoring
167
Blind spot monitoring system
168
Blinds, side
73
BlueHDi
20, 193, 202
Bluetooth (hands-free)
238–239, 252, 274
Bluetooth (telephone)
252–253, 274–275
Bodywork
200
Bonnet 190–191
Boot
44
Boot lid
33–34
Brake discs
195
Brake lamps
214, 216
Brakes
195
Braking
146
Braking assistance system
100
Braking, automatic emergency
162, 164
Braking, dynamic emergency
139–140
Brightness
254
Bulbs
2 11
Bulbs (changing)
211, 214
C
Cable, audio 272
Cable, Jack
272
Capacity, fuel tank
174–175
Cap, fuel filler
174–175
Care of the bodywork
200
CD
237
CD, MP3
237
Central locking
29, 33, 37
Changing a bulb
211, 214, 216
Changing a bulb (side-hinged doors)
214
Changing a fuse
216
Changing a wheel
207
Changing a wiper blade
95
Changing the remote control battery
36
Changing to free-wheeling
198, 220 CarM an uals 2 .c o m