2023 PEUGEOT 508 maintenance
[x] Cancel search: maintenancePage 3 of 244
Welcome
Thank you for choosing a Peugeot 508.
This document contains the key information and recommendations you
will need to be able to explore your vehicle in complete safety. We strongly
recommend familiarising yourself with it, as well as the Maintenance and
Warranty Guide.
003C
00470052004600580050004800510057
country in which it was sold.
The descriptions and illustrations are for guidance only.
0024005800570052005000520045004C004F004800560003
004800540058004C00530050004800510057
If ownership of your vehicle is transferred, please ensure this Han is
passed on to the new owner.
Key
Safety warning
Additional information
Environmental protection feature
Left-hand drive vehicle
Right-hand drive vehicle002F0052004600440057004C005200510003005200490003004800540058004C0053005000480051005700120045005800570057005200510003004C00510047004C00460044005700480047000300580056004C0051004A000300440003
black area
For any work on your vehicle, contact a member of the Manufacturer
Page 5 of 244

3
Contents
Drive Assist Plus 121
Adaptive cruise control 122
Lane positioning assist 125
Active Safety Brake with Collision Risk Alert and
Intelligent emergency braking assistance
129
Distraction detection 132
Lane keeping assist 134
Blind spot monitoring 136
Parking sensors 138
Visiopark 1 140
Visiopark 2 141
7Practical informationCompatibility of fuels 145
Refuelling 145
Misfuel prevention (Diesel) 146
Rechargeable hybrid system 147
Charging the traction battery
(Rechargeable hybrid)
155
Towing device 157
Towing device with retractable ball joint 158
Roof bars 159
Very cold climate screen 161
Snow chains 161
Energy economy mode 161
Bonnet 162
Engine compartment 163
Checking levels 163
Checks 165
AdBlue® (BlueHDi) 167
Free-wheeling 169
Advice on care and maintenance 169
8In the event of a breakdownWarning triangle 172
Running out of fuel (Diesel) 172
Tool kit 172
Temporary puncture repair kit 174
Spare wheel 176
Changing a bulb 180
Fuses 182
12
V battery/Accessory batteries 182
Towing the vehicle 187
9Technical dataEngine technical data and towed loads 190
Petrol engines 191
Diesel engines 192
Rechargeable hybrid engines 193
Dimensions 194
Identification markings 195
10 PEUGEOT i-Connect Advanced -PEUGEOT i-Connect
First steps 196
Customisation 199
Steering mounted controls 200
Applications 200
Voice commands 201
Navigation 202
Connectivity 203
Mirror Screen 204
Media 206
Phone 208
Settings 209
Help 210
11Vehicle data recording and privacy
■
Alphabetical index
■
Appendix
Page 41 of 244
39
Access
2Acknowledgement of the "kicking" movement
is confirmed by the lighting of the direction
indicators.
"Sideward kicking" movements do not
work. If the "kicking" movement has not
been detected, wait at least 2 seconds before
repeating the movement.
Do not perform repetitive "kicking"
movements.
If the motorised tailgate has not started to open
or close, check that:
–
the function is activated.
–
the electronic key is on your person, outside
the vehicle in the rear recognition area.
–
the "kicking" movement was performed in the
detection zone, close enough to the bumper
.
–
the foot was removed from the bumper quickly
enough.
Automatic locking
It is possible to lock automatically the vehicle
using the hands-free function (Hands-Free
Tailgate Access).
The "Handsfree Trunk Locking" function is configured in the Settings
> Vehicle
touch screen application.
When the vehicle is locked, the request
to open the tailgate with this function
unlocks the vehicle, or only the tailgate if
selective unlocking is activated, prior to the
opening of the tailgate.
Closing the tailgate with the "Hands-Free
Tailgate Access" function enables you to lock
the vehicle.
Recommendations on the
hands-free function (Hands-
Free Tailgate Access)
If it does not work, check that the electronic key
is not exposed to a source of electromagnetic
interference (e.g. smartphone).
The function may be deactivated or affected if
there is rain or snow.
The function may not work correctly with a
prosthetic leg.
In some circumstances, the tailgate may open or
close by itself, particularly when:
–
hitching up or removing a trailer
.
–
operating a towing device.
–
fitting or removing a bicycle carrier
.
–
loading
or unloading bicycles on/from a bicycle
carrier.
–
depositing or lifting something behind the
vehicle.
–
an animal approaches the rear bumper
.
–
washing the vehicle.
–
maintenance is performed on the vehicle.
–
accessing the spare wheel.
To avoid such operating problems, keep the
electronic key away from the recognition zone or
deactivate the hands-free function.
Towing device
The installation of a towing device may
disturb the detection system.
►
Perform the "kicking" movement on the
right side of the towing device.
Electric windows
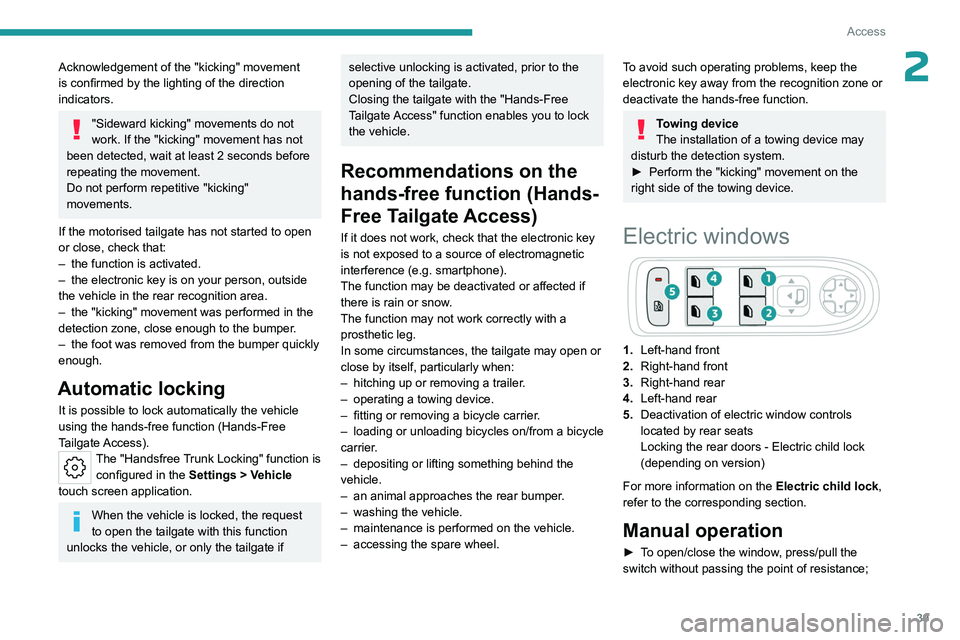
1. Left-hand front
2. Right-hand front
3. Right-hand rear
4. Left-hand rear
5. Deactivation of electric window controls
located by rear seats
Locking the rear doors - Electric child lock
(depending on version)
For more information on the Electric child lock,
refer to the corresponding section.
Manual operation
► To open/close the window, press/pull the
switch without passing the point of resistance;
Page 71 of 244
69
Lighting and visibility
4– when the vehicle is unlocked.
– when a door is opened.
–
when a request to locate the vehicle is
received from the remote control.
They also come on with the welcome lighting
and guide-me-home lighting functions.
They go off automatically after 30 seconds.
Automatic lighting systems - General
recommendations
The automatic lighting systems use a detection
camera, located at the top of the windscreen.
Operating limits
The system may be disrupted or not work
correctly:
–
When visibility conditions are poor
(e.g.
snowfall, heavy rain).
–
If the windscreen is dirty
, misted-up or
masked (e.g.
sticker) in front of the camera.
–
If the vehicle is facing highly reflective signs
or safety barrier reflectors.
The system is not able to detect:
–
Road users that do not have their own
lighting, such as pedestrians.
–
V
ehicles with hidden lighting (e.g. travelling
behind a safety barrier on the motorway).
–
V
ehicles at the top or bottom of a steep
slope, on winding roads, on crossroads.
Maintenance
Clean the windscreen regularly,
particularly the area in front of the camera.
The internal surface of the windscreen can
also become misted around the camera.
In humid and cold weather, demist the
windscreen regularly.
Do not allow snow to accumulate on the
bonnet or roof of the vehicle as this could
obstruct the camera.
Peugeot Matrix LED
Technology 2.0
For more information, refer to the
General recommendations for
automatic lighting systems.
This system automatically adapts the main
beam according to the driving conditions, so that
optimum illumination is maintained for the driver,
without causing a nuisance to other road users.
The driver remains responsible for the vehicle's lighting, its correct use in the
prevailing light, visibility and traffic conditions,
and for compliance with driving and vehicle
regulations.
The system is active from 28 mph
(45 km/h) and deactivates below 22 mph
(35
km/h).
Activation/Deactivation
► Place the ring of the lighting control stalk in
the “ AUTO” position.
This indicator lamp comes on in the instrument panel.
It is configured in the Settings > Vehicle
touch screen application.
The state of the system is stored when the
ignition is switched off.
When deactivated, the lighting system changes
to "Automatic illumination of lamps" mode.
It is recommended that you deactivate
the function in foggy or snowy conditions
or in case of heavy mist.
The function temporarily is deactivated when
the system detects thick fog or when the
foglamps are switched on manually. This is
signalled by the indicator lamp going off on
the instrument panel.
Operation
Using a camera, the system detects the driving
conditions (brightness, lights from oncoming or
followed vehicles, road turns) and adapts the
beams of the main headlamps accordingly.
The modules that make up the main beams
switch on and off gradually, segment by
segment, depending on the driving conditions
detected.
Page 74 of 244
72
Lighting and visibility
Conditions for operation
– With the engine running and in Stop mode
of Stop & Start.
–
V
ery low light conditions with dipped beam
headlamps on and in good working order.
–
T
emperature between -30°C and +28°C.
–
Speed below 99 mph (160
km/h).
–
Detection of animals taller than 0.50 m.
Activation/Deactivation
It is configured in the ADAS touch screen
application.
Operation
If the function is selected but the display
on the instrument panel and the alerts are
not available (in " Night Vision"mode), the
indicator lamp comes on in grey.
If all operating conditions are met, the
indicator lamp comes on in green: the
display on the instrument panel (with " Night
Vision " mode selected) and the triggering of
alerts are available.
If certain operating conditions (speed or
temperature) are not met, the indicator
lamp comes on in orange: only the display on the
instrument panel is available (in " Night Vision"
mode).
Whilst the exterior light is too bright or the dipped
beam headlamps have not been switched on,
the alerts are not available.
The camera detection range is between 15 m
(for pedestrians) and 200 m, depending on
visibility conditions.
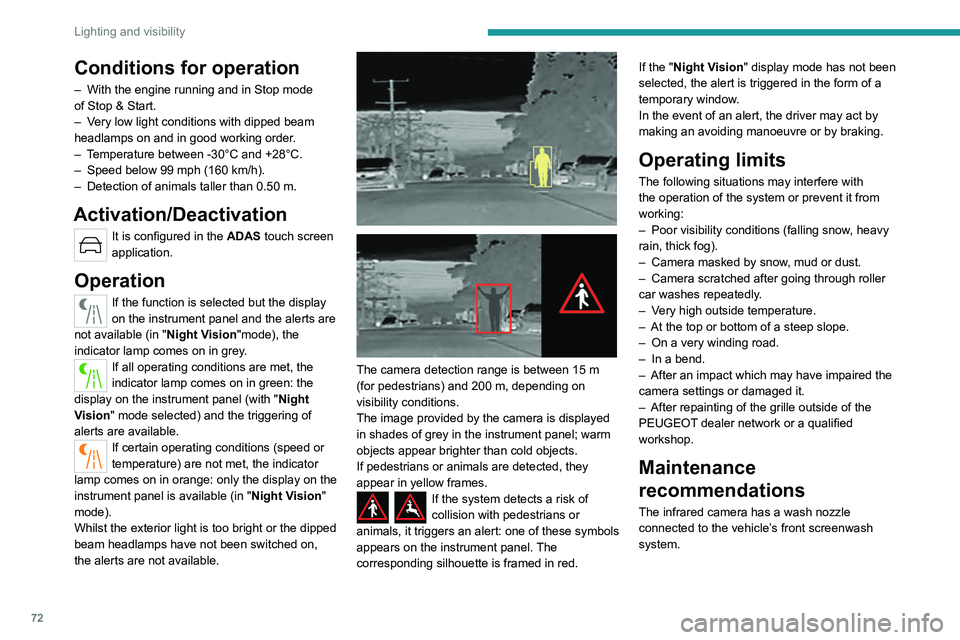
The image provided by the camera is displayed
in shades of grey in the instrument panel; warm
objects appear brighter than cold objects.
If pedestrians or animals are detected, they
appear in yellow frames.
If the system detects a risk of
collision with pedestrians or
animals, it triggers an alert: one of these symbols
appears on the instrument panel. The
corresponding silhouette is framed in red. If the "
Night Vision" display mode has not been
selected, the alert is triggered in the form of a
temporary window.
In the event of an alert, the driver may act by
making an avoiding manoeuvre or by braking.
Operating limits
The following situations may interfere with
the operation of the system or prevent it from
working:
–
Poor visibility conditions (falling snow
, heavy
rain, thick fog).
–
Camera masked by snow
, mud or dust.
–
Camera scratched after going through roller
car washes repeatedly
.
–
V
ery high outside temperature.
–
At the top or bottom of a steep slope.
–
On a very winding road.
–
In a bend.
–
After an impact which may have impaired the
camera settings or damaged it.
–
After repainting of the grille outside of the
PEUGEOT
dealer network or a qualified
workshop.
Maintenance
recommendations
The infrared camera has a wash nozzle
connected to the vehicle’s front screenwash
system.
Page 76 of 244
74
Lighting and visibility
Screenwash fluid is sprayed along the length
of the wiper blade. This improves visibility and
reduces screenwash fluid consumption.
With automatic air conditioning, any
action on the screenwash control results
in temporary closure of the air intake to
protect the passenger compartment from any
odour.
To avoid damaging the wiper blades, do not operate the screenwash if the
screenwash reservoir is empty.
Only operate the screenwash if there is no
risk of the fluid freezing on the windscreen
and hindering visibility. During the winter
period, use "very cold climate" rated products.
Never top up with water.
Rear wiper (SW)
► Turn the ring to align the desired symbol with
the marking.
Off
Intermittent wiping
Screenwash-wipe
Reverse
When reverse gear is engaged, the rear wiper
will come into operation automatically if the front
windscreen wipers are operating.
It is configured in the Settings > Vehicle
touch screen application.
In the event of accumulation of snow or
hard frost or if a bicycle carrier is fitted to
a towing system, deactivate the automatic
rear wiper via the Settings
> Vehicle touch
screen application.
Rear screenwash
► Turn the ring as far as it will go and hold it in
position.
The screenwash and the wiper operate for as
long as the ring remains turned.
A final wiping cycle is performed when screen
washing ends.
Special position of the
windscreen wipers
This maintenance position is used while cleaning
or replacing the wiper blades. It can also be
useful, in wintry weather (ice, snow), to release
the wiper blades from the windscreen.
To maintain the effectiveness of the flat wiper blades, it is advisable to:
–
handle them with care.
–
clean them regularly using soapy water
.
–
avoid using them to hold cardboard on the
windscreen.
–
replace them at the first signs of wear
.
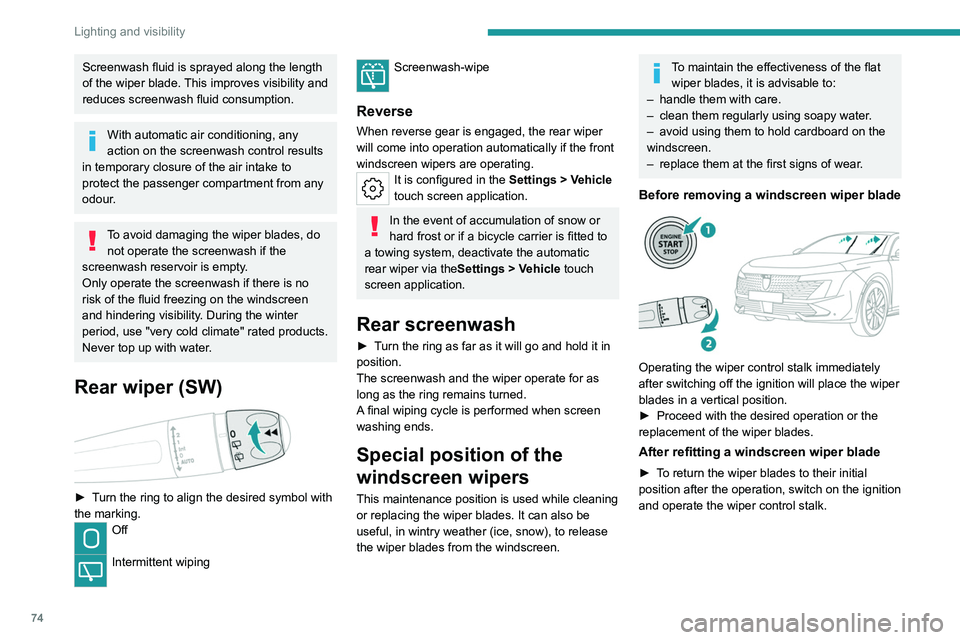
Before removing a windscreen wiper blade
Operating the wiper control stalk immediately
after switching off the ignition will place the wiper
blades in a vertical position.
►
Proceed with the desired operation or the
replacement of the wiper blades.
After refitting a windscreen wiper blade
► To return the wiper blades to their initial
position after the operation, switch on the ignition
and operate the wiper control stalk.
Page 86 of 244
84
Safety
Seat belt not fastened/
unfastened alerts
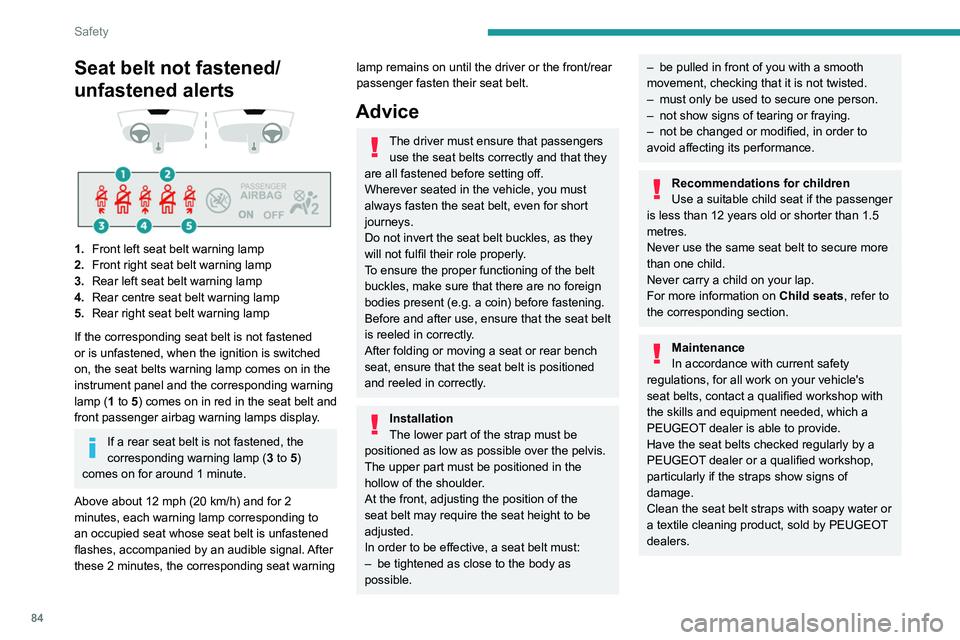
1. Front left seat belt warning lamp
2. Front right seat belt warning lamp
3. Rear left seat belt warning lamp
4. Rear centre seat belt warning lamp
5. Rear right seat belt warning lamp
If the corresponding seat belt is not fastened
or is unfastened, when the ignition is switched
on, the seat belts warning lamp comes on in the
instrument panel and the corresponding warning
lamp (1 to 5) comes on in red in the seat belt and
front passenger airbag warning lamps display.
If a rear seat belt is not fastened, the
corresponding warning lamp ( 3 to 5)
comes on for around 1 minute.
Above about 12 mph (20 km/h) and for 2
minutes, each warning lamp corresponding to
an occupied seat whose seat belt is unfastened
flashes, accompanied by an audible signal. After
these 2 minutes, the corresponding seat warning
lamp remains on until the driver or the front/rear
passenger fasten their seat belt.
Advice
The driver must ensure that passengers use the seat belts correctly and that they
are all fastened before setting off.
Wherever seated in the vehicle, you must
always fasten the seat belt, even for short
journeys.
Do not invert the seat belt buckles, as they
will not fulfil their role properly.
To ensure the proper functioning of the belt
buckles, make sure that there are no foreign
bodies present (e.g.
a coin) before fastening.
Before and after use, ensure that the seat belt
is reeled in correctly.
After folding or moving a seat or rear bench
seat, ensure that the seat belt is positioned
and reeled in correctly.
Installation
The lower part of the strap must be
positioned as low as possible over the pelvis.
The upper part must be positioned in the
hollow of the shoulder.
At the front, adjusting the position of the
seat belt may require the seat height to be
adjusted.
In order to be effective, a seat belt must:
–
be tightened as close to the body as
possible.
– be pulled in front of you with a smooth
movement, checking that it is not twisted.
–
must only be used to secure one person.
–
not show signs of tearing or fraying.
–
not be changed or modified, in order to
avoid affecting its performance.
Recommendations for children
Use a suitable child seat if the passenger
is less than 12 years old or shorter than 1.5
metres.
Never use the same seat belt to secure more
than one child.
Never carry a child on your lap.
For more information on Child seats, refer to
the corresponding section.
Maintenance
In accordance with current safety
regulations, for all work on your vehicle's
seat belts, contact a qualified workshop with
the skills and equipment needed, which a
PEUGEOT dealer is able to provide.
Have the seat belts checked regularly by a
PEUGEOT dealer or a qualified workshop,
particularly if the straps show signs of
damage.
Clean the seat belt straps with soapy water or
a textile cleaning product, sold by PEUGEOT
dealers.
Page 115 of 244

11 3
Driving
6In the event of a windscreen replacement,
contact a PEUGEOT dealer or a qualified
workshop to recalibrate the camera;
otherwise, the operation of the associated
driving aids may be disrupted.
Other cameras
The images from the camera(s)
displayed on the touch screen or on the
instrument panel may be distorted by the
terrain.
In the presence of areas in shade, or in
conditions of bright sunlight or inadequate
lighting, the image may be darkened and with
lower contrast.
Obstacles may appear further away than they
actually are.
Sensors
The operation of the sensors, as well as
any associated functions, may be disrupted
by noise pollution such as that emitted by
noisy vehicles and machinery (e.g. lorries,
pneumatic drills), by the accumulation of
snow or dead leaves on the road or in the
event of damaged bumpers and mirrors.
When reverse gear is engaged, an audible
signal (long beep) indicates that the sensors
may be dirty.
A front or rear impact to the vehicle can
upset the sensors’ settings, which is not
always detected by the system: distance
measurements may be distorted.
The sensors do not systematically detect
obstacles that are too low (pavements, studs)
or too thin (trees, posts, wire fences).
Certain obstacles located in the sensors’ blind
spots may not be detected or may no longer
be detected during the manoeuvre.
Certain materials (fabrics) absorb sound
waves: pedestrians may not be detected.
Maintenance
Clean the bumpers and door mirrors and
the field of vision of the cameras regularly.
When washing your vehicle at high pressure,
direct the spray from at least 30
cm away
from the radar, sensors and cameras.
Mats/Pedal trims
The use of mats or pedal trims not
approved by PEUGEOT may interfere with
the operation of the speed limiter or cruise
control.
To avoid any risk of jamming the pedals:
–
Ensure that the mat is secured correctly
.
–
Never fit one mat on top of another
.
Units of speed
Ensure that the units of speed displayed
on the instrument panel (mph or km/h) are
those for the country you are driving in.
If this is not the case, when the vehicle is
stationary, set the display to the required
units of speed so that it complies with what is
authorised locally.
In case of doubt, contact a PEUGEOT dealer
or a qualified workshop.
Shortcuts for driving aids
The full list of available driving aids can be found
in the Functions tab.
Driving aids can be accessed directly to quickly
activate/deactivate them.
By default, driving aids are already stored in the
Shortcuts tab (e.g.
Stop & Start, Lane keeping
assist).
Other driving aids can be added or deleted from
this tab.
It is configured in the ADAS>Functions
touch screen application.
► Press the button corresponding to the
driving assistance concerned:
•
Full symbol: the function is added to the
Shortcuts
tab.
•
Empty symbol: the function is deleted from
the
Shortcuts tab.
►
Check the modification in the Shortcuts
tab.