2023 PEUGEOT 508 radio
[x] Cancel search: radioPage 7 of 244

5
Overview
Steering-mounted controls
1.Exterior lighting controls/Direction indicators/
Service indicator
2. Wiper controls/Screenwash/Trip computer
3. Automatic gearbox control paddles
4. Horn/Driver front airbag
5. Controls for Cruise control/Speed limiter/
Adaptive cruise control
6. Audio system and instrument panel controls
A. Instrument panel display mode:
Up/Down: display mode selection
Press: confirm a selection
B. Short press: system voice commands
Long press: smartphone voice commands
C. Decrease/Increase volume D.
Press: radio/media display
Up/Down: previous/next radio/media/
smartphone selection
Press: confirm a selection
E. Pick up/Hang up call
Access to the Phone application's call log
F. Select an audio source
G. Display the list of radio stations/audio tracks
Side control bar
1. Motorised tailgate
2. Lane positioning assist
3. Alarm
4. Temperature pre-conditioning operation
indicator lamp
5. Opening the fuel filler flap
Central control bars
1. Controls for the 10" HD touch screen
On/Off and Volume adjustment
HOME button
Access to the Shortcuts for driving aids
2. Heated windscreen
3. Maximum air conditioning
4. Front demisting/defrosting
5. Recirculation of interior air
6. Rear screen demisting/defrosting
7. Switching the air conditioning system off
8. Heated seats
Page 58 of 244
56
Ease of use and comfort
Operating conditions
– The function is only activated when the
ignition is switched off and the
vehicle
locked.
–
When the vehicle is not connected, the
function is only activated if the battery charge
level is greater than 20%.
–
When the vehicle is not connected and a
recurring programme is active (e.g. from Monday
to Friday), if two temperature pre-conditioning
sequences are run without the vehicle being
used, the programme will be deactivated.
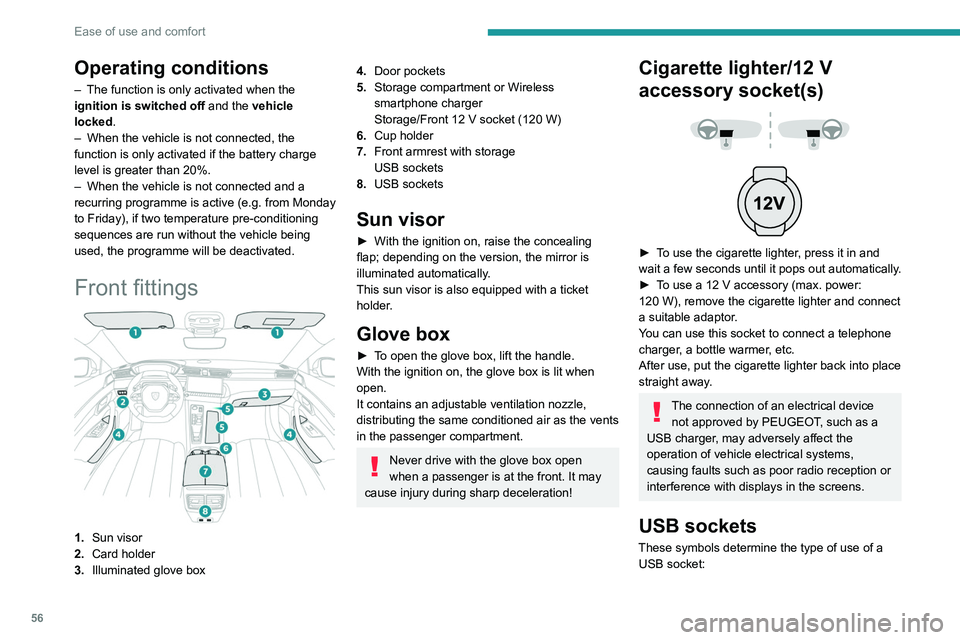
Front fittings
1. Sun visor
2. Card holder
3. Illuminated glove box
4.Door pockets
5. Storage compartment or Wireless
smartphone charger
Storage/Front 12
V socket (120 W)
6. Cup holder
7. Front armrest with storage
USB sockets
8. USB sockets
Sun visor
► With the ignition on, raise the concealing
flap; depending on the version, the mirror is
illuminated automatically
.
This sun visor is also equipped with a ticket
holder.
Glove box
► To open the glove box, lift the handle.
With the ignition on, the glove box is lit when
open.
It contains an adjustable ventilation nozzle,
distributing the same conditioned air as the vents
in the passenger compartment.
Never drive with the glove box open
when a passenger is at the front. It may
cause injury during sharp deceleration!
Cigarette lighter/12 V
accessory socket(s)
► To use the cigarette lighter, press it in and
wait a few seconds until it pops out automatically.
►
T
o use a 12 V accessory (max. power:
120
W), remove the cigarette lighter and connect
a suitable adaptor.
You can use this socket to connect a telephone
charger, a bottle warmer, etc.
After use, put the cigarette lighter back into place
straight away.
The connection of an electrical device not approved by PEUGEOT, such as a
USB charger, may adversely affect the
operation of vehicle electrical systems,
causing faults such as poor radio reception or
interference with displays in the screens.
USB sockets
These symbols determine the type of use of a USB socket:
Page 66 of 244
64
Ease of use and comfort
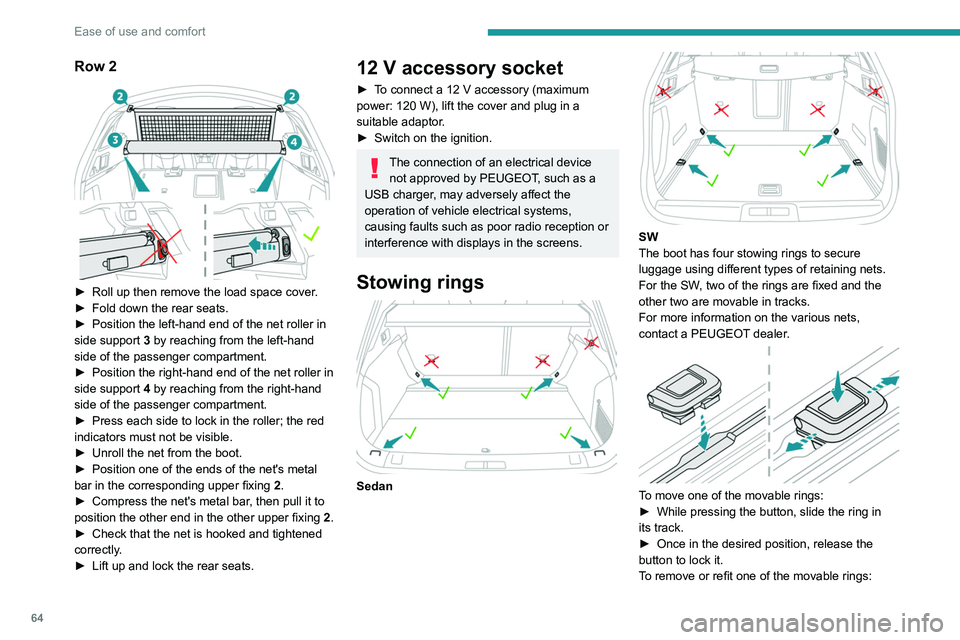
Row 2
► Roll up then remove the load space cover.
► Fold down the rear seats.
►
Position the left-hand end of the net roller in
side support 3
by reaching from the left-hand
side of the passenger compartment.
►
Position the right-hand end of the net roller in
side support 4
by reaching from the right-hand
side of the passenger compartment.
►
Press each side to lock in the roller; the red
indicators must not be visible.
►
Unroll the net from the boot.
►
Position one of the ends of the net's metal
bar in the corresponding upper fixing 2
.
►
Compress the net's metal bar
, then pull it to
position the other end in the other upper fixing 2.
►
Check that the net is hooked and tightened
correctly
.
►
Lift up and lock the rear seats.
12 V accessory socket
► To connect a 12 V accessory (maximum
power: 120 W), lift the cover and plug in a
suitable adaptor.
►
Switch on the ignition.
The connection of an electrical device not approved by PEUGEOT, such as a
USB charger, may adversely affect the
operation of vehicle electrical systems,
causing faults such as poor radio reception or
interference with displays in the screens.
Stowing rings
Sedan
SW
The boot has four stowing rings to secure
luggage using different types of retaining nets.
For the SW, two of the rings are fixed and the
other two are movable in tracks.
For more information on the various nets,
contact a PEUGEOT dealer.
To move one of the movable rings:
► While pressing the button, slide the ring in
its track.
►
Once in the desired position, release the
button to lock it.
T
o remove or refit one of the movable rings:
Page 79 of 244
77
Safety
5General safety
recommendations
Do not remove the labels attached in
different places on your vehicle. They
include safety warnings as well as
identification information for the vehicle.
Depending on country regulations,
certain safety equipment may be
mandatory: high visibility safety vests,
warning triangles, breathalysers, spare bulbs,
spare fuses, fire extinguisher, first aid kit, mud
flaps at the rear of the vehicle, etc.
Installing electrical accessories
The fitting of electrical equipment or
accessories not approved by PEUGEOT may
cause excessive current consumption and
faults and failures with the electrical system
of your vehicle. Contact a PEUGEOT dealer
for information on the range of approved
accessories.
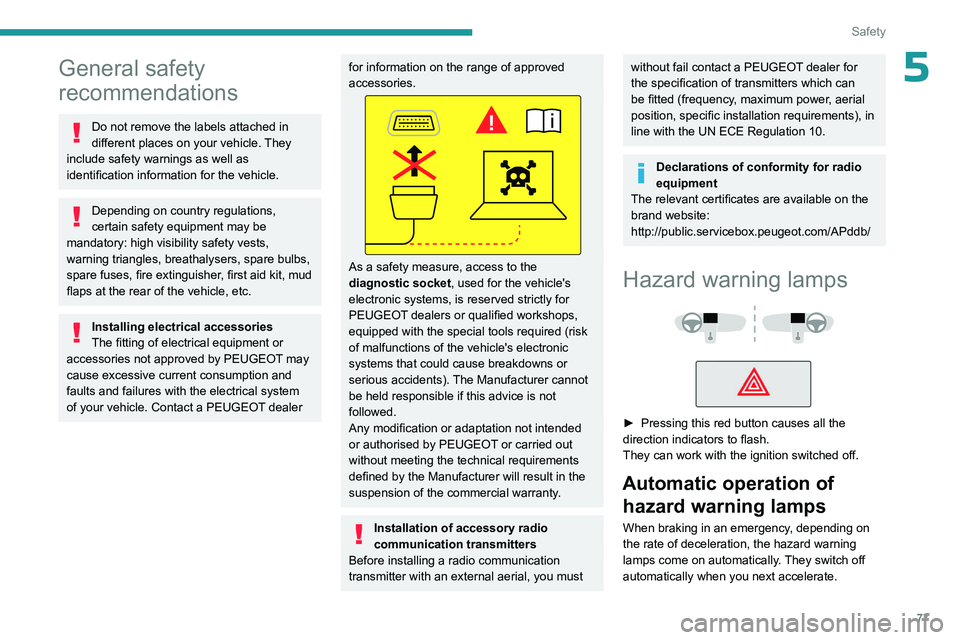
As a safety measure, access to the
diagnostic socket, used for the vehicle's
electronic systems, is reserved strictly for
PEUGEOT dealers or qualified workshops,
equipped with the special tools required (risk
of malfunctions of the vehicle's electronic
systems that could cause breakdowns or
serious accidents). The Manufacturer cannot
be held responsible if this advice is not
followed.
Any modification or adaptation not intended
or authorised by PEUGEOT or carried out
without meeting the technical requirements
defined by the Manufacturer will result in the
suspension of the commercial warranty.
Installation of accessory radio
communication transmitters
Before installing a radio communication
transmitter with an external aerial, you must
without fail contact a PEUGEOT dealer for
the specification of transmitters which can
be fitted (frequency, maximum power, aerial
position, specific installation requirements), in
line with the UN ECE Regulation
10.
Declarations of conformity for radio
equipment
The relevant certificates are available on the
brand website:
http://public.servicebox.peugeot.com/APddb/
Hazard warning lamps
► Pressing this red button causes all the
direction indicators to flash.
They can work with the ignition switched off.
Automatic operation of hazard warning lamps
When braking in an emergency, depending on
the rate of deceleration, the hazard warning
lamps come on automatically. They switch off
automatically when you next accelerate.
Page 189 of 244
187
In the event of a breakdown
8accessory batteries - risk of irreversible
damage!
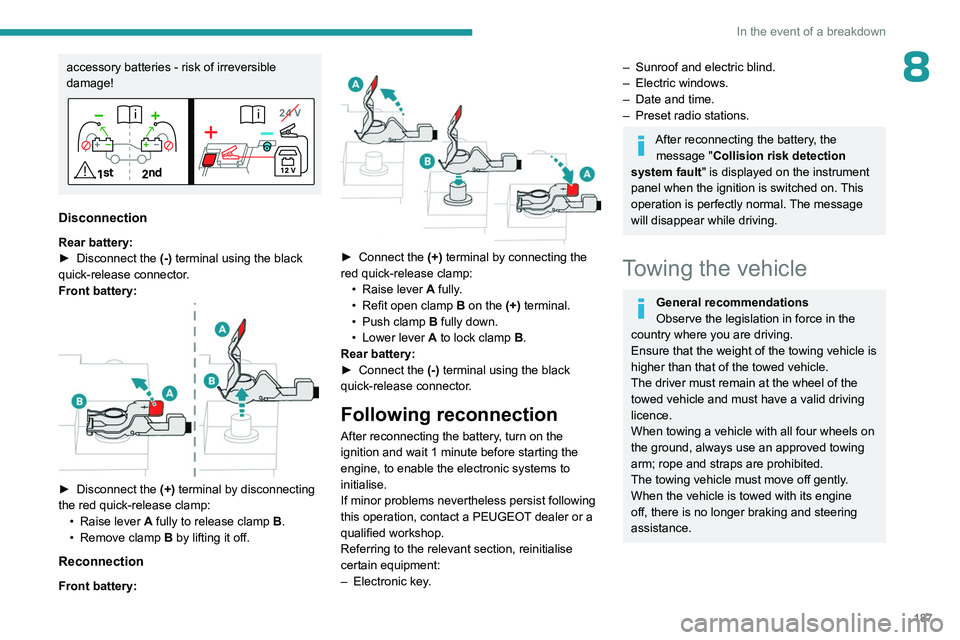
Disconnection
Rear battery:
► Disconnect the (-)
terminal using the black
quick-release connector.
Front battery:
► Disconnect the (+) terminal by disconnecting
the red quick-release clamp: •
Raise lever
A
fully to release clamp
B
.
•
Remove clamp
B
by lifting it off.
Reconnection
Front battery:
► Connect the (+) terminal by connecting the
red quick-release clamp: •
Raise lever
A
fully.
•
Refit open clamp
B
on the (+) terminal.
•
Push clamp
B fully down.
•
Lower lever
A
to lock clamp B.
Rear battery:
►
Connect the
(-) terminal using the black
quick-release connector.
Following reconnection
After reconnecting the battery, turn on the
ignition and wait 1 minute before starting the
engine, to enable the electronic systems to
initialise.
If minor problems nevertheless persist following
this operation, contact a PEUGEOT dealer or a
qualified workshop.
Referring to the relevant section, reinitialise
certain equipment:
–
Electronic key
.
– Sunroof and electric blind.
– Electric windows.
–
Date and time.
–
Preset radio stations.
After reconnecting the battery, the message "Collision risk detection
system fault" is displayed on the instrument
panel when the ignition is switched on. This
operation is perfectly normal. The message
will disappear while driving.
Towing the vehicle
General recommendations
Observe the legislation in force in the
country where you are driving.
Ensure that the weight of the towing vehicle is
higher than that of the towed vehicle.
The driver must remain at the wheel of the
towed vehicle and must have a valid driving
licence.
When towing a vehicle with all four wheels on
the ground, always use an approved towing
arm; rope and straps are prohibited.
The towing vehicle must move off gently.
When the vehicle is towed with its engine
off, there is no longer braking and steering
assistance.
Page 199 of 244
197
PEUGEOT i-Connect Advanced - PEUGEOT i-Connect
10– Quick access to the Mirror Screen® functions
(associated with a connected smartphone).
Swipe down from the upper edge of the touch
screen to access the notifications centre and
display a list of quick settings :Guest, Privacy
Settings, Brightness, My Devices, night mode,
etc.
Principles
► Use this button (HOME) to display the
most recent home page used; a second
press displays the first home page, then press
the virtual buttons displayed
on the touch screen.
Scroll through the home pages by sliding
your finger along the screen to the right or
to the left.
Principle of movement in the system
Depending on the pages displayed on the
screen, scroll through the text or the menu (on
the left side of the screen) by sliding your finger,
as with a smartphone.
Touch buttons
Display/hide the context menu.
Return to the previous page.
►
T
o change the status of a function, press the
description for the corresponding line (change
confirmed by the slider moving to the right/left:
function activated/deactivated).
Access to additional information about the function.
Access to a function’s settings.
Add/delete shortcuts.
Configuring profiles
Press the "Settings" application.
In the list, select the "Profile" tab.
The screen displays a "Guest" profile built
into the system and allows you to create and
personalise several new profiles with or without
an associated mobile device.
The "Guest" profile has a default display with the possibility of adding to it and/or
returning it to its initial configuration. This profile
is built into the system and cannot be deleted.
Each profile created can be associated
with a mobile device of your choice
connected via Bluetooth
®; the Bluetooth® function
of the mobile device must first be activated. This
association allows the system to detect your
presence in the vehicle when it starts and to
propose the activation of your personalised
profile.
If a profile is not connected to the mobile device,
the last profile used will be highlighted.
Select "Create Profile", then follow the
procedure.
Creating a new profile allows you to personalise:
–
Language, units, Privacy Settings.
–
Screen configuration, appearance, i-T
oggles
(depending on equipment).
– Audio settings, favourite radio stations.
– Lighting, interior ambience (refer to the "Ease
of use and comfort" section).
–
Navigation history
, favourite points of interest
(POIs), navigation settings.
–
Some driving aids and the list of favourites.
To delete a profile, select it from the list of profiles then press the bin.
Privacy Settings
The "Privacy Settings" management is
associated with each profile. This function is
used with:
a "Guest" profile configured by default in "Private
Mode",
or
a profile to be created in the system, with or
without connection to a mobile device.
For each profile (even "Guest"), the last privacy
mode saved value will be restored.
"Sharing Data and Location"
This mode allows the vehicle to externally
transmit all the personal data needed for each
valid available connected service.
The personal data required to use the connected services is sent to the
providers of these services.
"Sharing Data"
This mode allows the vehicle to externally
transmit all the data needed for each valid
available connected service, with the exception
of vehicle location data (e.g.
GPS coordinates).
Page 200 of 244
198
PEUGEOT i-Connect Advanced - PEUGEOT i-Connect
Some connected services may not
function without the vehicle location data.
This mode will not be applied to the emergency call function or to specific
services to which the user has consented
under the terms of commercial contracts
(e.g.
Connected alarm).
"Private Mode"
This mode does not allow the vehicle to
transmit personal data outside the vehicle.
Connected services will only perform
local processing inside the vehicle with
limited functions.
This mode will not be applied to the emergency call function or to specific
services to which the user has consented
under the terms of commercial contracts
(e.g.
Connected alarm).
Professional purposes
If the vehicle is used for professional
purposes or under the terms of specific
contracts (e.g.
corporate fleet, government
assignment), some privacy modes will not
be available for the user on the screen,
depending on the data sharing needs of the
services. To change mode, swipe down from the upper
edge of the touch screen to display all of the
quick settings.
Press this button and select the chosen
mode. The mode is highlighted.
OR
Press the "Settings" application.
In the list, select the "Connectivity" tab.
Select "Privacy Settings".
Choose the mode.
Internet portal
During the first use, upon acquisition of the
vehicle, the user is invited to select the country
of residence for the use of the Internet portal.
If the country is not selected, the notification is
stored in the notification centre and disappears
once the country is selected. Slide a finger on
the touch screen from top to bottom to display all
the notifications.
The selection of a country is necessary to use
the available internet applications.
Press the "Settings" application.
In the list, select the "Connected Services".
Choose the country.
The first time you use it, via a connected mobile device, the system links to your
profile. The connected mobile device serves as
an access key to saved personal information.
First activate the mobile device’s Bluetooth®
function.
Select the desired application, authentication will
be requested if necessary. This authentication
will be saved for future uses via the mobile
device connected to the current profile.
An authentication will be requested at each use if
the mobile device is not connected to the current
profile or if the Guest profile is used.
With the use of the “Guest” profile, an
identification will be requested for each
use.
Updating the system
Managing devices remotely and
remote updating of software and
firmware.
Being an integral part of the
service used to
provide connected services contract(s), the
required management of devices as well as
the required updating of the software and
firmware associated with the aforementioned
connected service will be carried out remotely,
in particular using "Over the Air" technology.
To do this, a secure connection via radio
network is established between the vehicle
and the Manufacturer's device management
server each time the ignition is switched on,
when a mobile telephone network is available.
Depending on the vehicle's equipment,
the connection
configuration must be set
Page 201 of 244
199
PEUGEOT i-Connect Advanced - PEUGEOT i-Connect
10to "Connected vehicle" to enable to the
connection to the radio network.
Irrespective of a valid subscription to a
connected service, the remote management
of devices relating to or connected with
the security of devices, and the updating
of software and firmware, will be carried
out when necessary in order to comply
with a legal requirement applicable to the
Manufacturer (e.g. the applicable law in terms
of product liability, the regulations governing
e-call) or when necessary to protect the
respective vital interests of the vehicle's users
and passengers.
The establishment of a secure connection via
radio network and the corresponding remote
updates are not affected by the privacy
settings and are intended to be carried out
after being initialised by the user in response
to a related notification.
The system can notify the receipt of an update
when it is connected to an exterior Wi-Fi network
or a mobile telephone network.
Large updates are downloaded only via the Wi-Fi
network.
The availability of an update is notified on the
screen at the end of the journey with an option
of immediate installation or postponement of
installation.
The installation time is variable and can take
several minutes with a maximum of about 30 minutes. A notification will give an estimate of the
duration and a description of the update.
Update information is available through the
"Settings" application.
Press the "Settings" application.
In the list, select the "Updates" tab.
This button allows you to change the authorisation for automatic downloading
of updates via an exterior Wi-Fi network.
For safety reasons and because it
requires sustained attention on the part
of the driver, the installation must be carried
out with the ignition on but without starting the
engine.
The installation cannot be carried out in the
following cases:
–
engine running.
–
emergency call in progress.
–
insufficient battery level.
–
when charging for electric vehicles.
If an update has failed or has expired, contact a
dealer or a qualified workshop.
The Manufacturer does not charge for the use of this service.
However, the use of Wi-Fi and/or mobile
telephone networks by your smartphone may
incur extra charges if you exceed the data
allowance included in your contract.
Any associated costs will be billed to you by
your mobile telephone operator.
Personalisation
Press and hold the screen from one of the
system's home pages.
Or
Press the "Settings" application.
In the list, select the "Customization" tab.
Press the "Displays" field.
A page divided into 2 parts is displayed.
Press the HOME button at any time to leave this
page.
Personalising the screen
Press the pencil in the "Customize
Touchscreen" part.
A representation of the organisation of the
different home page ( HOME) Widgets
is
displayed.
A Widget is a reduced window of an application or service.
Adding a Widget
To add a Widget, press "Widget" on the left of the screen.
Or
Press one of these buttons on the screen.
Select the desired Widget.
Press the back arrow to return to the
previous page.