2023 PEUGEOT 508 buttons
[x] Cancel search: buttonsPage 29 of 244
27
Access
2► With a non-motorised tailgate: press and hold
this button to unlock the boot and partially open
the tailgate.
When selective unlocking of the tailgate is
activated, the doors and the fuel filler flap remain
locked.
If selective unlocking of the tailgate is
deactivated, pressing the button unlocks the
whole vehicle.
If motorised operation of the tailgate is
deactivated, pressing the button partially
opens the tailgate.
To lock the vehicle, it is necessary to close
the tailgate again.
Locking the vehicle
Normal locking
► Press the locking button.
The locking, and the activation of the alarm
depending on version, is confirmed by the
lighting of the direction indicators.
The door mirrors fold.
An access (door or boot) that is not properly closed prevents locking of the
vehicle. However, if the vehicle is fitted with
an alarm, it will be activated after 45
seconds.
If the vehicle is unlocked but the doors or boot
are not subsequently opened,
the vehicle
will automatically lock itself again after about
30 seconds. If the vehicle is fitted with an
alarm, it will be reactivated automatically.
Deadlocking
Deadlocking renders the interior door
controls inoperative. It also disables the
central locking button.
The horn remains operational.
Never leave anyone inside the vehicle
when it is deadlocked.
►
Press the locking button again within 5
seconds to deadlock the vehicle (confirmed by
the temporary lighting of the direction indicators).
Closing the windows
Holding the locking button pressed for
more than 3 seconds closes the windows.
When closing windows, ensure that no
person or object could prevent their
correct closure.
To leave the windows partly open on versions
with alarm, you must first deactivate the
interior volumetric monitoring.
For more information on the Alarm, refer to
the corresponding section.
"Peugeot Adaptive LED Technology"
With the Full LED 3D rear lamps, the
lamps illuminate in a scrolling pattern upon
locking and unlocking the vehicle.
Locating the vehicle
This function helps you to spot your vehicle from
a distance, with the vehicle locked:
–
The direction indicators or sidelamps and/or
daytime running lamps, depending on version,
flash for approximately 10 seconds.
–
The door mirror spotlamps come on.
–
The courtesy lamps come on.
► Press this button.
Advice
Remote control
The remote control is a sensitive, high-
frequency device; avoid handling it in your
pocket, due to the risk of unintentionally
unlocking the vehicle.
Avoid pressing the remote control buttons
while out of range of the vehicle, due to
the risk of rendering the remote control
inoperative. It would then be necessary to
reset it.
Anti-theft protection
Do not modify the electronic vehicle
immobiliser, as this might result in
malfunctions.
Locking the vehicle
Driving with the doors locked could make
it more difficult for the emergency services
Page 31 of 244
29
Access
2This operation also closes the sunroof blind.
Make sure that no item or person could
prevent the correct closing of the
windows and sunroof.
Pay particular attention to children when
operating windows.
The locking, and the activation of the alarm
depending on version, is confirmed by the
temporary lighting of the direction indicators.
The door mirrors fold.
Deadlocking
Deadlocking renders the interior door
controls inoperative. It also disables the
central locking button.
The horn remains operational.
Never leave anyone inside the vehicle when it
is deadlocked.
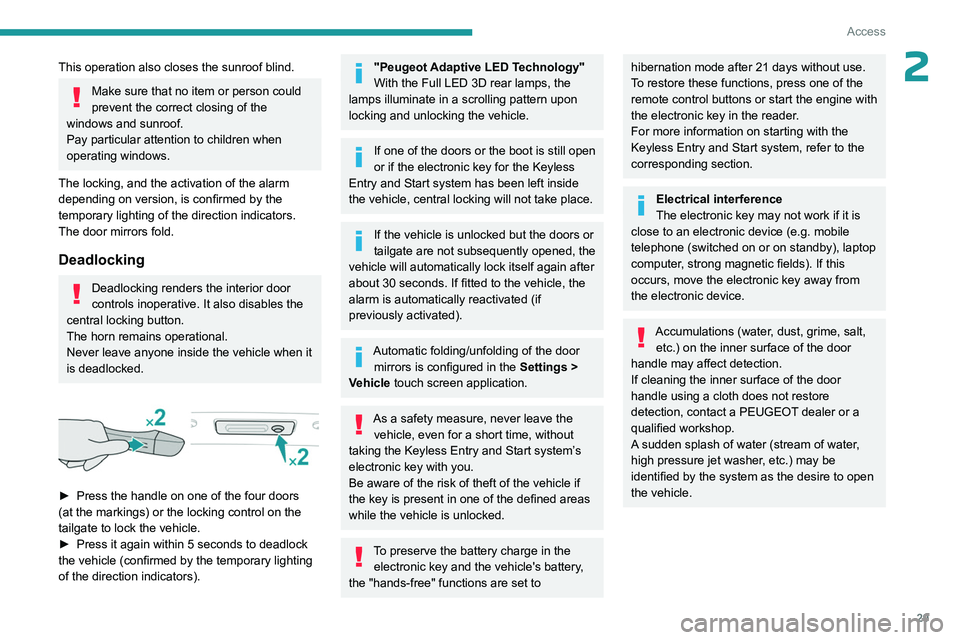
► Press the handle on one of the four doors
(at the markings) or the locking control on the
tailgate to lock the vehicle.
►
Press it again within 5 seconds to deadlock
the vehicle (confirmed by the temporary lighting
of the direction indicators).
"Peugeot Adaptive LED Technology"
With the Full LED 3D rear lamps, the
lamps illuminate in a scrolling pattern upon
locking and unlocking the vehicle.
If one of the doors or the boot is still open
or if the electronic key for the Keyless
Entry and Start
system has been left inside
the vehicle, central locking will not take place.
If the vehicle is unlocked but the doors or
tailgate are not subsequently opened, the
vehicle will automatically lock itself again after
about 30
seconds. If fitted to the vehicle, the
alarm is automatically reactivated (if
previously activated).
Automatic folding/unfolding of the door mirrors is configured in the Settings
>
Vehicle touch screen application.
As a safety measure, never leave the vehicle, even for a short time, without
taking the Keyless Entry and Start system’s
electronic key with you.
Be aware of the risk of theft of the vehicle if
the key is present in one of the defined areas
while the vehicle is unlocked.
To preserve the battery charge in the electronic key and the vehicle's battery,
the "hands-free" functions are set to
hibernation mode after 21 days without use.
To restore these functions, press one of the
remote control buttons or start the engine with
the electronic key in the reader.
For more information on starting with the
Keyless Entry and Start system, refer to the
corresponding section.
Electrical interference
The electronic key may not work if it is
close to an electronic device (e.g.
mobile
telephone (switched on or on standby), laptop
computer, strong magnetic fields). If this
occurs, move the electronic key away from
the electronic device.
Accumulations (water, dust, grime, salt, etc.) on the inner surface of the door
handle may affect detection.
If cleaning the inner surface of the door
handle using a cloth does not restore
detection, contact a PEUGEOT dealer or a
qualified workshop.
A sudden splash of water (stream of water,
high pressure jet washer, etc.) may be
identified by the system as the desire to open
the vehicle.
Page 35 of 244
33
Access
2When the vehicle is parked, the alarm
will not be triggered if the vehicle is
knocked.
Self-protection function
The system checks whether any of its
components are out of service.
The alarm is triggered if the battery, the central
control or the siren wiring is put out of service or
damaged.
Work on the alarm system
Consult a PEUGEOT dealer or a
qualified workshop.
Locking the vehicle with full
alarm system
Activation
► Switch off the ignition and exit the vehicle.
► Lock or deadlock the vehicle using the
remote control or with the Keyless Entry and
Start system.
When the monitoring system is active, the red
indicator lamp in the button flashes once per
second and the direction indicators come on for
about 2 seconds.
The exterior perimeter monitoring is activated
after 5 seconds and the interior volumetric and
anti-tilt monitoring after 45 seconds.
Door, boot or bonnet
If an opening is not properly closed,
the vehicle is not locked, but the exterior
perimeter monitoring will be activated after
45 seconds, at the same time as the interior
volumetric and anti-tilt monitoring.
Sunroof
If the sunroof remains open, the vehicle
is locked with exterior perimeter monitoring
activated but without interior volumetric or
anti-tilt monitoring.
Deactivation
► Press one of the remote control unlocking
buttons:
short press
long press
or
►
Unlock the vehicle with the Keyless Entry and
Start system.
The monitoring system is deactivated: the
indicator lamp in the button goes off and the
sidelamps and/or the daytime running lamps
flash for about 2 seconds.
If the vehicle automatically locks itself
again (as happens if a door or the boot is
not opened within 30 seconds of unlocking),
the monitoring system is automatically
reactivated.
Locking the vehicle
with exterior perimeter
monitoring only
Deactivate the interior volumetric and anti-tilt
monitoring to avoid the unwanted triggering of
the
alarm, in certain cases such as:
–
Slightly open window
.
–
W
ashing the vehicle.
–
Changing a wheel.
–
T
owing the vehicle.
–
T
ransport on a ship or ferry.
Deactivating the interior volumetric
and anti-tilt monitoring
► Switch off the ignition and within 10 seconds
press the alarm button until its red indicator lamp
is on fixed.
►
Get out of the vehicle.
►
Immediately lock the vehicle using the remote
control or the Keyless Entry and Start system.
Only the exterior perimeter monitoring is
activated; the button's red indicator lamp flashes
once every second.
To take effect, this deactivation must be carried out after each time the ignition is
switched off.
Page 43 of 244

41
Access
2Do not put your head or arms through the
open windows when the vehicle is moving -
risk of serious injury!
Panoramic sunroof
The panoramic sunroof consists of a movable
glass panel that slides over the roof and a blind
that can be opened independently. Opening the
sunroof automatically opens the blind.
►
T
o operate the panoramic sunroof or the
blind, use the buttons in the roof console.
A. Sunroof blind control
B. Sunroof control
The sunroof or blind can be operated when the
ignition is turned on (if the battery is charged
enough), with the engine running, in STOP mode
of Stop & Start, and up to 45
seconds after
turning off the ignition or after locking the vehicle.
Precautions
Do not put your head or arms through the
sunroof while the vehicle is moving - risk
of serious injury!
Do not operate the sunroof if transverse
roof bars are fitted - risk of serious
damage!
Do not place heavy loads on the movable
glass panel of the sunroof.
If the sunroof is wet, following a rain
shower or washing the vehicle, wait until
it is completely dry before operating it.
Do not operate the sunroof if it is covered by
snow or ice - risk of damage!
Use only plastic scrapers to remove snow or
ice from the sunroof.
Regularly check the condition of the
sunroof seals (e.g. presence of dust,
dead leaves).
If using a car wash, check first that the roof is
correctly closed and keep the high-pressure
jet at least 30 centimetres from the seals.
Never leave the vehicle with the sunroof
open.
Operation
When opening the sunroof fully, the movable
glass moves to a partially open position, then
slides over the roof. Any intermediate position is
possible.
Depending on the speed of the vehicle,
the partially open position may vary to
improve the acoustics.
Before operating the sunroof or blind
control buttons, ensure that no object or
person might prevent the movement.
Be particularly aware of children when
operating the sunroof or blind.
If something is trapped when operating the
sunroof or blind, you should reverse the
movement of the sunroof or blind by pressing
the control in question.
The driver must ensure that passengers use
the sunroof and blind correctly.
Anti-pinch system
If the sunroof or blind encounters an obstacle
when closing, the movement is automatically
reversed.
The roof anti-pinch system is designed to be
effective at speeds of up to 75 mph (120
km/h).
Opening/Closing
► To open the sunroof or the blind, use the
part of the button located towards the rear of the
vehicle.
Page 44 of 244
42
Access
► To close the sunroof or the blind, use the part
of the button located towards the front of the
vehicle.
Operation of buttons
► Pressing a button beyond its point of
resistance directly opens or closes the sunroof
or blind fully
.
►
Pressing the button again stops the current
movement.
►
When holding a button (without going
beyond the point of resistance), the movement
of the sunroof or blind stops when this button is
released.
►
When the sunroof is closed: pressing once
without passing the point of resistance moves it
to a partially open position.
►
When the sunroof is partially open: pressing
once without passing the point of resistance
opens or closes it fully
.
The sunroof and windows, then the blind, can be closed by holding down the door
locking control. The manoeuvre stops as soon
as the locking control is released.
Closing of the blind is limited by the
position of the sunroof: the blind cannot
go further than the front of the movable glass.
During simultaneous movements of the
sunroof and blind, the blind automatically
stops or resumes movement depending on
the position of the sunroof.
Reinitialisation
Following reconnection of the battery or in the
event of a fault or jerky movement of the sunroof
or blind, reinitialisation is required.
►
Check that nothing is interfering with the
sunroof or blind and that the seals are clean.
►
With the ignition on, fully close the sunroof
and blind.
►
Press and hold the front part of button
B, until
the sunroof and blind move slightly, then hold for
a further 1 second before releasing.
►
W
ait 2 seconds and then press and hold the
front part of button B. The blind and the sunroof
will open and close, one after the other. When
both are completely closed again, hold for a
further 2 seconds and release.
If there is an operating fault, restart the
whole procedure.
Page 48 of 244
46
Ease of use and comfort
Memorising driving
positions
Associated with the electrically-adjusted driver’s
seat, this function allows two driving positions
to be memorised, to make these adjustments
easier if there are frequent driver changes.
It records the electric adjustments made to the
seat and door mirrors.
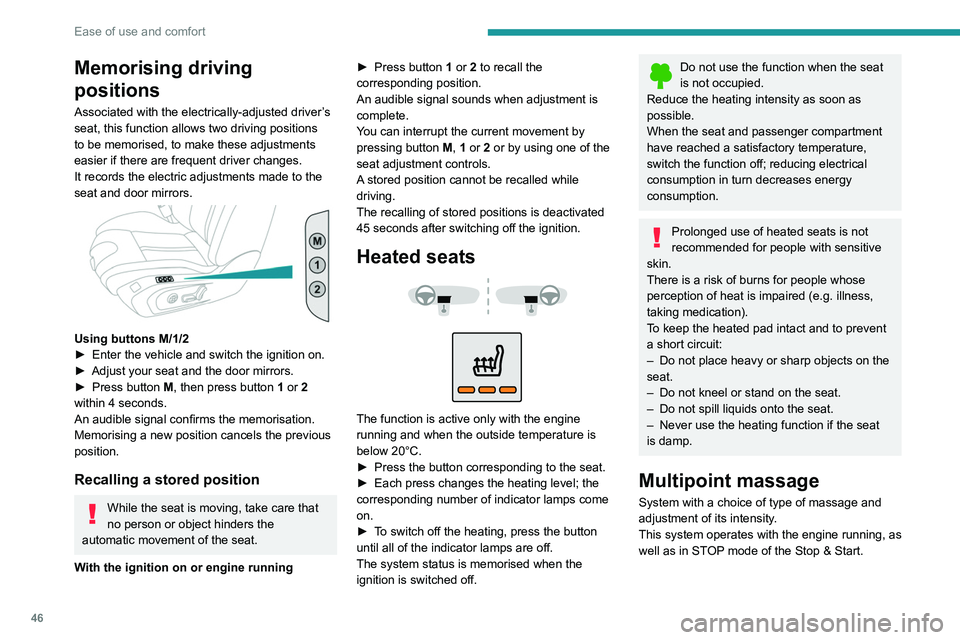
Using buttons M/1/2
► Enter the vehicle and switch the ignition on.
►
Adjust your seat and the door mirrors.
►
Press button
M, then press button 1 or 2
within 4 seconds.
An audible signal confirms the memorisation.
Memorising a new position cancels the previous
position.
Recalling a stored position
While the seat is moving, take care that
no person or object hinders the
automatic movement of the seat.
With the ignition on or engine running ►
Press button
1 or 2 to recall the
corresponding position.
An audible signal sounds when adjustment is
complete.
You can interrupt the current movement by
pressing button M, 1 or 2 or by using one of the
seat adjustment controls.
A stored position cannot be recalled while
driving.
The recalling of stored positions is deactivated
45 seconds after switching off the ignition.
Heated seats
The function is active only with the engine
running and when the outside temperature is
below 20°C.
►
Press the button corresponding to the seat.
►
Each press changes the heating level; the
corresponding number of indicator lamps come
on.
►
T
o switch off the heating, press the button
until all of the indicator lamps are off.
The system status is memorised when the
ignition is switched off.
Do not use the function when the seat
is not occupied.
Reduce the heating intensity as soon as
possible.
When the seat and passenger compartment
have reached a satisfactory temperature,
switch the function off; reducing electrical
consumption in turn decreases energy
consumption.
Prolonged use of heated seats is not
recommended for people with sensitive
skin.
There is a risk of burns for people whose
perception of heat is impaired (e.g.
illness,
taking medication).
To keep the heated pad intact and to prevent
a short circuit:
–
Do not place heavy or sharp objects on the
seat.
–
Do not kneel or stand on the seat.
–
Do not spill liquids onto the seat.
–
Never use the heating function if the seat
is damp.
Multipoint massage
System with a choice of type of massage and
adjustment of its intensity.
This system operates with the engine running, as
well as in STOP mode of the
Stop & Start.
Page 54 of 244
52
Ease of use and comfort
This system works with the engine running, but
access to the ventilation and its controls remains
possible with the ignition on.
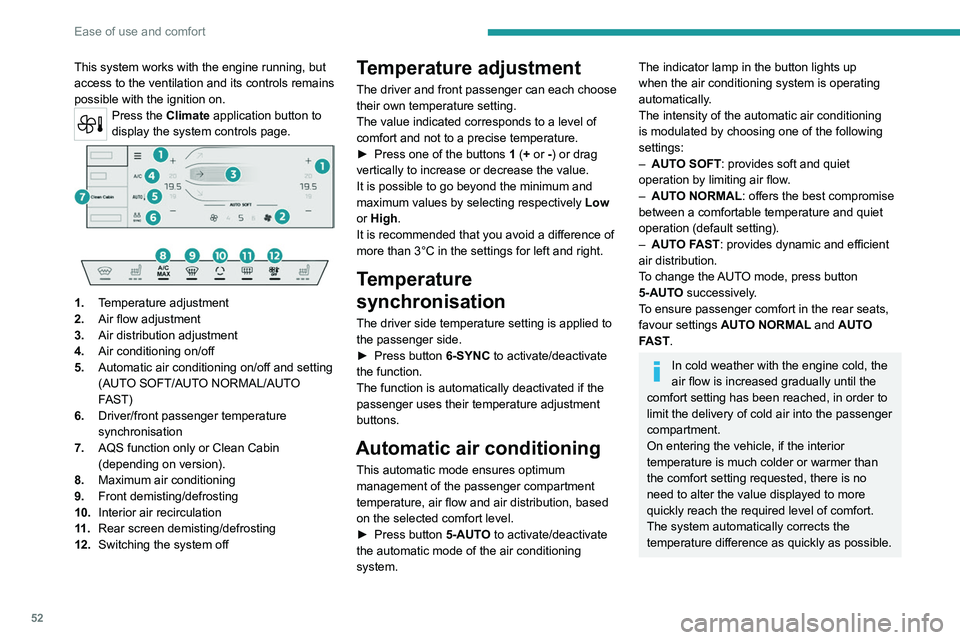
Press the Climate application button to
display the system controls page.
1. Temperature adjustment
2. Air flow adjustment
3. Air distribution adjustment
4. Air conditioning on/off
5. Automatic air conditioning on/off and setting
(AUTO SOFT/AUTO NORMAL/AUTO
FAST)
6. Driver/front passenger temperature
synchronisation
7. AQS function only or Clean Cabin
(depending on version).
8. Maximum air conditioning
9. Front demisting/defrosting
10. Interior air recirculation
11 . Rear screen demisting/defrosting
12. Switching the system off
Temperature adjustment
The driver and front passenger can each choose
their own temperature setting.
The value indicated corresponds to a level of
comfort and not to a precise temperature.
►
Press one of the buttons
1 (+ or -) or drag
vertically to increase or decrease the value.
It is possible to go beyond the minimum and
maximum values by selecting respectively Low
or High.
It is recommended that you avoid a difference of
more than 3°C in the settings for left and right.
Temperature
synchronisation
The driver side temperature setting is applied to
the passenger side.
►
Press button
6-SYNC to activate/deactivate
the function.
The function is automatically deactivated if the
passenger uses their temperature adjustment
buttons.
Automatic air conditioning
This automatic mode ensures optimum
management of the passenger compartment
temperature, air flow and air distribution, based
on the selected comfort level.
►
Press button
5-AUTO to activate/deactivate
the automatic mode of the air conditioning
system.
The indicator lamp in the button lights up
when the air conditioning system is operating
automatically.
The intensity of the automatic air conditioning
is modulated by choosing one of the following
settings:
–
AUT
O SOFT : provides soft and quiet
operation by limiting air flow.
–
AUT
O NORMAL: offers the best compromise
between a comfortable temperature and quiet
operation (default setting).
–
AUT
O FAST: provides dynamic and efficient
air distribution.
To change the AUTO mode, press button
5-AUTO successively.
To ensure passenger comfort in the rear seats,
favour settings AUTO NORMAL and AUTO
FAST.
In cold weather with the engine cold, the
air flow is increased gradually until the
comfort setting has been reached, in order to
limit the delivery of cold air into the passenger
compartment.
On entering the vehicle, if the interior
temperature is much colder or warmer than
the comfort setting requested, there is no
need to alter the value displayed to more
quickly reach the required level of comfort.
The system automatically corrects the
temperature difference as quickly as possible.
Page 55 of 244

53
Ease of use and comfort
3Automatic air conditioning manual settings
It is possible to manually adjust one or more
of these functions, while the system retains
automatic control of the other functions:
–
air flow
.
–
air distribution.
The indicator lamp in the " AUT
O” button goes
out if a setting is changed.
►
Press button
5-AUTO again to reactivate
automatic air conditioning.
Adjusting the air flow
► Press one of the buttons 2 (fan) or drag
horizontally to increase or decrease air flow.
It is also possible to directly press one of the
values.
Switching off the air conditioning
system
When the air flow is reduced to a minimum,
ventilation stops.
“OFF" is displayed alongside the fan.
Adjusting the air distribution
► Press the buttons 3 to adjust the air flow
distribution inside the passenger compartment.
Windscreen and side windows
Central and side air vents
Footwells
A symbol is activated to display the presence of
blown air in the direction indicated.
It is possible to activate all three buttons
simultaneously, for uniform distribution
throughout the passenger compartment.
Clean Cabin function
It includes the AQS (Air Quality System) and
Clean Air functions.
►
T
o activate/deactivate the function, press
button 7.
AQS function
Using an exterior pollution sensor, this function
automatically activates the recirculation of
interior air when a certain level of pollutants in
the exterior
air is detected.
When the air quality returns to a satisfactory
level, recirculation of interior air is automatically
deactivated.
This function is not designed to detect
unpleasant odours.
Recirculation is automatically activated when the
windscreen wash is used or when reverse gear
is engaged.
The function is inactive if the outside temperature
is below 5°C to prevent the risk of misting on the
windscreen and side windows.
Clean Air function
Using an interior pollution sensor, this function
detects fine particles (e.g. cigarette smoke,
mould, bacteria).
The management of the recirculation of
interior
air makes it possible to return to a purified
passenger compartment in just a few minutes,
thanks to the passage of air through the high-
performance passenger compartment filter.
If the air quality appears to be reduced, contact
a PEUGEOT dealer or a qualified workshop
to change the high-performance passenger
compartment filter.
Air conditioning on/off
The air conditioning system is designed to
operate effectively in all seasons, with the
windows closed:
–
It lowers the temperature in summer
.
–
It increase the effectiveness of the demisting,
in winter
, above 3°C.
►
Press button
4-A/C to switch the air
conditioning on/off.
When the function is switched on, " A/C" changes
colour.
Air conditioning does not operate when the air flow is deactivated.
To obtain cool air more quickly, enable interior
air recirculation for a brief period. Then return
to the intake of exterior air.
Switching off the air conditioning may result in
some discomfort (humidity or misting).