2023 PEUGEOT 508 reset
[x] Cancel search: resetPage 20 of 244
18
Dashboard instruments
Black/white warning lamps
Foot on the brake
Fixed.
Insufficient or no pressure on the brake
pedal.
With the engine running, before releasing the
parking brake, to move out of mode P on an
automatic gearbox.
e-SAVE function (Rechargeable hybrid)Fixed, accompanied by the reserved
electric range.
The function is activated.
Indicators
Service indicator
The servicing information is expressed in terms
of distance (miles or kilometres) and time
(months or days).
The alert is given at whichever of these two
terms is reached first.
The servicing information is displayed in the
instrument panel. Depending on the version of
the vehicle:
–
The distance recorder display line indicates
the distance remaining before the next service
is due, or the distance travelled since it was due
preceded by the "-" sign.
–
An alert message indicates the distance
remaining, as well as the period before the next
service is due or how long it is overdue.
The value indicated is calculated according to the distance covered and
the time elapsed since the last service.
The alert may also be triggered close to a
due date.
Service spannerOn temporarily when the ignition is
switched on.
Between 620 and 1,860 miles (1,000 and 3,000
km) remain before the next service is due.
Fixed, when the ignition is switched on.
The next service is due in less than 620
miles (1,000 km).
Have your vehicle serviced very soon.
Service spanner flashingFlashing then fixed, when the
ignition is switched on.
(With
BlueHDi Diesel engines, associated with
the Service warning lamp.)
The servicing interval has been exceeded.
Have your vehicle serviced as soon as possible.
Resetting the service indicator
The service indicator must be reset after each
service.
If you have serviced your vehicle yourself:
►
Switch the ignition off.
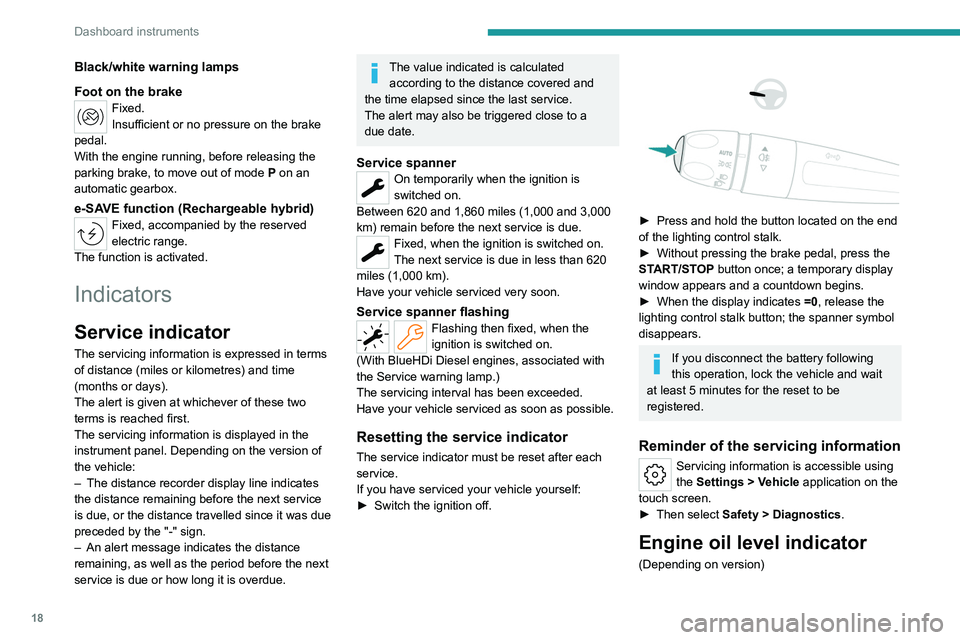
► Press and hold the button located on the end
of the lighting control stalk.
►
Without pressing the brake pedal, press the
ST
ART/STOP button once; a temporary display
window appears and a countdown begins.
►
When the display indicates =0
, release the
lighting control stalk button; the spanner symbol
disappears.
If you disconnect the battery following
this operation, lock the vehicle and wait
at least 5 minutes for the reset to be
registered.
Reminder of the servicing information
Servicing information is accessible using
the Settings > Vehicle application on the
touch screen.
►
Then select
Safety > Diagnostics.
Engine oil level indicator
(Depending on version)
Page 24 of 244
22
Dashboard instruments
The test is launched in the Settings> Vehicle touch screen application.
►
Then select
Safety > Diagnostics.
The following information is displayed on the
instrument panel:
–
T
yre pressures.
–
Engine oil level (depending on engine).
–
Next service due.
–
Driving range associated with the
AdBlue® and
the SCR system (BlueHDi
Diesel).
–
Current alerts.
This information is also displayed automatically every time the ignition is
switched on.
Total distance recorder
The total distance recorder measures the total
distance travelled by the vehicle since its initial
registration.
With the ignition on, the total distance is
displayed at all times. It remains displayed for
30
seconds after switching off the ignition. It is
displayed when the driver's door is opened, and
when the vehicle is locked or unlocked.
When travelling abroad, you may have to
change the distance units (miles or km):
the displayed speed must be in the local
country’s official unit (mph or km/h).
The unit is changed via the screen's
configuration application, with the vehicle
stationary.
Rechargeable hybrid vehicles
The total distance recorder is only
accessible from the trip computer.
For more information on the Trip computer,
refer to the corresponding section.
Lighting dimmer
Used to manually adjust the brightness of the
instruments and controls to suit the exterior light
level.
It is configured in the Settings >
Brightness touch screen application.
►
In the "
Cockpit" category, press or move the
slider to the desired setting.
Trip computer
Displays information related to the current trip
(range, fuel consumption, average speed, etc.).
Data displayed on the
instrument panel
Trip computer data is permanently displayed
when the "Personal" display mode is selected. In all other display modes, pressing the end of
the wiper control stalk will cause this data to
appear temporarily in a specific window.
Displaying the different tabs
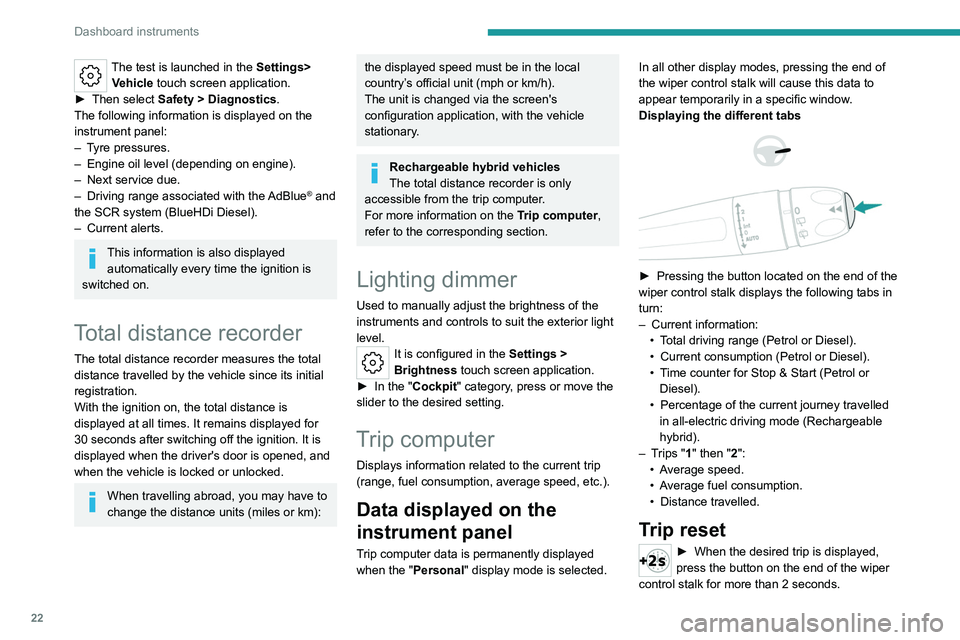
► Pressing the button located on the end of the
wiper control stalk displays the following tabs in
turn:
–
Current information:
•
T
otal driving range (Petrol or Diesel).
•
Current consumption (Petrol or Diesel).
•
T
ime counter for Stop & Start (Petrol or
Diesel).
•
Percentage of the current journey travelled
in all-electric driving mode (Rechargeable
hybrid).
–
T
rips "1" then "2":
•
A
verage speed.
•
A
verage fuel consumption.
•
Distance travelled.
Trip reset
► When the desired trip is displayed,
press the button on the end of the wiper
control stalk for more than 2
seconds.
Page 25 of 244
23
Dashboard instruments
1Trips "1" and "2" are independent and are used
in the same way.
Definitions
Range
(miles or km)Distance that can still be travelled with the
fuel remaining in the tank (based on the
average fuel consumption over the last few miles
(kilometres) travelled).
This value may vary following a change in driving
style or terrain, leading to a significant change in
current fuel consumption.
When the range falls below 19 miles (30
km),
dashes are displayed.
After filling with at least 5 litres of fuel, the range
is recalculated and is displayed if it exceeds 62
miles (100
km).
Dashes appearing permanently in place of
numbers while driving indicates a malfunction.
Consult a PEUGEOT dealer or a qualified
workshop.
Current consumption
(mpg or l/100 km or km/l)Calculated during the last few seconds.
This function is only displayed at speeds above
19 mph (30
km/h).
Average consumption
(mpg or l/100 km or km/l)
Calculated since the last trip computer
reset.
Average speed
(mph or km/h)Calculated since the last trip computer
reset.
Distance travelled
(miles or km)Calculated since the last trip computer
reset.
Stop & Start time counter
(minutes/seconds or hours/minutes)
If your vehicle is fitted with the Stop & Start
function, a time counter calculates the time spent
in STOP mode during a journey.
The time counter is reset each time the ignition is
switched on.
10-inch touch screen
This system gives access to the following elements:
–
T
ime and exterior temperature.
–
Heating/air conditioning system controls and
reminders of settings.
–
Settings for driving aid functions, comfort and
safety functions, audio equipment and digital
instrument panel.
– Settings of functions specific to rechargeable
hybrid vehicles.
–
Display of visual manoeuvring aid functions.
–
Interactive handbook.
–
V
ideo tutorials (e.g. screen management,
driving aids, voice recognition).
–
Audio equipment and telephone controls with
display of
associated information.
–
Connected services and display of associated
information.
–
Navigation system controls and display
of associated information (depending on
equipment).
–
V
oice recognition (depending on equipment).
For safety reasons, always stop the
vehicle before performing operations
that require sustained attention.
Some functions are not accessible while
driving.
Recommendations
This screen uses capacitive sensing technology.
– Do not use pointed objects on the touch
screen.
–
Do not touch the touch screen with wet hands.
–
Use a soft, clean cloth to clean the touch
screen.
Main controls
Access to one of the home pages Return to the first home page
Page 29 of 244
27
Access
2► With a non-motorised tailgate: press and hold
this button to unlock the boot and partially open
the tailgate.
When selective unlocking of the tailgate is
activated, the doors and the fuel filler flap remain
locked.
If selective unlocking of the tailgate is
deactivated, pressing the button unlocks the
whole vehicle.
If motorised operation of the tailgate is
deactivated, pressing the button partially
opens the tailgate.
To lock the vehicle, it is necessary to close
the tailgate again.
Locking the vehicle
Normal locking
► Press the locking button.
The locking, and the activation of the alarm
depending on version, is confirmed by the
lighting of the direction indicators.
The door mirrors fold.
An access (door or boot) that is not properly closed prevents locking of the
vehicle. However, if the vehicle is fitted with
an alarm, it will be activated after 45
seconds.
If the vehicle is unlocked but the doors or boot
are not subsequently opened,
the vehicle
will automatically lock itself again after about
30 seconds. If the vehicle is fitted with an
alarm, it will be reactivated automatically.
Deadlocking
Deadlocking renders the interior door
controls inoperative. It also disables the
central locking button.
The horn remains operational.
Never leave anyone inside the vehicle
when it is deadlocked.
►
Press the locking button again within 5
seconds to deadlock the vehicle (confirmed by
the temporary lighting of the direction indicators).
Closing the windows
Holding the locking button pressed for
more than 3 seconds closes the windows.
When closing windows, ensure that no
person or object could prevent their
correct closure.
To leave the windows partly open on versions
with alarm, you must first deactivate the
interior volumetric monitoring.
For more information on the Alarm, refer to
the corresponding section.
"Peugeot Adaptive LED Technology"
With the Full LED 3D rear lamps, the
lamps illuminate in a scrolling pattern upon
locking and unlocking the vehicle.
Locating the vehicle
This function helps you to spot your vehicle from
a distance, with the vehicle locked:
–
The direction indicators or sidelamps and/or
daytime running lamps, depending on version,
flash for approximately 10 seconds.
–
The door mirror spotlamps come on.
–
The courtesy lamps come on.
► Press this button.
Advice
Remote control
The remote control is a sensitive, high-
frequency device; avoid handling it in your
pocket, due to the risk of unintentionally
unlocking the vehicle.
Avoid pressing the remote control buttons
while out of range of the vehicle, due to
the risk of rendering the remote control
inoperative. It would then be necessary to
reset it.
Anti-theft protection
Do not modify the electronic vehicle
immobiliser, as this might result in
malfunctions.
Locking the vehicle
Driving with the doors locked could make
it more difficult for the emergency services
Page 49 of 244

47
Ease of use and comfort
3Activation/Deactivation
In the Seats touch screen application,
select the Massage tab.
►
Select the driver or passenger seat.
The corresponding page is displayed with the
last memorised settings.
If the settings are suitable, press to
activate/deactivate the function in the
Seats application.
If no action is taken, the display returns to its
initial state.
The function status is not memorised when the
ignition is switched off.
Changing settings
► In the Massage page, select the seat
concerned.
►
Select a massage intensity from the three
preset levels: "
1" (Low), "2" (Normal) or "3"
(High).
►
Select another type of massage from those
offered.
The modifications are taken into account
immediately and memorised when the ignition is
switched off.
Once activated, the system starts a one hour
massage cycle, made up of sequences of 6
minutes of massage followed by 3 minutes at
rest.
The system stops automatically at the end of the
cycle.
Steering wheel
adjustment
► When stationary , pull the control to release
the steering wheel.
►
Adjust the height and reach to suit your
driving position.
►
Push the control to lock the steering wheel.
For safety reasons, these adjustments
must only be carried out with the vehicle
stationary.
PEUGEOT i-Cockpit®
The instrument panel information is
visible above the steering wheel, for greater
safety and driving comfort.
Adjust the steering wheel height so that it
does not obstruct the instrument panel.
Mirrors
Door mirrors
Depending on version, the electrochrome system
uses a sensor that detects the level of exterior
brightness and that coming from the rear of the
vehicle, in order to automatically and gradually
switch between day and night usage.
As a safety measure, the mirrors should be adjusted to reduce the "blind spots".
The objects that you see in the mirrors are
in fact closer than they appear. Take this
into account in order to correctly judge the
distance of vehicles approaching from behind.
Demisting/Defrosting
The demisting/defrosting of the door mirrors works with the demisting/
defrosting of the rear screen.
For more information on Rear screen
demisting/defrosting , refer to the
corresponding section.
Page 75 of 244
73
Lighting and visibility
4This wash nozzle does not operate every time
the front screenwash system is used. Its wash
frequency is preset in the system.
Regularly check that the infrared camera is
clean.
In bad weather, or in wintry conditions, ensure
that the infrared camera is not covered with mud,
ice or snow.
Malfunction
If the event of a malfunction, this warning
lamp comes on in orange on the
instrument panel, accompanied by the display of
a message.
Have it checked by a PEUGEOT dealer or a
qualified workshop.
Wiper control stalk
Before operating the wipers in wintry
conditions, clear any snow, ice or frost
from the windscreen and around the wiper
arms and blades.
Do not operate the wipers on a dry
windscreen. In extremely hot or cold
weather, check that the wiper blades are not
stuck to the windscreen before operating the
wipers.
After using an automatic car wash, you may temporarily notice abnormal noises and poorer wiping performance.
You do not
need to replace the wiper blades.
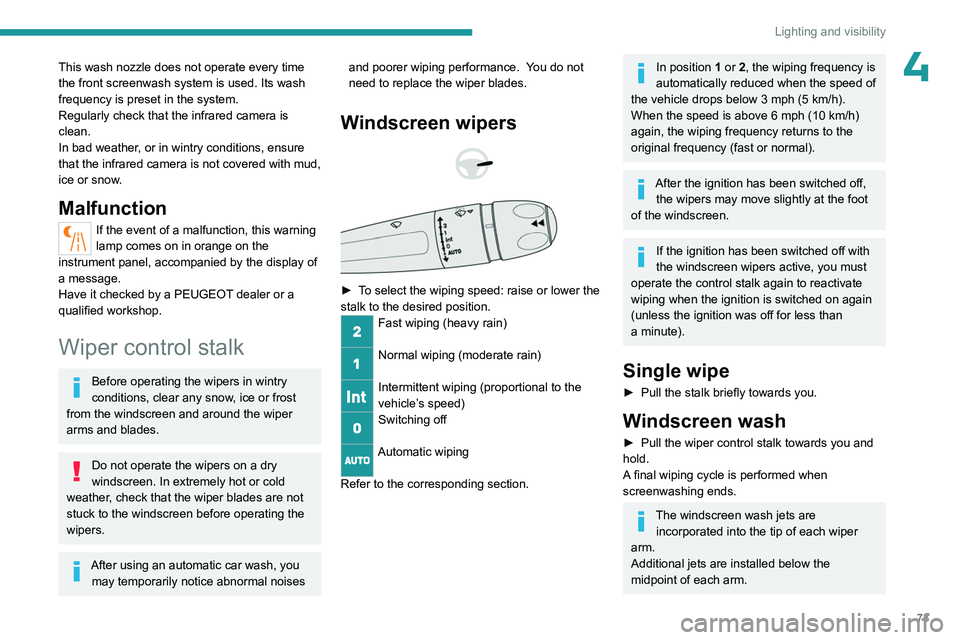
Windscreen wipers
► To select the wiping speed: raise or lower the
stalk to the desired position.
Fast wiping (heavy rain)
Normal wiping (moderate rain)
Intermittent wiping (proportional to the
vehicle’s speed)
Switching off
Automatic wiping
Refer to the corresponding section.
In position 1 or 2, the wiping frequency is
automatically reduced when the speed of
the vehicle drops below 3
mph (5 km/h).
When the speed is above 6
mph (10 km/h)
again, the wiping frequency returns to the
original frequency (fast or normal).
After the ignition has been switched off, the wipers may move slightly at the foot
of the windscreen.
If the ignition has been switched off with
the windscreen wipers active, you must
operate the control stalk again to reactivate
wiping when the ignition is switched on again
(unless the ignition was off for less than
a
minute).
Single wipe
► Pull the stalk briefly towards you.
Windscreen wash
► Pull the wiper control stalk towards you and
hold.
A
final wiping cycle is performed when
screenwashing ends.
The windscreen wash jets are incorporated into the tip of each wiper
arm.
Additional jets are installed below the
midpoint of each arm.
Page 112 of 244

11 0
Driving
– The outside temperature must be between
0°C and 35°C.
Putting the engine into standby
(STOP mode)
The engine automatically enters standby mode
as soon as the driver indicates their intention to
stop:
–
At speeds below 12 mph (20
km/h) on
BlueHDi versions, or below 0.6 mph (1
km/h) on
PureTech versions, when you brake firmly with
the gear selector in mode D.
–
With the vehicle stationary
, when you select
the mode N with the gear selector.
Time counter
A time counter adds up the time spent in standby
during the journey. It is reset to zero every time
the ignition is switched on.
Special cases
The engine will not go into standby if the
conditions for operation are not met and in the
following cases:
–
Steep slope (ascending or descending).
–
Sport mode selected (depending on
equipment).
–
Needed
to maintain a comfortable temperature
in the passenger compartment.
–
Demisting active.
In these cases, this indicator lamp flashes
for a few seconds, then goes off.
After the engine has restarted, STOP mode is not available until the vehicle
has reached a speed of 5 mph (8
km/h).
During parking manoeuvres, STOP mode
is not available for a few seconds after
coming out of reverse gear or turning the
steering wheel.
Restarting the engine (START mode)
The engine automatically restarts as soon as the
driver indicates the intention of moving off again:
–
With the selector in mode
D or M: when the
brake pedal is released.
–
With the selector in mode
N and the brake
pedal released: when the mode D or M is
selected.
–
With the selector in mode
P and the brake
pedal depressed: when the mode R, N, D or M
is selected.
–
When the reverse gear is engaged.
Special cases
The engine will restart automatically if the
conditions for operation are met again and in the
following cases:
–
Deselecting the Sport mode (depending on
equipment).
–
Automatic gearbox in mode N
, vehicle speed
exceeds 0.6 mph (1 km/h).
In this case, this indicator lamp flashes for
a few seconds, then goes off.
Malfunctions
In the event of a fault with the system, this
warning lamp flashes for a few moments
on the instrument panel, then remains on,
accompanied by the display of a message.
Have it checked by a PEUGEOT dealer or a
qualified workshop.
The vehicle stalls in STOP mode
All of the instrument panel warning lamps come
on if there is a fault.
►
Switch off the ignition then start the engine
again with the " ST
ART/STOP" button.
12 V battery
The Stop & Start system requires a
12 V battery of specific technology and
specification.
All work must be carried out only by a
PEUGEOT
dealer or a qualified workshop
Tyre under-inflation detection
This system alerts the driver if one or more tyres
suffer a drop in pressure.
The alert is raised when the vehicle is moving,
not when stationary.
It compares the information given by the wheel
speed sensors with reference values, which
must be reinitialised every time the tyre
pressures are adjusted or a wheel changed.
Page 118 of 244
11 6
Driving
The system is designed to detect signs that
conform to the Vienna Convention on road
signs.
Specific speed limits, such as those for
heavy goods vehicles, are not displayed.
The display of the speed limit on the
instrument panel is updated when passing
a speed limit sign intended for cars (light
vehicles).
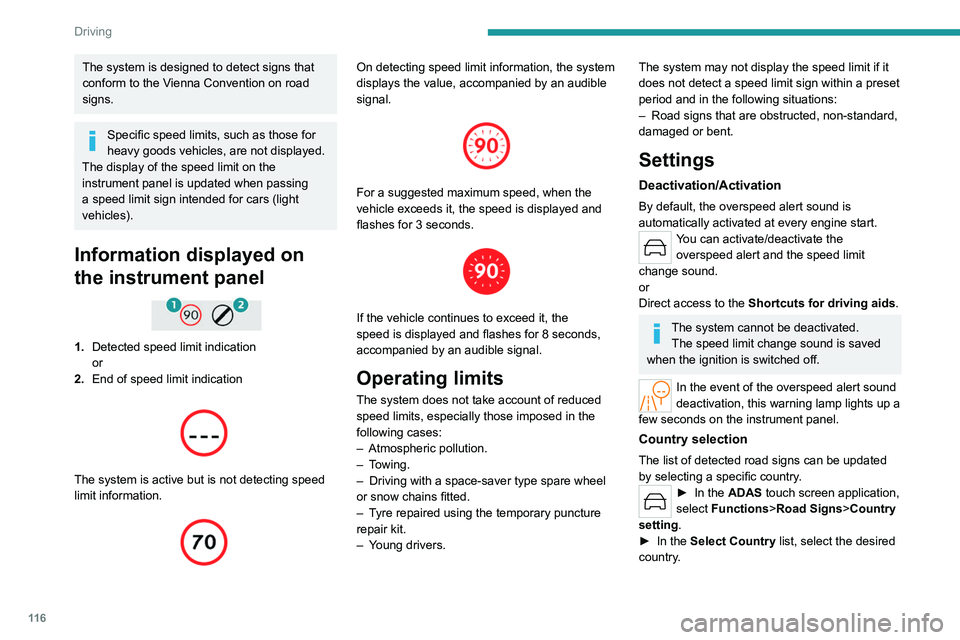
Information displayed on
the instrument panel
1. Detected speed limit indication
or
2. End of speed limit indication
The system is active but is not detecting speed
limit information.
On detecting speed limit information, the system
displays the value, accompanied by an audible
signal.
For a suggested maximum speed, when the
vehicle exceeds it, the speed is displayed and
flashes for 3
seconds.
If the vehicle continues to exceed it, the
speed is displayed and flashes for 8 seconds,
accompanied by an audible signal.
Operating limits
The system does not take account of reduced
speed limits, especially those imposed in the
following cases:
–
Atmospheric pollution.
–
Towing.
–
Driving with a space-saver type spare wheel
or snow chains fitted.
–
T
yre repaired using the temporary puncture
repair kit.
–
Y
oung drivers.
The system may not display the speed limit if it
does not detect a speed limit sign within a preset
period and in the following situations:
–
Road signs that are obstructed, non-standard,
damaged or bent.
Settings
Deactivation/Activation
By default, the overspeed alert sound is
automatically activated at every engine start.
You can activate/deactivate the overspeed alert and the speed limit
change sound.
or
Direct access to the Shortcuts for driving aids .
The system cannot be deactivated.
The speed limit change sound is saved
when the ignition is switched off.
In the event of the overspeed alert sound
deactivation, this warning lamp lights up a
few seconds on the instrument panel.
Country selection
The list of detected road signs can be updated
by selecting a specific country.
► In the ADAS touch screen application,
select Functions >Road Signs>Country
setting.
►
In the
Select Country list, select the desired
country.