2023 PEUGEOT 508 towing
[x] Cancel search: towingPage 5 of 244

3
Contents
Drive Assist Plus 121
Adaptive cruise control 122
Lane positioning assist 125
Active Safety Brake with Collision Risk Alert and
Intelligent emergency braking assistance
129
Distraction detection 132
Lane keeping assist 134
Blind spot monitoring 136
Parking sensors 138
Visiopark 1 140
Visiopark 2 141
7Practical informationCompatibility of fuels 145
Refuelling 145
Misfuel prevention (Diesel) 146
Rechargeable hybrid system 147
Charging the traction battery
(Rechargeable hybrid)
155
Towing device 157
Towing device with retractable ball joint 158
Roof bars 159
Very cold climate screen 161
Snow chains 161
Energy economy mode 161
Bonnet 162
Engine compartment 163
Checking levels 163
Checks 165
AdBlue® (BlueHDi) 167
Free-wheeling 169
Advice on care and maintenance 169
8In the event of a breakdownWarning triangle 172
Running out of fuel (Diesel) 172
Tool kit 172
Temporary puncture repair kit 174
Spare wheel 176
Changing a bulb 180
Fuses 182
12
V battery/Accessory batteries 182
Towing the vehicle 187
9Technical dataEngine technical data and towed loads 190
Petrol engines 191
Diesel engines 192
Rechargeable hybrid engines 193
Dimensions 194
Identification markings 195
10 PEUGEOT i-Connect Advanced -PEUGEOT i-Connect
First steps 196
Customisation 199
Steering mounted controls 200
Applications 200
Voice commands 201
Navigation 202
Connectivity 203
Mirror Screen 204
Media 206
Phone 208
Settings 209
Help 210
11Vehicle data recording and privacy
■
Alphabetical index
■
Appendix
Page 39 of 244
37
Access
2Bicycle carrier/Towing device
The motorised tailgate is not designed to support
a bicycle carrier.
When installing a bicycle carrier on the towing
device with connection of the cable to the trailer
socket, the motorised operation of the tailgate
will be automatically deactivated.
If using a towing device or bicycle carrier
not recommended by PEUGEOT, it is
essential to deactivate the motorised
operation of the tailgate.
Motorised operation
The motorised operation of the tailgate is configured in the Settings
> Vehicle
touch screen application.
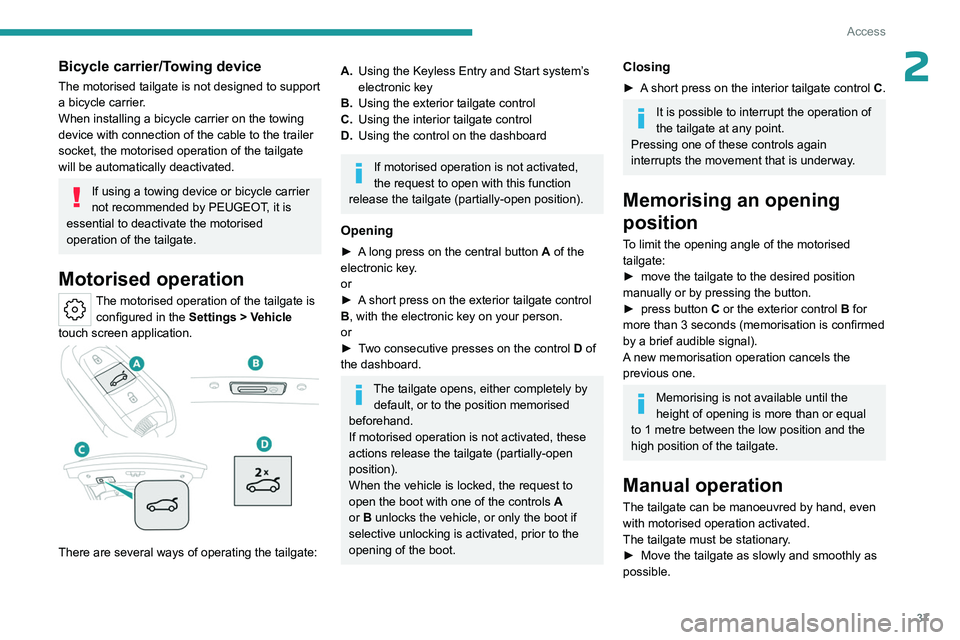
There are several ways of operating the tailgate:
A. Using the Keyless Entry and Start system’s
electronic key
B. Using the exterior tailgate control
C. Using the interior tailgate control
D. Using the control on the dashboard
If motorised operation is not activated,
the request to open with this function
release the tailgate (partially-open position).
Opening
► A long press on the central button A of the
electronic key.
or
►
A
short press on the exterior tailgate control
B, with the electronic key on your person.
or
►
T
wo consecutive presses on the control D of
the dashboard.
The tailgate opens, either completely by default, or to the position memorised
beforehand.
If motorised operation is not activated, these
actions release the tailgate (partially-open
position).
When the vehicle is locked, the request to
open the boot with one of the controls A
or B unlocks the vehicle, or only the boot if
selective unlocking is activated, prior to the
opening of the boot.
Closing
► A short press on the interior tailgate control C.
It is possible to interrupt the operation of
the tailgate at any point.
Pressing one of these controls again
interrupts the movement that is underway.
Memorising an opening
position
To limit the opening angle of the motorised
tailgate:
►
move the tailgate to the desired position
manually or by pressing the button.
►
press button
C or the exterior control B for
more than 3 seconds (memorisation is confirmed
by a brief audible signal).
A new memorisation operation cancels the
previous one.
Memorising is not available until the
height of opening is more than or equal
to 1 metre between the low position and the
high position of the tailgate.
Manual operation
The tailgate can be manoeuvred by hand, even
with motorised operation activated.
The tailgate must be stationary.
►
Move the tailgate as slowly and smoothly as
possible.
Page 41 of 244
39
Access
2Acknowledgement of the "kicking" movement
is confirmed by the lighting of the direction
indicators.
"Sideward kicking" movements do not
work. If the "kicking" movement has not
been detected, wait at least 2 seconds before
repeating the movement.
Do not perform repetitive "kicking"
movements.
If the motorised tailgate has not started to open
or close, check that:
–
the function is activated.
–
the electronic key is on your person, outside
the vehicle in the rear recognition area.
–
the "kicking" movement was performed in the
detection zone, close enough to the bumper
.
–
the foot was removed from the bumper quickly
enough.
Automatic locking
It is possible to lock automatically the vehicle
using the hands-free function (Hands-Free
Tailgate Access).
The "Handsfree Trunk Locking" function is configured in the Settings
> Vehicle
touch screen application.
When the vehicle is locked, the request
to open the tailgate with this function
unlocks the vehicle, or only the tailgate if
selective unlocking is activated, prior to the
opening of the tailgate.
Closing the tailgate with the "Hands-Free
Tailgate Access" function enables you to lock
the vehicle.
Recommendations on the
hands-free function (Hands-
Free Tailgate Access)
If it does not work, check that the electronic key
is not exposed to a source of electromagnetic
interference (e.g. smartphone).
The function may be deactivated or affected if
there is rain or snow.
The function may not work correctly with a
prosthetic leg.
In some circumstances, the tailgate may open or
close by itself, particularly when:
–
hitching up or removing a trailer
.
–
operating a towing device.
–
fitting or removing a bicycle carrier
.
–
loading
or unloading bicycles on/from a bicycle
carrier.
–
depositing or lifting something behind the
vehicle.
–
an animal approaches the rear bumper
.
–
washing the vehicle.
–
maintenance is performed on the vehicle.
–
accessing the spare wheel.
To avoid such operating problems, keep the
electronic key away from the recognition zone or
deactivate the hands-free function.
Towing device
The installation of a towing device may
disturb the detection system.
►
Perform the "kicking" movement on the
right side of the towing device.
Electric windows
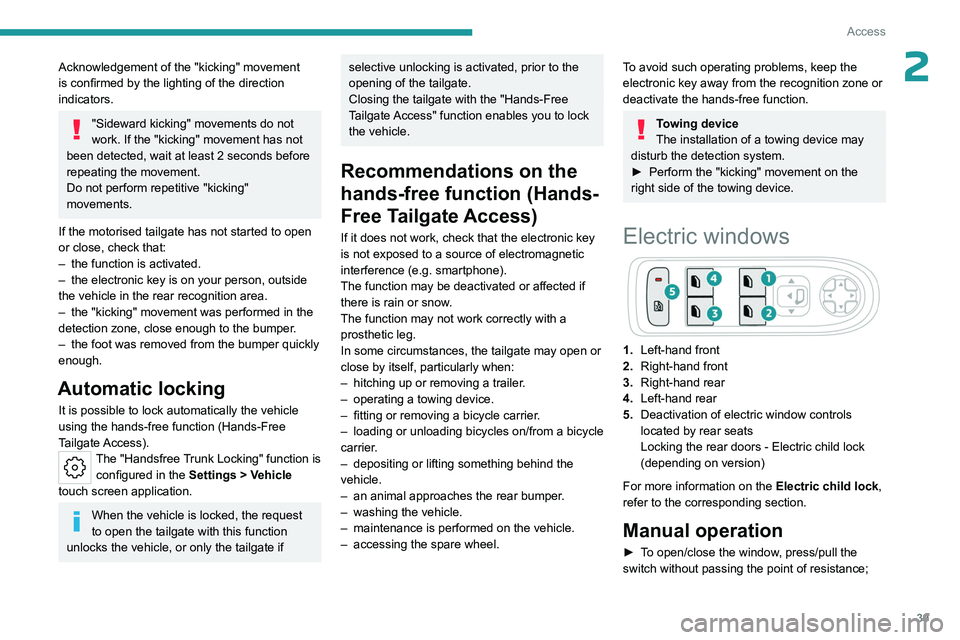
1. Left-hand front
2. Right-hand front
3. Right-hand rear
4. Left-hand rear
5. Deactivation of electric window controls
located by rear seats
Locking the rear doors - Electric child lock
(depending on version)
For more information on the Electric child lock,
refer to the corresponding section.
Manual operation
► To open/close the window, press/pull the
switch without passing the point of resistance;
Page 51 of 244
49
Ease of use and comfort
3Rear seats
Rear head restraints
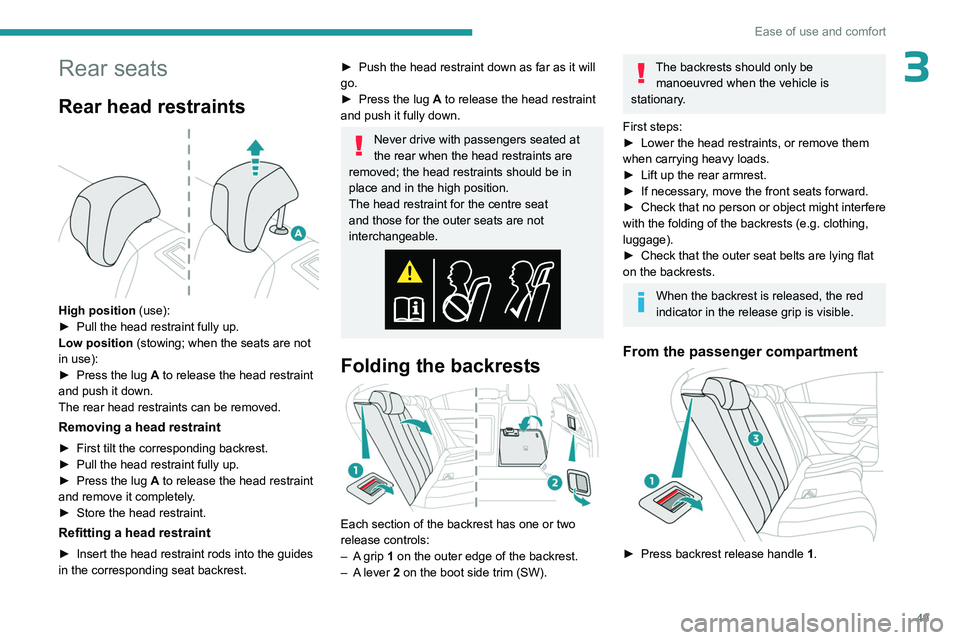
High position (use):
► Pull the head restraint fully up.
Low position (stowing; when the seats are not
in use):
►
Press the lug
A to release the head restraint
and push it down.
The rear head restraints can be removed.
Removing a head restraint
► First tilt the corresponding backrest.
► Pull the head restraint fully up.
►
Press the lug
A to release the head restraint
and remove it completely.
►
Store the head restraint.
Refitting a head restraint
► Insert the head restraint rods into the guides
in the corresponding seat backrest.
► Push the head restraint down as far as it will
go.
►
Press the lug
A to release the head restraint
and push it fully down.
Never drive with passengers seated at
the rear when the head restraints are
removed; the head restraints should be in
place and in the high position.
The head restraint for the centre seat
and those for the outer seats are not
interchangeable.
Folding the backrests
Each section of the backrest has one or two
release controls:
–
A
grip 1 on the outer edge of the backrest.
–
A
lever 2 on the boot side trim (SW).
The backrests should only be manoeuvred when the vehicle is
stationary.
First steps:
►
Lower the head restraints, or remove them
when carrying heavy loads.
►
Lift up the rear armrest.
►
If necessary
, move the front seats forward.
►
Check
that no person or object might interfere
with the folding of the backrests (e.g.
clothing,
luggage).
►
Check that the outer seat belts are lying flat
on the backrests.
When the backrest is released, the red
indicator in the release grip is visible.
From the passenger compartment
► Press backrest release handle 1 .
Page 53 of 244

51
Ease of use and comfort
3Advice
Using the ventilation and air
conditioning system
►
T
o ensure that air is distributed evenly,
keep the external air intake grilles at the base
of the windscreen, the nozzles, the vents, the
air outlets and the air extractor in the boot
free from obstructions.
►
Do not cover the sunshine sensor located
on the dashboard; this sensor is used to
regulate the automatic air conditioning
system.
►
Operate the air conditioning system for at
least 5 to 10 minutes once or twice a month to
keep it in good working order
.
►
If the system does not produce cold air
,
switch it off and contact a PEUGEOT dealer
or a qualified workshop.
When towing a large load on a steep gradient
in high temperatures, switching off the air
conditioning increases the available engine
power, enhancing the towing capacity.
Avoid driving for too long with the ventilation off or with prolonged operation
of interior air recirculation. Risk of misting and
deterioration of the air quality!
If the interior temperature is very high
after the vehicle has stood for a long
time in the sunshine, air the passenger
compartment for a few moments.
Put the air flow control at a setting high
enough to quickly change the air in the
passenger compartment.
Condensation created by the air
conditioning results in a discharge of
water underneath the vehicle. This is perfectly
normal.
Servicing the ventilation and air
conditioning system
►
Ensure that the passenger compartment
filter is in good condition and have the filter
elements replaced regularly
.
We recommend using a composite passenger
compartment filter. Its specific active additive
helps protect against polluting gases and bad
smells.
►
T
o ensure correct operation of the
air conditioning system, have it checked
according to the recommendations in the
Manufacturer’s service schedule.
Stop & Start
The heating and air conditioning systems
only operate when the engine is running.
Temporarily deactivate the Stop & Start
system to maintain a comfortable temperature
in the passenger compartment.
For more information on the Stop &
Start system, refer to the corresponding
section.
Eco driving mode
Selection of this mode optimises fuel
consumption, but limits the performance
of the heating and air conditioning, without
however deactivating them.
Rechargeable hybrid vehicles
Intensive use of the air conditioning
reduces the vehicle range in Electric mode.
Ventilation with the ignition on
When the ignition is switched on, the ventilation
system and the air flow 2 and air distribution
3 settings in the passenger compartment are
activated, for a period which depends on the
battery charge.
This function does not include the air
conditioning system.
Dual-zone automatic air
conditioning
This system automatically controls the activation
of the air conditioning system, regulating the
temperature, air flow and air distribution inside
the passenger compartment.
Page 63 of 244
61
Ease of use and comfort
3
► Load the objects from inside the boot.
Boot fittings
Sedan
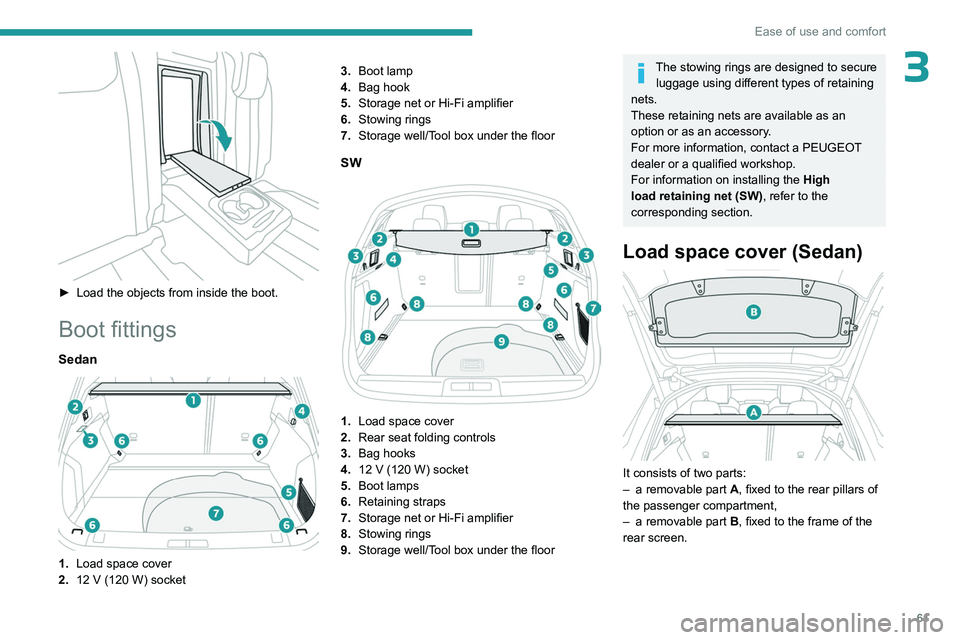
1.Load space cover
2. 12
V (120 W) socket 3.
Boot lamp
4. Bag hook
5. Storage net or Hi-Fi amplifier
6. Stowing rings
7. Storage well/Tool box under the floor
SW
1.Load space cover
2. Rear seat folding controls
3. Bag hooks
4. 12
V (120 W) socket
5. Boot lamps
6. Retaining straps
7. Storage net or Hi-Fi amplifier
8. Stowing rings
9. Storage well/Tool box under the floor
The stowing rings are designed to secure
luggage using different types of retaining
nets.
These retaining nets are available as an
option or as an accessory.
For more information, contact a PEUGEOT
dealer or a qualified workshop.
For information on installing the
High
load retaining net (SW) , refer to the
corresponding section.
Load space cover (Sedan)
It consists of two parts:
– a removable part A, fixed to the rear pillars of
the passenger compartment,
–
a removable part B
, fixed to the frame of the
rear screen.
Page 66 of 244
64
Ease of use and comfort
Row 2
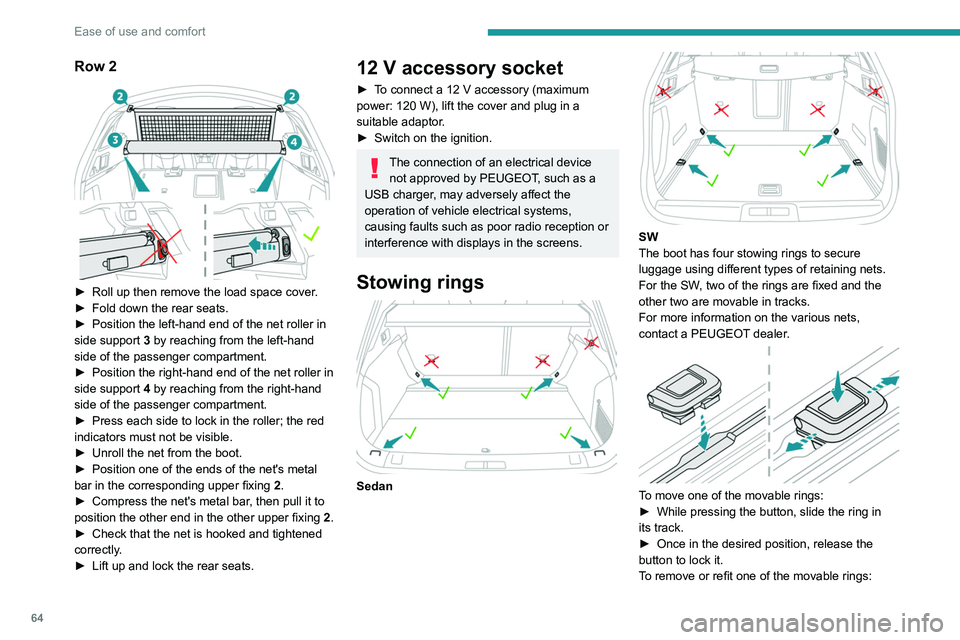
► Roll up then remove the load space cover.
► Fold down the rear seats.
►
Position the left-hand end of the net roller in
side support 3
by reaching from the left-hand
side of the passenger compartment.
►
Position the right-hand end of the net roller in
side support 4
by reaching from the right-hand
side of the passenger compartment.
►
Press each side to lock in the roller; the red
indicators must not be visible.
►
Unroll the net from the boot.
►
Position one of the ends of the net's metal
bar in the corresponding upper fixing 2
.
►
Compress the net's metal bar
, then pull it to
position the other end in the other upper fixing 2.
►
Check that the net is hooked and tightened
correctly
.
►
Lift up and lock the rear seats.
12 V accessory socket
► To connect a 12 V accessory (maximum
power: 120 W), lift the cover and plug in a
suitable adaptor.
►
Switch on the ignition.
The connection of an electrical device not approved by PEUGEOT, such as a
USB charger, may adversely affect the
operation of vehicle electrical systems,
causing faults such as poor radio reception or
interference with displays in the screens.
Stowing rings
Sedan
SW
The boot has four stowing rings to secure
luggage using different types of retaining nets.
For the SW, two of the rings are fixed and the
other two are movable in tracks.
For more information on the various nets,
contact a PEUGEOT dealer.
To move one of the movable rings:
► While pressing the button, slide the ring in
its track.
►
Once in the desired position, release the
button to lock it.
T
o remove or refit one of the movable rings:
Page 67 of 244
65
Ease of use and comfort
3► Bring it to an oblong slot on the track.
► T o observe the direction of installation, make
sure the ring is positioned vertically and towards
the outside of the vehicle.
Do not confuse the stowing rings with the
bag hooks or the Top Tether fixings.
Storage well
Sedan
SW
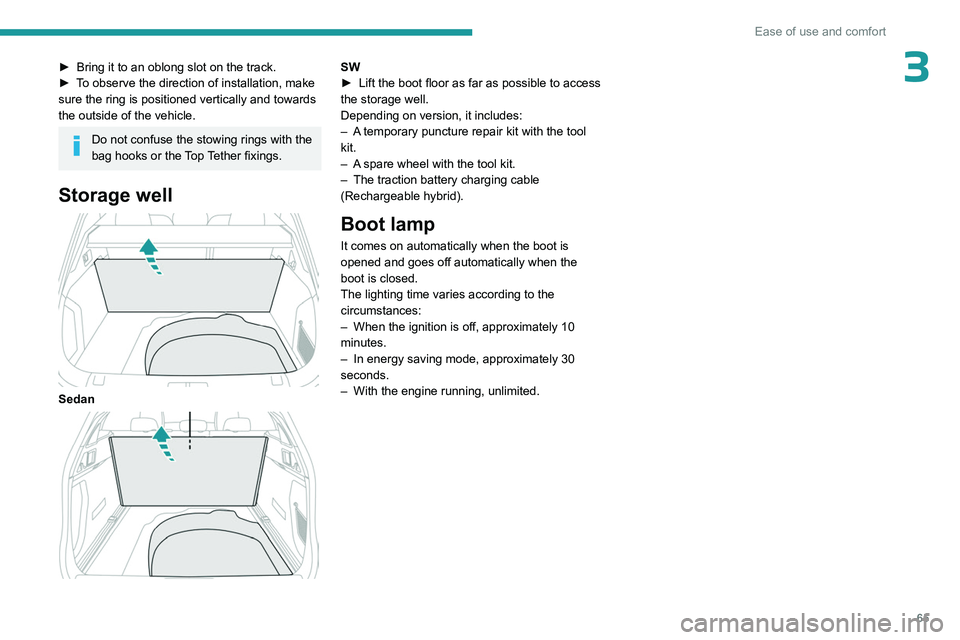
► Lift the boot floor as far as possible to access
the storage well.
Depending on version, it includes:
–
A
temporary puncture repair kit with the tool
kit.
–
A
spare wheel with the tool kit.
–
The traction battery charging cable
(Rechargeable hybrid).
Boot lamp
It comes on automatically when the boot is
opened and goes off automatically when the
boot is closed.
The lighting time varies according to the
circumstances:
–
When the ignition is off, approximately 10
minutes.
–
In energy saving mode, approximately 30
seconds.
–
With the engine running, unlimited.