2023 PEUGEOT 508 heating
[x] Cancel search: heatingPage 4 of 244
2
Contents
■
OverviewOverview 4
■
Eco-driving
1Dashboard instrumentsDriver information 10
Digital instrument panels 10
Warning and indicator lamps 11
Indicators 18
Manual test 21
Total distance recorder 22
Trip computer 22
10-inch touch screen 23
Remotely operable additional functions
(Rechargeable hybrid)
25
2AccessElectronic key with remote control function
and built-in key 26
Keyless Entry and Start 28
Central locking 30
Back-up procedures 30
Alarm 32
Doors 34
Boot 35
Motorised tailgate 36
Electric windows 39
Panoramic sunroof 41
3Ease of use and comfortDriving position 43
Front seats 44
Steering wheel adjustment 47
Mirrors 47
Rear seats 49
Heating and Ventilation 50
Dual-zone automatic air conditioning 51
Front demisting/defrosting 54
Heated windscreen 54
Rear screen demisting/defrosting 55
Temperature pre-conditioning
(Rechargeable hybrid)
55
Front fittings 56
Courtesy lamps 59
Interior ambient lighting 60
Rear fittings 60
Boot fittings 61
4Lighting and visibilityExterior lighting control stalk 66
Direction indicators 67
Headlamp beam height adjustment 67
Automatic illumination of headlamps 68
Guide-me-home and welcome lighting 68
Automatic lighting systems - General
recommendations
69
Peugeot Matrix LED Technology 2.0 69
Adaptive Frontlight System 70
Night Vision 71
Wiper control stalk 73
Changing a wiper blade 75
Automatic wipers 75
5SafetyGeneral safety recommendations 77
Hazard warning lamps 77
Horn 78
Pedestrian horn (Rechargeable hybrid) 78
Emergency or assistance 78
Event Data Recording system 80
Electronic stability control (ESC) 81
Seat belts 83
Airbags 85
Active bonnet 87
Child seats 88
Deactivating the front passenger airbag 90
ISOFIX child seats 90
i-Size child seats 91
Installing child seats 93
Child lock 96
6DrivingDriving recommendations 97
Starting/switching off the engine 99
Starting rechargeable hybrid vehicles 99
Electric parking brake 101
Automatic gearbox 103
Active Suspension Control 106
Driving modes 106
Hill start assist 108
Gear shift indicator 109
Stop & Start 109
Tyre under-inflation detection 11 0
Driving and manoeuvring aids - General
recommendations
11 2
Shortcuts for driving aids 11 3
Road signs recognition 11 4
Speed limiter 11 8
Cruise control - Specific recommendations 11 9
Programmable cruise control 120
Page 11 of 244
9
Eco-driving
Optimising the driving range
(rechargeable hybrid vehicles)
Connect the vehicle as soon as possible.
Favour the ECO zone of the power indicator by
driving smoothly and at a steady speed.
Anticipate slowing down as much as possible
and, if possible, favour decelerations with
regenerative braking mode activated (power
indicator in the CHARGE zone).
With the vehicle connected, carry out
temperature pre-conditioning before setting off.
To optimise consumption during a journey:
►
Programme a destination in the vehicle’
s
GPS navigation system.
►
Select the
Hybrid driving mode.
►
Make sure that the battery charge level is
close to maximum.
►
Do not use the e-Save function while driving.
►
Use the heating/air conditioning system
wisely
.
Page 13 of 244

11
Dashboard instruments
1When a message is displayed in a
temporary window, pressing this button
will cause this window to disappear
immediately.
Settings for displayed pages
The available settings operations are: addition,
deletion and layout of pages and widgets.
It is possible to memorise up to 5 pages.
Each page may contain 1 or 2 widgets:
–
With 1 widget, large display in central position.
–
With 2 widgets, reduced display in side
position.
The colour for each driving mode may be
personalised.
A default setting is suggested.
The setting also matches the interior ambient
lighting (depending on availability).
The settings are changed via the Settings > Customization touch screen
application.
For more information on Personalisation -
Instrument Panel, refer to the corresponding
section for the Audio equipment and telematics
systems.
Warning and indicator
lamps
Displayed as symbols, the warning and indicator
lamps inform the driver of the occurrence of a
malfunction (warning lamps) or of the operating
status of a system (operation or deactivation indicator lamps). Certain lamps light up in two
ways (fixed or flashing) and/or in several colours.
Associated warnings
The illumination of a lamp may be accompanied
by an audible signal and/or a message displayed
in a screen.
Relating the type of alert to the operating status
of the vehicle allows you to determine whether
the situation is normal or whether a fault has
occurred: refer to the description of each lamp
for further information.
When the ignition is switched on
Certain red or orange warning lamps come on
for a few seconds when the ignition is switched
on. These warning lamps should go off as soon
as the engine is started.
For more information on a system or a function,
refer to the corresponding section.
Persistent warning lamp
If a red or orange warning lamp comes on, there
may be fault which needs further investigation.
If a lamp remains lit
The references (1), (2) and (3) in the warning
and indicator lamp description indicate whether
you should contact a qualified professional in
addition to the immediate recommended actions.
(1): You must stop the vehicle
.
Stop as soon as it is safe to do so and switch off
the ignition. (2): Contact a PEUGEOT dealer or a qualified
workshop.
(3): Go to a PEUGEOT dealer or a qualified
workshop.
List of warning and
indicator lamps
Red warning/indicator lamps
STOP
Fixed, associated with another warning
lamp, accompanied by the display of a
message and an audible signal.
A serious fault with the engine, braking system,
power steering or automatic gearbox or a major
electrical fault has been detected.
Carry out (1) and then (2).
Traction battery overheating
(Rechargeable hybrid)
Fixed, combined with the STOP
warning lamp, accompanied by the
display of a message and an audible signal.
The traction battery's temperature is too high.
Carry out (1).
Evacuate the vehicle as quickly as possible
and move to a safe distance.
Carry out (2).
Page 15 of 244

13
Dashboard instruments
1You may be able to deal with some faults
yourself, such as changing the battery in the
remote control.
For other faults, such as with the tyre under-
inflation detection system, carry out (3).
Fixed, accompanied by the display of a
message.
One or more major faults, for which there is/are
no specific warning lamp(s), have been detected.
Identify the cause of the fault using the message
displayed on the instrument panel, then carry
out (3).
Fixed, accompanied by the message
"Parking brake fault".
Automatic release of the electric parking brake is
unavailable.
Carry out (2).
Service warning lamp fixed and
service spanner flashing then
fixed.
The servicing interval has been exceeded.
The vehicle must be serviced as soon as
possible.
Only with BlueHDi Diesel engines.
Engine preheating (Diesel)Temporarily on (up to approximately 30 seconds in
severe weather conditions).
When switching on the ignition, if the weather
conditions and the engine temperature make it
necessary.
Wait until the warning lamp goes off before
starting. When the warning lamp goes off, starting will
occur immediately if you press and hold the
brake pedal.
If the engine does not start, make the engine
starting request again, while keeping your foot
on the pedal.
Low fuel levelFixed, with the reserve level shown in red,
accompanied by an audible signal and
the display of a message.
When it first comes on, you have approximately
6
litres of fuel remaining in the tank (reserve).
Until the fuel level is topped up, this alert will
be repeated every time the ignition is switched
on, with increasing frequency as the fuel level
decreases and approaches zero.
Refuel without delay to avoid running out of fuel.
Never drive until completely empty, as
this could damage the emissions control and
injection systems.
Engine self-diagnostic systemFlashing.
The engine management system has a
fault.
There is a risk that the catalytic converter will be
destroyed.
You must carry out (2).
Fixed.
The emissions control system has a fault.
The warning lamp should go off when the engine
is started.
Carry out (3) without delay.
AdBlue® (BlueHDi)On for around 30 seconds when starting
the vehicle, accompanied by a message
indicating the driving range.
The driving range is between 1,500 and 500
miles (2,400 and 800
km).
Top up the AdBlue
®.Fixed, on switching on the ignition,
accompanied by an audible signal and a
message indicating the driving range.
The driving range is between 500 and 62 miles
(800 and 100
km).
Promptly top up the AdBlue
®, or carry out (3).Flashing, accompanied by an audible
signal and a message indicating the
driving range.
The driving range is less than 62 miles (100
km).
You must top up the AdBlue
® to avoid engine
starting being prevented , or carry out (3).
Flashing, accompanied by an audible
signal and a message indicating that
starting is prevented.
The AdBlue
® tank is empty: the legally required
engine immobiliser system prevents the engine
from starting.
To restart the engine, top up the AdBlue
® or carry
out (2).
It is essential to add at least 10
litres of AdBlue
®
to the tank.
Page 25 of 244
23
Dashboard instruments
1Trips "1" and "2" are independent and are used
in the same way.
Definitions
Range
(miles or km)Distance that can still be travelled with the
fuel remaining in the tank (based on the
average fuel consumption over the last few miles
(kilometres) travelled).
This value may vary following a change in driving
style or terrain, leading to a significant change in
current fuel consumption.
When the range falls below 19 miles (30
km),
dashes are displayed.
After filling with at least 5 litres of fuel, the range
is recalculated and is displayed if it exceeds 62
miles (100
km).
Dashes appearing permanently in place of
numbers while driving indicates a malfunction.
Consult a PEUGEOT dealer or a qualified
workshop.
Current consumption
(mpg or l/100 km or km/l)Calculated during the last few seconds.
This function is only displayed at speeds above
19 mph (30
km/h).
Average consumption
(mpg or l/100 km or km/l)
Calculated since the last trip computer
reset.
Average speed
(mph or km/h)Calculated since the last trip computer
reset.
Distance travelled
(miles or km)Calculated since the last trip computer
reset.
Stop & Start time counter
(minutes/seconds or hours/minutes)
If your vehicle is fitted with the Stop & Start
function, a time counter calculates the time spent
in STOP mode during a journey.
The time counter is reset each time the ignition is
switched on.
10-inch touch screen
This system gives access to the following elements:
–
T
ime and exterior temperature.
–
Heating/air conditioning system controls and
reminders of settings.
–
Settings for driving aid functions, comfort and
safety functions, audio equipment and digital
instrument panel.
– Settings of functions specific to rechargeable
hybrid vehicles.
–
Display of visual manoeuvring aid functions.
–
Interactive handbook.
–
V
ideo tutorials (e.g. screen management,
driving aids, voice recognition).
–
Audio equipment and telephone controls with
display of
associated information.
–
Connected services and display of associated
information.
–
Navigation system controls and display
of associated information (depending on
equipment).
–
V
oice recognition (depending on equipment).
For safety reasons, always stop the
vehicle before performing operations
that require sustained attention.
Some functions are not accessible while
driving.
Recommendations
This screen uses capacitive sensing technology.
– Do not use pointed objects on the touch
screen.
–
Do not touch the touch screen with wet hands.
–
Use a soft, clean cloth to clean the touch
screen.
Main controls
Access to one of the home pages Return to the first home page
Page 40 of 244
38
Access
When opening and closing the motorised tailgate
manually, there is no assistance from gas struts.
Resistance to opening and closing is therefore
entirely normal.
In case of the motor overheating
Repeatedly opening and closing the
motorised tailgate can cause overheating of
its electric motor, after which opening and
closing will not be possible.
Allow at least 10
minutes for the electric
motor to cool down before operating the
tailgate again.
If you are unable to wait, operate it manually.
Manual closing of the
motorised tailgate in case of
failure
This operation is only necessary in the case of
failure or deinitialisation/loss of the tailgate
motor.
If the failure originates from the battery, it is
recommended to recharge it or change it with the
tailgate closed.
In this situation, a significant force may be
needed to close the tailgate.
►
Close it gently without slamming, as slowly as
possible, by pushing at the centre of the tailgate.
Do not lower the tailgate by pushing at
one of its sides - risk of damage!
Precautions in use
In wintry conditions
To avoid any operating problems, remove
the snow or wait until the ice melts before
requesting motorised opening of the tailgate.
When washing
When washing the vehicle in an
automatic car wash, do not forget to lock and
move away from the vehicle
to prevent any
risk of unwanted opening.
Hands-free function
(Hands-Free Tailgate
Access)
(Depending on version)
With the electronic key on your person, this
function allows the motorised tailgate to be
opened, closed or stopped via a "kicking"
movement under the rear bumper.
The "Handsfree Trunk Opening" function is configured in the Settings
> Vehicle
touch screen application.
Ensure that you are steady on your feet
before performing the "kicking"
movement.
Take care not to touch the exhaust system
which may be hot - risk of burns!
Rechargeable hybrid vehicles
The function is not available when the
vehicle is connected.
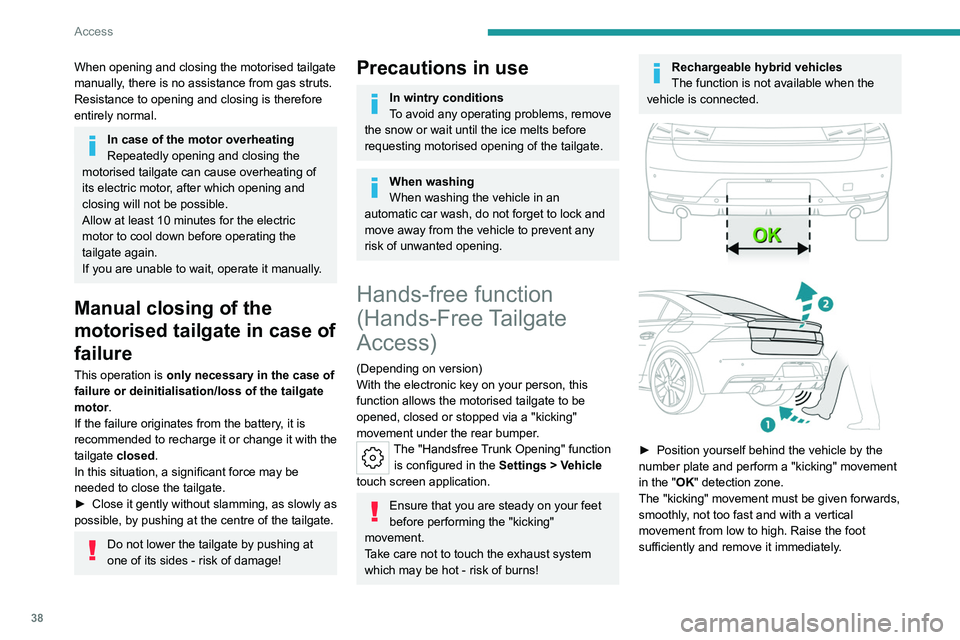
► Position yourself behind the vehicle by the
number plate and perform a "kicking" movement
in the "
OK" detection zone.
The "kicking" movement must be given forwards,
smoothly, not too fast and with a vertical
movement from low to high. Raise the foot
sufficiently and remove it immediately.
Page 48 of 244
46
Ease of use and comfort
Memorising driving
positions
Associated with the electrically-adjusted driver’s
seat, this function allows two driving positions
to be memorised, to make these adjustments
easier if there are frequent driver changes.
It records the electric adjustments made to the
seat and door mirrors.
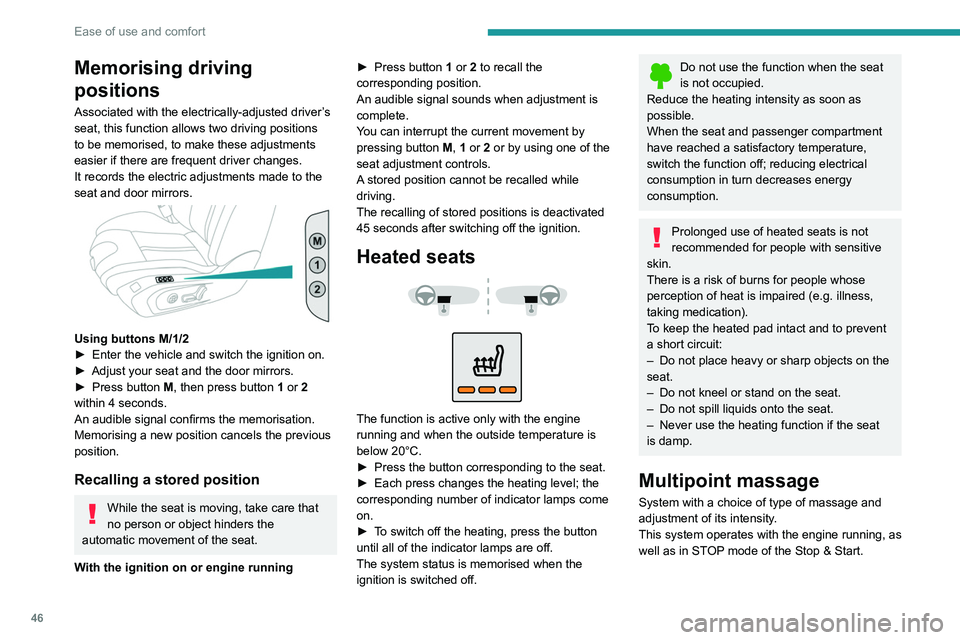
Using buttons M/1/2
► Enter the vehicle and switch the ignition on.
►
Adjust your seat and the door mirrors.
►
Press button
M, then press button 1 or 2
within 4 seconds.
An audible signal confirms the memorisation.
Memorising a new position cancels the previous
position.
Recalling a stored position
While the seat is moving, take care that
no person or object hinders the
automatic movement of the seat.
With the ignition on or engine running ►
Press button
1 or 2 to recall the
corresponding position.
An audible signal sounds when adjustment is
complete.
You can interrupt the current movement by
pressing button M, 1 or 2 or by using one of the
seat adjustment controls.
A stored position cannot be recalled while
driving.
The recalling of stored positions is deactivated
45 seconds after switching off the ignition.
Heated seats
The function is active only with the engine
running and when the outside temperature is
below 20°C.
►
Press the button corresponding to the seat.
►
Each press changes the heating level; the
corresponding number of indicator lamps come
on.
►
T
o switch off the heating, press the button
until all of the indicator lamps are off.
The system status is memorised when the
ignition is switched off.
Do not use the function when the seat
is not occupied.
Reduce the heating intensity as soon as
possible.
When the seat and passenger compartment
have reached a satisfactory temperature,
switch the function off; reducing electrical
consumption in turn decreases energy
consumption.
Prolonged use of heated seats is not
recommended for people with sensitive
skin.
There is a risk of burns for people whose
perception of heat is impaired (e.g.
illness,
taking medication).
To keep the heated pad intact and to prevent
a short circuit:
–
Do not place heavy or sharp objects on the
seat.
–
Do not kneel or stand on the seat.
–
Do not spill liquids onto the seat.
–
Never use the heating function if the seat
is damp.
Multipoint massage
System with a choice of type of massage and
adjustment of its intensity.
This system operates with the engine running, as
well as in STOP mode of the
Stop & Start.
Page 52 of 244
50
Ease of use and comfort
► Guide the backrest 3 down to the horizontal
position.
From the boot (SW)
► Pull the backrest release lever 2 towards you.
The backrest 3 folds fully onto the cushion.
Repositioning the backrests
First check that the outer seat belts are
lying vertically flat alongside the backrest
latching rings.
► Straighten the backrest 3 and push it firmly to
latch it into place.
►
Check that the red indicator is no longer
visible in the release grip 1
.
►
Ensure that the outer seat belts were not
trapped during the operation.
Please note: an incorrectly latched
backrest compromises the safety of
passengers in the event of sudden braking or
an accident.
The contents of the boot may be thrown
forwards - risk of serious injury!
Heating and Ventilation
Air intake
The air circulating in the passenger compartment
is filtered and originates either from the
exterior, via the grille located at the base of the windscreen, or from the inside in air recirculation
mode.
Controls
Depending on version, certain controls
are accessible in the
Climate touch
screen application and/via the control panel on
the centre console.
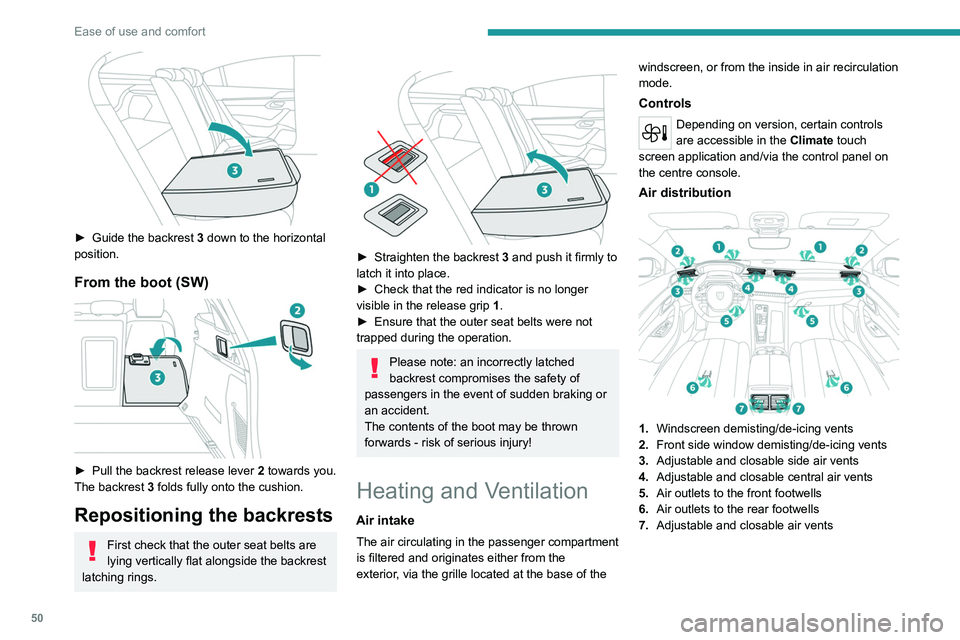
Air distribution
1. Windscreen demisting/de-icing vents
2. Front side window demisting/de-icing vents
3. Adjustable and closable side air vents
4. Adjustable and closable central air vents
5. Air outlets to the front footwells
6. Air outlets to the rear footwells
7. Adjustable and closable air vents