2023 PEUGEOT 508 child lock
[x] Cancel search: child lockPage 4 of 244
2
Contents
■
OverviewOverview 4
■
Eco-driving
1Dashboard instrumentsDriver information 10
Digital instrument panels 10
Warning and indicator lamps 11
Indicators 18
Manual test 21
Total distance recorder 22
Trip computer 22
10-inch touch screen 23
Remotely operable additional functions
(Rechargeable hybrid)
25
2AccessElectronic key with remote control function
and built-in key 26
Keyless Entry and Start 28
Central locking 30
Back-up procedures 30
Alarm 32
Doors 34
Boot 35
Motorised tailgate 36
Electric windows 39
Panoramic sunroof 41
3Ease of use and comfortDriving position 43
Front seats 44
Steering wheel adjustment 47
Mirrors 47
Rear seats 49
Heating and Ventilation 50
Dual-zone automatic air conditioning 51
Front demisting/defrosting 54
Heated windscreen 54
Rear screen demisting/defrosting 55
Temperature pre-conditioning
(Rechargeable hybrid)
55
Front fittings 56
Courtesy lamps 59
Interior ambient lighting 60
Rear fittings 60
Boot fittings 61
4Lighting and visibilityExterior lighting control stalk 66
Direction indicators 67
Headlamp beam height adjustment 67
Automatic illumination of headlamps 68
Guide-me-home and welcome lighting 68
Automatic lighting systems - General
recommendations
69
Peugeot Matrix LED Technology 2.0 69
Adaptive Frontlight System 70
Night Vision 71
Wiper control stalk 73
Changing a wiper blade 75
Automatic wipers 75
5SafetyGeneral safety recommendations 77
Hazard warning lamps 77
Horn 78
Pedestrian horn (Rechargeable hybrid) 78
Emergency or assistance 78
Event Data Recording system 80
Electronic stability control (ESC) 81
Seat belts 83
Airbags 85
Active bonnet 87
Child seats 88
Deactivating the front passenger airbag 90
ISOFIX child seats 90
i-Size child seats 91
Installing child seats 93
Child lock 96
6DrivingDriving recommendations 97
Starting/switching off the engine 99
Starting rechargeable hybrid vehicles 99
Electric parking brake 101
Automatic gearbox 103
Active Suspension Control 106
Driving modes 106
Hill start assist 108
Gear shift indicator 109
Stop & Start 109
Tyre under-inflation detection 11 0
Driving and manoeuvring aids - General
recommendations
11 2
Shortcuts for driving aids 11 3
Road signs recognition 11 4
Speed limiter 11 8
Cruise control - Specific recommendations 11 9
Programmable cruise control 120
Page 28 of 244
26
Access
Electronic key with
remote control function
and built-in key
Remote control function
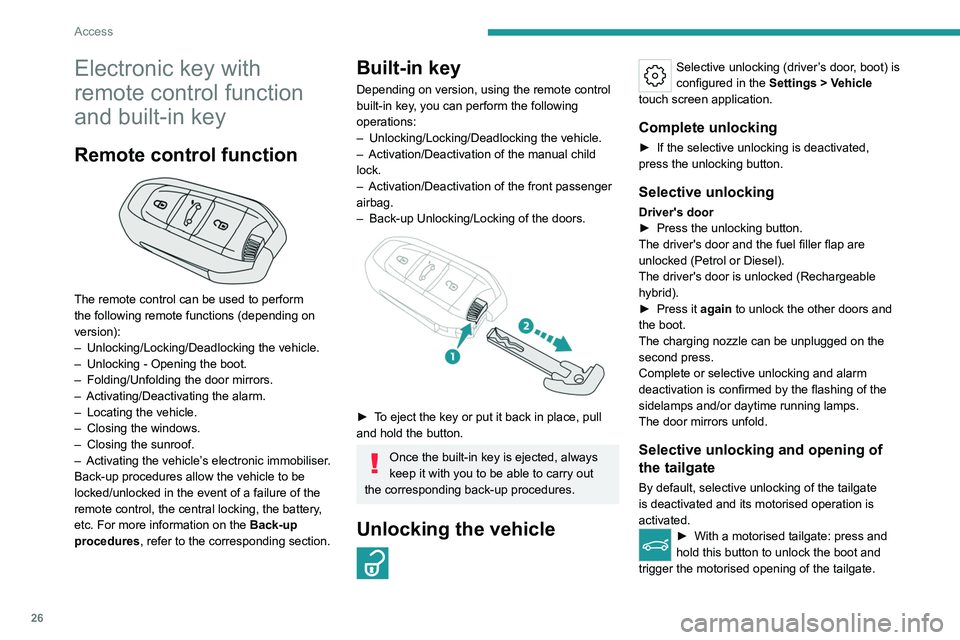
The remote control can be used to perform
the following remote functions (depending on
version):
–
Unlocking/Locking/Deadlocking the vehicle.
–
Unlocking - Opening the boot.
–
Folding/Unfolding the door mirrors.
–
Activating/Deactivating the alarm.
–
Locating the vehicle.
–
Closing the windows.
–
Closing the sunroof.
–
Activating the vehicle’
s electronic immobiliser.
Back-up procedures allow the vehicle to be
locked/unlocked in the event of a failure of the
remote control, the central locking, the battery,
etc. For more information on the Back-up
procedures, refer to the corresponding section.
Built-in key
Depending on version, using the remote control
built-in key, you can perform the following
operations:
–
Unlocking/Locking/Deadlocking the vehicle.
–
Activation/Deactivation of the manual child
lock.
–
Activation/Deactivation of the front passenger
airbag.
–
Back-up Unlocking/Locking of the doors.
► To eject the key or put it back in place, pull
and hold the button.
Once the built-in key is ejected, always
keep it with you to be able to carry out
the corresponding back-up procedures.
Unlocking the vehicle
Selective unlocking (driver’s door, boot) is
configured in the Settings
> Vehicle
touch screen application.
Complete unlocking
► If the selective unlocking is deactivated,
press the unlocking button.
Selective unlocking
Driver's door
► Press the unlocking button.
The driver's door and the fuel filler flap are
unlocked (Petrol or Diesel).
The driver's door is unlocked (Rechargeable
hybrid).
►
Press it
again to unlock the other doors and
the boot.
The charging nozzle can be unplugged on the
second press.
Complete or selective unlocking and alarm
deactivation is confirmed by the flashing of the
sidelamps and/or daytime running lamps.
The door mirrors unfold.
Selective unlocking and opening of
the tailgate
By default, selective unlocking of the tailgate
is deactivated and its motorised operation is
activated.
► With a motorised tailgate: press and
hold this button to unlock the boot and
trigger the motorised opening of the tailgate.
Page 31 of 244
29
Access
2This operation also closes the sunroof blind.
Make sure that no item or person could
prevent the correct closing of the
windows and sunroof.
Pay particular attention to children when
operating windows.
The locking, and the activation of the alarm
depending on version, is confirmed by the
temporary lighting of the direction indicators.
The door mirrors fold.
Deadlocking
Deadlocking renders the interior door
controls inoperative. It also disables the
central locking button.
The horn remains operational.
Never leave anyone inside the vehicle when it
is deadlocked.
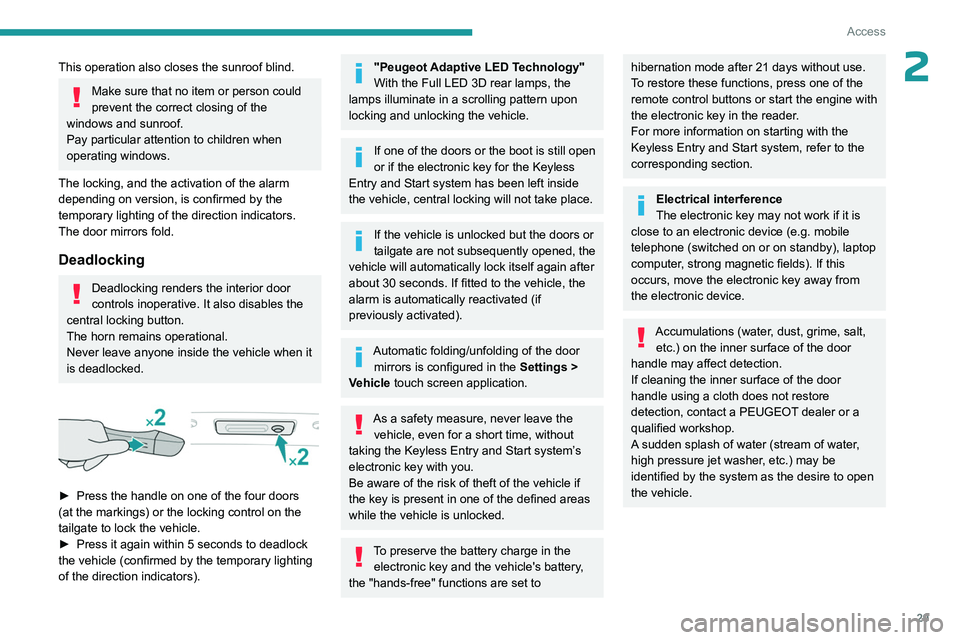
► Press the handle on one of the four doors
(at the markings) or the locking control on the
tailgate to lock the vehicle.
►
Press it again within 5 seconds to deadlock
the vehicle (confirmed by the temporary lighting
of the direction indicators).
"Peugeot Adaptive LED Technology"
With the Full LED 3D rear lamps, the
lamps illuminate in a scrolling pattern upon
locking and unlocking the vehicle.
If one of the doors or the boot is still open
or if the electronic key for the Keyless
Entry and Start
system has been left inside
the vehicle, central locking will not take place.
If the vehicle is unlocked but the doors or
tailgate are not subsequently opened, the
vehicle will automatically lock itself again after
about 30
seconds. If fitted to the vehicle, the
alarm is automatically reactivated (if
previously activated).
Automatic folding/unfolding of the door mirrors is configured in the Settings
>
Vehicle touch screen application.
As a safety measure, never leave the vehicle, even for a short time, without
taking the Keyless Entry and Start system’s
electronic key with you.
Be aware of the risk of theft of the vehicle if
the key is present in one of the defined areas
while the vehicle is unlocked.
To preserve the battery charge in the electronic key and the vehicle's battery,
the "hands-free" functions are set to
hibernation mode after 21 days without use.
To restore these functions, press one of the
remote control buttons or start the engine with
the electronic key in the reader.
For more information on starting with the
Keyless Entry and Start system, refer to the
corresponding section.
Electrical interference
The electronic key may not work if it is
close to an electronic device (e.g.
mobile
telephone (switched on or on standby), laptop
computer, strong magnetic fields). If this
occurs, move the electronic key away from
the electronic device.
Accumulations (water, dust, grime, salt, etc.) on the inner surface of the door
handle may affect detection.
If cleaning the inner surface of the door
handle using a cloth does not restore
detection, contact a PEUGEOT dealer or a
qualified workshop.
A sudden splash of water (stream of water,
high pressure jet washer, etc.) may be
identified by the system as the desire to open
the vehicle.
Page 33 of 244
31
Access
2Central locking not
functioning
Use these procedures in the following cases:
– Central locking malfunction.
–
Battery disconnected or discharged.
In the event of a malfunction of the
central locking system, the battery must
be disconnected to ensure that the vehicle is
locked fully.
Front left-hand door
► Insert the key into the door lock.
► T urn the key towards the rear of the vehicle
to lock it, or towards the front to unlock it.
Other doors
Unlocking
► Pull the interior door opening control.
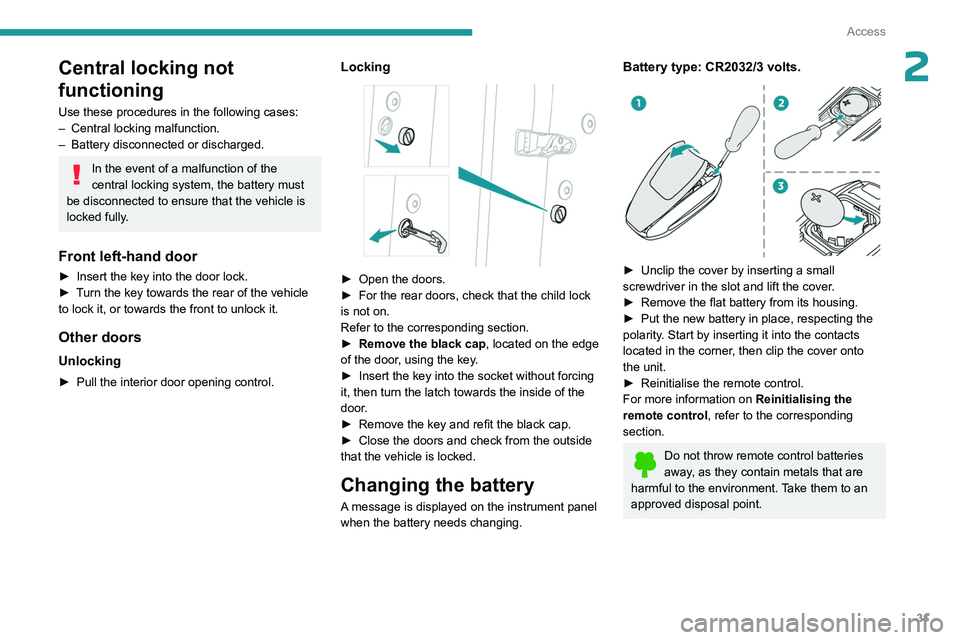
Locking
► Open the doors.
► For the rear doors, check that the child lock
is not on.
Refer to the corresponding section.
►
Remove the black cap
, located on the edge
of the door, using the key.
►
Insert the key into the socket without forcing
it, then turn the latch towards the inside of the
door
.
►
Remove the key and refit the black cap.
►
Close the doors and check from the outside
that the vehicle is locked.
Changing the battery
A message is displayed on the instrument panel
when the battery needs changing.
Battery type: CR2032/3 volts.
► Unclip the cover by inserting a small
screwdriver in the slot and lift the cover .
►
Remove the flat battery from its housing.
►
Put the new battery in place, respecting the
polarity
. Start by inserting it into the contacts
located in the corner, then clip the cover onto
the unit.
►
Reinitialise the remote control.
For more information on Reinitialising the
remote control
, refer to the corresponding
section.
Do not throw remote control batteries
away, as they contain metals that are
harmful to the environment. Take them to an
approved disposal point.
Page 34 of 244
32
Access
This equipment contains a button type battery.
Do not swallow the battery. Risk of chemical
burns!
Swallowing the battery can cause serious
internal burning in only 2 hours and can be
fatal.
If batteries have been swallowed or inserted
into a part of the body, seek immediate
medical advice.
Keep new and used batteries out of the reach
of children.
If the battery compartment does not close
properly, stop using the product and keep it
out of the reach of children.
Risk of explosion if the battery is
replaced with an incorrect type!
Replace the battery with the same type.
Risk of explosion or leaking of
inflammable liquid or gas!
Do not use in/store in/place in an environment
where the temperature is extremely high or
where the pressure is extremely low due to
very high altitude.
Do not try to burn, crush or cut a used battery.
Reinitialising the remote
control
Following replacement of the battery or in
the event of a fault, it may be necessary to
reinitialise the remote control.
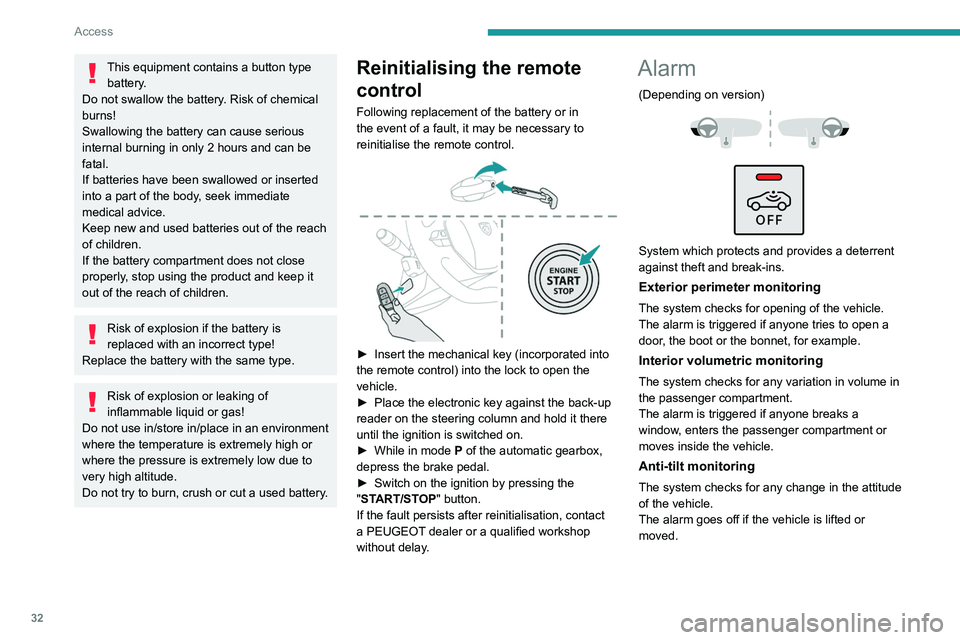
► Insert the mechanical key (incorporated into
the remote control) into the lock to open the
vehicle.
►
Place the electronic key against the back-up
reader on the steering column and hold it there
until the ignition is switched on.
►
While in mode P
of the automatic gearbox,
depress the brake pedal.
►
Switch on the ignition by pressing the
"
START/STOP" button.
If the fault persists after reinitialisation, contact
a PEUGEOT dealer or a qualified workshop
without delay.
Alarm
(Depending on version)
System which protects and provides a deterrent
against theft and break-ins.
Exterior perimeter monitoring
The system checks for opening of the vehicle.
The alarm is triggered if anyone tries to open a
door, the boot or the bonnet, for example.
Interior volumetric monitoring
The system checks for any variation in volume in
the passenger compartment.
The alarm is triggered if anyone breaks a
window, enters the passenger compartment or
moves inside the vehicle.
Anti-tilt monitoring
The system checks for any change in the attitude
of the vehicle.
The alarm goes off if the vehicle is lifted or
moved.
Page 38 of 244
36
Access
The tailgate is not designed to hold a bicycle carrier.
Closing the tailgate
► Lower the tailgate using the interior grips.
► Release the grips and press down on the
outside of the tailgate to close it.
In the event of a malfunction or if you
experience difficulty opening or closing
the tailgate, have it checked by a PEUGEOT
dealer or a qualified workshop without delay,
to avoid the issue deteriorating and prevent
any risk of the tailgate dropping, potentially
causing serious injury.
Back-up release
To manually unlock the boot in the event of a
battery or central locking failure.
Unlocking
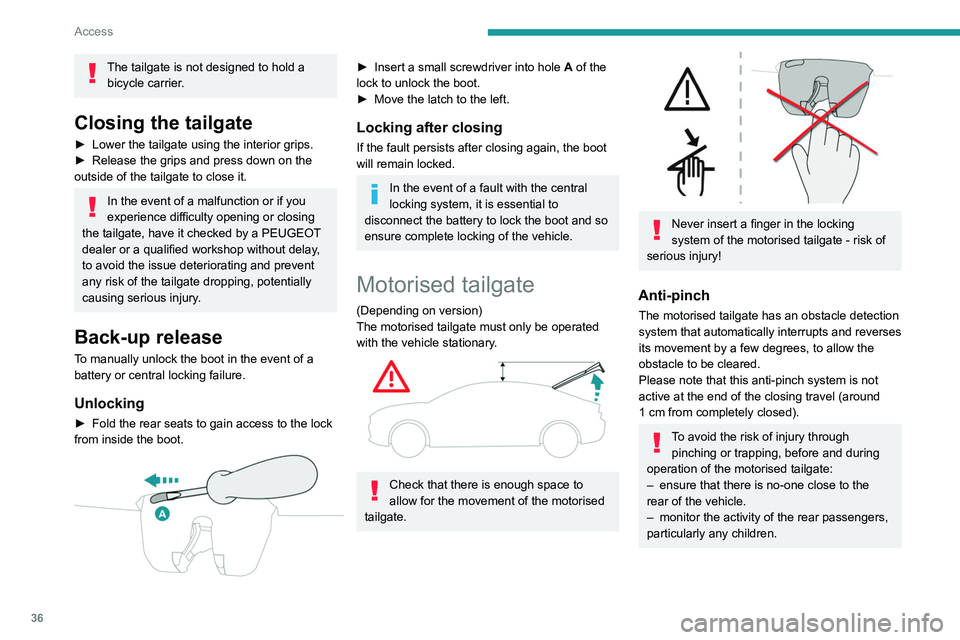
► Fold the rear seats to gain access to the lock
from inside the boot.
► Insert a small screwdriver into hole A of the
lock to unlock the boot.
►
Move the latch to the left.
Locking after closing
If the fault persists after closing again, the boot
will remain locked.
In the event of a fault with the central
locking system, it is essential to
disconnect the battery to lock the boot and so
ensure complete locking of the vehicle.
Motorised tailgate
(Depending on version)
The motorised tailgate must only be operated
with the vehicle stationary.
Check that there is enough space to
allow for the movement of the motorised
tailgate.
Never insert a finger in the locking
system of the motorised tailgate - risk of
serious injury!
Anti-pinch
The motorised tailgate has an obstacle detection
system that automatically interrupts and reverses
its movement by a few degrees, to allow the
obstacle to be cleared.
Please note that this anti-pinch system is not
active at the end of the closing travel (around
1
cm from completely closed).
To avoid the risk of injury through pinching or trapping, before and during
operation of the motorised tailgate:
–
ensure that there is no-one close to the
rear of the vehicle.
–
monitor the activity of the rear passengers,
particularly any children.
Page 41 of 244
39
Access
2Acknowledgement of the "kicking" movement
is confirmed by the lighting of the direction
indicators.
"Sideward kicking" movements do not
work. If the "kicking" movement has not
been detected, wait at least 2 seconds before
repeating the movement.
Do not perform repetitive "kicking"
movements.
If the motorised tailgate has not started to open
or close, check that:
–
the function is activated.
–
the electronic key is on your person, outside
the vehicle in the rear recognition area.
–
the "kicking" movement was performed in the
detection zone, close enough to the bumper
.
–
the foot was removed from the bumper quickly
enough.
Automatic locking
It is possible to lock automatically the vehicle
using the hands-free function (Hands-Free
Tailgate Access).
The "Handsfree Trunk Locking" function is configured in the Settings
> Vehicle
touch screen application.
When the vehicle is locked, the request
to open the tailgate with this function
unlocks the vehicle, or only the tailgate if
selective unlocking is activated, prior to the
opening of the tailgate.
Closing the tailgate with the "Hands-Free
Tailgate Access" function enables you to lock
the vehicle.
Recommendations on the
hands-free function (Hands-
Free Tailgate Access)
If it does not work, check that the electronic key
is not exposed to a source of electromagnetic
interference (e.g. smartphone).
The function may be deactivated or affected if
there is rain or snow.
The function may not work correctly with a
prosthetic leg.
In some circumstances, the tailgate may open or
close by itself, particularly when:
–
hitching up or removing a trailer
.
–
operating a towing device.
–
fitting or removing a bicycle carrier
.
–
loading
or unloading bicycles on/from a bicycle
carrier.
–
depositing or lifting something behind the
vehicle.
–
an animal approaches the rear bumper
.
–
washing the vehicle.
–
maintenance is performed on the vehicle.
–
accessing the spare wheel.
To avoid such operating problems, keep the
electronic key away from the recognition zone or
deactivate the hands-free function.
Towing device
The installation of a towing device may
disturb the detection system.
►
Perform the "kicking" movement on the
right side of the towing device.
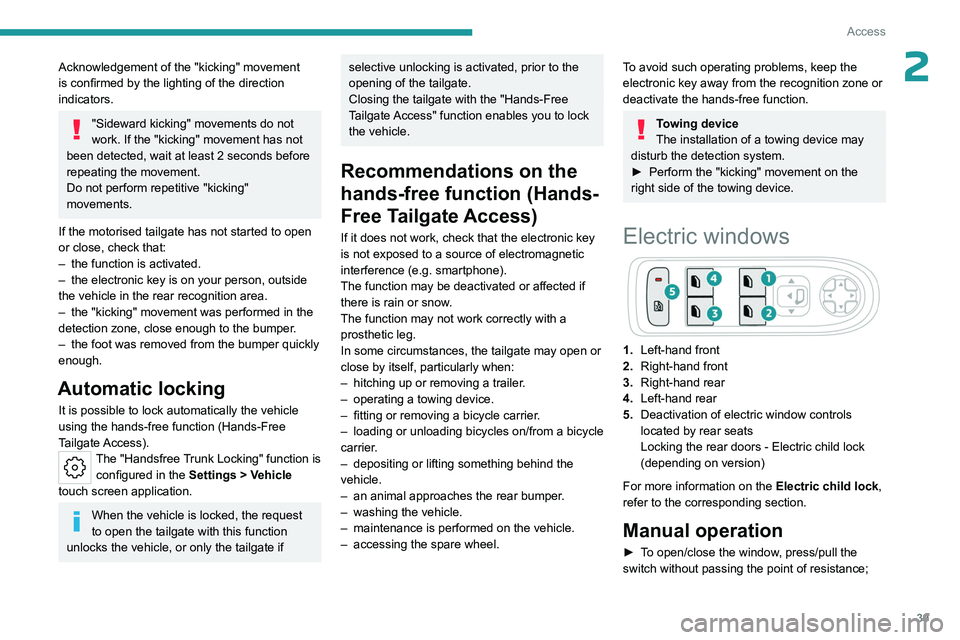
Electric windows
1. Left-hand front
2. Right-hand front
3. Right-hand rear
4. Left-hand rear
5. Deactivation of electric window controls
located by rear seats
Locking the rear doors - Electric child lock
(depending on version)
For more information on the Electric child lock,
refer to the corresponding section.
Manual operation
► To open/close the window, press/pull the
switch without passing the point of resistance;
Page 42 of 244

40
Access
the window stops as soon as the switch is
released.
Automatic operation
► To open/close the window, press/pull the
switch past its resistance point: the window
opens/closes completely when the switch is
released.
Operating the switch again stops the movement
of the window.
Window controls remain operational for
approximately 45 seconds after switching
off the ignition or after locking the vehicle.
After that time, the controls are disabled.
To reactivate them, switch on the ignition or
unlock the vehicle.
Anti-pinch
If the window meets an obstacle while rising, it
stops and immediately partially lowers again.
Overtaking of the anti-pinch
After triggering the anti-pinch, check
that there are no obstacles blocking the
movement of the window.
Try to close the window again.
If the window closing is interrupted by the
anti-pinch 3
times in a row (max. 10 seconds
between each action), the anti-pinch function
becomes inoperable.
Without this protection, the window can only
be closed manually - risk of injury!
Deactivating the rear
controls for the rear electric
windows
For your children's safety, ignition on or engine
on, press control 5 to deactivate the controls for
the rear electric windows, irrespective of their
positions.
The red indicator lamp in the button comes
on and a confirmation message is displayed.
The lamp will remain lit until the controls are
reactivated.
The rear electric windows can still be controlled
using the driver's controls.
In the event of a serious impact, use of
the rear electric window controls is
re-enabled, if they had been deactivated.
Reinitialising the electric
windows
After reconnecting the battery, or in the event
of abnormal window movement, the anti-pinch
function must be reinitialised.
Automatic window closing is no longer available, only manual closing is
possible.
Remote window closing with the electronic
key is also no longer available in this case.
The anti-pinch function is inoperable during
the following sequence of operations.
For each window:
►
Lower the window fully
, then raise it; it will
rise in steps of a few centimetres each time the
control is pressed. Repeat the operation until the
window is fully closed.
►
Continue to pull the control for at least one
second after the window reaches the closed
position.
If an electric window meets an obstacle
during operation, the movement of the
window must be reversed. To do this, press
the relevant control.
When the driver operates the passengers’
electric window controls, it is important to
ensure that nothing can prevent the window
from closing properly.
It is important to ensure that passengers use
the electric windows correctly.
Pay particular attention to children when
operating the windows.
Be aware of passengers and/or other persons
present when closing windows remotely using
the electronic key.