2023 PEUGEOT 508 window
[x] Cancel search: windowPage 98 of 244

96
Safety
"Rearward facing" ISOFIX child seat:
–
R1
: ISOFIX child seat for a baby.
–
R2
: ISOFIX reduced size child seat.
–
R3
: ISOFIX large size child seat.
"Forward facing" ISOFIX child seat:
–
F2X
: ISOFIX child seat for toddlers.
–
F2
: ISOFIX reduced height child seat.
–
F3
: ISOFIX full height child seat.
Booster child seat:
–
B2
: reduced width booster seat.
–
B3
: full width booster seat.
Seat position authorised for the
installation of an ISOFIX child seat.
Seat position where the installation of an
ISOFIX child seat is forbidden.
For seat adjustments, refer to the summary table
"Installing universal, ISOFIX and i-Size child
seats ".
Manual child lock
The system prevents a rear door from being
opened using its interior handle.
The red control is located on the edge of each
rear door (marked by a label).
Activation/Deactivation
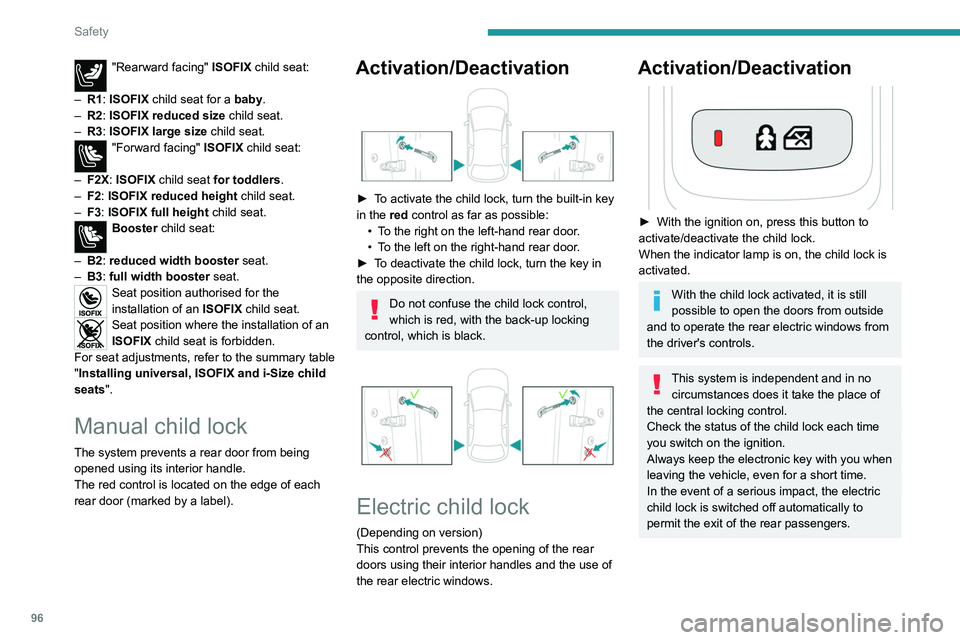
► To activate the child lock, turn the built-in key
in the red control as far as possible:
•
T
o the right on the left-hand rear door.
•
T
o the left on the right-hand rear door.
►
T
o deactivate the child lock, turn the key in
the opposite direction.
Do not confuse the child lock control,
which is red, with the back-up locking
control, which is black.
Electric child lock
(Depending on version)
This control prevents the opening of the rear
doors using their interior handles and the use of
the rear electric windows.
Activation/Deactivation
► With the ignition on, press this button to
activate/deactivate the child lock.
When the indicator lamp is on, the child lock is
activated.
With the child lock activated, it is still
possible to open the doors from outside
and to operate the rear electric windows from
the driver's controls.
This system is independent and in no circumstances does it take the place of
the central locking control.
Check the status of the child lock each time
you switch on the ignition.
Always keep the electronic key with you when
leaving the vehicle, even for a short time.
In the event of a serious impact, the electric
child lock is switched off automatically to
permit the exit of the rear passengers.
Page 140 of 244

138
Driving
labels or other objects; they may hamper
correct operation of the system.
Parking sensors
For more information, refer to the
General recommendations on the use
of driving and manoeuvring aids .
This system detects and signals the proximity of
obstacles (e.g.
pedestrian, vehicle, tree, barrier)
using sensors located in the bumper.
Rear parking sensors
System startup is available under the following
conditions:
–
when reverse gear is engaged.
–
when the vehicle is moving backwards
(e.g.
downhill, in neutral).
It is indicated by an audible confirmation signal
and a display indication.
If an obstacle is detected as soon as the
reverse gear is engaged, an audible
detection signal is given directly instead of the
audible confirmation signal.
If no audible signal is given, the display
indication is not shown or a warning message
appears, the system has a failure.
Audible assistance
The system signals the presence of obstacles
which are both within the sensors’ detection zone
and in the vehicle path defined by the direction of
the steering wheel.
Depending on version, in the example shown,
only the obstacles present in the shaded area
will be signalled by the audible assistance.
The proximity information is given by an
intermittent audible signal, the frequency of
which increases as the vehicle approaches the
obstacle.
When the distance between the vehicle and
the obstacle becomes less than about thirty
centimetres, the audible signal becomes
continuous.
The sound emitted by the speaker (right or
left) indicates the side on which the obstacle is
located.
The audible signal is automatically suspended
when the vehicle is stationary for a few seconds.
The audible signal is automatically restored
when the vehicle is moving again or if the
obstacle approaches the vehicle.
Adjusting the audible detection signalPressing this button opens the
window for adjusting the volume
of the audible signal.
Pressing this button mutes/unmutes
the audible signal.
Visual assistance
This supplements the audible signal, without
taking account of the vehicle's trajectory, by
displaying bars on the screen whose location
represents the distance between the obstacle
Page 141 of 244

139
Driving
6and the vehicle (white: more distant, orange:
close, red: very close).
When the obstacle is very close, the "Danger"
symbol is displayed on the screen.
Closing the system display windowPressing this button closes the
system display window.
This warning lamp flashes during obstacle detection on the instrument panel.
Muting the audible assistance /
Closing the visual assistance
If the audible detection signal is muted or
the system display window is closed by the
driver during the obstacle detection, only
the warning lamp continues to flash on the
instrument panel.
Front parking sensors
Supplementing the rear parking sensors, the
front parking sensors are triggered when an
obstacle is detected in front and the speed of the
vehicle is below 6 mph (10
km/h).
Front parking sensor operation is suspended if
the vehicle stops for more than three seconds in
forward gear, if an obstacle is no longer detected
or the vehicle speed exceeds 6
mph (10 km/h).
The sound emitted by the speaker (front or rear) locates the obstacle relative to
the vehicle, whether in front of or behind it on
its path.
Side parking sensors
Using four additional sensors located on the
sides of the bumpers, the system records the
position of obstacles during the manoeuvre and
indicates them when they are located alongside
the vehicle.
Only fixed obstacles are indicated
correctly. Moving obstacles detected at
the beginning of the manoeuvre may be
indicated mistakenly, while moving obstacles
that appear alongside the vehicle but were
not previously recorded will not be indicated.
Objects memorised during the
manoeuvre will no longer be stored after
switching off the ignition.
Deactivation/Activation
(Depending on country of sale)
By default, the audible signal is automatically
activated at each time the reverse gear is
engaged.
The system cannot be deactivated.
You can start the system manually and activate/deactivate the audible signal in
the ADAS touch screen application.
The rear parking sensors are deactivated automatically if a trailer or bicycle carrier
is connected to a towing device installed in
accordance with the Manufacturer's
recommendations.
In this case, the outline of a trailer is displayed
at the rear of the image of the vehicle.
When starting the vehicle, the graphic
and audible aids are only available after
the touch screen has started up.
Operating limits
If the boot is heavily loaded, the vehicle may tilt,
affecting distance measurements.
In case of a gearbox failure, the system is not
active, when the reverse gear is engaged.
Page 142 of 244

140
Driving
Malfunction
In the event of a malfunction, this warning
lamp lights up on the instrument panel,
accompanied by the display of a message and
an audible signal (short beep).
Have it checked by a PEUGEOT dealer or a
qualified workshop.
This warning lamp lights up on the instrument panel with the message
"Parking Assistance Sensor blind: Clean
sensor, see User Manual" if the sensor is
masked.
This is a normal behavior, which does not
request the support of a qualified workshop.
In this case, stop the vehicle and verify if the
front and/or rear sensors are covered by dirt,
mud, sand, snow, ice or anything preventing the
sensing.
The system is operational again after the
detection field has been cleaned.
Visiopark 1
For more information, refer to the
General recommendations on the use
of driving and manoeuvring aids .
When reverse gear is engaged, with the engine
running, this system displays views of the
vehicle's close surroundings on the touch screen
using a camera located at the rear of the vehicle.
The screen is divided into 3 parts with a side
menu, a contextual view and a view from above
the vehicle in its close surroundings.
The parking sensors supplement the information
in the view from above the vehicle.
Different contextual views are available:
–
Automatic zoom view
.
–
Standard view
.
–
Panoramic view
.
Depending on the context, the system chooses
the best view to display (standard or automatic
zoom).
The view type can be changed at any time
during the manoeuvre.
The system status is not saved when the ignition
is switched off.
Operating principle
Using the camera, the vehicle's close
surroundings are recorded during low speed
manoeuvres.
An image from above the vehicle in its close
surroundings is created in real time (on the side
of the screen), as the vehicle progresses.
This view makes it easier to align the vehicle
when parking and to perceive nearby obstacles.
It is automatically deleted if the vehicle remains
stationary for too long.
Settings
In the side menu:This window allows to carry out the following operations:
–
adjust the volume of the audible signal.
–
trig the camera washing (depending on
equipment).
This button allows to mute/unmute the audible signal.
Page 144 of 244

142
Driving
conditions, such as entering a blind intersection
or manoeuvring in areas with reduced visibility.
Different contextual views are available for the
rear or for the front:
–
Automatic zoom view
.
–
Standard view
.
–
Panoramic view
.
Depending on the context, the system chooses
the best view to display (standard or automatic
zoom).
The view type can be changed at any time
during the manoeuvre.
The system status is not saved when the ignition
is switched off.
Operating principle
Reconstructed view
The cameras are activated and a reconstruction
of a view from above your vehicle in its close
surroundings is displayed on the touch screen.
Live view
The front and rear views automatically appear in
the view from above the vehicle.
It is also possible to display any live view by
selecting the corresponding zone.
The front view can be selected in forward gear
up to 10 mph (16 km/h).
Installing the very cold climate screen
can alter the image transmitted by the
front camera.
Settings
In the side menu:This window allows to carry out the following operations:
–
adjust the volume of the audible signal.
–
adjust the brightness.
–
adjust the contrast.
–
trig the camera washing (depending on
equipment).
This button allows to mute/unmute the audible signal.
Activation/Deactivation
Automatic
With the rear camera, engine running and
vehicle stationary, rear vision is displayed
automatically if reverse gear is engaged.
With the front camera, engine running and speed
below 10 mph (16 km/h), rear vision is displayed
automatically if a gear is engaged.
Manual
► In the ADAS touch screen application,
select Functions>Panoramic Camera
The system is deactivated: –
automatically for the rear
, when changing out
of reverse gear.
–
automatically for the front, above
approximately 10 mph (16 km/h).
–
by pressing the cross in the top left-hand
corner of the touch screen.
Automatic zoom view
The front or rear camera records the
surroundings during the manoeuvre to create
a front or rear view from above the vehicle in
its close surroundings, making it possible to
manoeuvre the vehicle around the surrounding
obstacles.
Using the sensors located on the front or rear
bumper, the automatic zoom view is displayed
when approaching an obstacle at the red line
(less than 30 cm) during the manoeuvre.
This view is only available automatically.
Depending on version, it can be activated/
deactivated in the ADAS application of the touch
screen.
Page 186 of 244

184
In the event of a breakdown
In some circumstances, it may be necessary to
charge the battery:
–
When using the vehicle mainly for short
journeys.
–
If the vehicle is to be taken off the road for
several weeks.
Consult a PEUGEOT
dealer or a qualified
workshop.
To charge the vehicle's battery yourself, use only a charger compatible with
lead-acid batteries with a nominal voltage of
12
V.
Follow the instructions provided by the
manufacturer of the charger.
Never reverse polarities.
It is not necessary to disconnect the
battery.
►
Switch the ignition off.
►
Switch off all electrical consumers (audio
system, lighting, wipers, etc.).
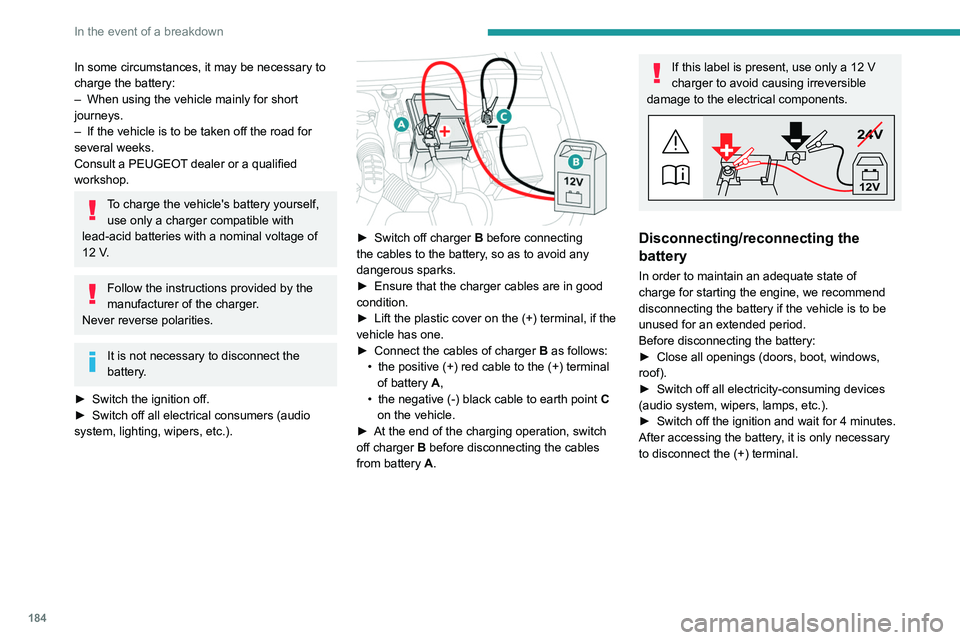
► Switch off charger B before connecting
the cables to the battery, so as to avoid any
dangerous sparks.
►
Ensure that the charger cables are in good
condition.
►
Lift the plastic cover on the (+) terminal, if the
vehicle has one.
►
Connect the cables of charger B
as follows:
•
the positive (+) red cable to the (+) terminal
of battery
A,
•
the negative (-) black cable to earth point C
on the vehicle.
►
At the end of the charging operation, switch
off charger B
before disconnecting the cables
from battery A.
If this label is present, use only a 12 V
charger to avoid causing irreversible
damage to the electrical components.
24V
12V
Disconnecting/reconnecting the
battery
In order to maintain an adequate state of
charge for starting the engine, we recommend
disconnecting the battery if the vehicle is to be
unused for an extended period.
Before disconnecting the battery:
►
Close all openings (doors, boot, windows,
roof).
►
Switch off all electricity-consuming devices
(audio system, wipers, lamps, etc.).
►
Switch off the ignition and wait for 4
minutes.
After accessing the battery, it is only necessary
to disconnect the (+) terminal.
Page 189 of 244

187
In the event of a breakdown
8accessory batteries - risk of irreversible
damage!
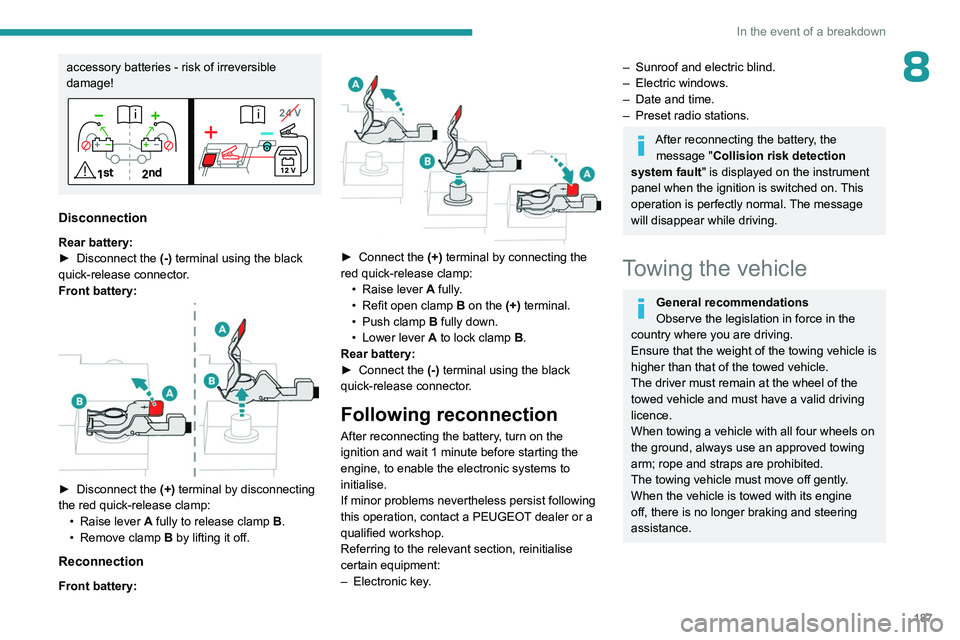
Disconnection
Rear battery:
► Disconnect the (-)
terminal using the black
quick-release connector.
Front battery:
► Disconnect the (+) terminal by disconnecting
the red quick-release clamp: •
Raise lever
A
fully to release clamp
B
.
•
Remove clamp
B
by lifting it off.
Reconnection
Front battery:
► Connect the (+) terminal by connecting the
red quick-release clamp: •
Raise lever
A
fully.
•
Refit open clamp
B
on the (+) terminal.
•
Push clamp
B fully down.
•
Lower lever
A
to lock clamp B.
Rear battery:
►
Connect the
(-) terminal using the black
quick-release connector.
Following reconnection
After reconnecting the battery, turn on the
ignition and wait 1 minute before starting the
engine, to enable the electronic systems to
initialise.
If minor problems nevertheless persist following
this operation, contact a PEUGEOT dealer or a
qualified workshop.
Referring to the relevant section, reinitialise
certain equipment:
–
Electronic key
.
– Sunroof and electric blind.
– Electric windows.
–
Date and time.
–
Preset radio stations.
After reconnecting the battery, the message "Collision risk detection
system fault" is displayed on the instrument
panel when the ignition is switched on. This
operation is perfectly normal. The message
will disappear while driving.
Towing the vehicle
General recommendations
Observe the legislation in force in the
country where you are driving.
Ensure that the weight of the towing vehicle is
higher than that of the towed vehicle.
The driver must remain at the wheel of the
towed vehicle and must have a valid driving
licence.
When towing a vehicle with all four wheels on
the ground, always use an approved towing
arm; rope and straps are prohibited.
The towing vehicle must move off gently.
When the vehicle is towed with its engine
off, there is no longer braking and steering
assistance.
Page 201 of 244

199
PEUGEOT i-Connect Advanced - PEUGEOT i-Connect
10to "Connected vehicle" to enable to the
connection to the radio network.
Irrespective of a valid subscription to a
connected service, the remote management
of devices relating to or connected with
the security of devices, and the updating
of software and firmware, will be carried
out when necessary in order to comply
with a legal requirement applicable to the
Manufacturer (e.g. the applicable law in terms
of product liability, the regulations governing
e-call) or when necessary to protect the
respective vital interests of the vehicle's users
and passengers.
The establishment of a secure connection via
radio network and the corresponding remote
updates are not affected by the privacy
settings and are intended to be carried out
after being initialised by the user in response
to a related notification.
The system can notify the receipt of an update
when it is connected to an exterior Wi-Fi network
or a mobile telephone network.
Large updates are downloaded only via the Wi-Fi
network.
The availability of an update is notified on the
screen at the end of the journey with an option
of immediate installation or postponement of
installation.
The installation time is variable and can take
several minutes with a maximum of about 30 minutes. A notification will give an estimate of the
duration and a description of the update.
Update information is available through the
"Settings" application.
Press the "Settings" application.
In the list, select the "Updates" tab.
This button allows you to change the authorisation for automatic downloading
of updates via an exterior Wi-Fi network.
For safety reasons and because it
requires sustained attention on the part
of the driver, the installation must be carried
out with the ignition on but without starting the
engine.
The installation cannot be carried out in the
following cases:
–
engine running.
–
emergency call in progress.
–
insufficient battery level.
–
when charging for electric vehicles.
If an update has failed or has expired, contact a
dealer or a qualified workshop.
The Manufacturer does not charge for the use of this service.
However, the use of Wi-Fi and/or mobile
telephone networks by your smartphone may
incur extra charges if you exceed the data
allowance included in your contract.
Any associated costs will be billed to you by
your mobile telephone operator.
Personalisation
Press and hold the screen from one of the
system's home pages.
Or
Press the "Settings" application.
In the list, select the "Customization" tab.
Press the "Displays" field.
A page divided into 2 parts is displayed.
Press the HOME button at any time to leave this
page.
Personalising the screen
Press the pencil in the "Customize
Touchscreen" part.
A representation of the organisation of the
different home page ( HOME) Widgets
is
displayed.
A Widget is a reduced window of an application or service.
Adding a Widget
To add a Widget, press "Widget" on the left of the screen.
Or
Press one of these buttons on the screen.
Select the desired Widget.
Press the back arrow to return to the
previous page.