2023 PEUGEOT 508 climate settings
[x] Cancel search: climate settingsPage 5 of 244

3
Contents
Drive Assist Plus 121
Adaptive cruise control 122
Lane positioning assist 125
Active Safety Brake with Collision Risk Alert and
Intelligent emergency braking assistance
129
Distraction detection 132
Lane keeping assist 134
Blind spot monitoring 136
Parking sensors 138
Visiopark 1 140
Visiopark 2 141
7Practical informationCompatibility of fuels 145
Refuelling 145
Misfuel prevention (Diesel) 146
Rechargeable hybrid system 147
Charging the traction battery
(Rechargeable hybrid)
155
Towing device 157
Towing device with retractable ball joint 158
Roof bars 159
Very cold climate screen 161
Snow chains 161
Energy economy mode 161
Bonnet 162
Engine compartment 163
Checking levels 163
Checks 165
AdBlue® (BlueHDi) 167
Free-wheeling 169
Advice on care and maintenance 169
8In the event of a breakdownWarning triangle 172
Running out of fuel (Diesel) 172
Tool kit 172
Temporary puncture repair kit 174
Spare wheel 176
Changing a bulb 180
Fuses 182
12
V battery/Accessory batteries 182
Towing the vehicle 187
9Technical dataEngine technical data and towed loads 190
Petrol engines 191
Diesel engines 192
Rechargeable hybrid engines 193
Dimensions 194
Identification markings 195
10 PEUGEOT i-Connect Advanced -PEUGEOT i-Connect
First steps 196
Customisation 199
Steering mounted controls 200
Applications 200
Voice commands 201
Navigation 202
Connectivity 203
Mirror Screen 204
Media 206
Phone 208
Settings 209
Help 210
11Vehicle data recording and privacy
■
Alphabetical index
■
Appendix
Page 26 of 244

24
Dashboard instruments
Direct access to the Climate application
Direct access to the Shortcuts for
driving aids
►
Swipe down from the upper edge of the touch
screen to access a list of quick settings (e.g.
Brightness
, Diagnostics).
►
Depending on the pages displayed on the
screen, with or without the context menu, scroll
the text by swiping with your finger
, as with a
smartphone.
From any page, press the touch screen
with three fingers to display the
applications wall.
Show/Hide context menu
Return to the previous page
►
T
o change the status of a function, press the
description for the corresponding line (change
confirmed by the slider moving to the right/left:
function activated/deactivated).
Access additional information on the function
Access to function parameters
Adding/Removing shortcuts
Short press, ignition off: system on/off.
Short press, ignition on: mute/restore
sound. Long press, ignition on: start standby mode
(mute sound, screens and clock display off).
Rotation: volume adjustment.
Applications
Press this button to access the
applications wall.
To obtain information about the other
applications not listed here, refer to the sections
describing the audio and telematic systems.
ADAS
Activation/Deactivation and configuration
of the driving aid functions.
Climate
Settings for temperature, air flow, etc.
For more information on Dual-zone automatic
air conditioning , refer to the corresponding
section.
Seats
Activation/Deactivation and configuration
of the seat comfort functions (massages).
For more information on the Multi-point
massages , refer to the corresponding section.
Settings
Main settings for the audio system, touch
screen and digital instrument panel.
Activation/Deactivation and configuration of
the exterior lighting, vehicle access and safety
functions.
Energy
Access to the rechargeable hybrid system
features (energy flow, consumption statistics,
deferred charging, e
- SAVE function).
Energy application
Energy Flow
The page shows the operation of the
rechargeable hybrid system in real time.
1.Active driving mode
2. Petrol engine
3. Electric motor(s)
4. Traction battery charge level
The energy flows have a specific colour for each
type of driving:
–
Blue: 100% electrical energy
.
–
White: energy from the petrol engine.
–
Green: energy recovery
.
Statistics
This page shows electrical energy and fuel
consumption statistics.
Page 54 of 244

52
Ease of use and comfort
This system works with the engine running, but
access to the ventilation and its controls remains
possible with the ignition on.
Press the Climate application button to
display the system controls page.
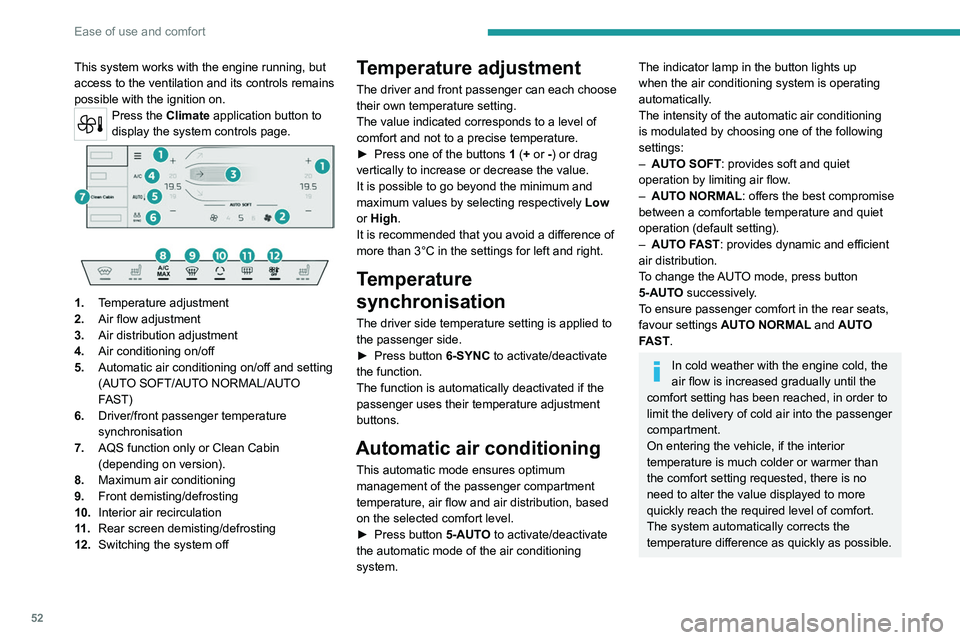
1. Temperature adjustment
2. Air flow adjustment
3. Air distribution adjustment
4. Air conditioning on/off
5. Automatic air conditioning on/off and setting
(AUTO SOFT/AUTO NORMAL/AUTO
FAST)
6. Driver/front passenger temperature
synchronisation
7. AQS function only or Clean Cabin
(depending on version).
8. Maximum air conditioning
9. Front demisting/defrosting
10. Interior air recirculation
11 . Rear screen demisting/defrosting
12. Switching the system off
Temperature adjustment
The driver and front passenger can each choose
their own temperature setting.
The value indicated corresponds to a level of
comfort and not to a precise temperature.
►
Press one of the buttons
1 (+ or -) or drag
vertically to increase or decrease the value.
It is possible to go beyond the minimum and
maximum values by selecting respectively Low
or High.
It is recommended that you avoid a difference of
more than 3°C in the settings for left and right.
Temperature
synchronisation
The driver side temperature setting is applied to
the passenger side.
►
Press button
6-SYNC to activate/deactivate
the function.
The function is automatically deactivated if the
passenger uses their temperature adjustment
buttons.
Automatic air conditioning
This automatic mode ensures optimum
management of the passenger compartment
temperature, air flow and air distribution, based
on the selected comfort level.
►
Press button
5-AUTO to activate/deactivate
the automatic mode of the air conditioning
system.
The indicator lamp in the button lights up
when the air conditioning system is operating
automatically.
The intensity of the automatic air conditioning
is modulated by choosing one of the following
settings:
–
AUT
O SOFT : provides soft and quiet
operation by limiting air flow.
–
AUT
O NORMAL: offers the best compromise
between a comfortable temperature and quiet
operation (default setting).
–
AUT
O FAST: provides dynamic and efficient
air distribution.
To change the AUTO mode, press button
5-AUTO successively.
To ensure passenger comfort in the rear seats,
favour settings AUTO NORMAL and AUTO
FAST.
In cold weather with the engine cold, the
air flow is increased gradually until the
comfort setting has been reached, in order to
limit the delivery of cold air into the passenger
compartment.
On entering the vehicle, if the interior
temperature is much colder or warmer than
the comfort setting requested, there is no
need to alter the value displayed to more
quickly reach the required level of comfort.
The system automatically corrects the
temperature difference as quickly as possible.
Page 76 of 244

74
Lighting and visibility
Screenwash fluid is sprayed along the length
of the wiper blade. This improves visibility and
reduces screenwash fluid consumption.
With automatic air conditioning, any
action on the screenwash control results
in temporary closure of the air intake to
protect the passenger compartment from any
odour.
To avoid damaging the wiper blades, do not operate the screenwash if the
screenwash reservoir is empty.
Only operate the screenwash if there is no
risk of the fluid freezing on the windscreen
and hindering visibility. During the winter
period, use "very cold climate" rated products.
Never top up with water.
Rear wiper (SW)
► Turn the ring to align the desired symbol with
the marking.
Off
Intermittent wiping
Screenwash-wipe
Reverse
When reverse gear is engaged, the rear wiper
will come into operation automatically if the front
windscreen wipers are operating.
It is configured in the Settings > Vehicle
touch screen application.
In the event of accumulation of snow or
hard frost or if a bicycle carrier is fitted to
a towing system, deactivate the automatic
rear wiper via the Settings
> Vehicle touch
screen application.
Rear screenwash
► Turn the ring as far as it will go and hold it in
position.
The screenwash and the wiper operate for as
long as the ring remains turned.
A final wiping cycle is performed when screen
washing ends.
Special position of the
windscreen wipers
This maintenance position is used while cleaning
or replacing the wiper blades. It can also be
useful, in wintry weather (ice, snow), to release
the wiper blades from the windscreen.
To maintain the effectiveness of the flat wiper blades, it is advisable to:
–
handle them with care.
–
clean them regularly using soapy water
.
–
avoid using them to hold cardboard on the
windscreen.
–
replace them at the first signs of wear
.
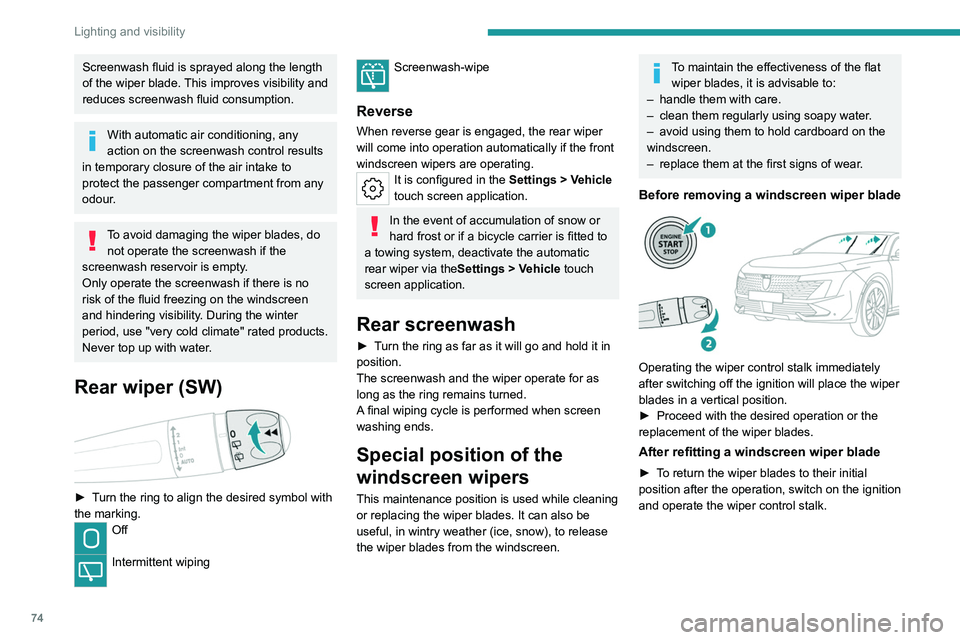
Before removing a windscreen wiper blade
Operating the wiper control stalk immediately
after switching off the ignition will place the wiper
blades in a vertical position.
►
Proceed with the desired operation or the
replacement of the wiper blades.
After refitting a windscreen wiper blade
► To return the wiper blades to their initial
position after the operation, switch on the ignition
and operate the wiper control stalk.
Page 144 of 244

142
Driving
conditions, such as entering a blind intersection
or manoeuvring in areas with reduced visibility.
Different contextual views are available for the
rear or for the front:
–
Automatic zoom view
.
–
Standard view
.
–
Panoramic view
.
Depending on the context, the system chooses
the best view to display (standard or automatic
zoom).
The view type can be changed at any time
during the manoeuvre.
The system status is not saved when the ignition
is switched off.
Operating principle
Reconstructed view
The cameras are activated and a reconstruction
of a view from above your vehicle in its close
surroundings is displayed on the touch screen.
Live view
The front and rear views automatically appear in
the view from above the vehicle.
It is also possible to display any live view by
selecting the corresponding zone.
The front view can be selected in forward gear
up to 10 mph (16 km/h).
Installing the very cold climate screen
can alter the image transmitted by the
front camera.
Settings
In the side menu:This window allows to carry out the following operations:
–
adjust the volume of the audible signal.
–
adjust the brightness.
–
adjust the contrast.
–
trig the camera washing (depending on
equipment).
This button allows to mute/unmute the audible signal.
Activation/Deactivation
Automatic
With the rear camera, engine running and
vehicle stationary, rear vision is displayed
automatically if reverse gear is engaged.
With the front camera, engine running and speed
below 10 mph (16 km/h), rear vision is displayed
automatically if a gear is engaged.
Manual
► In the ADAS touch screen application,
select Functions>Panoramic Camera
The system is deactivated: –
automatically for the rear
, when changing out
of reverse gear.
–
automatically for the front, above
approximately 10 mph (16 km/h).
–
by pressing the cross in the top left-hand
corner of the touch screen.
Automatic zoom view
The front or rear camera records the
surroundings during the manoeuvre to create
a front or rear view from above the vehicle in
its close surroundings, making it possible to
manoeuvre the vehicle around the surrounding
obstacles.
Using the sensors located on the front or rear
bumper, the automatic zoom view is displayed
when approaching an obstacle at the red line
(less than 30 cm) during the manoeuvre.
This view is only available automatically.
Depending on version, it can be activated/
deactivated in the ADAS application of the touch
screen.