Page 182 of 644
UNDER FRONT SEAT STORAGE BIN
(if so equipped)
To access the storage bin, lif t the center of
the front bench seat toward the front of the
vehicle.
CAUTION
• To avoid damaging the tray under
the seat, cargo in the tray should not
exceed 20 lbs. (9.08 kg).
• The cushion storage bin should not
be used while driving so full attention
may be given to vehicle operation.
OVERHEAD SUNGLASSES
STORAGE (if so equipped)
To open the sunglasses holder, push and
release.
Only store one pair of sunglasses in the
holder.
WARNING
Keep the sunglasses holder closed
while driving to avoid obstructing the
driver’s view and to help prevent an
accident.
LIC3437
Bench seat (center)
LIC3387
2-78Instruments and controls
Page 186 of 644
GROCERY HOOKS (if so equipped)
The grocery hooks allow for standard size
plastic grocery bags to hang side by side.
To access the grocery hooks, fold up the
rear bench seat. For additional information,
see “Folding the rear bench seat up” (P. 1-8).
CAUTION
Do not apply a total load of more than
18 lbs. (8 kg) to a single grocery hook.
BED LINER STORAGE BINS (if so
equipped)
To open the bed liner storage bins on the
top of the wheel wells, unlock the bin and
lif t the lid toward the inside of the truck bed.
To close, replace the lid and lock the bin. To open the bed liner storage bins on the
tail gate end of the bed liner, lif t the tab
away from the truck bed, pull the lid up and
away from the truck.
LIC3389LIC3449LIC3450
2-82Instruments and controls
Page 192 of 644
•Do not place objects through the
opened rear window. Do not use the
rear window as a cargo area pass-
through. This may result in damage
to the rear window system, or per-
sonal injury.
Squeeze the handles of the lever
O1, then
slide the window open
O2.
POWER MOONROOF
The front moonroof is a power moonroof,
the rear moonroof is fixed glass. The power
moonroof will only operate when the igni-
tion switch is placed in the ON position. The
moonroof is operational for a period of
time, even if the ignition switch is placed in
the OFF position. If the driver's door or the
front passenger's door is opened during
this period of time, the power to the moon-
roof is canceled.
Sliding the moonroof
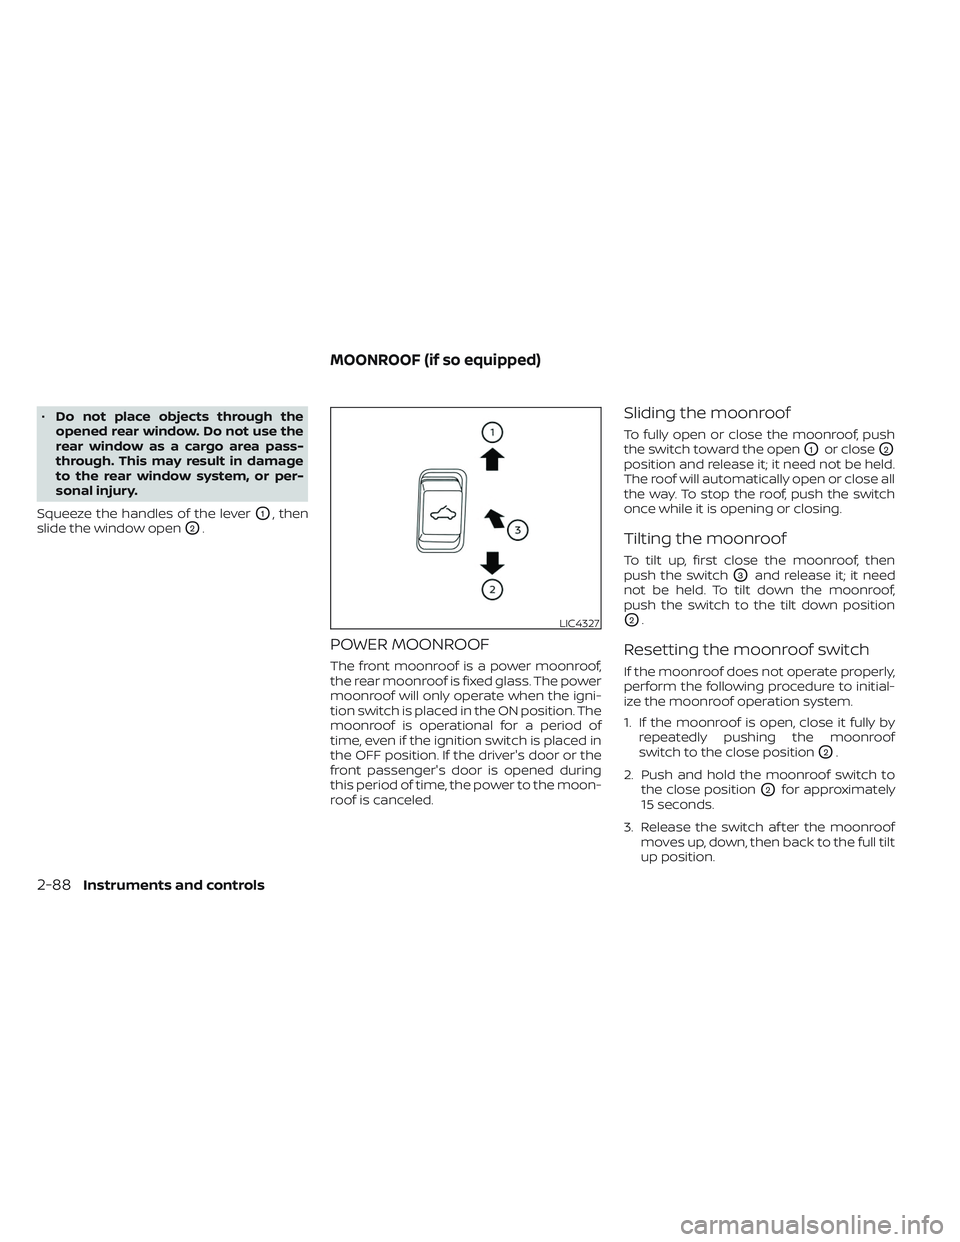
To fully open or close the moonroof, push
the switch toward the open
O1or closeO2
position and release it; it need not be held.
The roof will automatically open or close all
the way. To stop the roof, push the switch
once while it is opening or closing.
Tilting the moonroof
To tilt up, first close the moonroof, then
push the switch
O3and release it; it need
not be held. To tilt down the moonroof,
push the switch to the tilt down position
O2.
Resetting the moonroof switch
If the moonroof does not operate properly,
perform the following procedure to initial-
ize the moonroof operation system.
1. If the moonroof is open, close it fully by repeatedly pushing the moonroof
switch to the close position
O2.
2. Push and hold the moonroof switch to the close position
O2for approximately
15 seconds.
3. Release the switch af ter the moonroof moves up, down, then back to the full tilt
up position.
LIC4327
MOONROOF (if so equipped)
2-88Instruments and controls
Page 194 of 644
Sunshade
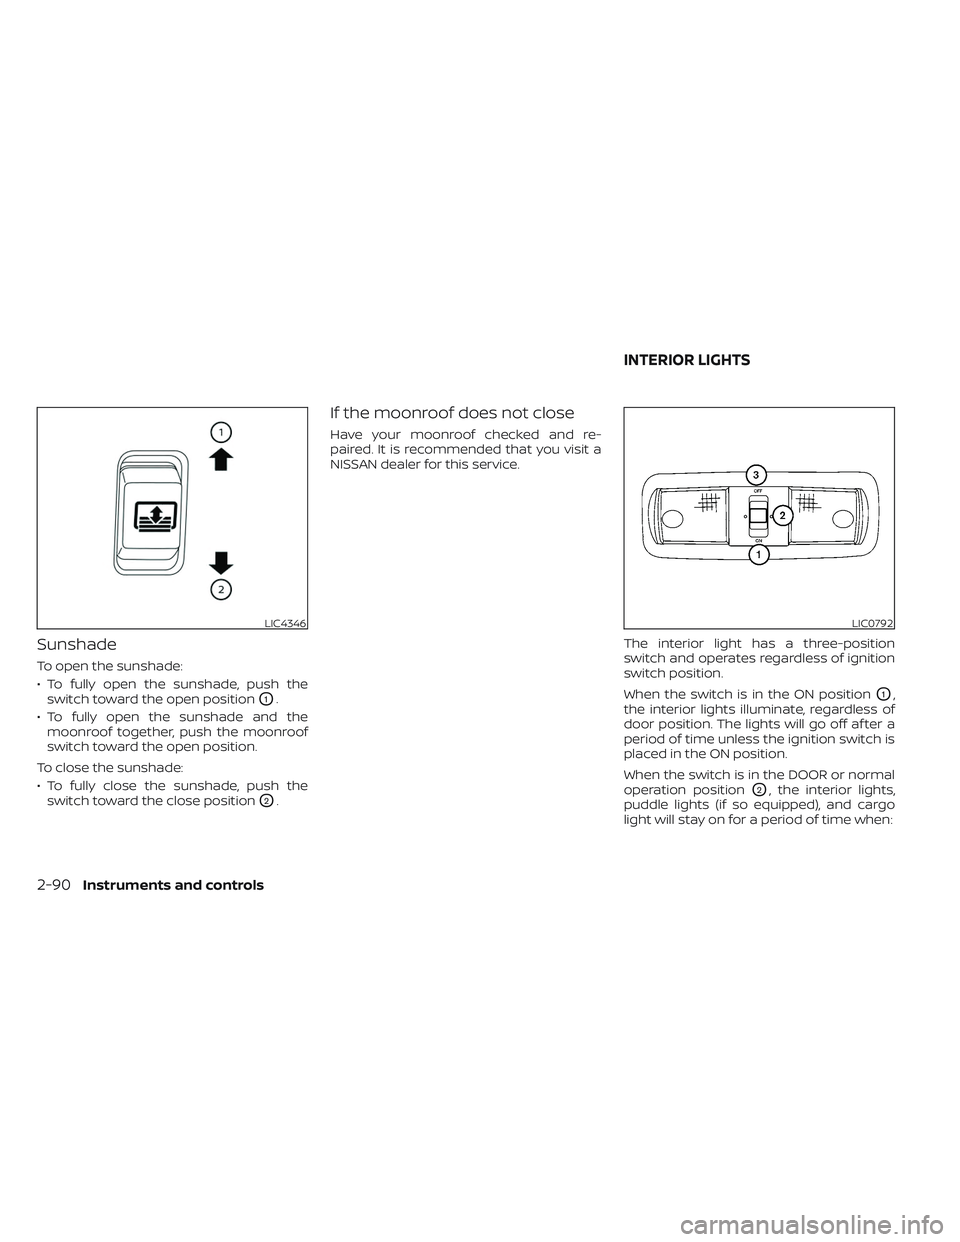
To open the sunshade:
• To fully open the sunshade, push theswitch toward the open position
O1.
• To fully open the sunshade and the moonroof together, push the moonroof
switch toward the open position.
To close the sunshade:
• To fully close the sunshade, push the switch toward the close position
O2.
If the moonroof does not close
Have your moonroof checked and re-
paired. It is recommended that you visit a
NISSAN dealer for this service.
The interior light has a three-position
switch and operates regardless of ignition
switch position.
When the switch is in the ON position
O1,
the interior lights illuminate, regardless of
door position. The lights will go off af ter a
period of time unless the ignition switch is
placed in the ON position.
When the switch is in the DOOR or normal
operation position
O2, the interior lights,
puddle lights (if so equipped), and cargo
light will stay on for a period of time when:
LIC4346LIC0792
INTERIOR LIGHTS
2-90Instruments and controls
Page 211 of 644
•To help avoid risk of injury or death
through unintended operation of the
vehicle and/or its systems, including
entrapment in windows or inadver-
tent door lock activation, do not
leave children, people who require
the assistance of others or pets unat-
tended in your vehicle. Additionally,
the temperature inside a closed ve-
hicle on a warm day can quickly be-
come high enough to cause a signifi-
cant risk of injury or death to people
and pets.
LOCKING WITH KEY
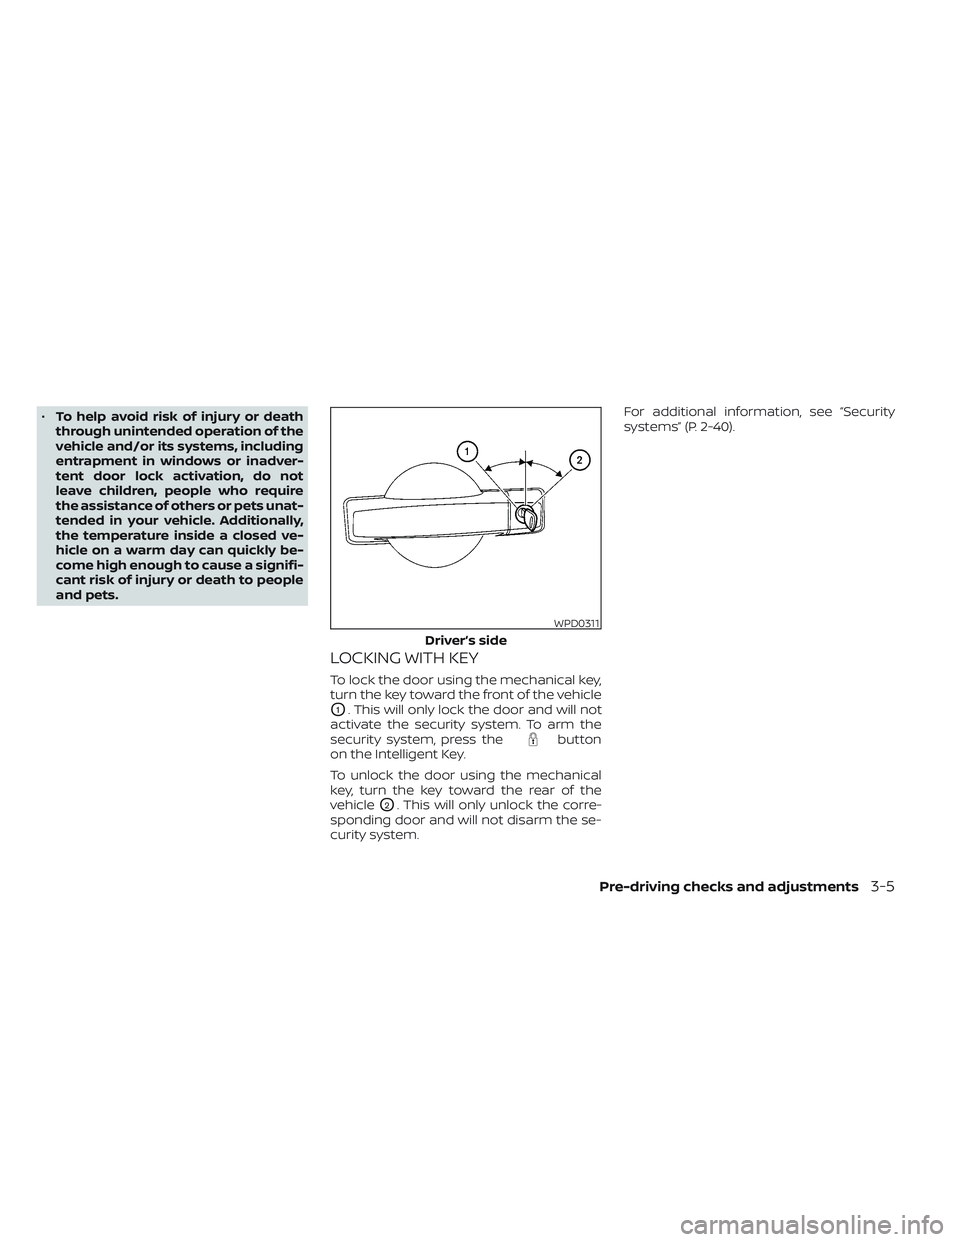
To lock the door using the mechanical key,
turn the key toward the front of the vehicle
O1. This will only lock the door and will not
activate the security system. To arm the
security system, press the
button
on the Intelligent Key.
To unlock the door using the mechanical
key, turn the key toward the rear of the
vehicle
O2. This will only unlock the corre-
sponding door and will not disarm the se-
curity system. For additional information, see “Security
systems” (P. 2-40).
WPD0311
Driver’s side
Pre-driving checks and adjustments3-5
Page 213 of 644
REAR DOORS (King Cab® models)
1. Open the driver’s or passenger’s door.2. From the outside, pull the door handleOAtoward you.
3. Open the door to the desired position.
LPD0278LPD2591LPD2592
Pre-driving checks and adjustments3-7
Page 216 of 644
CAUTION
Be sure to carry the Intelligent Key with
you when operating the vehicle.
The Intelligent Key is capable of receiving
and transmitting radio waves. The Intelli-
gent Key system transmits weak radio
waves from various distances. Environ-
mental conditions may interfere with the
operation of the Intelligent Key system un-
der the following operating conditions:
• When operating near a location where strong radio waves are transmitted, such
as a TV tower, power station and broad-
casting station.
• When in possession of wireless equip- ment, such as a cellular telephone, trans-
ceiver, or a CB radio.
• When the Intelligent Key is in contact with or covered by metallic materials.
• When any type of radio wave remote con- trol is used nearby.
• When the Intelligent Key is placed near an electric appliance such as a personal
computer.
• When the vehicle is parked near a parking meter. In such cases, correct the operating condi-
tions before using the Intelligent Key func-
tion or use the mechanical key.
Although the life of the battery varies de-
pending on the operating conditions, the
battery’s life is approximately two years. If
the battery is discharged, replace it with a
new one.
When the Intelligent Key battery is low the
“Key ID Incorrect” warning appears in the
vehicle information display. When the Intel-
ligent Key battery is low the “Key Battery
Low” indicator appears. For additional in-
formation, see “Vehicle information display
warnings and indicators” (P. 2-33).
Since the Intelligent Key is capable of re-
ceiving radio waves, if the key is lef t near
equipment which transmits strong radio
waves, such as signals from a TV and per-
sonal computer, the battery life may be-
come shorter.
For additional information, see “Battery re-
placement” (P. 8-28).
As many as four Intelligent Keys can be
registered and used with one vehicle. For
information about the purchase and use of
additional Intelligent Keys, it is recom-
mended that you visit a NISSAN dealer.
3-10Pre-driving checks and adjustments
Page 224 of 644
To activate the trailer light check function
with your Intelligent Key, perform the
following:
1. Aim the Intelligent Key at the vehicle.
2. Press and release the
LOCK
button.
3. Within 2 seconds, press and hold the
LOCK button again for at least 2
seconds, until the horn beeps once and
the park lights turn on.
The following events will occur:
• The lef t turn signal light on the vehicle and the trailer will flash for 5 seconds.
• The right turn signal light on the vehicle and the trailer will flash for 5 seconds.
• The brake lights on the vehicle and the trailer will turn ON for 5 seconds.
NOTE:
If the ignition switch is in the OFF po-
sition, the park lights will turn off af ter
the events above occur. If ignition
switch is in the ON position, lights will
stay on for 45 seconds af ter trailer
light check. If the trailer lights do not
work properly, check the connections
and bulbs. If the vehicle lights do not
turn on, check the bulbs. If the trailer
light check routine fails to start, en-
sure the following vehicle conditions:
• The vehicle is NOT moving, 0 mph (0 km/h)
• Brake switch is NOT depressed
• Lef t or right flasher is OFF
• Trailer light check configuration is NOT disabled and available in the meter
towing settings
• The hazard switch is NOT turned ON
• The shif t position is fully in P (Park) position
• Vehicle is within Remote Keyless Entry range
Answer back horn feature
If desired, the horn beep feature can be
deactivated using the Intelligent Key.
To deactivate: Press and hold the
andbuttonsfor at least 2 seconds.
The hazard warning lights will flash three
times to confirm that the horn beep fea-
ture has been deactivated.
To activate: Press and hold the
andbuttonsfor at least 2 seconds once
more.
The hazard warning lights will flash once
and the horn will sound once to confirm
that the horn beep feature has been
reactivated.
Deactivating the horn beep feature does
not silence the horn if the alarm is
triggered.
3-18Pre-driving checks and adjustments