Page 427 of 644
WARNING
Listed below are the system limitations
for the I-FCW system. Failure to operate
the vehicle in accordance with these
system limitations could result in seri-
ous injury or death.
• The I-FCW system cannot detect all
vehicles under all conditions. •
The radar sensor does not detect the
following objects:
– Pedestrians, animals or obstacles
in the roadway
– Oncoming vehicles
– Crossing vehicles
• (Illustration A) The I-FCW system
does not function when a vehicle
ahead is a narrow vehicle, such as a
motorcycle. •
The radar sensor may not detect a
vehicle ahead in the following
conditions:
– Snow or heavy rain
– When you are towing a trailer etc.
– Dirt, ice, snow or other material
covering the radar sensor.
– Interference by other radar
sources.
– Snow or road spray from traveling
vehicles.
– Driving in a tunnel
LSD2265
Illustration B
Starting and driving5-93
Page 428 of 644
–(Illustration B) When the vehicle
ahead is being towed.
– (Illustration C) When the distance
to the vehicle ahead is too close,
the beam of the radar sensor is
obstructed.
– (Illustration D) When driving on a
steep downhill slope or roads with
sharp curves.
• The system is designed to automati-
cally check the sensor’s functionality,
within certain limitations. The sys-
tem may not detect some forms of
obstruction of the sensor area such
as ice, snow, stickers, etc. In these
cases, the system may not be able to
warn the driver properly. Be sure that
you check, clean and clear the sensor
area regularly.
• Excessive noise will interfere with the
warning chime sound, and the chime
may not be heard.
5-94Starting and driving
Page 437 of 644

–If you have adopted a sporty driv-
ing style with higher cornering
speeds or higher rates of
acceleration.
– Frequent lane changes or
changes to vehicle speed.
• The I–DA system will not provide an
alert in the following conditions:
– Vehicle speeds lower than 37 mph
(60 km/h).
– Short lapses of attention.
– Instantaneous distractions such
as dropping an object.
System malfunction
If the Intelligent Driver Alertness system
malfunctions, the system warning mes-
sage will appear in the vehicle information
display and the function will be stopped
automatically.
Action to take
Stop the vehicle in a safe location, place the
vehicle in P (Park) position, turn the engine off
and restart the engine. If the system warning
message continues to appear, have the sys-
tem checked. It is recommended that you
visit a NISSAN dealer for this service.
CAUTION
During the first 1,200 miles (2,000 km),
follow these recommendations to ob-
tain maximum engine performance
and ensure the future reliability and
economy of your new vehicle. Failure to
follow these recommendations may
result in shortened engine life and re-
duced engine performance.
• Avoid driving for long periods at constant speed, either fast or slow, and do not run
the engine over 4,000 rpm.
• Do not accelerate at full throttle in any gear.
• Avoid quick starts.
• Avoid hard braking as much as possible.
• Do not tow a trailer for the first 500 miles (805 kilometers). Your engine, axle or
other parts could be damaged.
LIC3125
BREAK-IN SCHEDULE
Starting and driving5-103
Page 447 of 644

•Do not leave children unattended in-
side the vehicle. They could unknow-
ingly activate switches or controls or
make the vehicle move. Unattended
children could become involved in
serious accidents.
• To help avoid risk of injury or death
through unintended operation of the
vehicle and/or its systems, do not
leave children, people who require
the assistance of others or pets unat-
tended in your vehicle. Additionally,
the temperature inside a closed ve-
hicle on a warm day can quickly be-
come high enough to cause a signifi-
cant risk of injury or death to people
and pets. 1. Firmly apply the parking brake.
2. Move the shif t lever to the P (Park)
position.
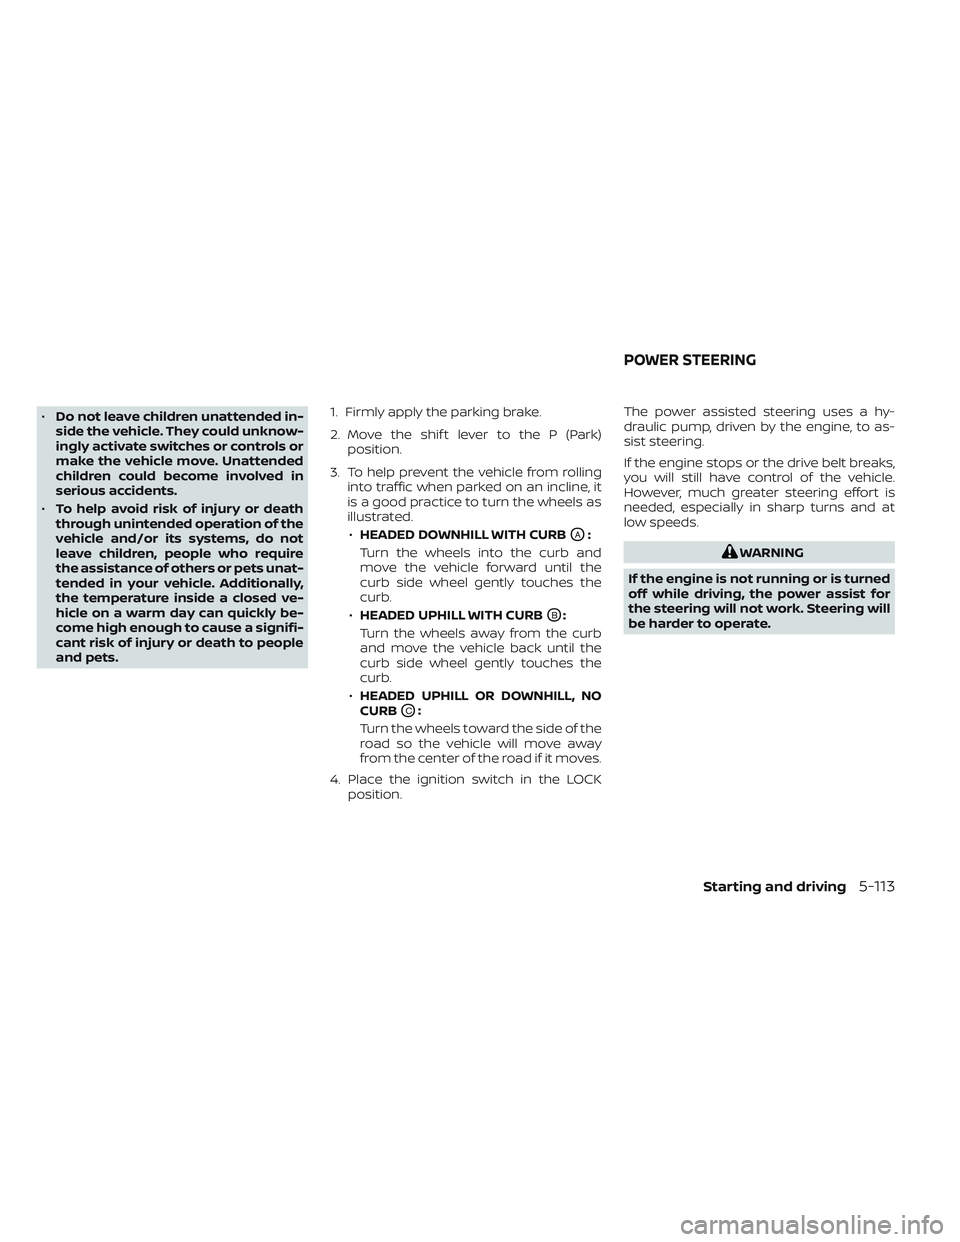
3. To help prevent the vehicle from rolling into traffic when parked on an incline, it
is a good practice to turn the wheels as
illustrated.
• HEADED DOWNHILL WITH CURB
OA:
Turn the wheels into the curb and
move the vehicle forward until the
curb side wheel gently touches the
curb.
• HEADED UPHILL WITH CURB
OB:
Turn the wheels away from the curb
and move the vehicle back until the
curb side wheel gently touches the
curb.
• HEADED UPHILL OR DOWNHILL, NO
CURB
OC:
Turn the wheels toward the side of the
road so the vehicle will move away
from the center of the road if it moves.
4. Place the ignition switch in the LOCK position. The power assisted steering uses a hy-
draulic pump, driven by the engine, to as-
sist steering.
If the engine stops or the drive belt breaks,
you will still have control of the vehicle.
However, much greater steering effort is
needed, especially in sharp turns and at
low speeds.
WARNING
If the engine is not running or is turned
off while driving, the power assist for
the steering will not work. Steering will
be harder to operate.
POWER STEERING
Starting and driving5-113
Page 463 of 644
6 In case of emergency
Hazard warning flasher switch..................6-2
Emergency engine shut off ......................6-2
Flat tire ..........................................6-3
Tire Pressure Monitoring System
(TPMS) .......................................6-3
Changing a flat tire ...........................6-3
Jump starting .................................. 6-10Push starting
................................... 6-12
If your vehicle overheats ........................6-12
Towing your vehicle ............................ 6-13
Towing recommended by NISSAN ...........6-13
Vehicle recovery (freeing a stuck
vehicle) ...................................... 6-15
Page 467 of 644

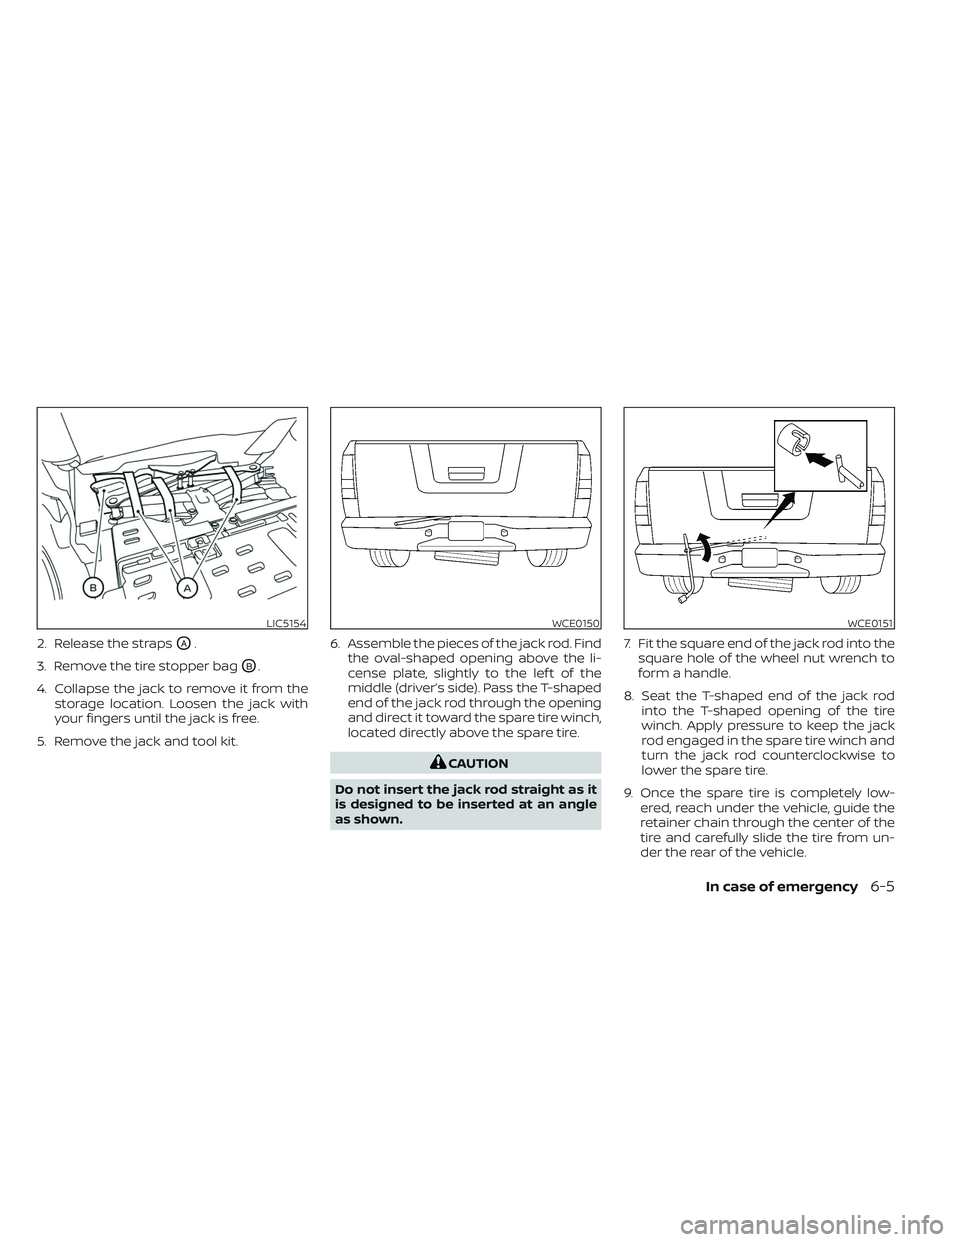
2. Release the strapsOA.
3. Remove the tire stopper bag
OB.
4. Collapse the jack to remove it from the storage location. Loosen the jack with
your fingers until the jack is free.
5. Remove the jack and tool kit. 6. Assemble the pieces of the jack rod. Find
the oval-shaped opening above the li-
cense plate, slightly to the lef t of the
middle (driver’s side). Pass the T-shaped
end of the jack rod through the opening
and direct it toward the spare tire winch,
located directly above the spare tire.
CAUTION
Do not insert the jack rod straight as it
is designed to be inserted at an angle
as shown. 7. Fit the square end of the jack rod into the
square hole of the wheel nut wrench to
form a handle.
8. Seat the T-shaped end of the jack rod into the T-shaped opening of the tire
winch. Apply pressure to keep the jack
rod engaged in the spare tire winch and
turn the jack rod counterclockwise to
lower the spare tire.
9. Once the spare tire is completely low- ered, reach under the vehicle, guide the
retainer chain through the center of the
tire and carefully slide the tire from un-
der the rear of the vehicle.
LIC5154WCE0150WCE0151
In case of emergency6-5
Page 468 of 644

10. Securely store the flat tire beneath thevehicle, from where the full size spare
was removed. To reinstall the wheel, re-
move the center cap (if so equipped)
and insert the retainer chain through
the wheel. Be sure the rubber rim cover
(if so equipped) is centered on the
wheel before lif ting. Use the assembled
jacking rod to slowly rotate the winch
clockwise to raise the wheel to the
vehicle.
11. To reinstall the jack and tool kit, reverse steps 1 through 5.
NOTE:
Inspect the rubber rim cover every six
years and replace as necessary. It is rec-
ommended that you visit a NISSAN
dealer for this service.
CAUTION
• Be sure to center the spare tire sus-
pending plate on the wheel and then
lif t the spare tire.
• Failure to use the rubber rim cover
may allow the chain to get stuck in
the wheel nut holes when stowed.
Removing bolt-on wheel caps (if
so equipped)
CAUTION
Do not use your hands to pry off wheel
caps or wheel covers. Doing so could
result in personal injury.
The wheel cap
O1is only attached with the
wheel nuts and is separate from the wheel
O2. To remove the wheel cap, remove the
wheel nuts af ter the jack is securely sup-
porting the vehicle and the tire clears the
ground.
For additional information, see “Jacking up
vehicle and removing the damaged tire”
(P. 6-6).
Take care not to scratch the wheel cap or
wheel surface.
Jacking up vehicle and removing
the damaged tire (all models)
WARNING
• Never get under the vehicle while it is
supported only by the jack. If it is nec-
essary to work under the vehicle,
support it with safety stands.
• Use only the jack provided with your
vehicle to lif t the vehicle. Do not use
the jack provided with your vehicle
on other vehicles. The jack is de-
signed for lif ting only your vehicle
during a tire change.
• Use the correct jack-up points. Never
use any other part of the vehicle for
jack support.
• Never jack up the vehicle more than
necessary.LCE2367
6-6In case of emergency
Page 474 of 644

Do not attempt to start the engine by
pushing.
CAUTION
• Automatic transmission models can-
not be push-started or tow-started.
Attempting to do so may cause
transmission damage.
• Three way catalyst equipped models
should not be started by pushing
since the three way catalyst may be
damaged.
• Never try to start the vehicle by tow-
ing it; when the engine starts, the for-
ward surge could cause the vehicle to
collide with the tow vehicle.
WARNING
• Do not continue to drive if your ve-
hicle overheats. Doing so could cause
engine damage or a vehicle fire.
• To avoid the danger of being scalded,
never remove the radiator or coolant
reservoir cap while the engine is still
hot. When the radiator or coolant res-
ervoir cap is removed, pressurized
hot water will spurt out, possibly
causing serious injury.
• Do not open the hood if steam is
coming out.
If your vehicle is overheating (indicated by
an extremely high temperature gauge
reading), or if you feel a lack of engine
power, detect abnormal noise, etc. take the
following steps:
1. Move the vehicle safely off the road, ap- ply the parking brake and move the shif t
lever to P (Park).
Do not stop the engine.
2. Turn off the air conditioner. Open all the windows, move the heater or air condi-
tioner temperature control to maximum
hot and fan control to high speed. 3. If engine overheating is caused by
climbing a long hill on a hot day, run the
engine at a fast idle (approximately 1,500
rpm) until the temperature gauge indi-
cation returns to normal.
4. Get out of the vehicle. Look and listen for steam or coolant escaping from the ra-
diator before opening the hood. If steam
or coolant is escaping, turn off the en-
gine. Do not open the hood further until
no steam or coolant can be seen.
5. Open the engine hood.
WARNING
If steam or water is coming from the
engine, stand clear to prevent getting
burned.
6. Visually check drive belts for damage or looseness. Also check if the cooling fan
is running. The radiator hoses and radia-
tor should not leak water. If coolant is
leaking, the water pump belt is missing
or loose, or the cooling fan does not run,
stop the engine.
PUSH STARTING IF YOUR VEHICLE OVERHEATS
6-12In case of emergency