2023 NISSAN ALTIMA ignition
[x] Cancel search: ignitionPage 191 of 644
NOTE:
The Selective Unlock feature can be
changed using the “Vehicle Settings”
menu on the vehicle information display.
For additional information, see “Vehicle
information display - 5 inch (13 cm) Type
A (if so equipped)” (P. 2-18) or “Vehicle
information display - 7 inch (18 cm) Type
B (if so equipped)” (P. 2-34).
All doors will be locked automatically un-
less one of the following operations is per-
formed within 1 minute af ter pressing the
button:
• Opening any doors.
• Pushing the ignition switch.
Using the interior lights
The interior lights illuminate for a period of
time when a door is unlocked.
The lights can be turned off without waiting
by performing one of the following
operations:
• Placing the ignition switch in the ON position.
• Locking the doors with the Intelligent Key.
• Switching the interior light switch to the OFF position. • Switching the Auto Room Lamp feature
to the OFF position in the “Vehicle Set-
tings” menu on the vehicle information
display. For additional information, see
“Vehicle information display - 5 inch (13
cm) Type A (if so equipped)” (P. 2-18) or
“Vehicle information display - 7 inch (18
cm) Type B (if so equipped)” (P. 2-34).
For additional information, see “Interior
lights” (P. 2-79).
Releasing the trunk lid
Press thebutton for longer than 0.5
seconds to open the trunk lid. The trunk
release button will not operate when the
ignition switch is placed in the ON position.
Using the panic alarm
If you are near your vehicle and feel threat-
ened, you may activate the panic alarm to
call attention by pressing and holding the
button on the Intelligent Key for lon-
ger than 0.5 seconds.
The panic alarm and headlights will stay on
for a period of time.
The panic alarm stops when:
• It has run for a period of time, or • Any button is pressed on the Intelligent
Key.
• The request switch on the driver or pas- senger door is pushed and the Intelligent
Key is in range of the door handle.
Answer back horn feature
If desired, the answer back horn feature
can be deactivated using the Intelligent
Key. When it is deactivated and the
button is pressed, the hazard indicator
lights flash twice. When thebutton is
pressed, neither the hazard indicator lights
nor the horn operates.
NOTE:
If you can change the Answer Back Horn
feature with the Intelligent Key, the ve-
hicle information display screen will
show the current mode af ter the ignition
switch has been cycled from the OFF to
the ON position. The vehicle information
display screen can also be used to
change the answer back horn mode.
For additional information, see “Vehicle
information display - 5 inch (13 cm) Type
A (if so equipped)” (P. 2-18 or “Vehicle in-
formation display - 7 inch (18 cm) Type B
(if so equipped)” (P. 2-34).
Pre-driving checks and adjustments3-15
Page 193 of 644
SymptomPossible CauseRemedy
When stopping the engine The “Shif t to Park” warning appears in
the display and the inside warning
chime sounds continuously. The shif t lever is not in the P (Park) po-
sition.
Move the shif t lever to the P (Park) po-
sition.
When opening the driver's door to get
out of the vehicle The “Door/Trunk Open” warning ap-
pears in the display. The ignition switch is in the ACC posi-
tion.Place the ignition switch in the OFF
position.
When closing the door af ter getting
out of the vehicle The “No Key Detected” warning ap-
pears in the display, the outside chime
sounds three times and the inside
warning chime sounds for approxi-
mately 3 seconds.
The ignition switch is in the ACC or ON
position.
Place the ignition switch in the OFF
position.
The “Shif t to Park” warning appears in
the display. The ignition switch is in the ACC posi-
tion and the shif t lever is not in the P
(Park) position.Move the shif t lever to the P (Park) po-
sition and place the ignition switch in
the OFF position.
The Rear Door Alert warning message
appears on the display, the horn
sounds three times twice, or a Check
Rear Seat for All Articles warning ap-
pears on the display. The Rear Door Alert is activated.
Check the back seat for all articles,
press the OK button to clear the Rear
Door Alert warning message.
When closing the door with the inside
lock knob turned to LOCK The outside chime sounds for approxi-
mately 3 seconds and all the doors
unlock.
The Intelligent Key is inside the vehicle. Carry the Intelligent Key with you.
When pushing the door handle re-
quest switch or the
button on
the Intelligent Key to lock the door The outside chime sounds for approxi-
mately 2 seconds.
The Intelligent Key is inside the vehicle. Carry the Intelligent Key with you.
Pre-driving checks and adjustments3-17
Page 194 of 644
SymptomPossible CauseRemedy
When pushing the ignition switch to
start the engine The “Key Battery Low” indicator ap-
pears in the display.
The battery charge is low.Replace the battery with a new one.
For additional information, see “Battery
replacement” (P. 8-23).
The “Key ID Incorrect” warning appears
in the display, the outside chime
sounds three times and the inside
warning chime sounds for approxi-
mately 3 seconds. The Intelligent Key is not in the vehicle. Carry the Intelligent Key with you.
When pressing the ignition switch The “Key System Error: See Owner’s
Manual” warning appears on the dis-
play. It warns of a malfunction with the Intel-
ligent Key system.
It is recommended that you visit a
NISSAN dealer.
3-18Pre-driving checks and adjustments
Page 196 of 644
CAUTION
When the Intelligent Key battery is dis-
charged or other strong radio wave
sources are present near the operating
location, the Intelligent Key operating
range becomes narrower, and the Intel-
ligent Key may not function properly.
The Remote Engine Start function can only
be used when the Intelligent Key is within
the specified operating range from the
vehicle.
The Remote Engine Start operating range
is approximately 197 f t (60 m) from the
vehicle.
REMOTE STARTING THE VEHICLE
To use the Remote Engine Start feature to
start the engine perform the following:
1. Aim the Intelligent Key at the vehicle.
2. Press the
button to lock all doors.
3. Within 5 seconds press and hold the
button until the turn signal lights
flash and the tail lamps turn on. If the
vehicle is not within view press and hold
the
button for at least 2 seconds. The following events will occur when the
engine starts:
• The parking lights will turn on and remain
on as long as the engine is running.
• The doors will be locked and the climate control system may come on.
• The engine will continue to run for 10 min- utes. Repeat the steps to extend the time
for an additional 10 minutes. For addi-
tional information, see “Extending engine
run time” (P. 3-20).
Depress and hold the brake then push the
push-button ignition switch to the ON po-
sition before driving. For additional infor-
mation, see “Driving the vehicle” (P. 5-18).
EXTENDING ENGINE RUN TIME
The Remote Engine Start feature can be
extended one time by performing the
steps listed in “Remote starting the vehicle”
in this section. Run time will be calculated
as follows:
• The first 10 minute run time will start when the Remote Engine Start function is
performed. • The second 10 minutes will start immedi-
ately when the Remote Engine Start
function is performed again. For example,
if the engine has been running for 5 min-
utes, and 10 minutes are added, the en-
gine will run for a total of 15 minutes.
• Extending engine run time will count to- wards the two Remote Engine Start limit.
A maximum of two Remote Engine Starts,
or a single Remote Engine Start with an
extension, are allowed between ignition
cycles. The ignition switch must be cycled
to the ON position and then back to the
OFF position before the Remote Engine
Start procedure can be used again.
CANCELING A REMOTE ENGINE
START
To cancel a Remote Engine Start, perform
one of the following:
• Aim the Intelligent Key at the vehicle and press
until the parking lights turn off.
• Turn on the hazard warning flashers.
• Cycle the ignition switch ON and then OFF.
• The extended engine run time has expired.
• The first 10 minute timer has expired.
• The engine hood has been opened.
3-20Pre-driving checks and adjustments
Page 197 of 644
• The shif t lever is moved out of park.
• The alarm sounds due to illegal entry intothe vehicle.
• The ignition switch is pushed without an Intelligent Key in the vehicle.
• The ignition switch is pushed with an In- telligent Key in the vehicle but the brake
pedal is not depressed.
CONDITIONS THE REMOTE ENGINE
START WILL NOT WORK
The Remote Engine Start will not operate if
any of the following conditions are present:
• The ignition switch is placed in the ONposition.
• The hood is not securely closed.
• The hazard indicator lights are on.
• The engine is still running. The engine must be completely stopped. Wait at
least 6 seconds if the engine goes from
running to off. This is not applicable when
extending engine run time.
• The
button is not pressed and held
for at least 2 seconds. • The
button is not pressed and held
within 5 seconds of pressing the lock
button.
• The brake is pressed.
• The doors are not closed and locked.
• The trunk is open.
• The Key System Error remains solid in the vehicle information display.
• The alarm sounds due to illegal entry into the vehicle.
• Two Remote Engine Starts, or a single Remote Engine Start with an extension,
have already been used.
• The vehicle is not in P (Park).
• There is a detected registered key already inside of the vehicle.
• The Remote Engine Start feature has been switched to the OFF using the “Ve-
hicle Settings” menu on the vehicle infor-
mation display. For additional informa-
tion, see “Vehicle information display - 5
inch (13 cm) Type A (if so equipped)”
(P. 2-18) or “Vehicle information display - 7
inch (18 cm) Type B (if so equipped)”
(P. 2-34). The Remote Engine Start may display a
warning or indicator in the vehicle informa-
tion display. For additional information, see
“Vehicle information display - 5 inch (13 cm)
Type A (if so equipped)” (P. 2-18) or “Vehicle
information display - 7 inch (18 cm) Type B (if
so equipped)” (P. 2-34).
Pre-driving checks and adjustments3-21
Page 205 of 644
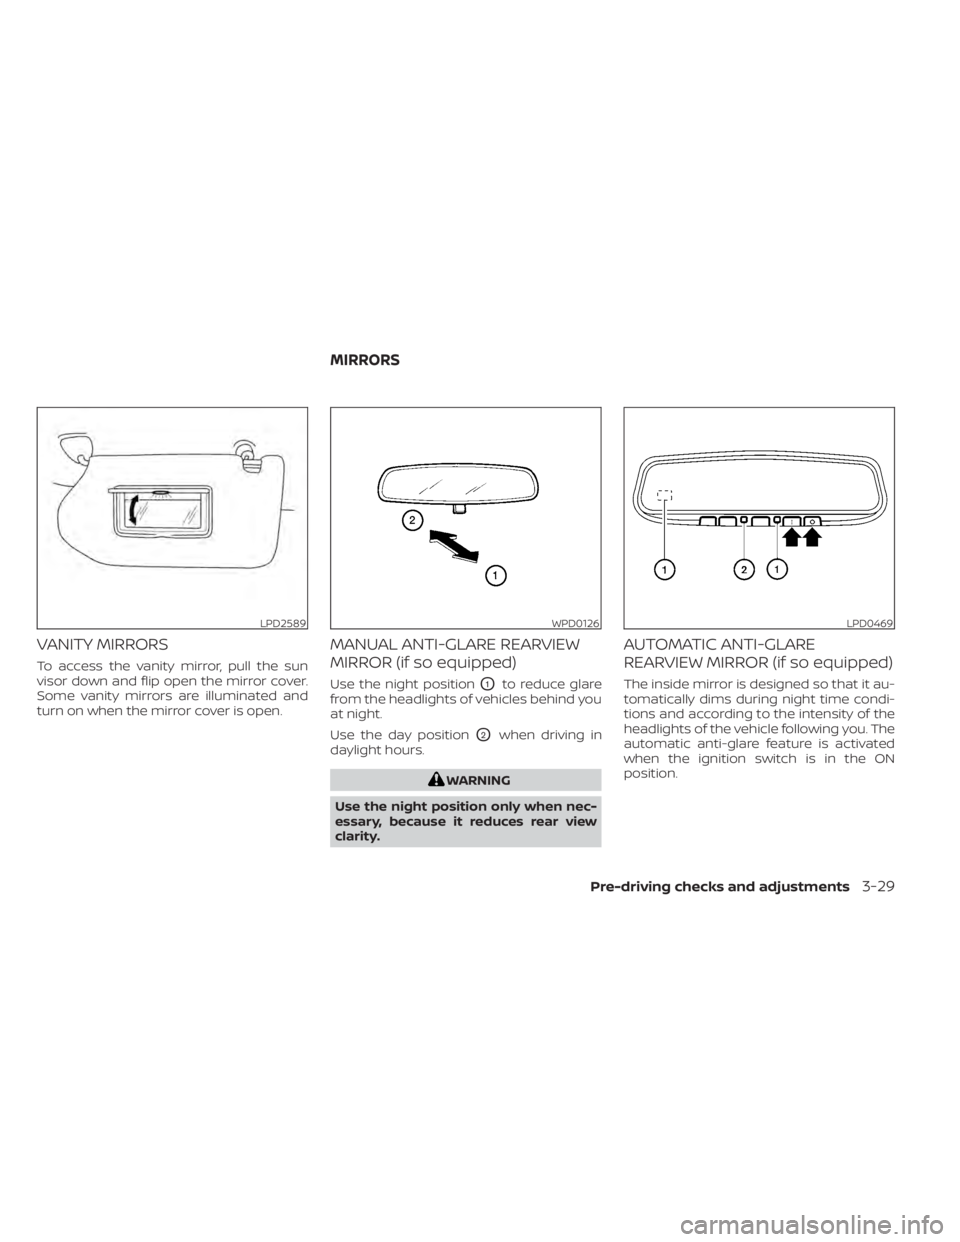
VANITY MIRRORS
To access the vanity mirror, pull the sun
visor down and flip open the mirror cover.
Some vanity mirrors are illuminated and
turn on when the mirror cover is open.
MANUAL ANTI-GLARE REARVIEW
MIRROR (if so equipped)
Use the night positionO1to reduce glare
from the headlights of vehicles behind you
at night.
Use the day position
O2when driving in
daylight hours.
WARNING
Use the night position only when nec-
essary, because it reduces rear view
clarity.
AUTOMATIC ANTI-GLARE
REARVIEW MIRROR (if so equipped)
The inside mirror is designed so that it au-
tomatically dims during night time condi-
tions and according to the intensity of the
headlights of the vehicle following you. The
automatic anti-glare feature is activated
when the ignition switch is in the ON
position.
LPD2589WPD0126LPD0469
MIRRORS
Pre-driving checks and adjustments3-29
Page 206 of 644
NOTE:
Do not hang any objects over the sen-
sors
O1or apply glass cleaner to the sen-
sors. Doing so will reduce the sensitivity
of the sensors, resulting in improper
operation.
The indicator light
O2will illuminate when
the automatic anti-glare feature is
operating.
• To turn off the anti-glare feature, press the O button. The indicator light will
turn off.
• To turn on the anti-glare feature, press the | button. The indicator light will turn
on.
For information on HomeLink® Universal
Transceiver operation, see the “HomeLink®
Universal Transceiver” (P. 2-81).
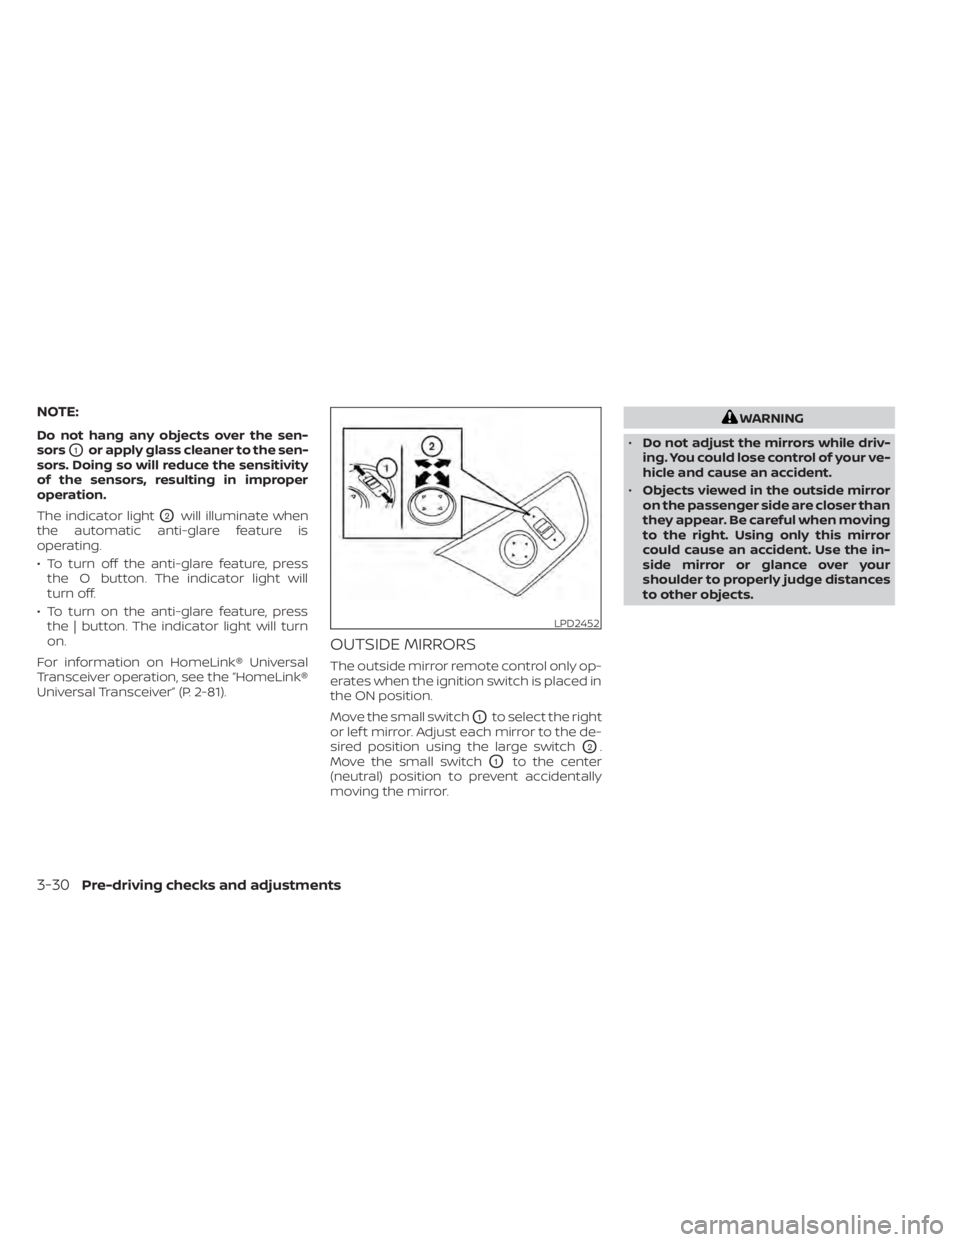
OUTSIDE MIRRORS
The outside mirror remote control only op-
erates when the ignition switch is placed in
the ON position.
Move the small switch
O1to select the right
or lef t mirror. Adjust each mirror to the de-
sired position using the large switch
O2.
Move the small switch
O1to the center
(neutral) position to prevent accidentally
moving the mirror.
WARNING
• Do not adjust the mirrors while driv-
ing. You could lose control of your ve-
hicle and cause an accident.
• Objects viewed in the outside mirror
on the passenger side are closer than
they appear. Be careful when moving
to the right. Using only this mirror
could cause an accident. Use the in-
side mirror or glance over your
shoulder to properly judge distances
to other objects.
LPD2452
3-30Pre-driving checks and adjustments
Page 207 of 644
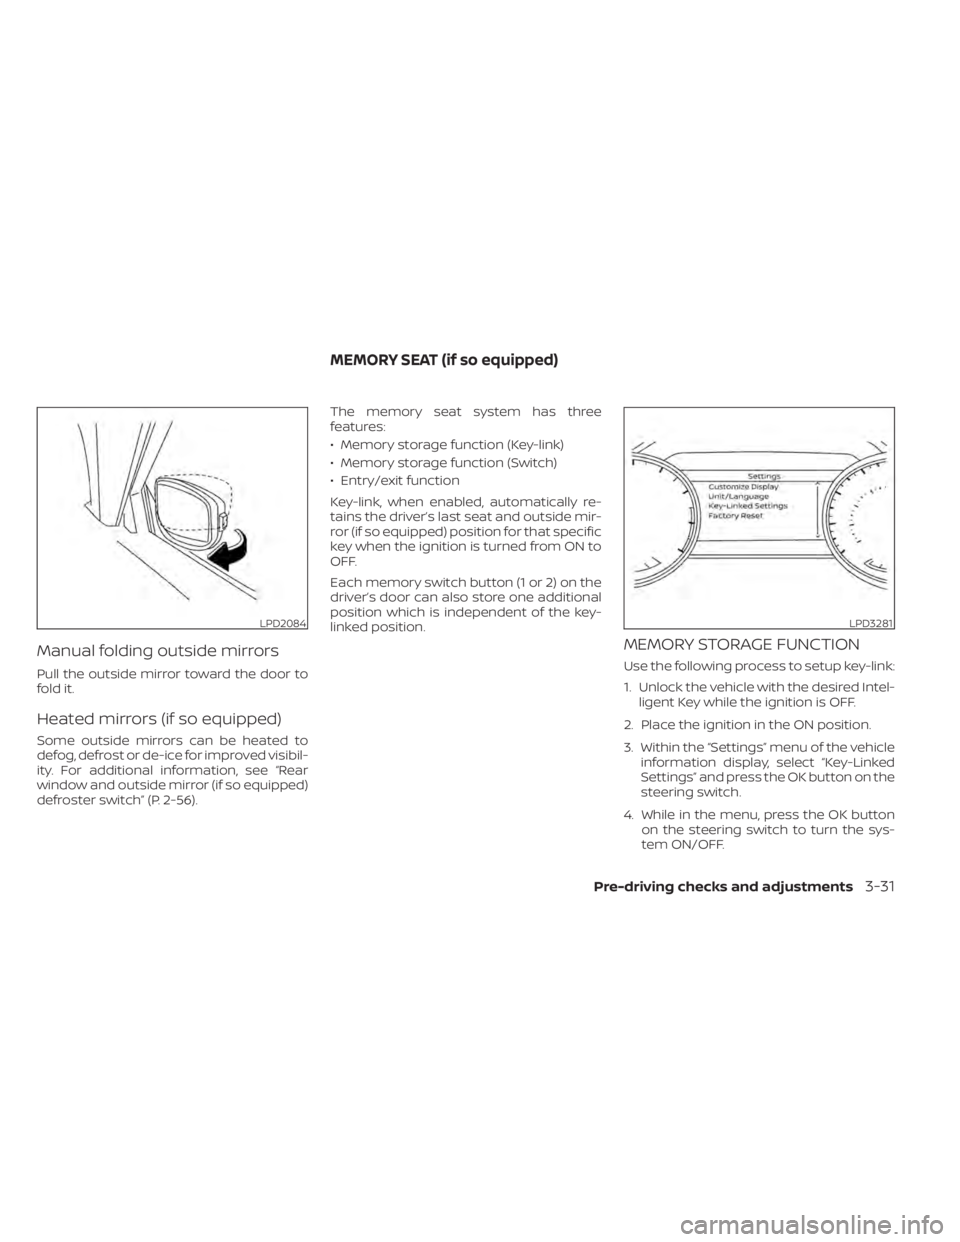
Manual folding outside mirrors
Pull the outside mirror toward the door to
fold it.
Heated mirrors (if so equipped)
Some outside mirrors can be heated to
defog, defrost or de-ice for improved visibil-
ity. For additional information, see “Rear
window and outside mirror (if so equipped)
defroster switch” (P. 2-56).The memory seat system has three
features:
• Memory storage function (Key-link)
• Memory storage function (Switch)
• Entry/exit function
Key-link, when enabled, automatically re-
tains the driver’s last seat and outside mir-
ror (if so equipped) position for that specific
key when the ignition is turned from ON to
OFF.
Each memory switch button (1 or 2) on the
driver’s door can also store one additional
position which is independent of the key-
linked position.
MEMORY STORAGE FUNCTION
Use the following process to setup key-link:
1. Unlock the vehicle with the desired Intel-
ligent Key while the ignition is OFF.
2. Place the ignition in the ON position.
3. Within the “Settings” menu of the vehicle information display, select “Key-Linked
Settings” and press the OK button on the
steering switch.
4. While in the menu, press the OK button on the steering switch to turn the sys-
tem ON/OFF.
LPD2084LPD3281
MEMORY SEAT (if so equipped)
Pre-driving checks and adjustments3-31