2023 NISSAN ALTIMA ignition
[x] Cancel search: ignitionPage 110 of 644
*Warnings will only display if there are any
present. For additional information, see
“Vehicle information display warnings and
indicators” (P. 2-28).
To control what items display in the vehicle
information display, see “How to use the
vehicle information display” (P. 2-19).
RESETTING THE DRIVE COMPUTER
The drive computer is divided across three
screens:
• Speed
• Trip Distance & Time
• Fuel Economy
1. Press the
orbuttons until the
desired drive computer screen is
displayed.
2. Press the OK button to bring up the drive computer Reset menu.
3. Use the
orto select the de-
sired option. Then press the OK button:
• “Cancel” — returns to the previous screen without resetting the trip computer.
• Drive computer value — resets only the displayed drive computer value.
– “Average Speed” - resets the average speed of the selected drive computer
screen. – “Distance & Time” - resets the distance
and time of the selected drive com-
puter screen.
– “Fuel Economy” - resets the fuel economy of the selected drive com-
puter screen.
• “All” — resets all linked drive computer val- ues. This includes distance & time, aver-
age fuel economy and average speed
information.
OIL CONTROL SYSTEM (if so
equipped)
The oil control system can be accessed in
the Maintenance portion of the vehicle in-
formation display settings.
Engine oil information informs the distance
to oil change. Never exceed one year or
7,500 miles (12,000 km) between oil change
intervals for the 2.0L 4 cylinder (KR20DDET
engine model) or 10,000 miles (16,000 km)
between oil change intervals for the 2.5L 4
cylinder (PR25DD engine model).
Display when
ignition is ON Display timing Action Re-
quired
Engine Oil Ser-
vice due in xxx
kilometers Remaining oil
life is less than
940 miles (1500
km). Plan to have
your vehicle
serviced.
Service due
now Remaining oil
lifeis0miles(0
km). Have your ve-
hicle serviced
within two
weeks or less
than 500 miles
(800 km).
The oil change interval cannot be adjusted
manually.
The distance to oil change interval is calcu-
lated depending on the driving conditions
and set automatically by the oil control sys-
tem. A reminder will be displayed when ap-
proaching the end of the service interval.
When the Factory Reset option is selected
in the vehicle information display, the oil
control system will also be reset to initial
value. Please change the engine oil when
Factory Reset is selected.
2-20Instruments and controls
Page 111 of 644
CAUTION
If the oil replacement indicator is dis-
played, change the engine oil within
two weeks or less than 500 miles (800
km).
Operating the vehicle with deteriorated
oil can damage the engine.
To reset oil control system:
1. Place the ignition switch in the ON position.
2. Press the
andbuttons located
on the steering wheel until “Settings” dis-
plays in the vehicle information display.
Use
to select “Maintenance”.
Then, press the OK button. 3. Select “Oil Control System” and press the
OK button.
4. Press the OK button according to the reset instructions displayed at the bot-
tom of the “Oil Control System” mainte-
nance screen.
5. For additional information, refer to the separate maintenance booklet.
SETTINGS
The setting mode allows you to change the
information displayed in the vehicle infor-
mation display. It also allows you to change
vehicle functions:
• VDC • Driver Assistance
• Clock
• Meter Settings
• Vehicle Settings
• Maintenance
• Alarm
• Tire Pressures
• Unit
• Language
• Factory Reset
VDC
The VDC Setting menu allows the user to enable or disable the Vehicle Dynamic Control (VDC) system.
Menu item
Explanation
VDC Allows the user turn the VDC system on or off. For additional information, see “Vehicle Dynamic Control (VDC) system”
(P. 5-175).
Instruments and controls2-21
Page 114 of 644
Vehicle Settings
The vehicle settings allow the user to change the settings for lights, wipers, locking, keys, and other vehicle settings.
Some menu items shown below may not be equipped on your vehicle.
Menu itemExplanation
Lighting Displays the available lighting options.
Welcome Light Allows user to turn the welcome light on or off.
Auto Room Lamp Allows user to turn the interior light timer on or off.
Light Sensitivity Allows user to change when the auto lights activate based on exterior brightness.
Light Off Delay Allows user to change the length of time the exterior lights remain on.
Turn indicator Displays the available turn indicator options.
3 Flash Pass Allows user to turn the 3 flash pass on or off.
Locking Displays the available locking options.
I-Key Door Lock Allows the user to turn the I-Key door lock on or off. When on, the request switch on the door is activated.
Selective Unlock Allows user to turn selective unlock on or off. When turned on, only the driver’s door is unlocked af ter the door
unlock operation. When the door handle request switch on the driver’s or front passenger’s side door is
pushed to be unlocked, only the corresponding door is unlocked first. All the doors can be unlocked if the
door unlock operation is performed again within 60 seconds. When this item is turned off, all the doors will be
unlocked af ter the door unlock operation is performed once.
Auto Door Unlock Displays the auto door unlock options.
Off Doors will have to be manually unlocked.
Ignition OFF Doors will unlock when the ignition is turned off.
Shif t to Park Doors will unlock when the vehicle is shif ted into Park.
Answer Back Horn Allows user to turn answer back horn on or off. When turned on, the horn will chirp and the hazard indicators
will flash twice when locking the vehicle with the Intelligent Key.
2-24Instruments and controls
Page 118 of 644
VEHICLE INFORMATION DISPLAY
WARNINGS AND INDICATORS
The following messages may appear in
your vehicle information display.
Engine start operation for
Intelligent Key system (if
I-Key battery level is low)
This indicator appears when the battery of
the Intelligent Key is low and when the In-
telligent Key system and the vehicle are not
communicating normally.
If this appears, touch the ignition switch
with the Intelligent Key while depressing
the brake pedal. For additional information,
see “Battery replacement” (P. 5-15).
Key Battery Low
This indicator appears when the Intelligent
Key battery is running out of power.
If this indicator appears, replace the bat-
tery with a new one. For additional infor-
mation, see “Battery replacement” (P. 8-23).
Key ID Incorrect
This warning appears when the ignition
switch is placed from the OFF position and
the Intelligent Key is not recognized by the
system. You cannot start the engine with
an unregistered key.
For additional information, see “NISSAN In-
telligent Key®” (P. 3-7).
Key System Error: See
Owner’s Manual
Af ter the ignition switch is placed in the ON
position, this warning appears for a period
of time and then turns off.
The Key System Error message warns of a
malfunction with the Intelligent Key sys-
tem. If the warning appears while the en-
gine is stopped, it may be impossible to
start the engine.
If the warning appears while the engine is
running, you can drive the vehicle. However,
in these cases, have the system checked. It
is recommended that you visit a NISSAN
dealer for this service.
No Key Detected
This warning appears when the Intelligent
Key is lef t outside the vehicle with the igni-
tion switch in the ON position. Make sure
the Intelligent Key is inside the vehicle.
For additional information, see “NISSAN In-
telligent Key®” (P. 3-2).
Brightness indicator
This indicator appears when the vehicle
information display screen brightness is
being adjusted.
Alarm— Time for a driver
break
This indicator appears when the set time is
reached. The time can be set up to six
hours. For additional information, see “Set-
tings” (P. 2-21).
Chassis Control System Error: See
Owner’s Manual
This warning appears if there is an error in
the Automatic Brake Hold system. Have the
system checked. It is recommended that
you visit a NISSAN dealer for this service. For
additional information, see “Chassis con-
trol” (P. 5-178) or “Automatic brake hold”
(P. 5-27).
2-28Instruments and controls
Page 120 of 644
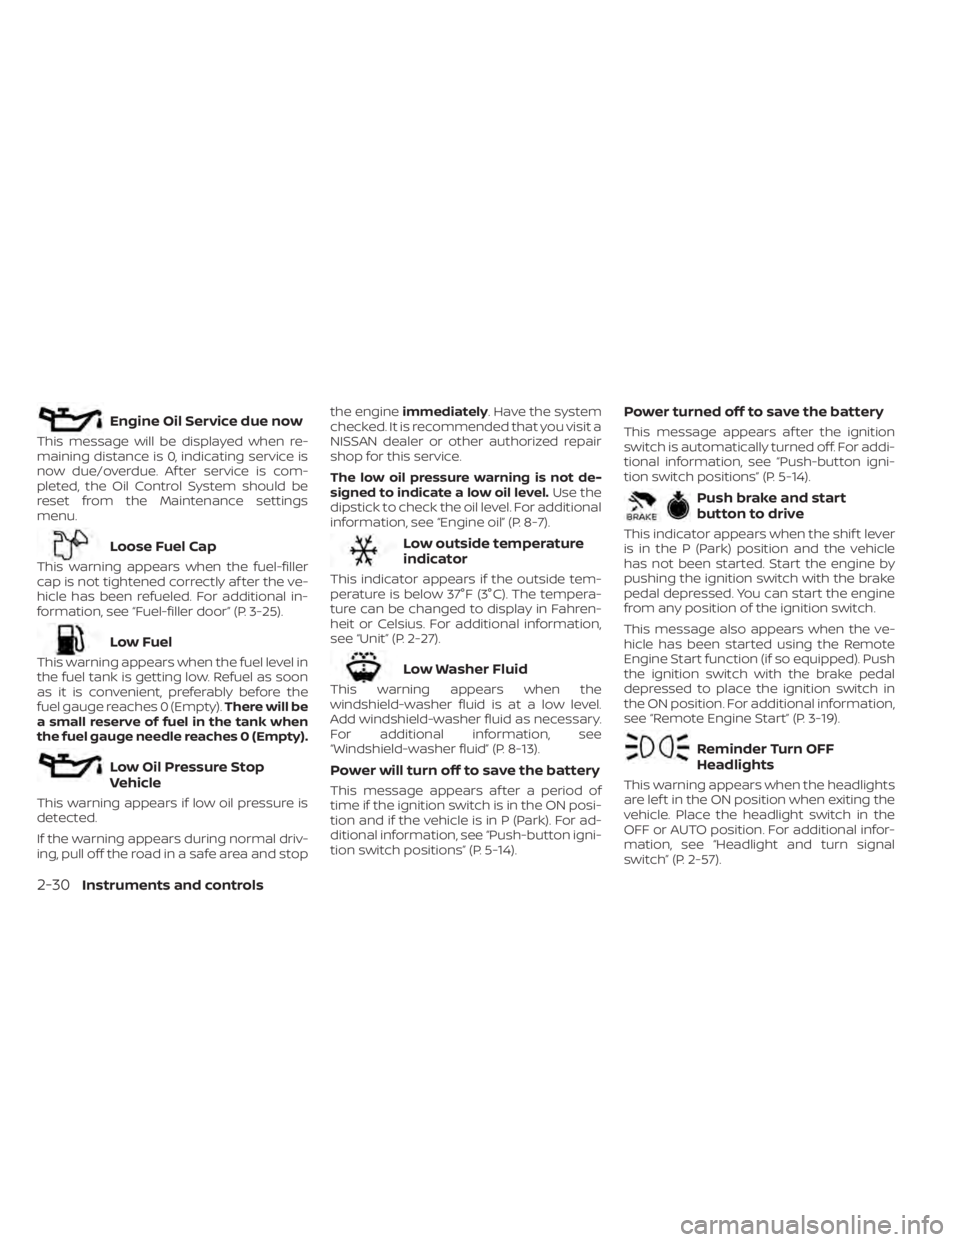
Engine Oil Service due now
This message will be displayed when re-
maining distance is 0, indicating service is
now due/overdue. Af ter service is com-
pleted, the Oil Control System should be
reset from the Maintenance settings
menu.
Loose Fuel Cap
This warning appears when the fuel-filler
cap is not tightened correctly af ter the ve-
hicle has been refueled. For additional in-
formation, see “Fuel-filler door” (P. 3-25).
Low Fuel
This warning appears when the fuel level in
the fuel tank is getting low. Refuel as soon
as it is convenient, preferably before the
fuel gauge reaches 0 (Empty).There will be
a small reserve of fuel in the tank when
the fuel gauge needle reaches 0 (Empty).
Low Oil Pressure Stop
Vehicle
This warning appears if low oil pressure is
detected.
If the warning appears during normal driv-
ing, pull off the road in a safe area and stop the engine
immediately . Have the system
checked. It is recommended that you visit a
NISSAN dealer or other authorized repair
shop for this service.
The low oil pressure warning is not de-
signed to indicate a low oil level. Use the
dipstick to check the oil level. For additional
information, see “Engine oil” (P. 8-7).
Low outside temperature
indicator
This indicator appears if the outside tem-
perature is below 37°F (3°C). The tempera-
ture can be changed to display in Fahren-
heit or Celsius. For additional information,
see “Unit” (P. 2-27).
Low Washer Fluid
This warning appears when the
windshield-washer fluid is at a low level.
Add windshield-washer fluid as necessary.
For additional information, see
“Windshield-washer fluid” (P. 8-13).
Power will turn off to save the battery
This message appears af ter a period of
time if the ignition switch is in the ON posi-
tion and if the vehicle is in P (Park). For ad-
ditional information, see “Push-button igni-
tion switch positions” (P. 5-14).
Power turned off to save the battery
This message appears af ter the ignition
switch is automatically turned off. For addi-
tional information, see “Push-button igni-
tion switch positions” (P. 5-14).
Push brake and start
button to drive
This indicator appears when the shif t lever
is in the P (Park) position and the vehicle
has not been started. Start the engine by
pushing the ignition switch with the brake
pedal depressed. You can start the engine
from any position of the ignition switch.
This message also appears when the ve-
hicle has been started using the Remote
Engine Start function (if so equipped). Push
the ignition switch with the brake pedal
depressed to place the ignition switch in
the ON position. For additional information,
see “Remote Engine Start” (P. 3-19).
Reminder Turn OFF
Headlights
This warning appears when the headlights
are lef t in the ON position when exiting the
vehicle. Place the headlight switch in the
OFF or AUTO position. For additional infor-
mation, see “Headlight and turn signal
switch” (P. 2-57).
2-30Instruments and controls
Page 121 of 644

Release Parking Brake
This warning appears when the parking
brake is set and the vehicle is driven.
Shif t to Park
This warning appears when the ignition
switch is in the AUTO ACC or OFF position
and the shif t lever is not in the P (Park)
position. Also, a chime sounds when the
ignition switch is in the AUTO ACC or OFF
position.
If this warning appears, move the shif t lever
to the P (Park) position and start the engine.
Shipping Mode On Push Storage Fuse
This warning may appear if the extended
storage switch is not pushed in. When this
warning appears, push in the extended
storage switch to turn off the warning. For
additional information, see “Extended stor-
age switch” (P. 2-70).
Tire Pressure Low - Add Air
This warning appears when the low tire
pressure warning light in the meter illumi-
nates and low tire pressure is detected. The
warning appears each time the ignition
switch is placed in the ON position as long
as the low tire pressure warning light re-mains illuminated. If this warning appears,
stop the vehicle and adjust the tire pres-
sures of all four tires to the recommended
COLD tire pressure shown on the Tire and
Loading Information label. For additional
information, see “Low tire pressure warning
light” (P. 2-13) and “Tire Pressure Monitoring
System (TPMS)” (P. 5-5).
Transmission Shif t Position
indicator
This indicator shows the transmission shif t
position.
Service CVT
This warning appears when there is a
problem with the CVT system. If this
warning appears, have the system
checked. It is recommended that you visit a
NISSAN dealer for this service.
CVT hot Power reduced
This transmission has a high fluid tem-
perature protection mode. If the fluid tem-
perature becomes too high (for example,
climbing steep grades in high tempera-
tures with heavy loads, such as when tow-
ing a trailer), engine power and, under
some conditions, vehicle speed will be de-
creased automatically to reduce thechance of transmission damage. Vehicle
speed can be controlled with the accelera-
tor pedal, but the engine and vehicle speed
may be reduced.
WARNING
When the high fluid temperature pro-
tection mode operation occurs, vehicle
speed may be gradually reduced. The
reduced speed may be lower than
other traffic, which could increase the
chance of a collision. Be especially
careful when driving. If necessary, pull
to the side of the road at a safe place
and allow the transmission to return to
normal operation; or have it repaired if
necessary.
CVT (AT) Malfunction Service now
This warning appears when there is a
problem with the CVT system. If this
warning comes on, have the system
checked. It is recommended that you visit a
NISSAN dealer for this service.
CVT (AT) Stop the vehicle
This message appears 30 seconds before
the vehicle is shut down due to an above
normal operating transmission tempera-
ture. The Malfunction Indicator Light (MIL)
Instruments and controls2-31
Page 126 of 644
2. Press and hold the OK button for ap-proximately 1 second to reset the infor-
mation on the currently displayed
screen.
NOTE:
If you wish to reset all drive computer
values at once, press and hold the OK
button for approximately 3 seconds until
a reset menu appears; and follow the
instructions.
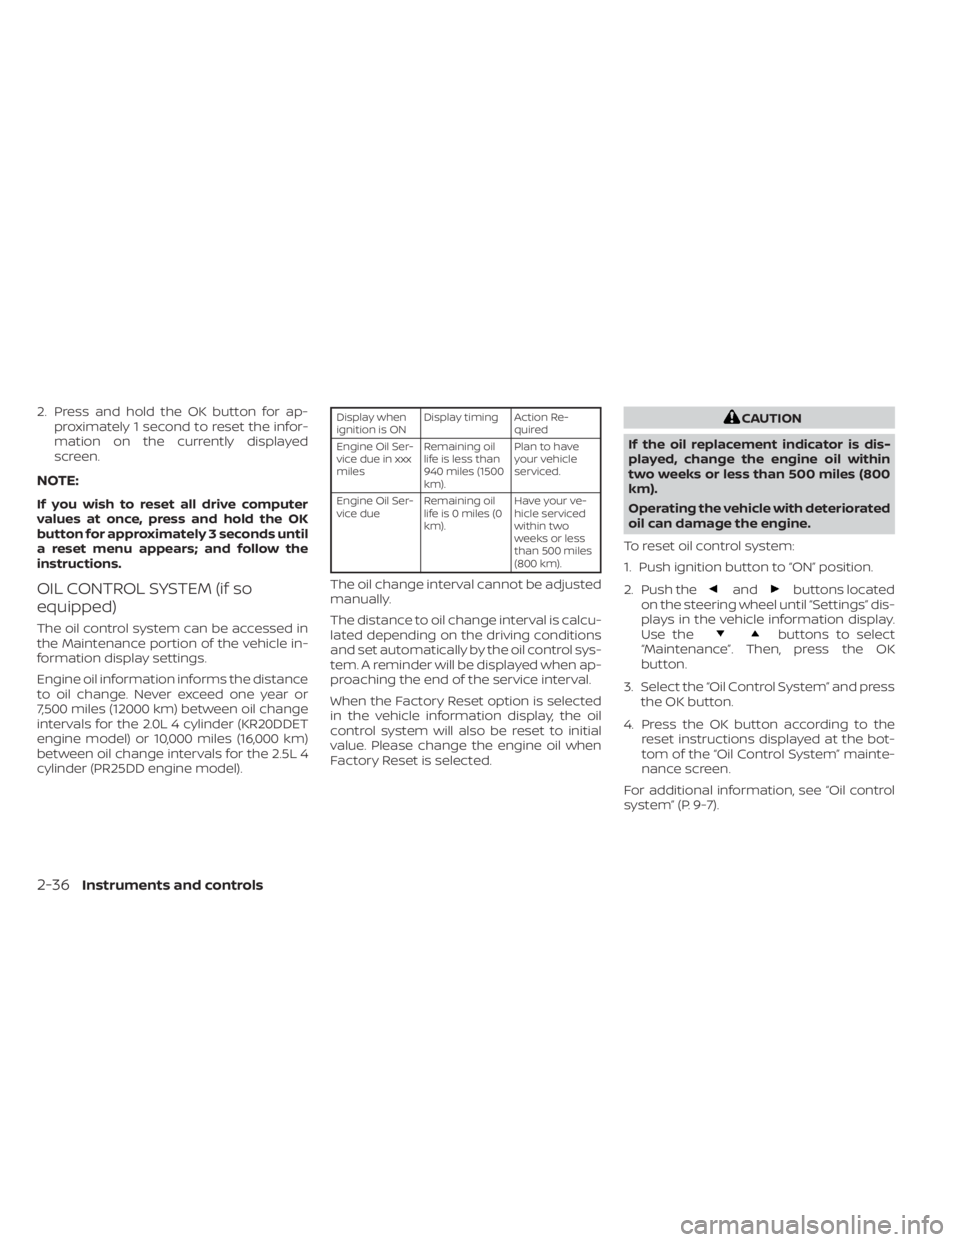
OIL CONTROL SYSTEM (if so
equipped)
The oil control system can be accessed in
the Maintenance portion of the vehicle in-
formation display settings.
Engine oil information informs the distance
to oil change. Never exceed one year or
7,500 miles (12000 km) between oil change
intervals for the 2.0L 4 cylinder (KR20DDET
engine model) or 10,000 miles (16,000 km)
between oil change intervals for the 2.5L 4
cylinder (PR25DD engine model).
Display when
ignition is ON Display timing Action Re-
quired
Engine Oil Ser-
vice due in xxx
miles Remaining oil
life is less than
940 miles (1500
km). Plan to have
your vehicle
serviced.
Engine Oil Ser-
vice due Remaining oil
lifeis0miles(0
km). Have your ve-
hicle serviced
within two
weeks or less
than 500 miles
(800 km).
The oil change interval cannot be adjusted
manually.
The distance to oil change interval is calcu-
lated depending on the driving conditions
and set automatically by the oil control sys-
tem. A reminder will be displayed when ap-
proaching the end of the service interval.
When the Factory Reset option is selected
in the vehicle information display, the oil
control system will also be reset to initial
value. Please change the engine oil when
Factory Reset is selected.
CAUTION
If the oil replacement indicator is dis-
played, change the engine oil within
two weeks or less than 500 miles (800
km).
Operating the vehicle with deteriorated
oil can damage the engine.
To reset oil control system:
1. Push ignition button to “ON” position.
2. Push the
andbuttons located
on the steering wheel until “Settings” dis-
plays in the vehicle information display.
Use the
buttons to select
“Maintenance”. Then, press the OK
button.
3. Select the “Oil Control System” and press the OK button.
4. Press the OK button according to the reset instructions displayed at the bot-
tom of the “Oil Control System” mainte-
nance screen.
For additional information, see “Oil control
system” (P. 9-7).
2-36Instruments and controls
Page 130 of 644
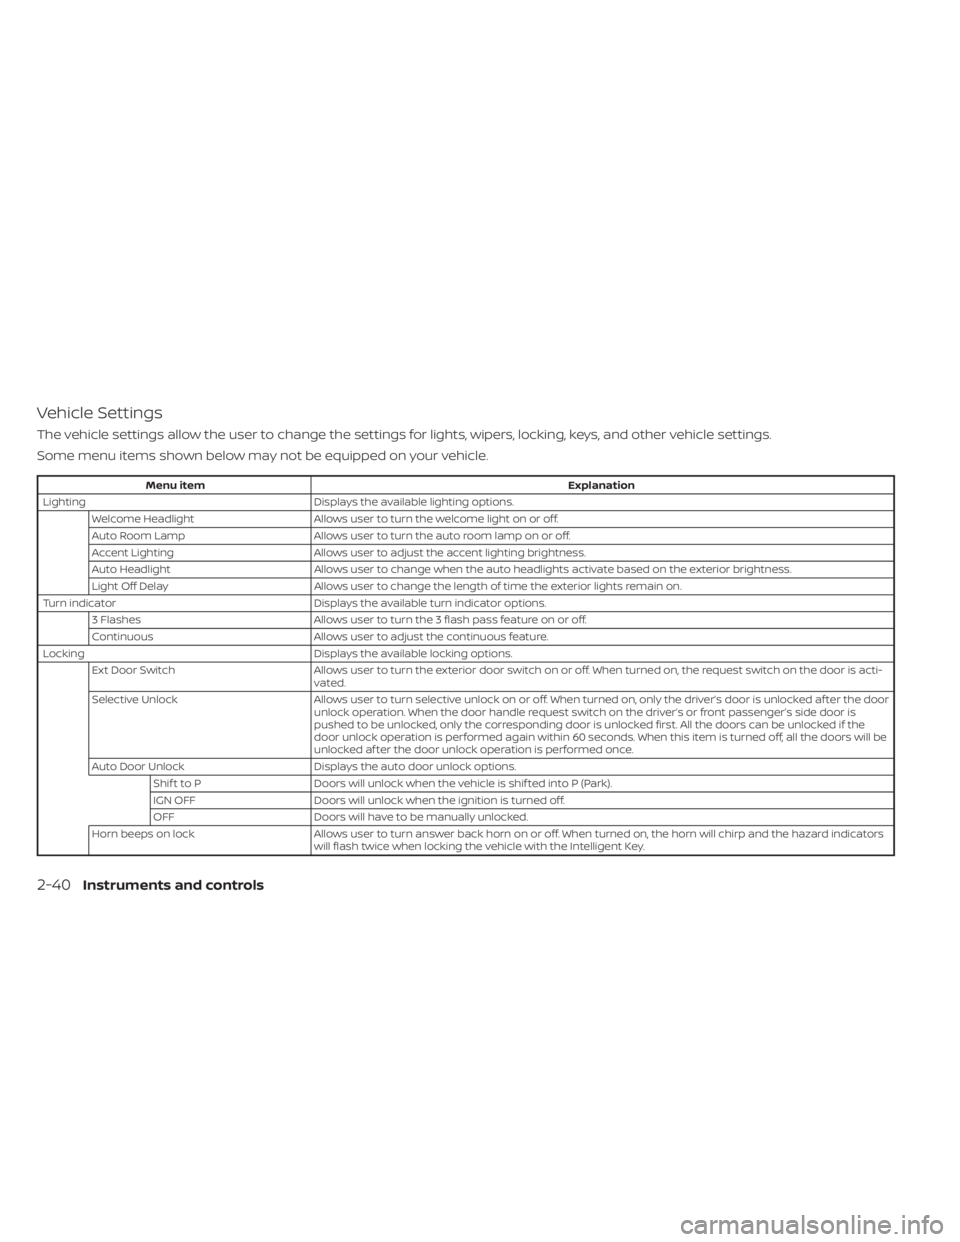
Vehicle Settings
The vehicle settings allow the user to change the settings for lights, wipers, locking, keys, and other vehicle settings.
Some menu items shown below may not be equipped on your vehicle.
Menu itemExplanation
Lighting Displays the available lighting options.
Welcome Headlight Allows user to turn the welcome light on or off.
Auto Room Lamp Allows user to turn the auto room lamp on or off.
Accent Lighting Allows user to adjust the accent lighting brightness.
Auto Headlight Allows user to change when the auto headlights activate based on the exterior brightness.
Light Off Delay Allows user to change the length of time the exterior lights remain on.
Turn indicator Displays the available turn indicator options.
3 Flashes Allows user to turn the 3 flash pass feature on or off.
Continuous Allows user to adjust the continuous feature.
Locking Displays the available locking options.
Ext Door Switch Allows user to turn the exterior door switch on or off. When turned on, the request switch on the door is acti-
vated.
Selective Unlock Allows user to turn selective unlock on or off. When turned on, only the driver’s door is unlocked af ter the door
unlock operation. When the door handle request switch on the driver’s or front passenger’s side door is
pushed to be unlocked, only the corresponding door is unlocked first. All the doors can be unlocked if the
door unlock operation is performed again within 60 seconds. When this item is turned off, all the doors will be
unlocked af ter the door unlock operation is performed once.
Auto Door Unlock Displays the auto door unlock options.
Shif t to P Doors will unlock when the vehicle is shif ted into P (Park).
IGN OFF Doors will unlock when the ignition is turned off.
OFF Doors will have to be manually unlocked.
Horn beeps on lock Allows user to turn answer back horn on or off. When turned on, the horn will chirp and the hazard indicators
will flash twice when locking the vehicle with the Intelligent Key.
2-40Instruments and controls