2023 NISSAN ALTIMA ignition
[x] Cancel search: ignitionPage 252 of 644
mode when Remote Engine Start is acti-
vated depending on outside and cabin
temperatures. During this period, the cli-
mate control display and buttons will be
inoperable until the ignition switch is
turned on. In Remote Engine Start defrost-
ing mode, the rear window defroster,
heated seats (if so equipped) and heated
steering wheel (if so equipped) may be ac-
tivated automatically.
MANUAL OPERATION
Fan speed control buttons
Press thefan speed control buttons
to manually control the fan speed.
Press the AUTO button to return to auto-
matic control of the fan speed.
Temperature control dial
The temperature control dial allows you to
adjust the temperature of the outlet air. To
lower the temperature, turn the dial to the
lef t. To increase the temperature, turn the
dial to the right. Temperature can be ad-
justed on the driver’s and passenger’s side.
Air recirculation
Press theair recirculation button to
recirculate interior air inside the vehicle.
The
indicator light on the button will
come on.
The air recirculation cannot be activated
when the air conditioner is in the
front
defrosting mode.
When the outside temperature exceeds
70°F (21°C), the air conditioning system may
default to air recirculation mode automati-
cally to reduce overall power consumption.
To exit air recirculation mode, deselect the
air recirculation button (indicator light will
turn off ) to enter fresh air mode.
Automatic intake air control
In the AUTO mode, the intake air will be
controlled automatically. To manually con-
trol the intake air, press the
air recir-
culation button. To return to the automatic
control mode, press and hold the
air
recirculation button for about 2 seconds.
The indicator light will flash twice, and then
the intake air will be controlled
automatically.
A/C (air conditioner) button
Start the engine, press thefan speed
control buttons to the desired position and
press the
button to turn on the air
conditioner. To turn off the air conditioner,
press the
button again.
The air conditioner cooling function op-
erates only when the engine is running.
Air flow control
Pressing thebutton manually con-
trols air flow and selects the air outlet:
— Air flows from center and side
vents.
— Air flows from center and sidevents and foot outlets.
— Air flows mainly from the footoutlets.
— Air flows from defroster and footoutlets.
4-42Monitor, climate, audio, phone and voice recognition systems
Page 255 of 644
RADIO
Place the ignition switch in the ACC or ON
position and press the PUSHbutton
to turn the radio on. If you listen to the radio
with the engine not running, the ignition
switch should be placed in the ACC
position.
Radio reception is affected by station sig-
nal strength, distance from radio transmit-
ter, buildings, bridges, mountains and other
external influences. Intermittent changes
in reception quality normally are caused by
these external influences.
Using a cellular phone in or near the ve-
hicle may influence radio reception
quality.
Radio reception
Your NISSAN radio system is equipped with
state-of-the-art electronic circuits to en-
hance radio reception. These circuits are
designed to extend reception range, and to
enhance the quality of that reception.
However, there are some general charac-
teristics of both FM and AM radio signals
that can affect radio reception quality in a
moving vehicle, even when the finest
equipment is used. These characteristics
are completely normal in a given reception area and do not indicate any malfunction
in your NISSAN radio system.
Reception conditions will constantly
change because of vehicle movement.
Buildings, terrain, signal distance and inter-
ference from other vehicles can work
against ideal reception. Described below
are some of the factors that can affect your
radio reception.
Some cellular phones or other devices may
cause interference or a buzzing noise to
come from the audio system speakers.
Storing the device in a different location
may reduce or eliminate the noise.
FM RADIO RECEPTION
Range: FM range is normally limited to 25 –
30 mi (40 – 48 km), with monaural (single
channel) FM having slightly more range
than stereo FM. External influences may
sometimes interfere with FM station re-
ception even if the FM station is within 25
mi (40 km). The strength of the FM signal is
directly related to the distance between
the transmitter and receiver. FM signals fol-
low a line-of-sight path, exhibiting many of
the same characteristics as light. For ex-
ample, they will reflect off objects.
Fade and drif t: As your vehicle moves away
from a station transmitter, the signals will
tend to fade and/or drif t.
Static and flutter: During signal interfer-
ence from buildings, large hills or due to
antenna position (usually in conjunction
with increased distance from the station
transmitter), static or flutter can be heard.
This can be reduced by adjusting the treble
control to reduce treble response.
Multipath reception: Because of the reflec-
tive characteristics of FM signals, direct and
reflected signals reach the receiver at the
same time. The signals may cancel each
other, resulting in momentary flutter or loss
of sound.AM RADIO RECEPTION
AM signals, because of their low frequency,
can bend around objects and skip along
the ground. In addition, the signals can be
bounced off the ionosphere and bent back
to earth. Because of these characteristics,
AM signals are also subject to interference
as they travel from transmitter to receiver.
Fading: Occurs while the vehicle is passing
through freeway underpasses or in areas
with many tall buildings. It can also occur
AUDIO SYSTEM
Monitor, climate, audio, phone and voice recognition systems4-45
Page 260 of 644
Audio main operation
VOL (volume) knob / PUSH(power) button
Place the ignition switch in the ON position
and press the PUSH(power) button
while the system is off to call up the mode
(radio, AUX, Bluetooth® audio, USB or iPod®)
that was playing immediately before the
system was turned off. To turn the system off, press the PUSH
(power) button.
Turn the VOL (volume) knob to adjust the
volume.
This vehicle may be equipped with Speed
Sensitive Volume. When this feature is ac-
tive, the audio volume changes as the driv-
ing speed changes.MENU button
Press theMENU button to show the
Menu screen. Touch the “Settings” key on
the display, then touch the “Sound” key.
Sound Settings
Bass Adjusts the bass to the desired level.
Treble Adjusts the treble to the desired level.
Balance Adjusts the balance to the desired level. Balance adjusts the sound level between the lef t and right
speakers.
Fade Adjusts the fade to the desired level. Fade adjusts the sound level between the front and rear
speakers.
Speed Sensitive Volume Adjusts the speed sensitive volume function, which increases the volume of the audio system as
the speed of the vehicle increases. Set to “OFF” to disable the feature. The higher the setting, the
more the volume increases in relation to vehicle speed.
Bass, treble, balance, fade and Speed Sensitive Volume can be adjusted by touching “-”/“+” , “L”/”R”, or “R”/”F” keys.
4-50Monitor, climate, audio, phone and voice recognition systems
Page 267 of 644
iPod®* PLAYER OPERATION
Connecting iPod®
WARNING
Do not connect, disconnect, or operate
the USB device while driving. Doing so
can be a distraction. If distracted you
could lose control of your vehicle and
cause an accident or serious injury.
CAUTION
• Do not force the USB device into the
USB port. Inserting the USB device
tilted or up-side-down into the port
may damage the port. Make sure
that the USB device is connected cor-
rectly into the USB port.
• Do not grab the USB port cover (if so
equipped) when pulling the USB de-
vice out of the port. This could dam-
age the port and the cover.
• Do not leave the USB cable in a place
where it can be pulled unintention-
ally. Pulling the cable may damage
the port.
For additional information, refer to your de-
vice manufacturer’s owner information re-
garding the proper use and care of the
device.
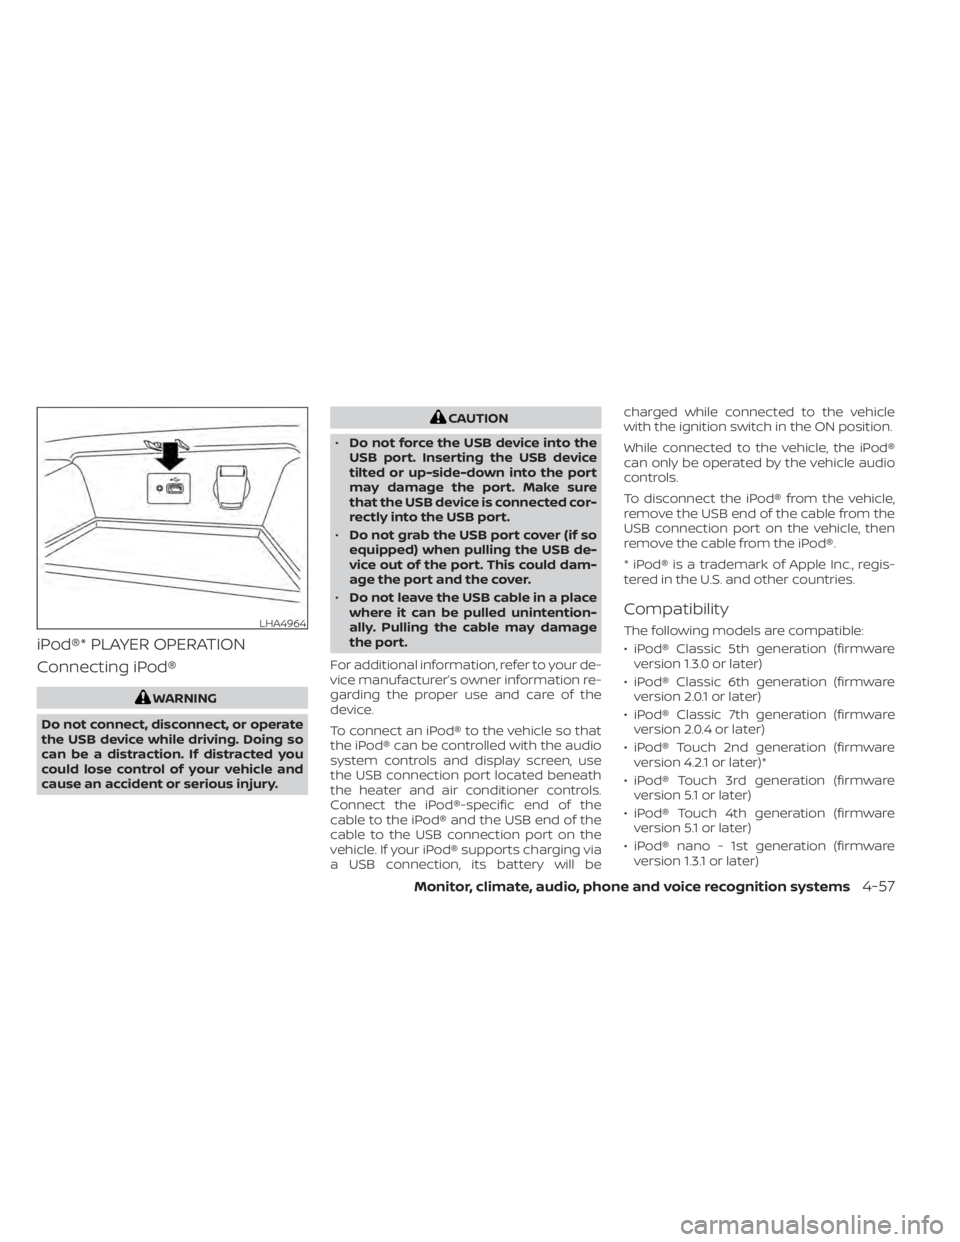
To connect an iPod® to the vehicle so that
the iPod® can be controlled with the audio
system controls and display screen, use
the USB connection port located beneath
the heater and air conditioner controls.
Connect the iPod®-specific end of the
cable to the iPod® and the USB end of the
cable to the USB connection port on the
vehicle. If your iPod® supports charging via
a USB connection, its battery will be charged while connected to the vehicle
with the ignition switch in the ON position.
While connected to the vehicle, the iPod®
can only be operated by the vehicle audio
controls.
To disconnect the iPod® from the vehicle,
remove the USB end of the cable from the
USB connection port on the vehicle, then
remove the cable from the iPod®.
* iPod® is a trademark of Apple Inc., regis-
tered in the U.S. and other countries.
Compatibility
The following models are compatible:
• iPod® Classic 5th generation (firmware
version 1.3.0 or later)
• iPod® Classic 6th generation (firmware version 2.0.1 or later)
• iPod® Classic 7th generation (firmware version 2.0.4 or later)
• iPod® Touch 2nd generation (firmware version 4.2.1 or later)*
• iPod® Touch 3rd generation (firmware version 5.1 or later)
• iPod® Touch 4th generation (firmware version 5.1 or later)
• iPod® nano - 1st generation (firmware version 1.3.1 or later)LHA4964
Monitor, climate, audio, phone and voice recognition systems4-57
Page 278 of 644
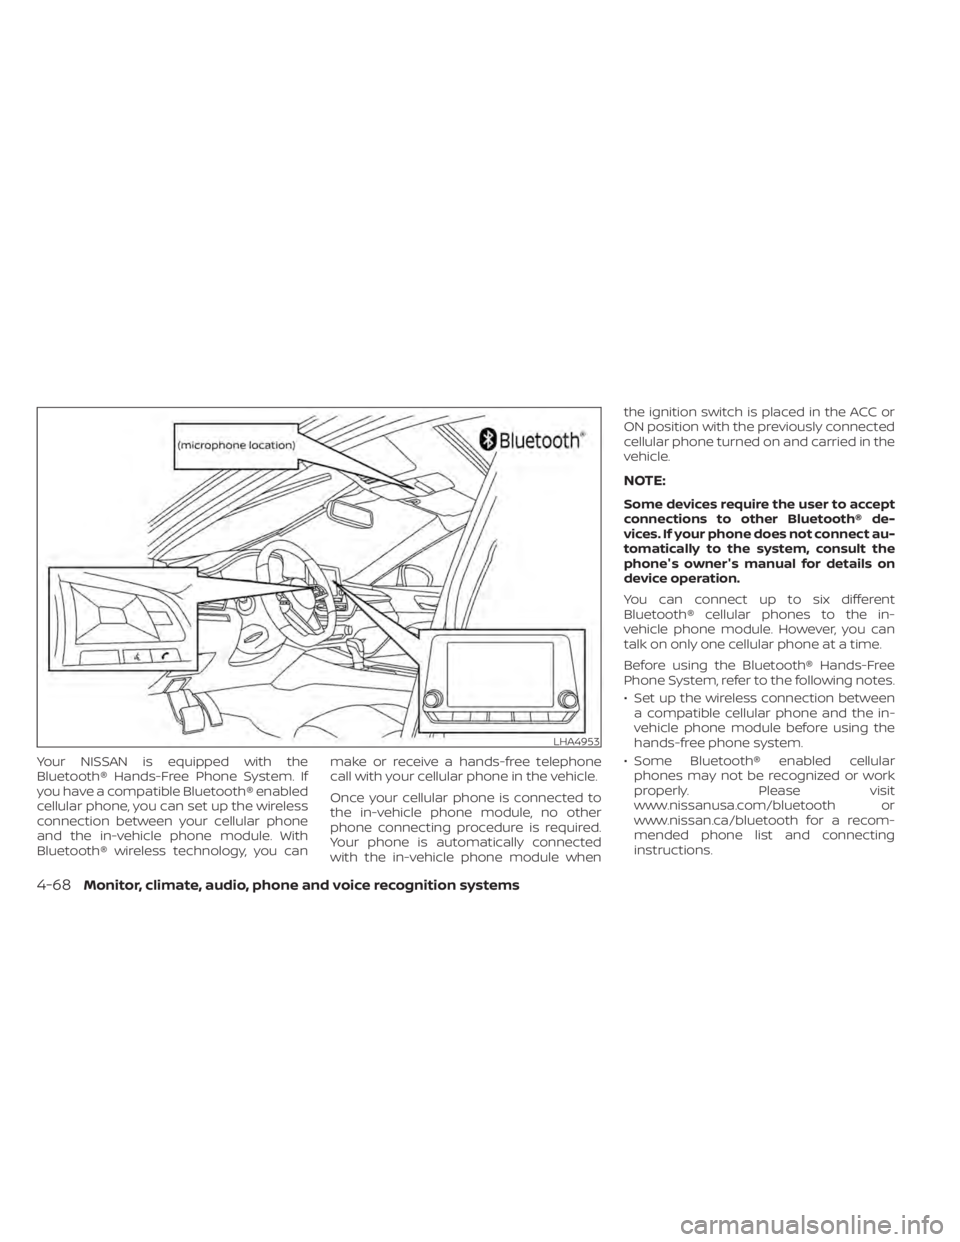
Your NISSAN is equipped with the
Bluetooth® Hands-Free Phone System. If
you have a compatible Bluetooth® enabled
cellular phone, you can set up the wireless
connection between your cellular phone
and the in-vehicle phone module. With
Bluetooth® wireless technology, you canmake or receive a hands-free telephone
call with your cellular phone in the vehicle.
Once your cellular phone is connected to
the in-vehicle phone module, no other
phone connecting procedure is required.
Your phone is automatically connected
with the in-vehicle phone module whenthe ignition switch is placed in the ACC or
ON position with the previously connected
cellular phone turned on and carried in the
vehicle.
NOTE:
Some devices require the user to accept
connections to other Bluetooth® de-
vices. If your phone does not connect au-
tomatically to the system, consult the
phone's owner's manual for details on
device operation.
You can connect up to six different
Bluetooth® cellular phones to the in-
vehicle phone module. However, you can
talk on only one cellular phone at a time.
Before using the Bluetooth® Hands-Free
Phone System, refer to the following notes.
• Set up the wireless connection between
a compatible cellular phone and the in-
vehicle phone module before using the
hands-free phone system.
• Some Bluetooth® enabled cellular phones may not be recognized or work
properly. Please visit
www.nissanusa.com/bluetooth or
www.nissan.ca/bluetooth for a recom-
mended phone list and connecting
instructions.
LHA4953
4-68Monitor, climate, audio, phone and voice recognition systems
Page 280 of 644
Initialization
When the ignition switch is placed in the ON
position, NISSAN Voice Recognition is initial-
ized, which takes a few seconds. If the
button is pressed before the initialization
completes, the system will announce
“There is no phone connected” and will not
react to voice commands.
Operating tips
To get the best performance out of the
NISSAN Voice Recognition System, observe
the following:
• Keep the interior of the vehicle as quiet aspossible. Keep all vents pointed away
from the microphone and close the win-
dows to eliminate surrounding noises
(traffic noises, vibration sounds, etc.),
which may prevent the system from rec-
ognizing voice commands correctly.
• Wait until the tone sounds before speak- ing a command. Otherwise, the com-
mand will not be received properly.
• Start speaking a command within 5 sec- onds af ter the tone sounds.
• Speak in a natural voice without pausing between words. • For calling contacts by name, please say
both the first and last name of the con-
tact for better recognition.
Giving voice commands
To operate NISSAN Voice Recognition,
press thebutton located on the steer-
ing wheel for less than 1.5 seconds. Af ter
the tone sounds, speak a command.
The command given is picked up by the
microphone, and voice feedback is given
when the command is accepted.
• If a command is not recognized, the sys- tem announces, “Please say or select a
command from the displayed list.” Make
sure the command is said exactly as
prompted by the system and repeat the
command in a clear voice.
• If you want to go back to the previous command, you can say “Go back” or “Cor-
rection” any time the system is waiting for
a response. • You can cancel a command when the
system is waiting for a response by say-
ing, “Cancel” or “Quit.” The system an-
nounces “Exit” and ends the Voice Recog-
nition session. You can also press and
hold the
button on the steering
wheel for 1.5 seconds at any time to end
the Voice Recognition session. Whenever
the Voice Recognition session is can-
celed, a double beep is played to indicate
you have exited the system.
• If you want to adjust the volume of the voice feedback, push the (+ or -) volume
control switches on the steering wheel
while being provided with feedback. You
can also use the radio volume control
knob.
Voice Prompt Interrupt
In most cases you can interrupt the voice
feedback to speak the next command by
pressing the
button on the steering
wheel. Af ter interrupting the system, wait
for a beep before speaking your command.
One Shot Call (if so equipped)
To use the system faster, you may speak
the second level commands with the main
menu command on the main menu. For
example, press the
button and af ter
the tone say, “Call Redial”.
4-70Monitor, climate, audio, phone and voice recognition systems
Page 296 of 644
5 Starting and driving
Precautions when starting and driving..........5-4
Exhaust gas (carbon monoxide) ..............5-4
Three-way catalyst ...........................5-4
Tire Pressure Monitoring System
(TPMS) .......................................5-5
Avoiding collision and rollover ................5-9
Off-roadrecovery ............................5-9
Rapid air pressure loss .......................5-9
Drinking alcohol/drugs and driving ..........5-10
Driving safety precautions ...................5-10
Push-button ignition switch ....................5-13
Operating range ............................ 5-14
Push-button ignition switch positions .......5-14
Emergency engine shut off ..................5-15
NISSAN Intelligent Key® battery
discharge ................................... 5-15
NISSAN Vehicle Immobilizer System .........5-16
Before starting the engine .....................5-16
Starting the engine ............................. 5-16
Remote Engine Start ........................ 5-17
Driving the vehicle .............................. 5-18
Continuously Variable Transmission
(CVT) ........................................ 5-18
Parking brake .................................. 5-25
Manual parking brake (pedal type) ...........5-25
Electronic parking brake (switch type) .......5-25 Automatic brake hold (if so equipped)
..........5-27
How to activate/deactivate the
automatic brake hold function ..............5-28
How to use the automatic brake hold
function ..................................... 5-29
Traffic Sign Recognition (TSR) (if so equipped) . . . 5-30 System operation ........................... 5-31
Turning the Traffic Sign Recognition
(TSR) system on and off .....................5-32
System temporarily unavailable .............5-32
System malfunction ......................... 5-32
System maintenance .......................5-33
Lane Departure Warning (LDW) .................5-33
LDW system operation ......................5-34
How to enable/disable the LDW system .....5-36
LDW system limitations .....................5-38
System temporarily unavailable .............5-39
System malfunction ......................... 5-39
System maintenance .......................5-39
Intelligent
Lane Intervention (I-LI)
(if so equipped) ................................. 5-40
I-LI system operation ........................ 5-41
How to enable/disable the I-LI system ......5-42
I-LI system limitations .......................5-43
System temporarily unavailable .............5-44
System malfunction ......................... 5-45
Page 301 of 644
•Do not stop or park the vehicle over
flammable materials such as dry
grass, waste paper or rags. They may
ignite and cause a fire.
CAUTION
• Do not use leaded gasoline. Deposits
from leaded gasoline will seriously
reduce the three-way catalyst's abil-
ity to help reduce exhaust pollutants.
• Keep your engine tuned up. Malfunc-
tions in the ignition, fuel injection, or
electrical systems can cause overrich
fuel flow into the three-way catalyst,
causing it to overheat. Do not keep
driving if the engine misfires, or if no-
ticeable loss of performance or other
unusual operating conditions are de-
tected. Have the vehicle inspected
promptly. It is recommended that
you visit a NISSAN dealer for this
service.
• Avoid driving with an extremely low
fuel level. Running out of fuel could
cause the engine to misfire, damag-
ing the three-way catalyst.
• Do not race the engine while warm-
ing it up. •
Do not push or tow your vehicle to
start the engine.
TIRE PRESSURE MONITORING
SYSTEM (TPMS)
Each tire, including the spare (if provided),
should be checked monthly when cold and
inflated to the inflation pressure recom-
mended by the vehicle manufacturer on
the vehicle placard or tire inflation pressure
label. (If your vehicle has tires of a different
size than the size indicated on the vehicle
placard or tire inflation pressure label, you
should determine the proper tire inflation
pressure for those tires.)
As an added safety feature, your vehicle
has been equipped with a Tire Pressure
Monitoring System (TPMS) that illuminates
a low tire pressure telltale when one or
more of your tires is significantly under-
inflated. Accordingly, when the low tire
pressure telltale illuminates, you should
stop and check your tires as soon as pos-
sible, and inflate them to the proper pres-
sure. Driving on a significantly under-
inflated tire causes the tire to overheat and
can lead to tire failure. Under-inflation also
reduces fuel efficiency and tire tread life,
and may affect the vehicle’s handling and
stopping ability. Please note that the TPMS is not a substi-
tute for proper tire maintenance, and it is
the driver’s responsibility to maintain cor-
rect tire pressure, even if under-inflation
has not reached the level to trigger illumi-
nation of the TPMS low tire pressure telltale.
Your vehicle has also been equipped with a
TPMS malfunction indicator to indicate
when the system is not operating properly.
The TPMS malfunction indicator is com-
bined with the low tire pressure telltale.
When the system detects a malfunction,
the telltale will flash for approximately one
minute and then remain continuously illu-
minated. This sequence will continue upon
subsequent vehicle start-ups as long as
the malfunction exists. When the malfunc-
tion indicator is illuminated, the system
may not be able to detect or signal low tire
pressure as intended. TPMS malfunctions
may occur for a variety of reasons, includ-
ing the installation of replacement or alter-
nate tires or wheels on the vehicle that
prevent the TPMS from functioning prop-
erly. Always check the TPMS malfunction
telltale af ter replacing one or more tires or
wheels on your vehicle to ensure that the
replacement or alternate tires and wheels
allow the TPMS to continue to function
properly.
Starting and driving5-5