2023 HYUNDAI IONIQ 6 remove seats
[x] Cancel search: remove seatsPage 105 of 582
3
3-11
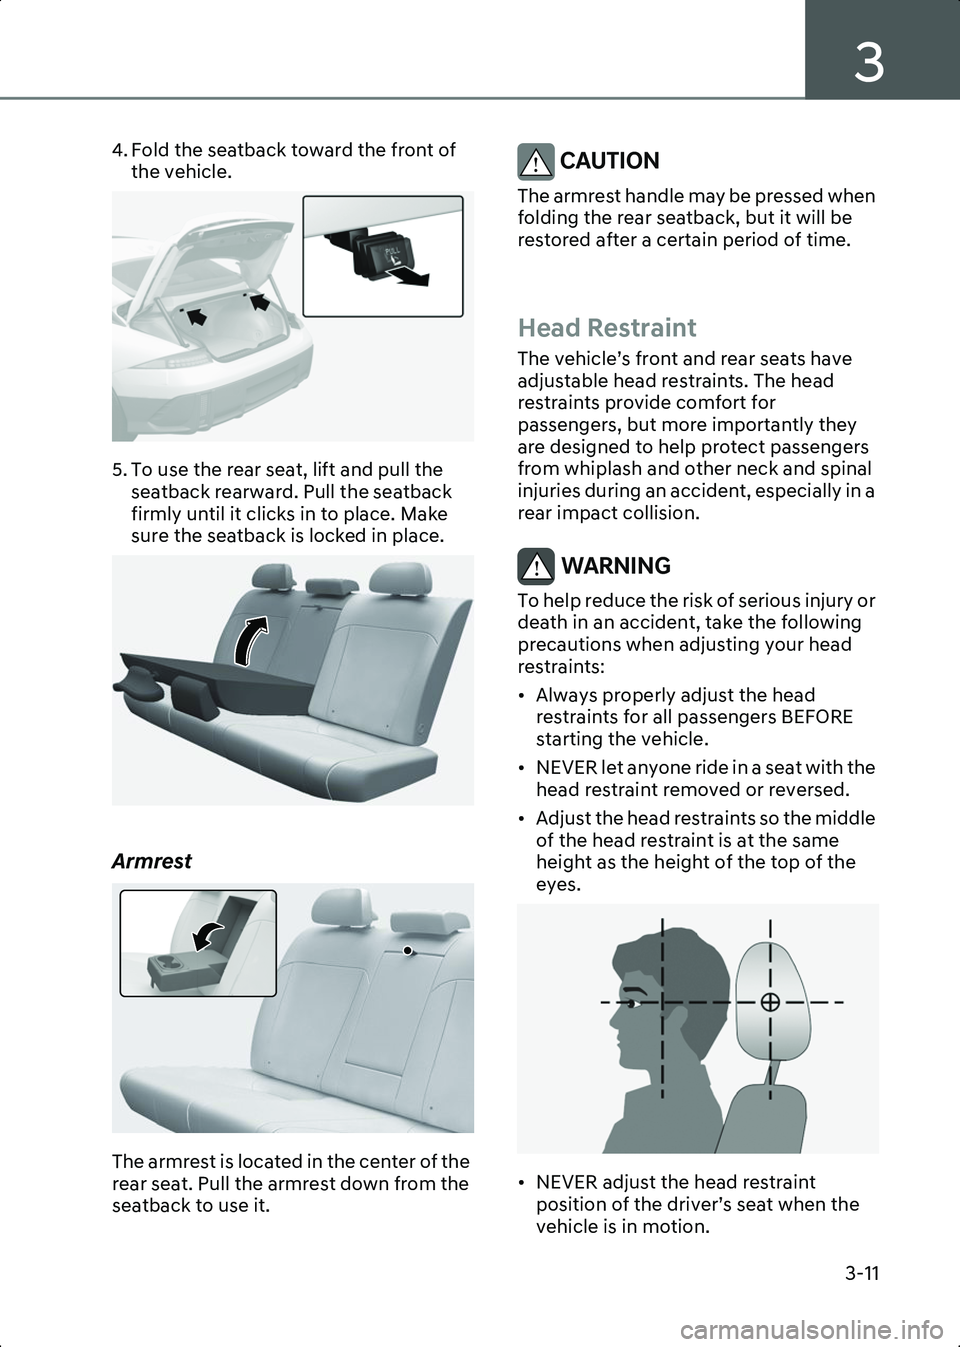
4. Fold the seatback toward the front of the vehicle.
B3000303
5. To use the rear seat, lift and pull the seatback rearward. Pull the seatback
firmly until it clicks in to place. Make
sure the seatback is locked in place.
B3000305
Armrest
B3000311
The armrest is located in the center of the
rear seat. Pull the armrest down from the
seatback to use it.
CAUTION The armrest handle may be pressed when
folding the rear seatback, but it will be
restored after a certain period of time.
Head Restraint
The vehicle’s front and rear seats have
adjustable head restraints. The head
restraints provide comfort for
passengers, but more importantly they
are designed to help protect passengers
from whiplash and other neck and spinal
injuries during an accident, especially in a
rear impact collision.
WARNING To help reduce the risk of serious injury or
death in an accident, take the following
precautions when adjusting your head
restraints:
• Always properly adjust the head restraints for all passengers BEFORE
starting the vehicle.
• NEVER let anyone ride in a seat with the head restraint removed or reversed.
• Adjust the head restraints so the middle of the head restraint is at the same
height as the height of the top of the
eyes.
OHI039190N
• NEVER adjust the head restraint position of the driver’s seat when the
vehicle is in motion.
Hyundai_CE_en_US.book Page 11
Page 108 of 582
Seats & Safety System
3-14
WARNING Always make sure the head restraint locks
into position after reinstalling and
adjusting it properly.
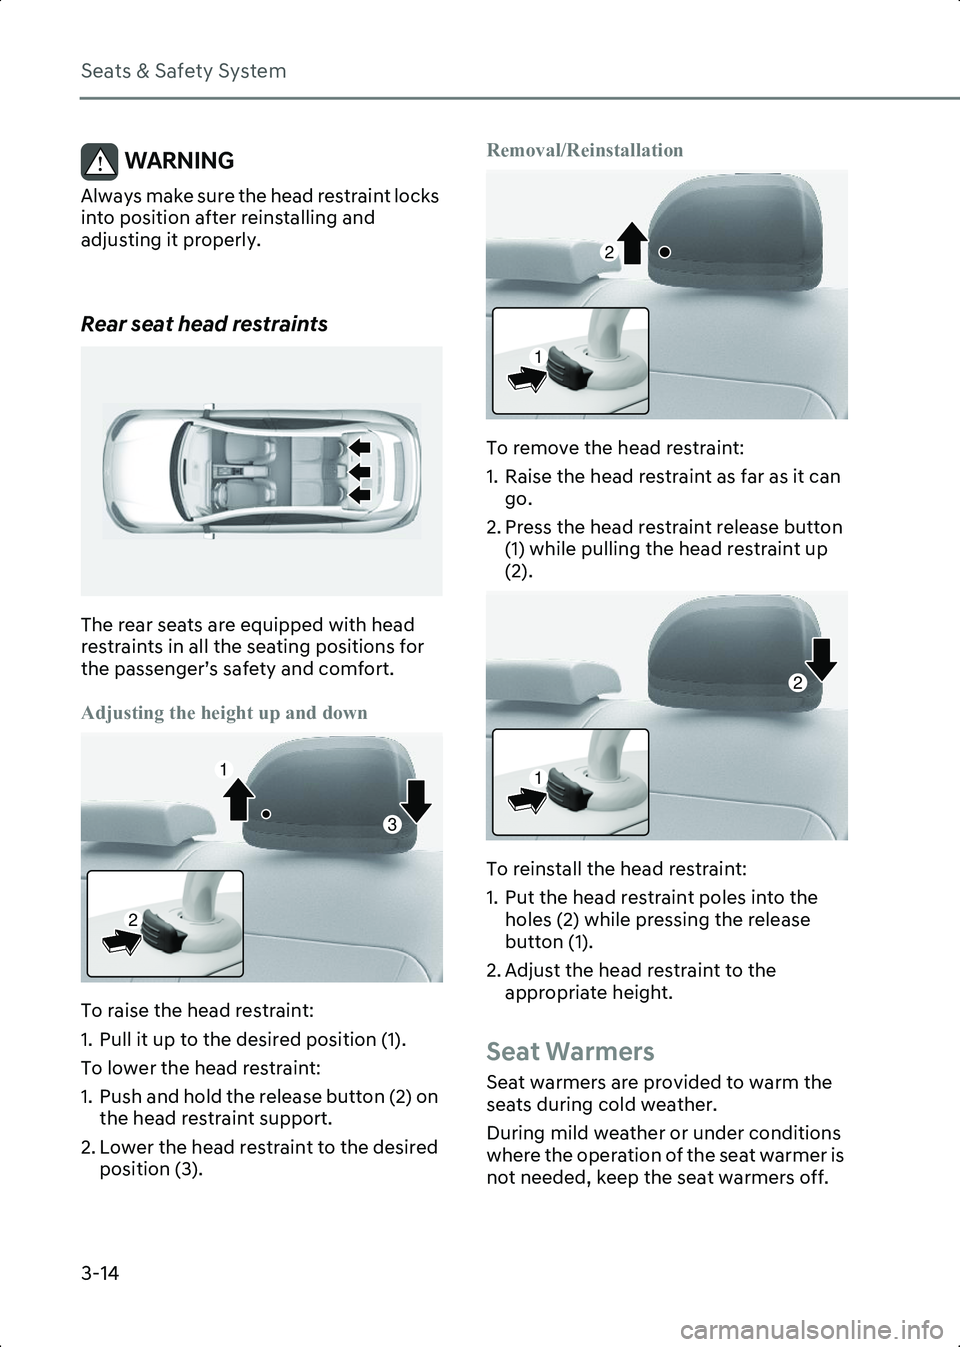
Rear seat head restraints
B3000306
The rear seats are equipped with head
restraints in all the seating positions for
the passenger’s safety and comfort.
Adjusting the height up and down
B3000307
To raise the head restraint:
1. Pull it up to the desired position (1).
To lower the head restraint:
1. Push and hold the release button (2) on the head restraint support.
2. Lower the head restraint to the desired position (3). Removal/Reinstallation
B3000308
To remove the head restraint:
1. Raise the head restraint as far as it can
go.
2. Press the head restraint release button (1) while pulling the head restraint up
(2).
B3000309
To reinstall the head restraint:
1. Put the head restraint poles into the holes (2) while pressing the release
button (1).
2. Adjust the head restraint to the appropriate height.
Seat Warmers
Seat warmers are provided to warm the
seats during cold weather.
During mild weather or under conditions
where the operation of the seat warmer is
not needed, keep the seat warmers off.
2
3
1
1
2
1
2
Hyundai_CE_en_US.book Page 14
Page 113 of 582
3
3-19
Seat Belts
This section describes how to use the seat
belts properly. It also describes some of
the things not to do when using seat belts.
Seat Belt Safety Precautions
Always fasten your seat belt and make
sure all passengers have fastened their
seat belts before starting any trip. Airbags
are designed to supplement the seat belt
as an additional safety device, not a
replacement. Most states require all
occupants of a vehicle to wear seat belts.
WARNING Seat belts must be used by ALL
passengers whenever the vehicle is
moving. Take the following precautions
when adjusting and wearing seat belts:
• Children under the age of 13 should be properly restrained in the rear seats.
• Never allow children to ride in the front passenger seat, unless the airbag is
deactivated. If a child is seated in the
front passenger seat, move the seat as
far back as possible. And the child must
always be restrained in the seat
properly.
• NEVER allow an infant or child to be carried on an occupant’s lap.
• NEVER ride with the seatback reclined when the vehicle is moving.
• Do not allow children to share a seat or seat belt.
• Do not wear the shoulder belt under your arm or behind your back.
• NEVER wear a seat belt over fragile objects. If there is a sudden stop or
impact, the seat belt can damage it.
• Do not use the seat belt if it is twisted. A twisted seat belt will not protect you
properly in an accident.
• Do not use a seat belt if the webbing or hardware is damaged. • Do not latch the seat belt into the
buckles of other seats.
• NEVER unfasten the seat belt while driving. This may cause loss of vehicle
control resulting in an accident.
• Make sure there is nothing in the buckle interfering with the seat belt latch
mechanism, because any materials in
the buckle can cause the seat belt not
to be fastened securely.
• No modifications or additions should be made by the user which will either
prohibit the seat belt adjusting devices
from operating to remove slack, or
prohibit the seat belt assembly from
being adjusted to remove slack.
WARNING Damaged seat belts and seat belt
assemblies will not operate properly.
Always replace:
• Frayed, contaminated, or damaged webbing.
• Damaged hardware.
• The entire seat belt assembly after it has been worn in an accident, even if
damage to webbing or assembly is not
apparent.
Hyundai_CE_en_US.book Page 19
Page 117 of 582
3
3-23
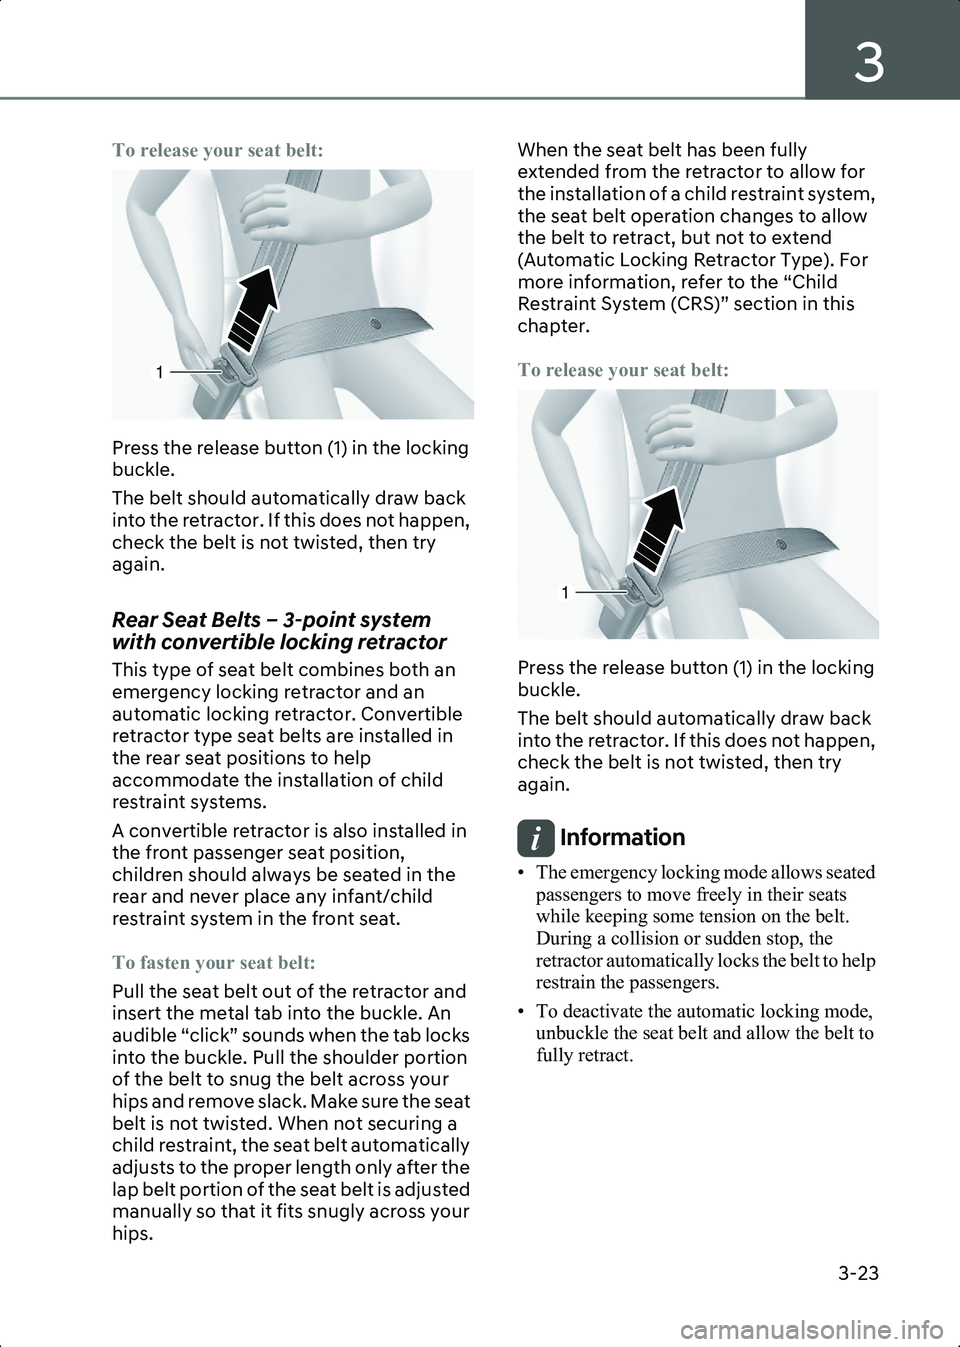
To release your seat belt:
B3001507
Press the release button (1) in the locking
buckle.
The belt should automatically draw back
into the retractor. If this does not happen,
check the belt is not twisted, then try
again.
Rear Seat Belts – 3-point system
with convertible locking retractor
This type of seat belt combines both an
emergency locking retractor and an
automatic locking retractor. Convertible
retractor type seat belts are installed in
the rear seat positions to help
accommodate the installation of child
restraint systems.
A convertible retractor is also installed in
the front passenger seat position,
children should always be seated in the
rear and never place any infant/child
restraint system in the front seat.
To fasten your seat belt:
Pull the seat belt out of the retractor and
insert the metal tab into the buckle. An
audible “click” sounds when the tab locks
into the buckle. Pull the shoulder portion
of the belt to snug the belt across your
hips and remove slack. Make sure the seat
belt is not twisted. When not securing a
child restraint, the seat belt automatically
adjusts to the proper length only after the
lap belt portion of the seat belt is adjusted
manually so that it fits snugly across your
hips.When the seat belt has been fully
extended from the retractor to allow for
the installation of a child restraint system,
the seat belt operation changes to allow
the belt to retract, but not to extend
(Automatic Locking Retractor Type). For
more information, refer to the “Child
Restraint System (CRS)” section in this
chapter.
To release your seat belt:
B3001507_1
Press the release button (1) in the locking
buckle.
The belt should automatically draw back
into the retractor. If this does not happen,
check the belt is not twisted, then try
again.
Information • The emergency locking mode allows seated
passengers to move freely in their seats
while keeping some tension on the belt.
During a collision or sudden stop, the
retractor automatically locks the belt to help
restrain the passengers.
• To deactivate the automatic locking mode, unbuckle the seat belt and allow the belt to
fully retract.
1
1
Hyundai_CE_en_US.book Page 23
Page 118 of 582
Seats & Safety System
3-24
Rear center seatbelt (3-point rear
center seat belt)
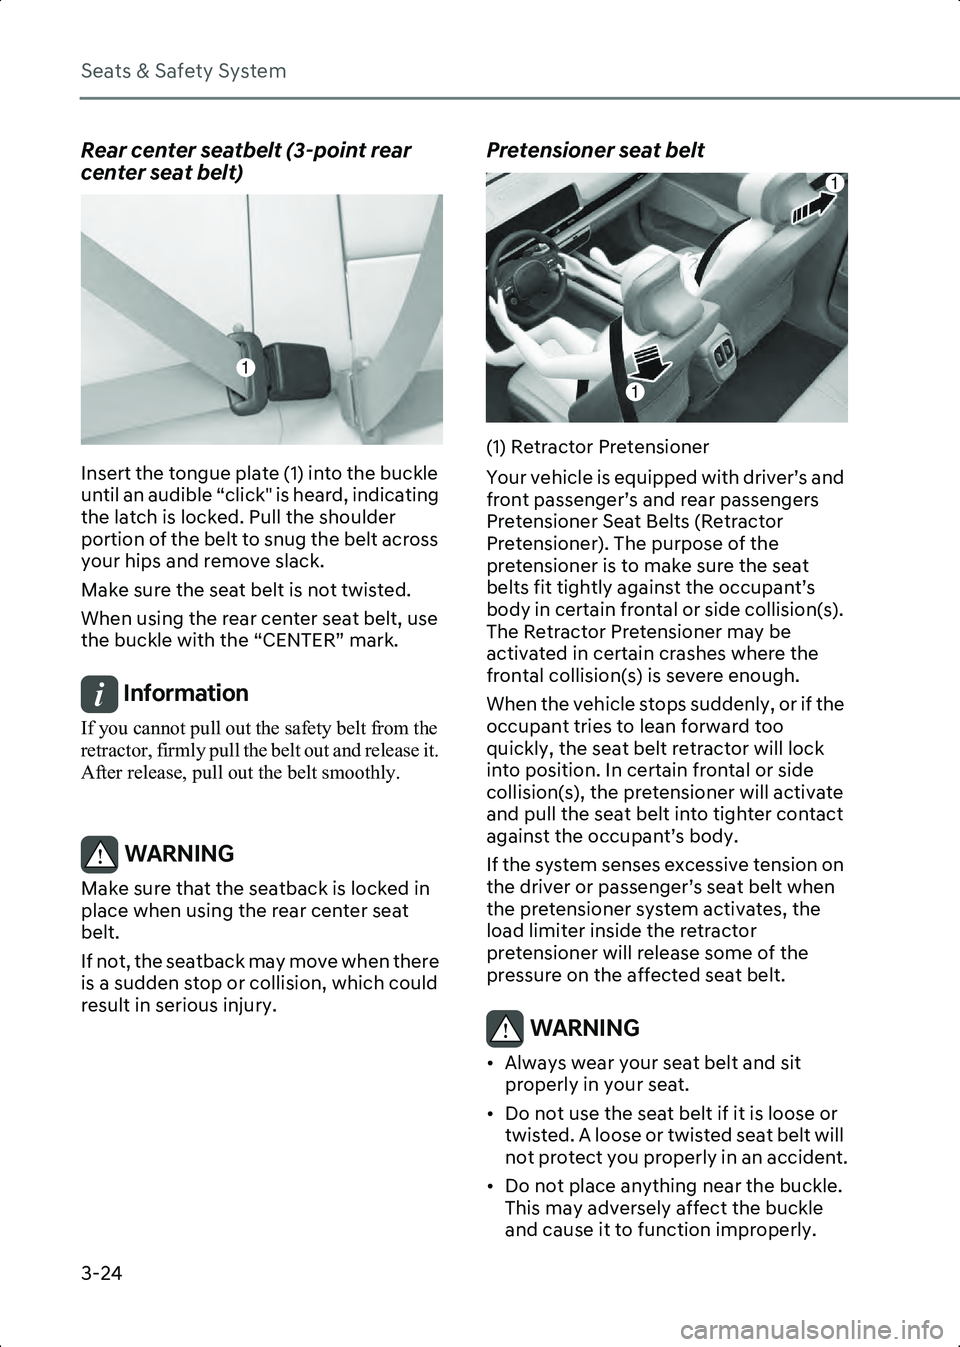
ONE1031087L
Insert the tongue plate (1) into the buckle
until an audible “click" is heard, indicating
the latch is locked. Pull the shoulder
portion of the belt to snug the belt across
your hips and remove slack.
Make sure the seat belt is not twisted.
When using the rear center seat belt, use
the buckle with the “CENTER” mark.
Information If you cannot pull out the safety belt from the
retractor, firmly pull the belt out and release it.
After release, pull out the belt smoothly.
WARNING Make sure that the seatback is locked in
place when using the rear center seat
belt.
If not, the seatback may move when there
is a sudden stop or collision, which could
result in serious injury.
Pretensioner seat belt
B3001601(1) Retractor Pretensioner
Your vehicle is equipped with driver’s and
front passenger’s and rear passengers
Pretensioner Seat Belts (Retractor
Pretensioner). The purpose of the
pretensioner is to make sure the seat
belts fit tightly against the occupant’s
body in certain frontal or side collision(s).
The Retractor Pretensioner may be
activated in certain crashes where the
frontal collision(s) is severe enough.
When the vehicle stops suddenly, or if the
occupant tries to lean forward too
quickly, the seat belt retractor will lock
into position. In certain frontal or side
collision(s), the pretensioner will activate
and pull the seat belt into tighter contact
against the occupant’s body.
If the system senses excessive tension on
the driver or passenger’s seat belt when
the pretensioner system activates, the
load limiter inside the retractor
pretensioner will release some of the
pressure on the affected seat belt.
WARNING • Always wear your seat belt and sit properly in your seat.
• Do not use the seat belt if it is loose or twisted. A loose or twisted seat belt will
not protect you properly in an accident.
• Do not place anything near the buckle. This may adversely affect the buckle
and cause it to function improperly.
1
1
1
Hyundai_CE_en_US.book Page 24
Page 123 of 582

3
3-29
or by a LATCH system in the rear seats of
the vehicle.
Child Restraint System (CRS)
Infants and younger children must be
restrained in an appropriate
rearward-facing or forward-facing CRS
that has first been properly secured to the
seat of the vehicle. Read and comply with
the instructions for installation and use
provided by the manufacturer of the Child
Restraint System.
WARNING An improperly secured child restraint can
increase the risk of SERIOUS INJURY or
DEATH in an accident. Always take the
following precautions when using a Child
Restraint System:
• NEVER install a child or infant restraint in the front passenger's seat.
• Always properly secure the child restraint to a rear seat of the vehicle.
• Always follow the child restraint system manufacturer's instructions for
installation and use.
• Always properly restrain your child in the child restraint.
• If the vehicle head restraint prevents proper installation of a child seat (as
described in the child restraint system
manual), the head restraint of the
respective seating position shall be
readjusted or entirely removed.
• Do not use an infant carrier or a child safety seat that "hooks" over a
seatback, it may not provide adequate
protection in an accident.
• After an accident, have an authorized HYUNDAI dealer check the child
restraint system, seat belts, tether
anchors and lower anchors.
Selecting a Child Restraint
System (CRS)
When selecting a Child Restraint System
for your child, always:
• Make sure the Child Restraint System has a label certifying that it meets
applicable Federal Motor Vehicle
Safety Standards (FMVSS 213).
• Select a Child Restraint System based on your child’s height and weight. The
required label or the instructions for use
typically provide this information.
• Select a Child Restraint System that fits the vehicle seating position where it will
be used.
• Read and comply with the warnings and instructions for installation and use
provided with the Child Restraint
System.
Child Restraint System types
There are three main types of Child
Restraint Systems: rearward-facing,
forward-facing and booster Child
Restraint Systems.
They are classified according to the
child’s age, height and weight.
Rearward-facing Child Restraint System
B3002201
A rearward-facing Child Restraint System
provides restraint with the seating
surface against the back of the child. The
harness system holds the child in place,
and in an accident, acts to keep the child
positioned in the Child Restraint Systems
Hyundai_CE_en_US.book Page 29
Page 125 of 582
3
3-31
respective seating position shall be
readjusted or entirely removed.
After selecting a proper Child Restraint
System for your child and checking that
the Child Restraint System fits properly
on the seating position, there are three
general steps for a proper installation:
•Properly secure the Child Restraint
System to the vehicle. All Child
Restraint Systems must be secured to
the vehicle with the lap belt or lap part
of a lap/shoulder belt or with the lower
anchor and/or tether anchor and/or
with the support leg.
• Make sure the Child Restraint System
is firmly secured. After installing a
Child Restraint System to the vehicle,
push and pull the seat forward and from
side-to-side to verify that it is securely
attached to the seat. A Child Restraint
System secured with a seat belt should
be installed as firmly as possible.
However, some side-to-side
movement can be expected. When
installing a Child Restraint System,
adjust the vehicle seat and seatback
(up and down, forward and rearward)
so that your child fits in the Child
Restraint System in a comfortable
manner.
• Secure the child in the Child Restraint
System. Make sure the child is properly
strapped in the Child Restraint System
according to the Child Restraint System
manufacturer’s instructions.
CAUTION A Child Restraint System in a closed
vehicle can become very hot. To prevent
burns, check the seating surface and
buckles before placing your child in the
Child Restraint System.
Lower Anchors and Tether for
Children (LATCH System)
The LATCH system holds a Child Restraint
System during driving and in an accident.
This system is designed to make
installation of the Child Restraint System
easier and reduce the possibility of
improperly installing your Child Restraint
System. The LATCH system uses anchors
in the vehicle and attachments on the
Child Restraint System. The LATCH
system eliminates the need to use seat
belts to secure the Child Restraint System
to the rear seats.
Lower anchors are metal bars built into
the vehicle. There are two lower anchors
for each LATCH seating position that will
accommodate a Child Restraint System
with lower attachments.
To use the LATCH system in your vehicle,
you must have a Child Restraint System
with LATCH attachments.
The Child Restraint System manufacturer
will provide you with instructions on how
to use the Child Restraint System with its
attachments for the LATCH anchorages.
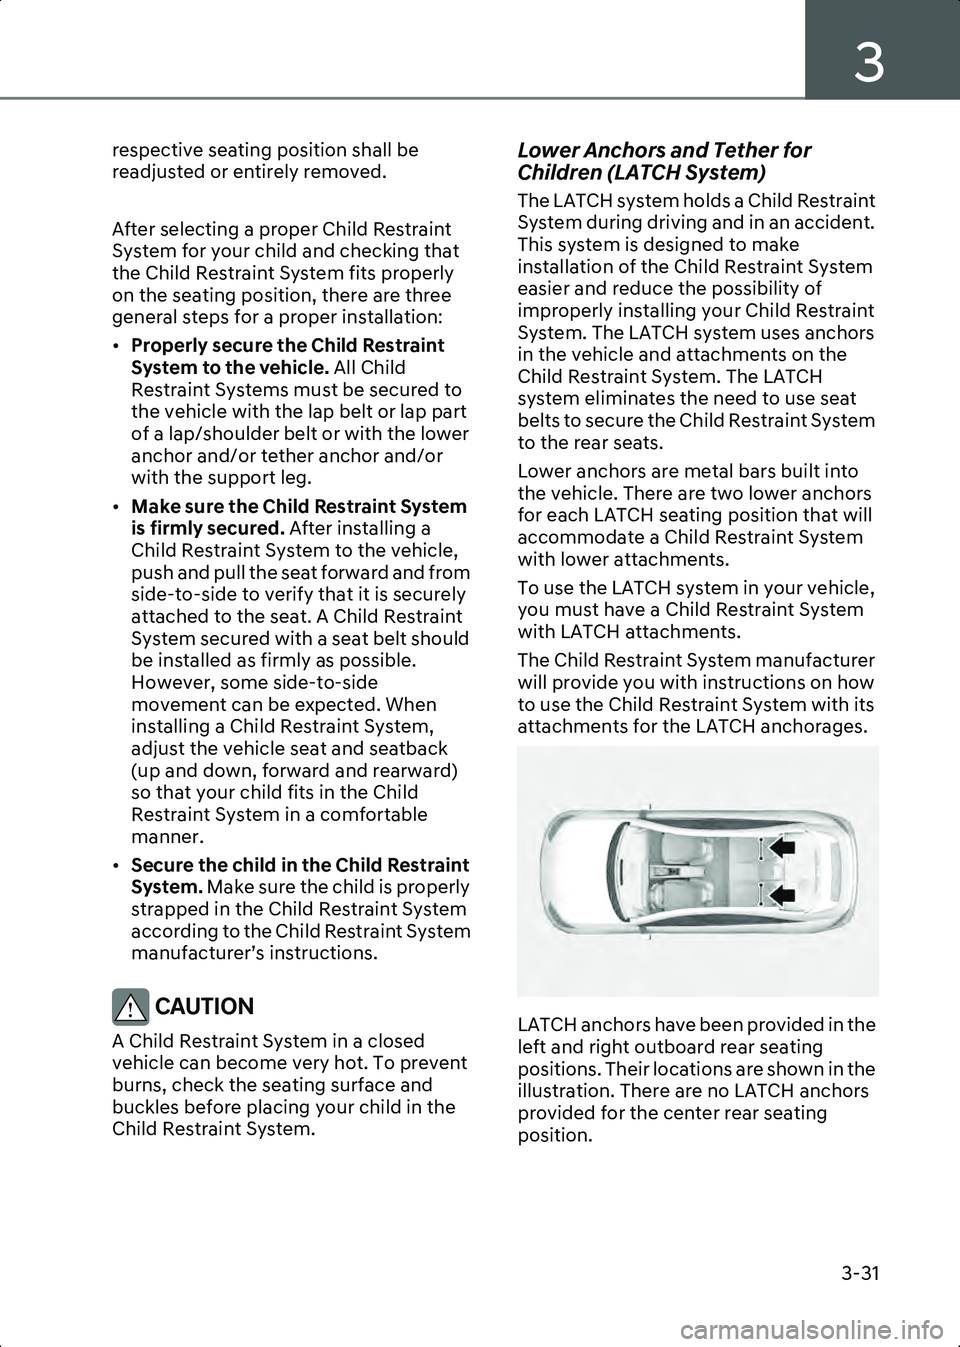
B3002210
LATCH anchors have been provided in the
left and right outboard rear seating
positions. Their locations are shown in the
illustration. There are no LATCH anchors
provided for the center rear seating
position.
Hyundai_CE_en_US.book Page 31
Page 128 of 582
Seats & Safety System
3-34
WARNING ALWAYS place a rearward-facing Child
Restraint System in the rear seat of the
vehicle.
Placing a rearward-facing child restraint
in the front seat can result in serious injury
or death if the Child Restraint System is
struck by an inflating airbag.
Automatic locking mode
Since all passenger seat belts move freely
under normal conditions and only lock
under extreme or emergency conditions
(emergency locking mode), you must
manually pull the seat belt all the way out
to shift the retractor to the "Automatic
Locking" mode to secure a Child Restraint
System.
The "Automatic Locking" mode will help
prevent the normal movement of the
child in the vehicle from causing the seat
belt to loosen and compromise the Child
Restraint System. To secure a Child
Restraint System, use the following
procedure.
To install a Child Restraint System on the
rear seats, do the following:
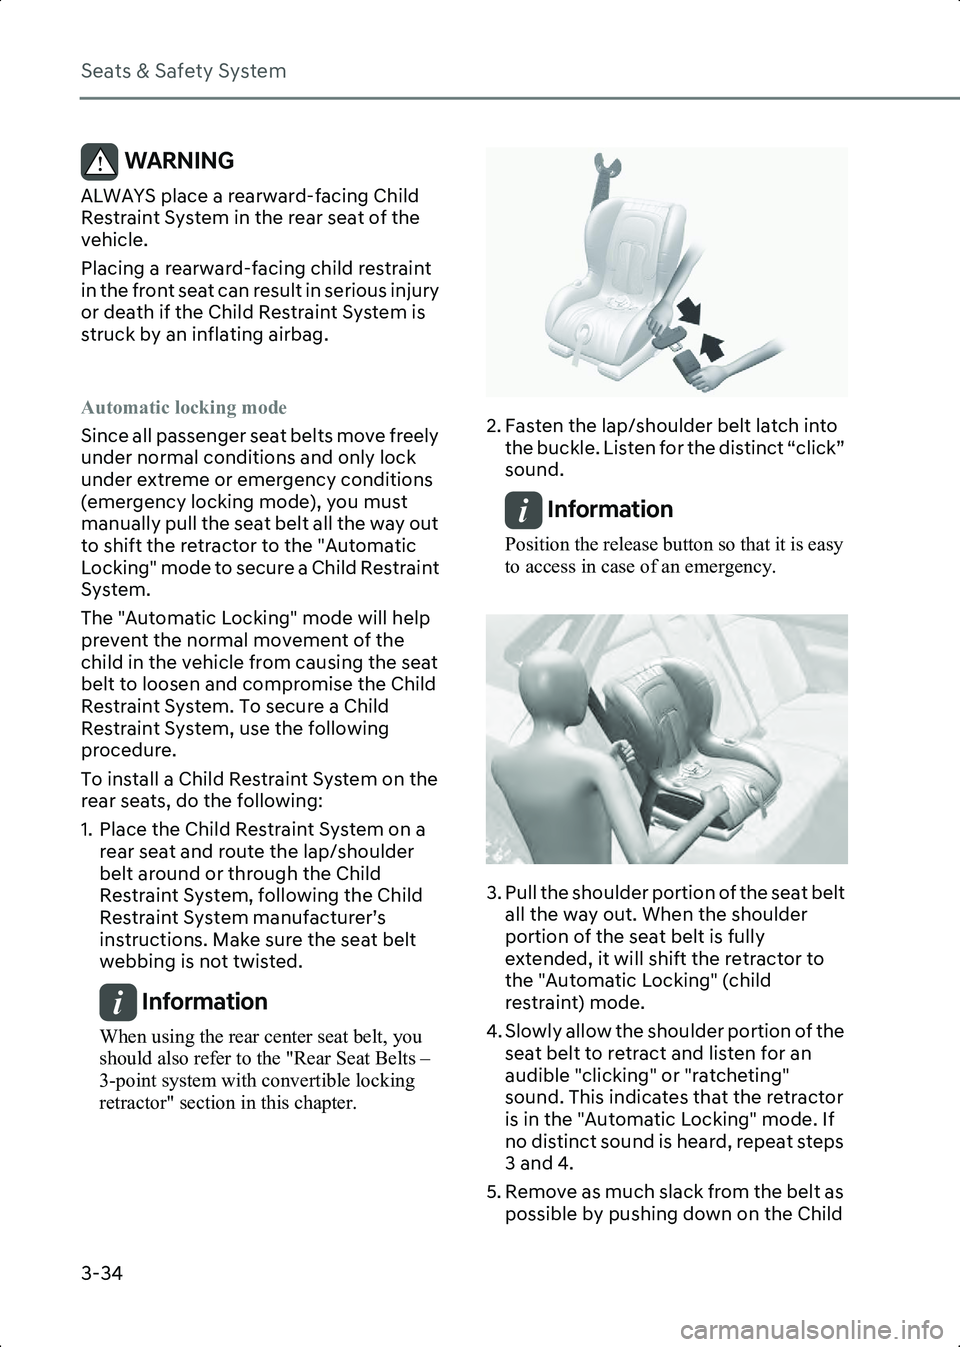
1. Place the Child Restraint System on a rear seat and route the lap/shoulder
belt around or through the Child
Restraint System, following the Child
Restraint System manufacturer’s
instructions. Make sure the seat belt
webbing is not twisted.
Information When using the rear center seat belt, you
should also refer to the "Rear Seat Belts –
3-point system with convertible locking
retractor" section in this chapter.
B3002204
2. Fasten the lap/shoulder belt latch into the buckle. Listen for the distinct “click”
sound.
Information Position the release button so that it is easy
to access in case of an emergency.
B3002207
3. Pull the shoulder portion of the seat belt all the way out. When the shoulder
portion of the seat belt is fully
extended, it will shift the retractor to
the "Automatic Locking" (child
restraint) mode.
4. Slowly allow the shoulder portion of the seat belt to retract and listen for an
audible "clicking" or "ratcheting"
sound. This indicates that the retractor
is in the "Automatic Locking" mode. If
no distinct sound is heard, repeat steps
3 and 4.
5. Remove as much slack from the belt as possible by pushing down on the Child
Hyundai_CE_en_US.book Page 34