2023 HYUNDAI IONIQ 5 Emergency
[x] Cancel search: EmergencyPage 590 of 680

Emergency Situations
8-12
ONE1081007
For safe operation, carefully read and
follow the instructions in this manual
before use.
(1) Compressor
(2) Sealant bottle
The tire mobility kit is a temporary fix
to the tire, have the tire inspected by
an authorized HYUNDAI dealer or the
equivalent approved for your vehicle as soon as possible.
CAUTION
When two or more tires are flat, do not
use the tire mobility kit because the
supported one sealant of Tire Mobility
Kit is only used for one flat tire.
WARNING
Do not use the Tire Mobility Kit to repair
punctures in the tire walls. This can
result in an accident due to tire failure.
WARNING
Have your tire repaired as soon as
possible. The tire may lose air pressure
at any time after inflating with the Tire
Mobility Kit.
Introduction
With the Tire Mobility Kit you stay mobile
even after experiencing a tire puncture.
The compressor and sealing compound
system effectively and comfortably seals
most punctures in a passenger car tire
caused by nails or similar objects and
reinflates the tire.
After you ensure that the tire is properly
sealed you can drive cautiously on the
tire (distance up to 120 miles (200 km))
at a max. speed of ( 50 mph (80 km/h))
in order to reach a service station or tire
dealer for the tire replacement.
It is possible that some tires, especially
with larger punctures or damage to the
sidewall, cannot be sealed completely.
Air pressure loss in the tire may adversely
affect tire performance.
For this reason, you should avoid abrupt
steering or other driving maneuvers,
especially if the vehicle is heavily loaded
or if a trailer is in use.
The Tire Mobility Kit is not designed
or intended as a permanent tire repair
method and is to be used for one tire
only.
This instruction shows you step by step
how to temporarily seal the puncture
simply and reliably.
Read the section “Notes on the safe use
of the Tire Mobility Kit”.
WARNING
Do not use the TMK if a tire is severely
damaged by driving run flat or with
insufficient air pressure.
Only punctured areas located within the
tread region of the tire can be sealed using the TMK.
if you haVe a flat tire (with tire mobility Kit,
if equipped)
Page 592 of 680

Emergency Situations
8-14
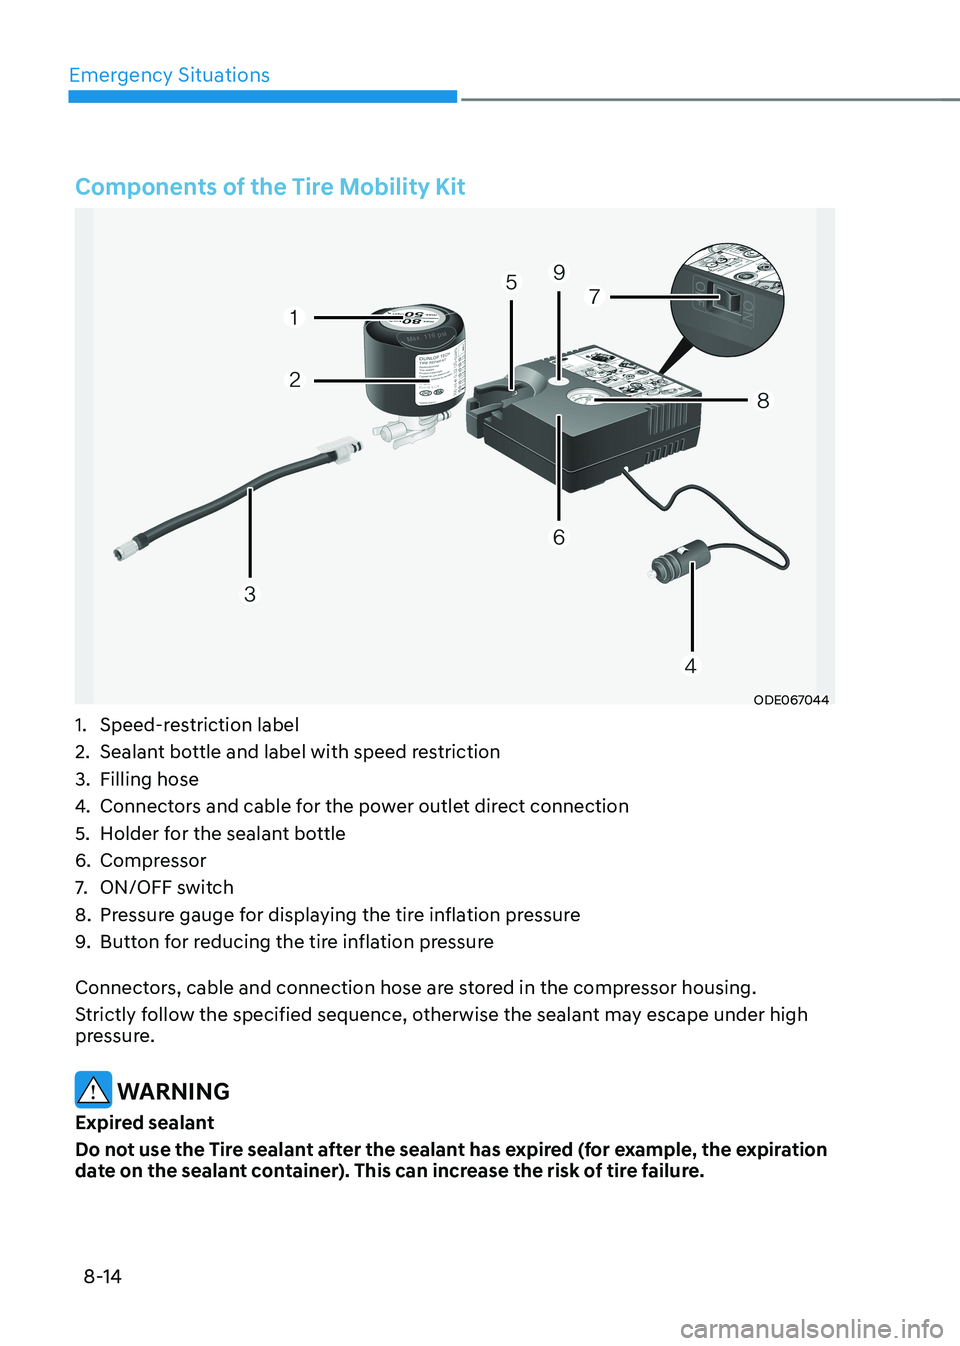
Components of the Tire Mobility Kit
ODE067044
1. Speed-restriction label
2. Sealant bottle and label with speed restriction
3. Filling hose
4. Connectors and cable for the power outlet direct connection
5. Holder for the sealant bottle
6. Compressor
7. ON/OFF switch
8. Pressure gauge for displaying the tire inflation pressure
9. Button for reducing the tire inflation pressure
Connectors, cable and connection hose are stored in the compressor housing.
Strictly follow the specified sequence, otherwise the sealant may escape under high
pressure.
WARNING
Expired sealant
Do not use the Tire sealant after the sealant has expired (for example, the expiration
date on the sealant container). This can increase the risk of tire failure.
Page 594 of 680

Emergency Situations
8-16
ONE1081010
5. Plug the compressor power cord (4) into the vehicle power outlet.
NOTICE
Only use the front passenger side
power outlet when connecting the
power cord.
6. With the vehicle ON (
indicator ON), switch on
the compressor and let it run for
approximately 5~7 minutes to fill the
sealant up to proper pressure. (refer
to the Tire and Wheels, chapter 2).
The inflation pressure of the tire after
filling is unimportant and will be
checked/corrected later.
Be careful not to overinflate the tire
and stay away from the tire when filling it.
CAUTION
Tire pressure
Do not attempt to drive your vehicle if
the tire pressure is below 200 kPa (29
psi). This could result in an accident due
to sudden tire failure. 7.
Switch off the compressor.
8. Detach the hoses from the sealant bottle connector and from the tire
valve.
Return the Tire Mobility Kit to its storage
location in the vehicle.
OLMF064106
9. Immediately drive approximately 4~6
miles (7~10 km or, about 10min) to
evenly distribute the sealant in the
tire.
Do not exceed a speed of 50 mph (80
km/h). If possible, do not fall below a
speed of 12 mph (20 km/h).
While driving, if you experience any
unusual vibration, ride disturbance or
noise, reduce your speed and drive with
caution until you can safely pull off of the
side of the road.
Call for road side service or towing.
Page 596 of 680

Emergency Situations
8-18
Information
When reinstalling the repaired or
replaced tire and wheel on the vehicle, tighten the wheel lug nut to 79~94 lbf·ft
(11~13 kgf·m).
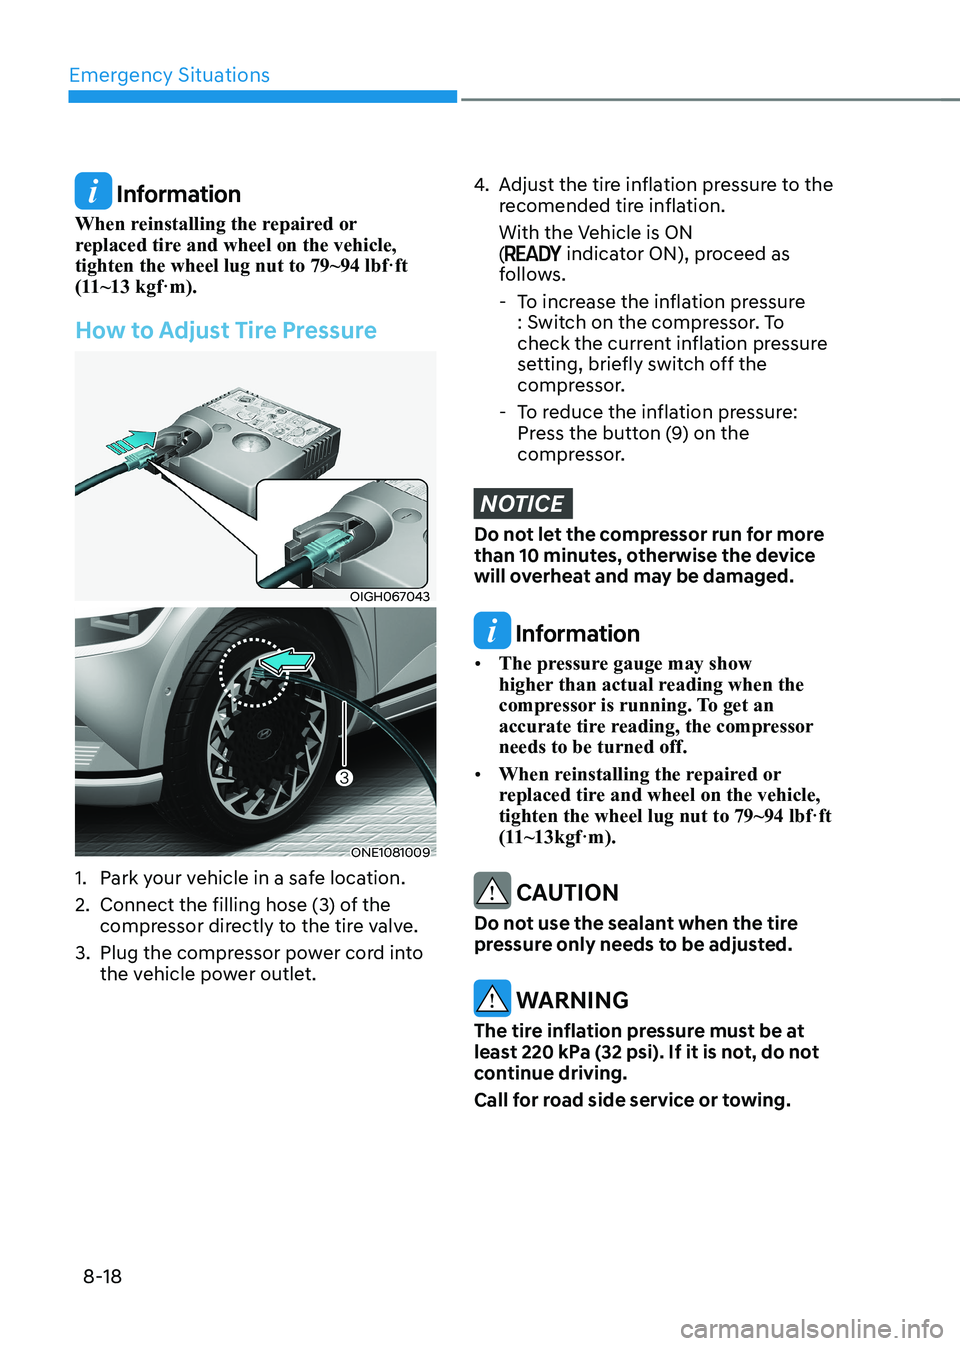
How to Adjust Tire Pressure
OIGH067043
ONE1081009
1. Park your vehicle in a safe location.
2. Connect the filling hose (3) of the compressor directly to the tire valve.
3. Plug the compressor power cord into the vehicle power outlet.
4. Adjust the tire inflation pressure to the
recomended tire inflation.
With the Vehicle is ON (
indicator ON), proceed as
follows.
- To increase the inflation pressure : Switch on the compressor. To
check the current inflation pressure
setting, briefly switch off the
compressor.
- To reduce the inflation pressure: Press the button (9) on the
compressor.
NOTICE
Do not let the compressor run for more
than 10 minutes, otherwise the device
will overheat and may be damaged.
Information
• The pressure gauge may show
higher than actual reading when the
compressor is running. To get an
accurate tire reading, the compressor needs to be turned off.
• When reinstalling the repaired or
replaced tire and wheel on the vehicle, tighten the wheel lug nut to 79~94 lbf·ft
(11~13kgf·m).
CAUTION
Do not use the sealant when the tire
pressure only needs to be adjusted.
WARNING
The tire inflation pressure must be at
least 220 kPa (32 psi). If it is not, do not
continue driving.
Call for road side service or towing.
Page 598 of 680
![HYUNDAI IONIQ 5 2023 Owners Manual Emergency Situations
8-20
Towing Service
ONE1081011
[A] : Dollies
If emergency towing is necessary, have it
done by an authorized HYUNDAI dealer
or a commercial tow-truck service.
Proper lifting HYUNDAI IONIQ 5 2023 Owners Manual Emergency Situations
8-20
Towing Service
ONE1081011
[A] : Dollies
If emergency towing is necessary, have it
done by an authorized HYUNDAI dealer
or a commercial tow-truck service.
Proper lifting](/manual-img/35/56168/w960_56168-597.png)
Emergency Situations
8-20
Towing Service
ONE1081011
[A] : Dollies
If emergency towing is necessary, have it
done by an authorized HYUNDAI dealer
or a commercial tow-truck service.
Proper lifting and towing procedures
are necessary to prevent damage to
the vehicle. The use of wheel dollies or
flatbed is recommended.
For 2WD vehicles, it is acceptable to tow
the vehicle with the front wheels on the
ground (without dollies) and the rear
wheels off the ground.
If any of the loaded wheels or suspension
components are damaged or the vehicle
is being towed with the rear wheels on
the ground, use a towing dolly under the
rear wheels.
When being towed by a commercial tow
truck and wheel dollies are not used,
the rear of the vehicle should always be
lifted, not the front.
For AWD vehicles, it must be towed
with a wheel lift and dollies or flatbed
equipment with all the wheels off the
ground.
NOTICE
Do not lift the vehicle by the tow fitting or body and chassis parts. Otherwise
the vehicle may be damaged.
CAUTION
• Do not tow the vehicle with the rear
wheels on the ground as this may
cause damage to the vehicle.
ONE1081014
• Do not tow with sling-type
equipment. Use wheel lift or flatbed
equipment.
ONE1081015
When towing your vehicle in an
emergency without wheel dollies:
1. While depressing the brake pedal shift to the N (Neutral) position and
turn the vehicle off. The START/STOP
button will be in the ACC position.
2. Release the parking brake.
CAUTION
Failure to shift the gear to N (Neutral)
may cause internal damage to the
reduction gear.
towing
Page 600 of 680

Emergency Situations
8-22
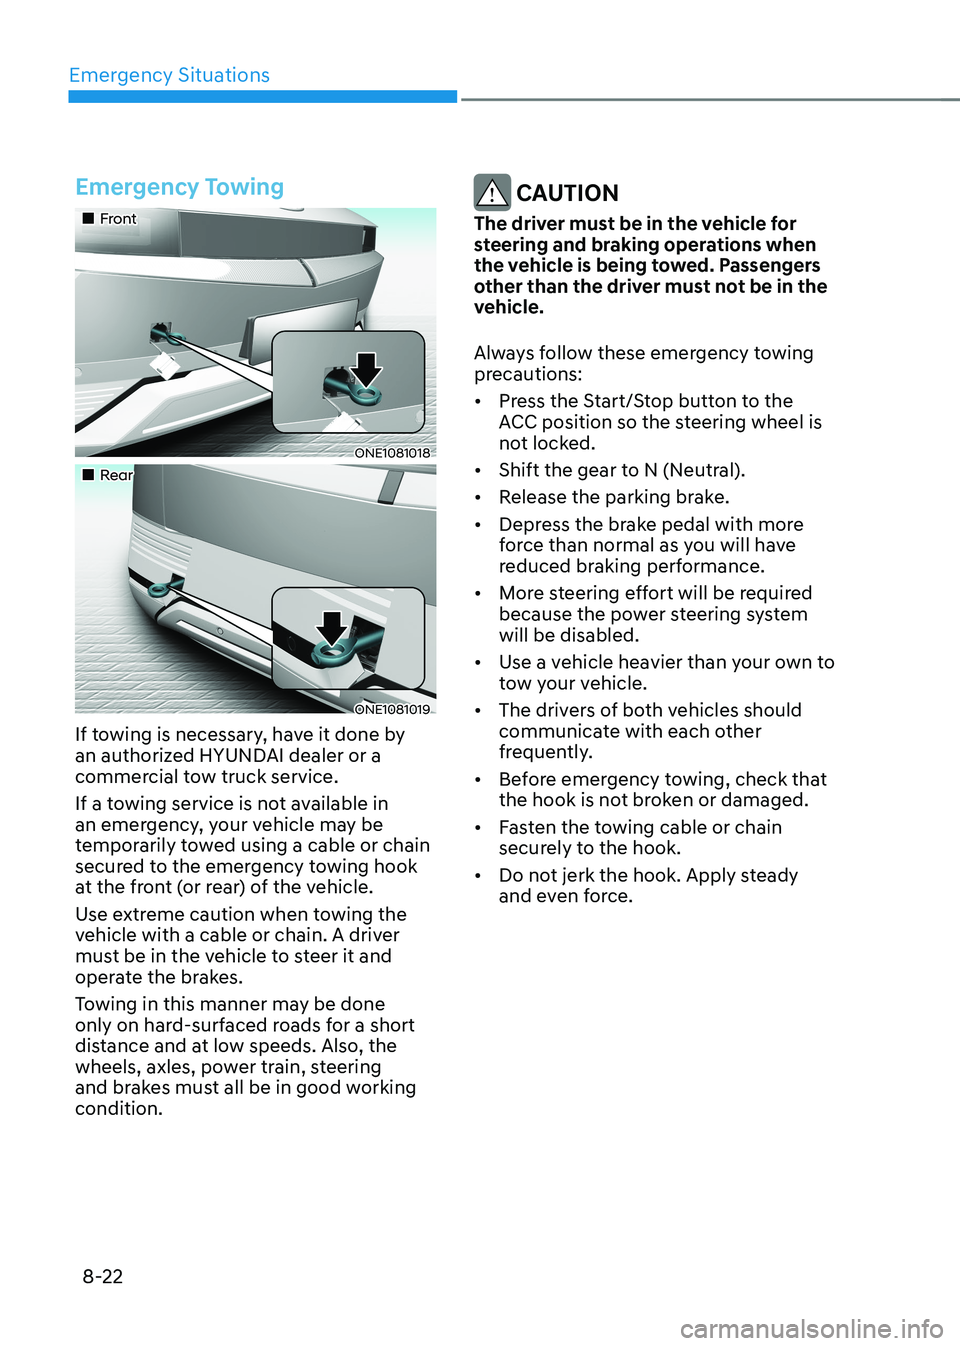
Emergency Towing
„„Front
ONE1081018
„„Rear
ONE1081019
If towing is necessary, have it done by
an authorized HYUNDAI dealer or a
commercial tow truck service.
If a towing service is not available in
an emergency, your vehicle may be
temporarily towed using a cable or chain
secured to the emergency towing hook
at the front (or rear) of the vehicle.
Use extreme caution when towing the
vehicle with a cable or chain. A driver
must be in the vehicle to steer it and
operate the brakes.
Towing in this manner may be done
only on hard-surfaced roads for a short
distance and at low speeds. Also, the
wheels, axles, power train, steering
and brakes must all be in good working condition.
CAUTION
The driver must be in the vehicle for
steering and braking operations when
the vehicle is being towed. Passengers
other than the driver must not be in the
vehicle.
Always follow these emergency towing
precautions: • Press the Start/Stop button to the
ACC position so the steering wheel is
not locked.
• Shift the gear to N (Neutral).
• Release the parking brake.
• Depress the brake pedal with more
force than normal as you will have
reduced braking performance.
• More steering effort will be required
because the power steering system will be disabled.
• Use a vehicle heavier than your own to
tow your vehicle.
• The drivers of both vehicles should
communicate with each other
frequently.
• Before emergency towing, check that
the hook is not broken or damaged.
• Fasten the towing cable or chain
securely to the hook.
• Do not jerk the hook. Apply steady
and even force.
Page 627 of 680

Maintenance
9-26
WARNING
The original tire should be repaired or
replaced as soon as possible to avoid
failure of the spare and loss of vehicle
control resulting in an accident. The
compact spare tire is for emergency
use only. Do not operate your vehicle
over 50 mph (80 km/h) when using the
compact spare tire.
Wheel Replacement
When replacing the metal wheels for any
reason, make sure the new wheels are
equivalent to the original factory units in
diameter, rim width and offset.
Tire Traction
Tire traction can be reduced if you drive
on worn tires, tires that are improperly
inflated or on slippery road surfaces.
Tires should be replaced when tread
wear indicators appear. To reduce the
possibility of losing control, slow down
whenever there is rain, snow or ice on
the road.
Tire Maintenance
In addition to proper inflation, correct
wheel alignment helps to decrease tire
wear. If you find a tire is worn unevenly,
have your dealer check the wheel
alignment.
When you have new tires installed,
make sure they are balanced. This will
increase vehicle ride comfort and tire
life. Additionally, a tire should always
be rebalanced if it is removed from the wheel.
Tire Sidewall Labeling
This information identifies and describes
the fundamental characteristics of
the tire and also provides the Tire
Identification Number (TIN) for safety
standard certification. The TIN can be
used to identify the tire in case of a
recall.
OLMB073028
3
5, 6
1
7
1
2
4
1. Manufacturer or brand name
Manufacturer or brand name is shown.
2. Tire size designation
A tire’s sidewall is marked with a tire
size designation. You will need this
information when selecting replacement
tires for your car. The following explains
what the letters and numbers in the tire
size designation mean.
Page 637 of 680

Maintenance
9-36
Instrument Panel Fuse
Replacement
„„Driver’s side
ONE1091010
1. Turn the vehicle off.
2. Turn all other switches off.
3. Open the fuse panel cover.
4. Refer to the label on the inside of
the fuse panel cover to locate the
suspected fuse location.
ONE1091011
5. Pull the suspected fuse straight out. Use the removal tool (1) provided in
the motor compartment fuses panel
cover.
6. Check the removed fuse; replace it if it is blown. Spare fuses are provided in
the instrument panel fuse panels (or in
the motor compartment fuse panel).
7. Push in a new fuse of the same
rating, and make sure it fits tightly in
the clips. If it fits loosely, consult an
authorized HYUNDAI dealer.
In an emergency, if you do not have
a spare fuse, use a fuse of the same
rating from a circuit you may not need
for operating the vehicle, such as the
cigarette lighter fuse.
If the headlamps or other electrical
components do not work and the fuses
are undamaged, check the fuse panel
in the motor compartment. If a fuse is
blown, it must be replaced with the same
rating.