2023 HYUNDAI IONIQ 5 transmission
[x] Cancel search: transmissionPage 242 of 680

Convenience Features
5-50
Automatic-Dimming Night Vision Safety™ (NVS®
) Mirror (if equipped)
The NVS® Mirror automatically reduces
glare by monitoring light levels in the
front and the rear of the vehicle. Any
object that obstructs either light sensor
will degrade the automatic dimming
control feature.
For more information regarding NVS®
mirrors and other applications, please
refer to the Gentex website:
www.gentex.com
Your mirror will automatically dim
upon detecting glare from the vehicles
traveling behind you.
The mirror defaults to the ON position
each time the vehicle is started.
Integrated HomeLink ®
Wireless Control
System
The HomeLink® Wireless Control System
provides a convenient way to replace
up to three hand held radio-frequency
transmitters used to activate compatible
devices such as gate operators, garage
door openers, entry door locks, security
systems, and home lighting.
NOTICE
HomeLink® operates while the ignition
switch is in the ACC or ON position
for safety reasons. It is to prevent
unintentional security problems from
happening when the vehicle is parked
outside the garage.
WARNING
Before programming HomeLink® to a
garage door opener or gate operator,
make sure people and objects are out
of the way of the device to prevent
potential harm or damage. Do not
use the HomeLink® with any garage
door opener that lacks the safety
stop and reverse features required
by U.S. federal safety standards (this
includes any garage door opener model
manufactured before April 1, 1982).
A garage door that cannot detect an
object - signaling the door to stop and
reverse - does not meet current U.S.
federal safety standards. Using a garage
door opener without these features
increases the risk of serious injury or
death.
For more information, contact
HomeLink® at www.homelink.com, or
call Home-Link customer support at
1-800-355-3515.
It is also recommended that a new
battery be replaced in the handheld
transmitter of the device being trained
to HomeLink® for quicker training and
accurate transmission of the radio
frequency.
Page 243 of 680

05
5-51
1. Programming HomeLink®
The following steps show how to
program HomeLink. If you have any
questions or are having difficulty
programming your HomeLink buttons,
refer to the HomeLink website or call the
HomeLink customer support toll-free
number. Do this, before going back to
the dealer who sold you the car. •
Visit the HomeLink website at: www.
homelink.com. Then at the top of the
page, choose your vehicle make. Then
watch the You Tube video, and/or
access additional website information.
• If you choose to access the website
via your cell phone, scan the QR code.
• Or, call HomeLink customer support at 1-800-355-3515 (Please have the
vehicle make/model AND the opener
device make/model readily available.) 1) Programming Preparation
ONE1051262N
1. When programming a garage door opener, it is advised to park the
vehicle outside of the garage.
2. It is recommended that a new battery be placed in the handheld transmitter
of the device being programmed to
HomeLink for quicker training and
accurate transmission of the radio-
frequency signal.
3. Place the ignition switch to the ACC (Accessory) position for programming
of HomeLink.
2) Programming a New HomeLink®
ONE1051263N
1. Press and release the HomeLink button (1), (2) or (3), you would like
to program. The HomeLink indicator
light (7) will flash orange slowly (if
not, perform the steps of “Erasing
HomeLink Buttons” section, and start
over).
Page 246 of 680

Convenience Features
5-54
4) Canadian Programming
Canadian radio-frequency laws require
transmitter remote signals to “time-
out” (or quit) after a couple seconds of
transmission, which may not be long
enough for HomeLink to pick up the
signal during programming.
If you live in Canada or you are having
difficulties programming a gate operator
or garage door opener by using the
programming procedures, replace
“Programming a New HomeLink Button”
step 3 with the following:
While the HomeLink indicator light (7)
is flashing orange, press and release
(“cycle”) your device’s handheld remote
every two seconds until the HomeLink
indicator light (7) changes from orange
to green. You may now release the hand-
held remote button. Then proceed with
“Programming a New HomeLink Button”
step 4.
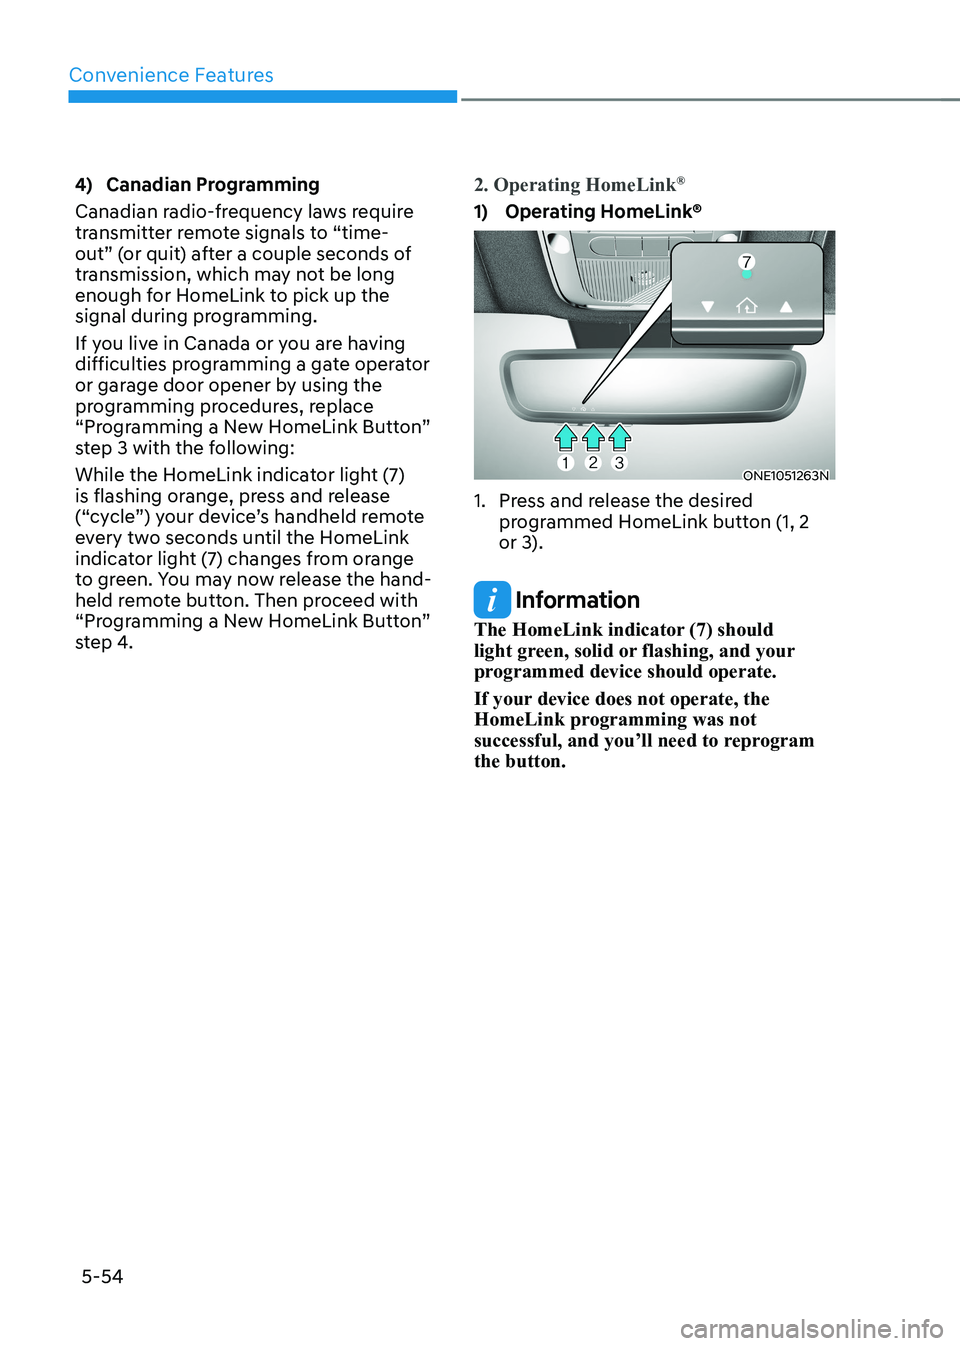
2. Operating HomeLink
®
1) Operating HomeLink®
ONE1051263N
1. Press and release the desired programmed HomeLink button (1, 2
or 3).
Information
The HomeLink indicator (7) should
light green, solid or flashing, and your
programmed device should operate.
If your device does not operate, the
HomeLink programming was not
successful, and you’ll need to reprogram the button.
Page 557 of 680

07
7-155
•
Check that all smart keys are
outside the vehicle when using
Remote Operation function.
• Remote Operation function will
operate only when the smart key is
within 13 ft. (4 m) from the vehicle. If
there is no vehicle movement even
when the Forward (
) or Backward
() button is pressed on the smart
key, check the distance to the
vehicle and press the button again.
• The detecting range of the smart
key may vary depending on the
surroundings that are affected by
radio waves such as transmission
tower, broadcast station, etc.
• When remotely moving forward
using method (1), it is recognized
as an exit situation, and the
vehicle moves 13 ft. (4 m) to
check for pedestrians, animals or
objects around the vehicle. After
confirmation, the steering wheel
is controlled according to the condition ahead.
• When remotely moving forward
using method (2), it is recognized
as a parking situation, and will
immediately control the steering
wheel according to the condition
ahead to assist with entering the parking space and aligning the
vehicle. However, performance
may reduce depending on the
pedestrians, animals, shape of
objects, location, etc., around the
vehicle.
• For moving remotely backward,
both method (1) and (2) aligns the
steering wheel first, and then will
only move the vehicle straight.
• When remotely moving forward or
backward is completed, the vehicle
will automatically shift to P (Park)
and engage EPB (Electronic Parking
Brake).
CAUTION
• When using Remote Operation
function, make sure that all
passengers have gotten out of the
vehicle.
• If the vehicle’s battery is discharged
or Remote Smart Parking Assist
malfunctions when parked in a
narrow parking space, Remote
Operation function will not operate.
Always park your vehicle in a space
wide enough for you to get in or out
of your vehicle.
• Please note that depending on the
parking space, you may not be able
to exit from the space you have
entered by using Remote Operation function.
• After parking, the surrounding may
change due to the movement of
surrounding vehicles. If this occurs,
Remote Operation function may not
operate.
• Before leaving the vehicle, close
windows and sunroofs, and make
sure the vehicle is off before locking
the doors.
Page 565 of 680

07
7-163
•
When operating Remote Smart
Parking function, make sure all
smart keys are outside of the
vehicle.
• Remote Smart Parking function will
operate only when the smart key is
within 13 ft. (4 m) from the vehicle. If
there is no vehicle movement even
when the Remote Operation button
is pressed on the smart key, check
the distance to the vehicle and
press the button again.
• The detecting range of the smart
key may vary depending on the
surroundings that are affected by
radio waves such as transmission
tower, broadcast station, etc.
• The parking location indicator is
displayed on Surround View Monitor
screen and is displayed until the
vehicle enters the parking space
for the first time by Remote Smart
Parking function.
• Depending on parking
environments, if the vehicle is
stopped by a stopper, parking may
be completed.
• If you need to change the vehicle's
position or location, manually
complete parking your vehicle.
CAUTION
• When using Remote Smart Parking
function, make sure that all
passengers have gotten out of the
vehicle.
• After ending or turning off Remote
Smart Parking function, before
leaving the vehicle, close windows
and sunroofs, and make sure the
vehicle is off before locking the
doors. How to turn off Parking function
while operating •
Press the Parking/View (
) button in
the following stage:
- Searching for parking space
- Select parking type
• Shift the gear to R (Reverse) in the
following stage:
- Searching for parking space
- Select parking type
- Select operating mode
• Press the Parking Safety (
) button
or select ‘Cancel’ on the infotainment
system screen to turn off Parking function.
• While Smart Parking function is
operating:
- If the vehicle is stopped by depressing the brake pedal, and the
gear is shifted, Parking function will
turn off. At this time, EPB (Electronic
Parking Brake) will not be engaged.
• While Remote Smart Parking function
is operating:
- Press the Remote Start (
) button
on the smart key. Parking function
will turn off.
- Get on the vehicle with the smart key. Parking function will turn off. At
this time, the vehicle will remain on.
Page 573 of 680

07
7-171
Limitations of Remote Smart Parking
Assist
In the following circumstances, Remote
Smart Parking Assist performance to
park or exit the vehicle may be limited,
there may be a risk of collision, or
Remote Smart Parking Assist may turn
off. Park or exit the vehicle manually if
necessary. •
An object is attached to the steering wheel
• The vehicle is installed with a snow
chain, spare tire or different size wheel
• Tire pressure is lower or higher than
the standard tire pressure
• Your vehicle is loaded with cargo
longer or wider than your vehicle or a
trailer is connected to your vehicle
• There is a problem with the wheel
alignment
• Your vehicle is leaned severely to one side
• Your vehicle is equipped with a trailer
hitch
• The license plate is installed
differently from the original location
• There is a person, animal or object
above or below the ultrasonic sensor
when Remote Smart Parking Assist is
activated
• The parking space is curved or diagonal
• There is an obstacle such as a person,
animal or object (trash can, bicycle,
motorcycle, shopping cart, narrow
pillar, etc.) near the parking space •
There is a circular pillar or narrow
pillar, or a pillar surrounded by objects
such as fire extinguisher, etc., near the parking space
• The road surface is bumpy (curbstone,
speed bump, etc.)
• The road is slippery
• The parking space is near a vehicle
with higher ground clearance or big,
such as a truck, etc.
• The parking space is Inclined
• There is heavy wind
• Operating Remote Smart Parking
Assist on uneven roads, gravel roads,
bushes, etc.
• The performance of the ultrasonic
sensor is affected by extremely hot or
cold weather
• The ultrasonic sensor is covered with
snow or water
• An object that generates ultrasonic
waves is nearby
• A wireless device with a transmission
function operates near the ultrasonic
sensors
• Your vehicle is affected by another
vehicle’s Parking Distance Warning
• The sensor is mounted or positioned
incorrectly by an impact to the bumper
• When the ultrasonic sensor cannot
detect the following objects:
- Sharp or slim objects, such as ropes, chains or small poles
- Objects smaller than 40 in. (100 cm) in length and narrower than 6 in. (14
cm) in diameter
- Objects which tend to absorb sensor frequency, such as clothes,
spongy material or snow
- A narrow object such as a corner of a square pillar
- Person, animal or object near the ultrasonic sensor
Page 630 of 680

09
9-29
Temperature - A, B & C
The temperature grades are A (the
highest), B and C representing the tire’s
resistance to the generation of heat
and its ability to dissipate heat when
tested under controlled conditions on a
specified indoor laboratory test wheel.
Sustained high temperature can cause
the material of the tire to degenerate
and reduce tire life, and excessive
temperature can lead to sudden tire
failure. Grades B and A represent higher
levels of performance on the laboratory
test wheel than the minimum required
by law.
WARNING
The temperature grade for this tire is
established for a tire that is properly
inflated and not overloaded. Excessive
speed, under-inflation, over-inflation,
or excessive loading, either separately
or in combination, can cause heat build-
up and possible sudden tire failure.
This may cause loss of vehicle control
resulting in an accident.
Tire Terminology and Definitions
Air pressure
The amount of air inside the tire
pressing outward on the tire. Air
pressure is expressed in pounds per
square inch (psi) or kilopascal (kPa).
Accessory weight
This means the combined weight
of optional accessories. Some
examples of optional accessories
are automatic transmission, power
seats, and air conditioning.
Aspect ratio
The relationship of a tire’s height to its width. Belt
A rubber coated layer of cords that
is located between the plies and the
tread. Cords may be made from steel
or other reinforcing materials. Bead
The tire bead contains steel wires
wrapped by steel cords that hold the
tire onto the rim.