Page 85 of 680
02
2-15
aIr conDItIoner
coMpressor laBel
ONE1011026L
A compressor label informs you the type
of compressor your vehicle is equipped with such as model, supplier part
number, production number, refrigerant
(1) and refrigerant oil (2).
Page 303 of 680
![HYUNDAI IONIQ 5 2023 Owners Manual 05
5-111
System Maintenance
Climate control air filter
OHI048581L
[A] : Outside air, [B] : Recirculated air
[C] : Climate control air filter, [D] : Blower
[E] : Evaporator core, [F] : PTC & Inner con HYUNDAI IONIQ 5 2023 Owners Manual 05
5-111
System Maintenance
Climate control air filter
OHI048581L
[A] : Outside air, [B] : Recirculated air
[C] : Climate control air filter, [D] : Blower
[E] : Evaporator core, [F] : PTC & Inner con](/manual-img/35/56168/w960_56168-302.png)
05
5-111
System Maintenance
Climate control air filter
OHI048581L
[A] : Outside air, [B] : Recirculated air
[C] : Climate control air filter, [D] : Blower
[E] : Evaporator core, [F] : PTC & Inner condenser
The cabin air filter is installed behind the
front trunk. It filters the dust or other
pollutants that enter the vehicle through
the heating and air conditioning system.
Have the cabin air filter replaced by an
authorized HYUNDAI dealer according to
the maintenance schedule. If the vehicle
is being driven in severe conditions such
as dusty or rough roads, more frequent
cabin air filter inspections and changes
are required.
If the air flow rate suddenly decreases,
have the system inspected at an
authorized HYUNDAI dealer.
Checking the amount of air
conditioner refrigerant and
compressor lubricant
When the amount of refrigerant is low,
the performance of the air conditioning
is reduced. Overfilling also reduces the
performance of the air conditixoning
system.
Therefore, if abnormal operation is
found, have the system inspected by an
authorized HYUNDAI dealer.
NOTICE
It is important that the correct type and
amount of oil and refrigerant is used.
Otherwise, damage to the compressor
and abnormal system operation may
occur. To prevent damage, the air
conditioning system in your vehicle
should only be serviced by trained and
certified technicians.
NOTICE
The refrigerant system should only
be serviced by trained and certified
technicians to insure proper and safe
operation.
The refrigerant system should be
serviced in a well-ventilated place.
The air conditioning evaporator (cooling
coil) shall never be repaired or replaced
with one removed from a used or
salvaged vehicle and new replacement
MAC evaporators shall be certified
(and labeled) as meeting SAE Standard J2842.
Page 304 of 680

Convenience Features
5-112
WARNING
Vehicles equipped with R-1234yf
Since the refrigerant is mildly flammable and
operated at high pressure,
the air conditioning system
should only be serviced
by trained and certified
technicians. It is important
that the correct type and
amount of oil and refrigerant
are used.
All refrigerants should be reclaimed
with proper equipment.
Venting refrigerants directly to the
atmosphere is harmful to individuals
and environment. Failure to heed these
warnings can lead to serious injuries.
ONE1051075
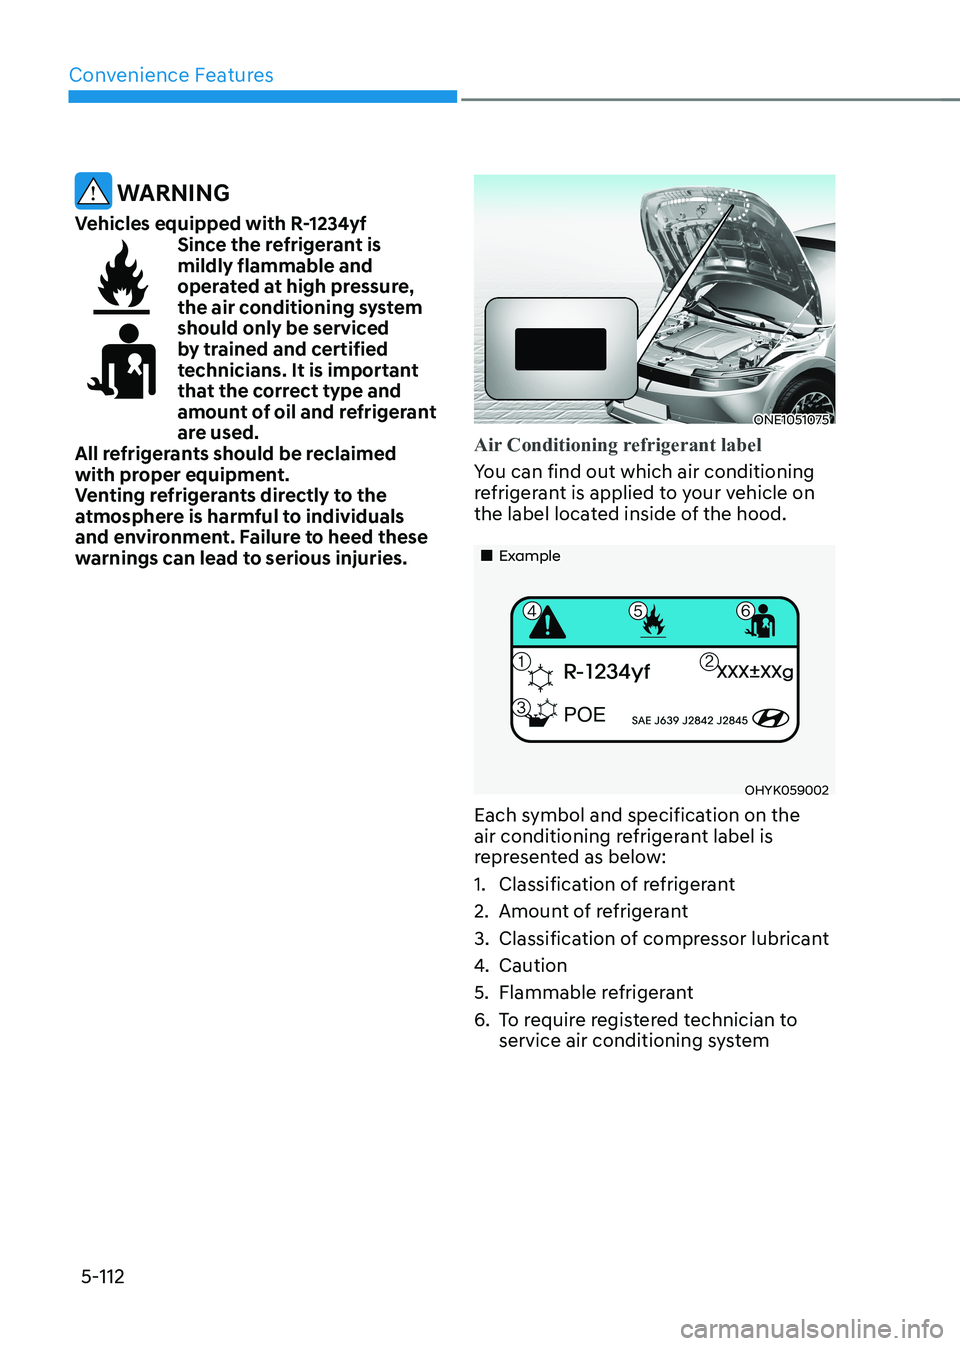
Air Conditioning refrigerant label
You can find out which air conditioning
refrigerant is applied to your vehicle on
the label located inside of the hood.
„„Example
OHYK059002
Each symbol and specification on the
air conditioning refrigerant label is
represented as below:
1. Classification of refrigerant
2. Amount of refrigerant
3. Classification of compressor lubricant
4. Caution
5. Flammable refrigerant
6. To require registered technician to service air conditioning system
Page 636 of 680

09
9-35
■ Blade type
■ Cartridge type
■ Multi type Normal Blown
Normal Blown
Normal Blown
OTM078035
A vehicle’s electrical system is protected
from electrical overload damage by fuses.
This vehicle has 5 fuse panels, one
located in the driver’s side panel bolster,
the other in the vehicle compartment.
If any of your vehicle’s lights,
accessories, or controls do not work,
check the appropriate circuit fuse. If a
fuse has blown, the element inside the
fuse will be melted or broken.
If the electrical system does not work,
first check the driver’s side fuse panel.
Before replacing a blown fuse, turn the
vehicle and all switches off, and then
disconnect the negative battery cable.
Always replace a blown fuse with one of
the same rating.
If the replacement fuse blows, this
indicates an electrical problem. Avoid
using the system involved. Consult an
authorized HYUNDAI dealer.
WARNING
NEVER replace a fuse with anything but
another fuse of the same rating. • A higher capacity fuse could cause
damage and possibly cause a fire.
• Do not install a wire or aluminum
foil instead of the proper fuse -
even as a temporary repair. It may
cause extensive wiring damage and
possibly a fire.
NOTICE
Do not use a screwdriver or any other
metal object to remove fuses because
it may cause a short circuit and damage
the system.
fuses
Page 647 of 680
Maintenance
9-46
Type Fuse NameFuse Rating Circuit Protected
FUSEP/OUTLET1
40A
P/R Junction Block (RLY.11)
T/GATE 30A
PTG Unit
A/C2 15A A/C Control Module
EOP1 40A
Rear Electronic Oil Pump
EOP2 40A
Front Electronic Oil Pump (AWD)
E-SHIFTER2 10AP/R Junction Block (RLY.2), SCU, Electronic
ATM Shift Lever
P/OUTLET3 20A
Rear Power Outlet
P/OUTLET2 20A
Front Power Outlet
Page 651 of 680

Maintenance
9-50
If the LED lamp does not operate, have
the system inspected by an authorized
HYUNDAI dealer.
The LED lamps cannot be replaced as
a single unit because it is an integrated
unit. The LED lamps has to be replaced with the unit.
A skilled technician should check or
repair the LED lamp, for it may damage
related parts of the vehicle.
Turn signal lamp (bulb type)
1. Engage the parking brake and
disconnect the negative battery cable.
2. Remove wheel guard clips (under the front bumper).
3. Push the wheel guard aside and remove the bulb socket by turning it
counterclockwise.
4. Remove the bulb from the socket
by pressing it in and rotating it
counterclockwise until the tabs on the
bulb align with the slots in the socket.
Pull the bulb out of the socket.
5. Install a new bulb by inserting it into the socket and rotating it until it locks
into place.
6. Push the socket into the assembly and turn the socket clockwise.
7. Install the wheel guard in the reverse
order.
WARNING
• Wear eye protection when changing
a bulb. Allow the bulb to cool down
before handling it.
• Always handle them carefully, and
avoid scratches and abrasions. If
the bulbs are lit, avoid contact with liquids.
• Never touch the glass with bare
hands. Residual oil may cause the
bulb to overheat and burst when lit.
• A bulb should be operated only when
installed in a turn signal lamp.
• If a bulb becomes damaged or
cracked, replace it immediately and
carefully dispose of it.
• Replacing the bulb may cause
damage to the bulb relevant parts
of the vehicle, and also may cause
injuries. To replace the turn signal
lamp, visit an authorized HYUNDAI
dealer.
Page 653 of 680

Maintenance
9-52
Reverse lamp (bulb type)
1. Disconnect the negative battery
cable.
2. Loosen the retaining clips under the bumper and screws on the wheel house trim.
3. Prey trim under the bumper toward the vehicle.
4. Remove the socket from the
assembly by turning the socket
counterclockwise until the tabs on
the socket align with the slots on the
assembly.
5. Remove the bulb by pulling it straight out.
6. Insert a new bulb in the socket.
7. Reinstall the light assembly to the
body of the vehicle.
WARNING
• Wear eye protection when changing
a bulb. Allow the bulb to cool down
before handling it.
• Always handle them carefully, and
avoid scratches and abrasions. If
the bulbs are lit, avoid contact with liquids.
• Never touch the glass with bare
hands. Residual oil may cause the
bulb to overheat and burst when lit.
• A bulb should be operated only when
installed in a turn signal lamp.
• If a bulb becomes damaged or
cracked, replace it immediately and
carefully dispose of it.
• Replacing the bulb may cause
damage to the bulb relevant parts
of the vehicle, and also may cause
injuries. To replace the turn signal
lamp, visit an authorized HYUNDAI
dealer.