2023 FORD SUPER DUTY spare tire
[x] Cancel search: spare tirePage 515 of 738
WARNING: Never place anythingbetween the vehicle jack and the ground.
WARNING: Do not attempt tochange a tire on the side of the vehicleclose to moving traffic. Pull far enoughoff the road to not obstruct the flow oftraffic and avoid the danger of being hitwhen operating the jack or changing thewheel.
WARNING: The jack supplied withthis vehicle is only intended for changinga flat tire in an emergency. Do notattempt to do any other work on yourvehicle when it is supported by the jack,as your vehicle could slip off the jack.Failure to follow this instruction couldresult in personal injury or death.
WARNING: Only use the sparewheel carrier to stow wheels providedwith your vehicle.
Note:Do not use impact tools or powertools operating at over 200 RPM on thespare wheel carrier winch, which may causeit to malfunction and result in the wheel andtire not being securely stowed.
Note:Passengers should not remain in thevehicle when the vehicle is being jacked.
1.Park the vehicle on a level firm groundand activate the hazard flashers.
2.Apply the parking brake, place thetransmission in park (P), switch theengine off.
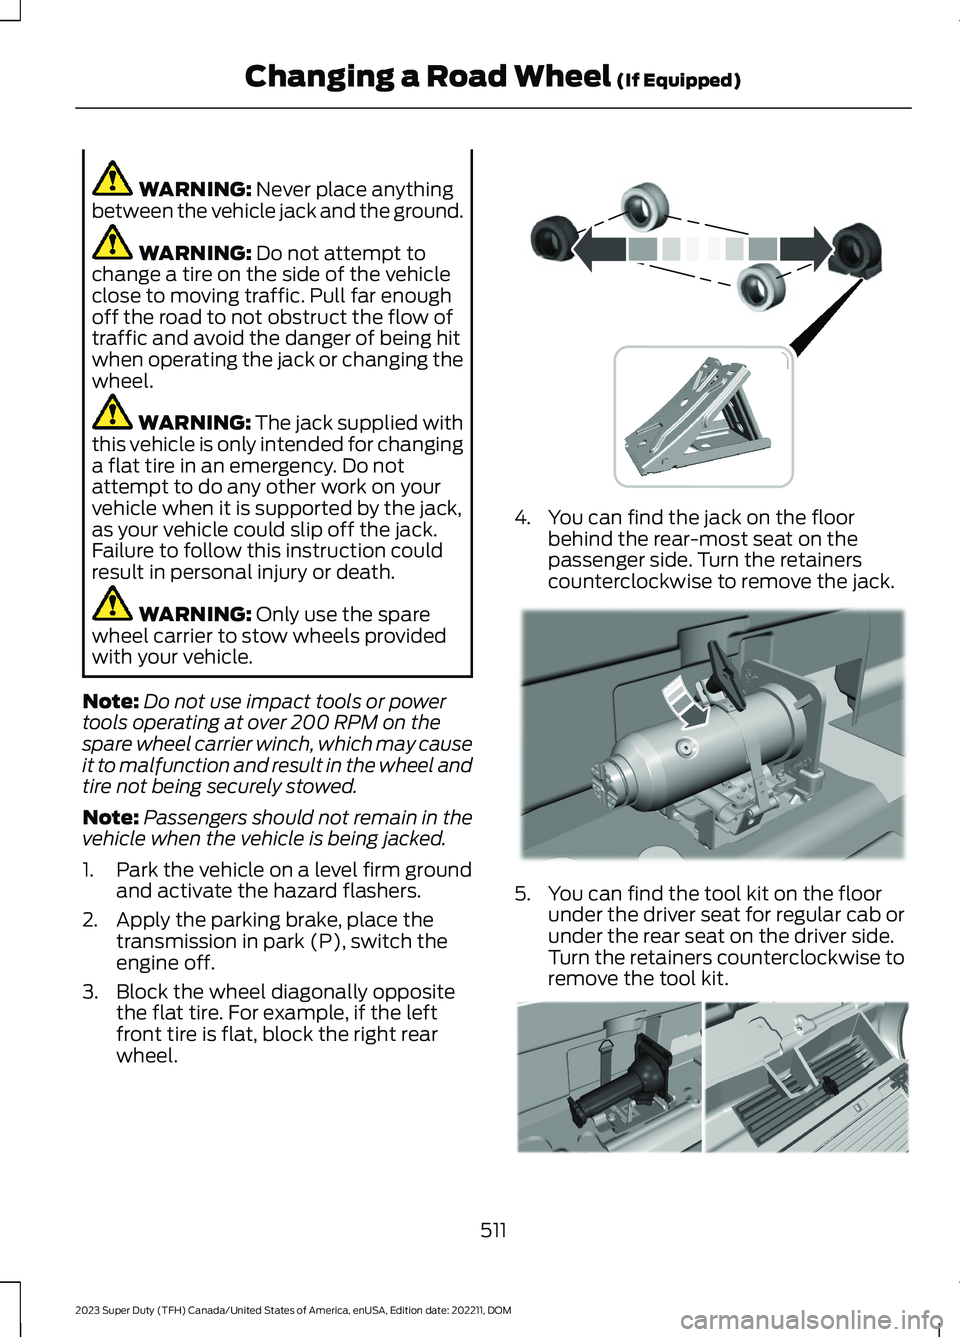
3.Block the wheel diagonally oppositethe flat tire. For example, if the leftfront tire is flat, block the right rearwheel.
4.You can find the jack on the floorbehind the rear-most seat on thepassenger side. Turn the retainerscounterclockwise to remove the jack.
5.You can find the tool kit on the floorunder the driver seat for regular cab orunder the rear seat on the driver side.Turn the retainers counterclockwise toremove the tool kit.
511
2023 Super Duty (TFH) Canada/United States of America, enUSA, Edition date: 202211, DOMChanging a Road Wheel (If Equipped) E388040 E309424 E309795
Page 516 of 738
6.Use the ignition key to open the lock atthe rear bumper.
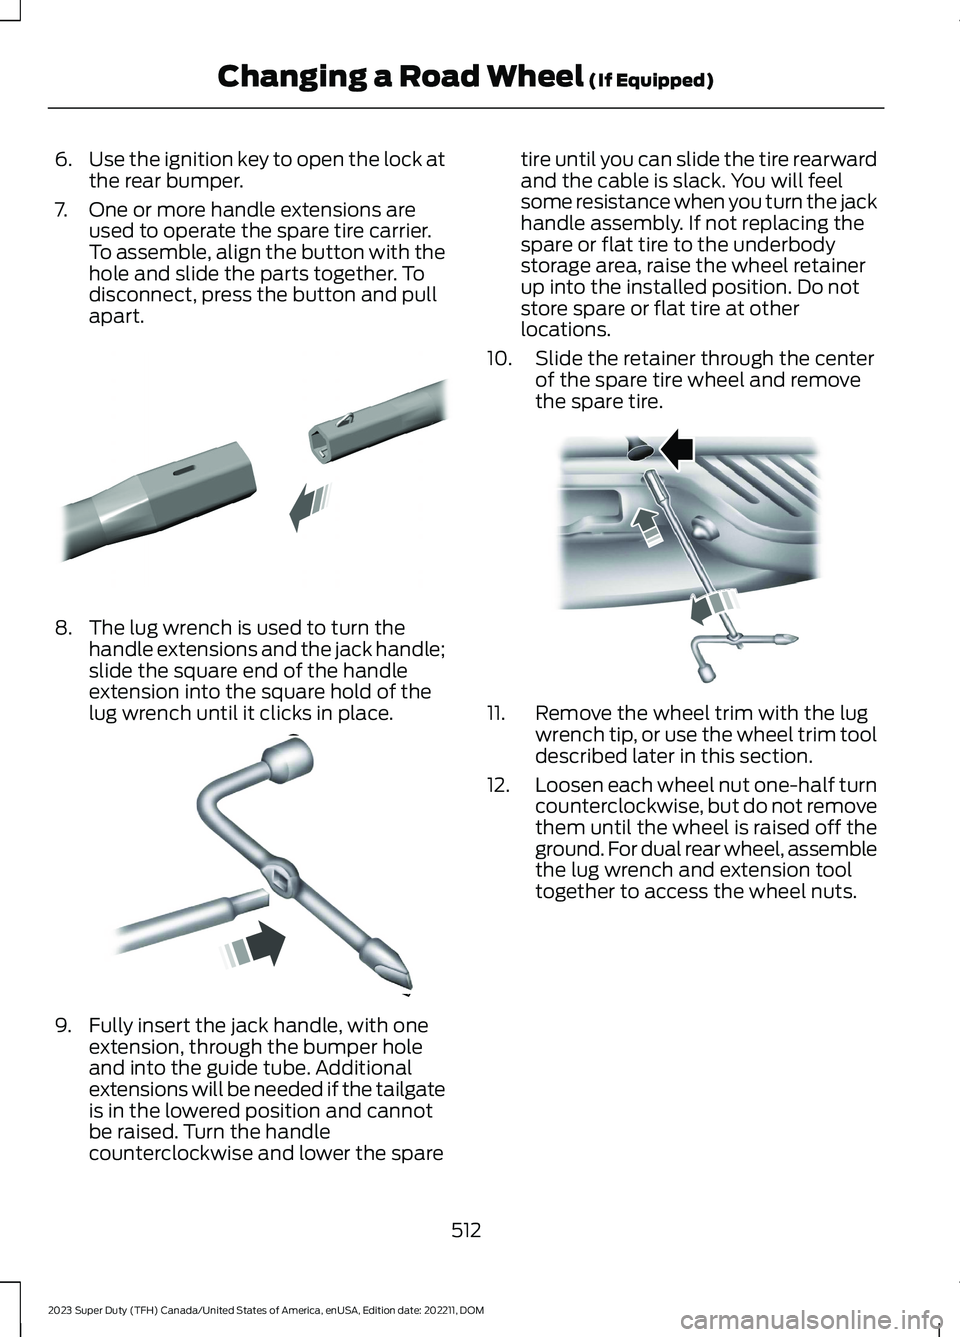
7.One or more handle extensions areused to operate the spare tire carrier.To assemble, align the button with thehole and slide the parts together. Todisconnect, press the button and pullapart.
8.The lug wrench is used to turn thehandle extensions and the jack handle;slide the square end of the handleextension into the square hold of thelug wrench until it clicks in place.
9.Fully insert the jack handle, with oneextension, through the bumper holeand into the guide tube. Additionalextensions will be needed if the tailgateis in the lowered position and cannotbe raised. Turn the handlecounterclockwise and lower the spare
tire until you can slide the tire rearwardand the cable is slack. You will feelsome resistance when you turn the jackhandle assembly. If not replacing thespare or flat tire to the underbodystorage area, raise the wheel retainerup into the installed position. Do notstore spare or flat tire at otherlocations.
10.Slide the retainer through the centerof the spare tire wheel and removethe spare tire.
11.Remove the wheel trim with the lugwrench tip, or use the wheel trim tooldescribed later in this section.
12.Loosen each wheel nut one-half turncounterclockwise, but do not removethem until the wheel is raised off theground. For dual rear wheel, assemblethe lug wrench and extension tooltogether to access the wheel nuts.
512
2023 Super Duty (TFH) Canada/United States of America, enUSA, Edition date: 202211, DOMChanging a Road Wheel (If Equipped)E308882 E162796 E310417
Page 520 of 738
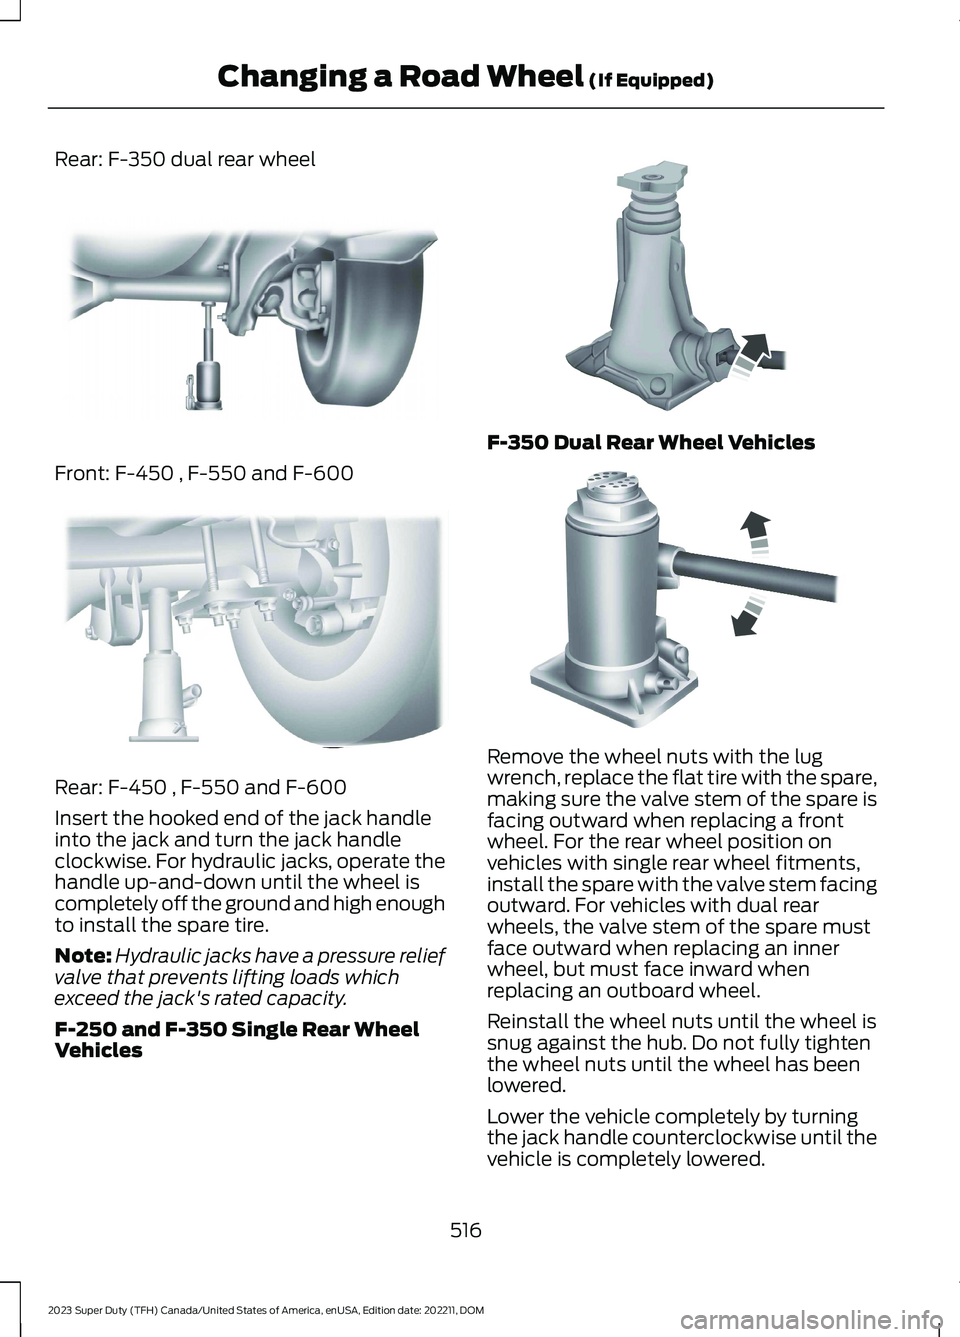
Rear: F-350 dual rear wheel
Front: F-450 , F-550 and F-600
Rear: F-450 , F-550 and F-600
Insert the hooked end of the jack handleinto the jack and turn the jack handleclockwise. For hydraulic jacks, operate thehandle up-and-down until the wheel iscompletely off the ground and high enoughto install the spare tire.
Note:Hydraulic jacks have a pressure reliefvalve that prevents lifting loads whichexceed the jack's rated capacity.
F-250 and F-350 Single Rear WheelVehicles
F-350 Dual Rear Wheel Vehicles
Remove the wheel nuts with the lugwrench, replace the flat tire with the spare,making sure the valve stem of the spare isfacing outward when replacing a frontwheel. For the rear wheel position onvehicles with single rear wheel fitments,install the spare with the valve stem facingoutward. For vehicles with dual rearwheels, the valve stem of the spare mustface outward when replacing an innerwheel, but must face inward whenreplacing an outboard wheel.
Reinstall the wheel nuts until the wheel issnug against the hub. Do not fully tightenthe wheel nuts until the wheel has beenlowered.
Lower the vehicle completely by turningthe jack handle counterclockwise until thevehicle is completely lowered.
516
2023 Super Duty (TFH) Canada/United States of America, enUSA, Edition date: 202211, DOMChanging a Road Wheel (If Equipped)E162816 E162818 E162811 E162819
Page 522 of 738
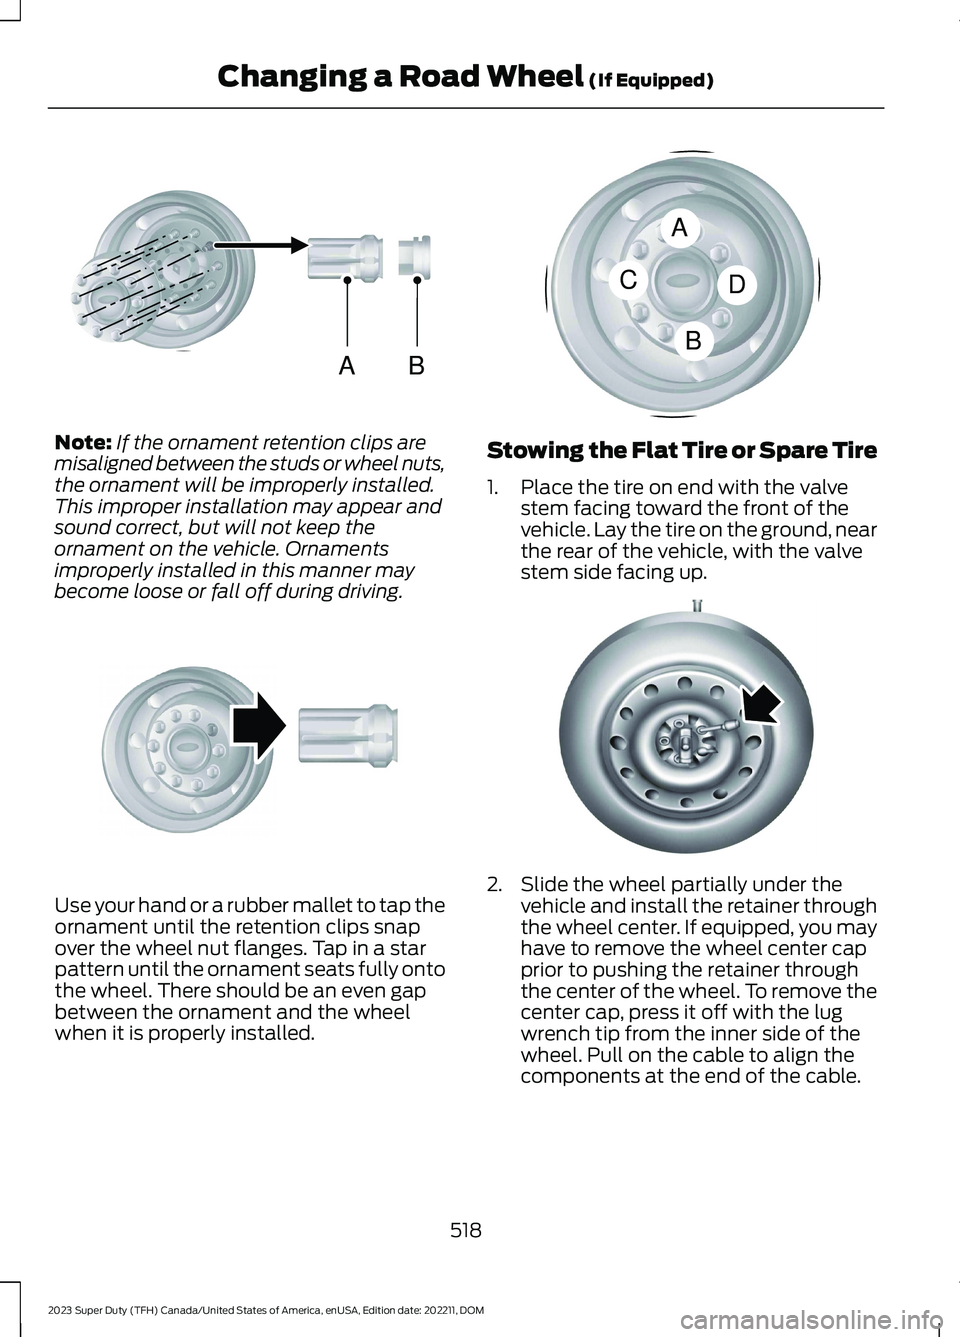
Note:If the ornament retention clips aremisaligned between the studs or wheel nuts,the ornament will be improperly installed.This improper installation may appear andsound correct, but will not keep theornament on the vehicle. Ornamentsimproperly installed in this manner maybecome loose or fall off during driving.
Use your hand or a rubber mallet to tap theornament until the retention clips snapover the wheel nut flanges. Tap in a starpattern until the ornament seats fully ontothe wheel. There should be an even gapbetween the ornament and the wheelwhen it is properly installed.
Stowing the Flat Tire or Spare Tire
1.Place the tire on end with the valvestem facing toward the front of thevehicle. Lay the tire on the ground, nearthe rear of the vehicle, with the valvestem side facing up.
2.Slide the wheel partially under thevehicle and install the retainer throughthe wheel center. If equipped, you mayhave to remove the wheel center capprior to pushing the retainer throughthe center of the wheel. To remove thecenter cap, press it off with the lugwrench tip from the inner side of thewheel. Pull on the cable to align thecomponents at the end of the cable.
518
2023 Super Duty (TFH) Canada/United States of America, enUSA, Edition date: 202211, DOMChanging a Road Wheel (If Equipped)ABE162822 E162823 ACBDE162824 E162800
Page 523 of 738
3.Reinsert the lug wrench extension(s)through the rear bumper and guidetube and turn the lug wrench clockwiseuntil the tire is raised to its stowedposition underneath the vehicle. Thewrench will become harder to turn andthe spare tire winch will ratchet or slipwhen the tire is raised to maximumtightness. You will hear a clicking soundfrom the winch indicating that the tireis properly stowed, tighten until aminimum of three clicks are heard.Check that the tire lies flat against theframe and is secure.
4.Carefully place all tools back in the toolkit bag.
5.Reinstall the tool kit bag and tightenthe wing nut.
6.Properly reinstall the jack into thebracket and tighten the wing nut.
WHEEL NUTS
WARNING: When you install awheel, always remove any corrosion, dirtor foreign materials present on themounting surfaces of the wheel or thesurface of the wheel hub, brake drum orbrake disc that contacts the wheel. Makesure to secure any fasteners that attachthe rotor to the hub so they do notinterfere with the mounting surfaces ofthe wheel. Installing wheels withoutcorrect metal-to-metal contact at thewheel mounting surfaces can cause thewheel nuts to loosen and the wheel tocome off while your vehicle is in motion,resulting in loss of vehicle control,personal injury or death.
lb.ft (Nm)1Bolt Size
150 lb.ft (204 Nm)M14 x 1.5
1 Torque specifications are for nut and boltthreads free of dirt and rust. Use only ourrecommended replacement wheel nutsand or wheel bolts.
Retighten the wheel nuts to the specifiedtorque within 100 mi (160 km) after anywheel disturbance, such as tire rotation,changing a flat tire or wheel removal.
On vehicles equipped with dual rearwheels, retighten the wheel lug nuts to thespecified torque at 100 mi (160 km), andagain at 500 mi (800 km) of new vehicleoperation and after any wheel disturbance,such as tire rotation, changing a flat tire,or wheel removal.
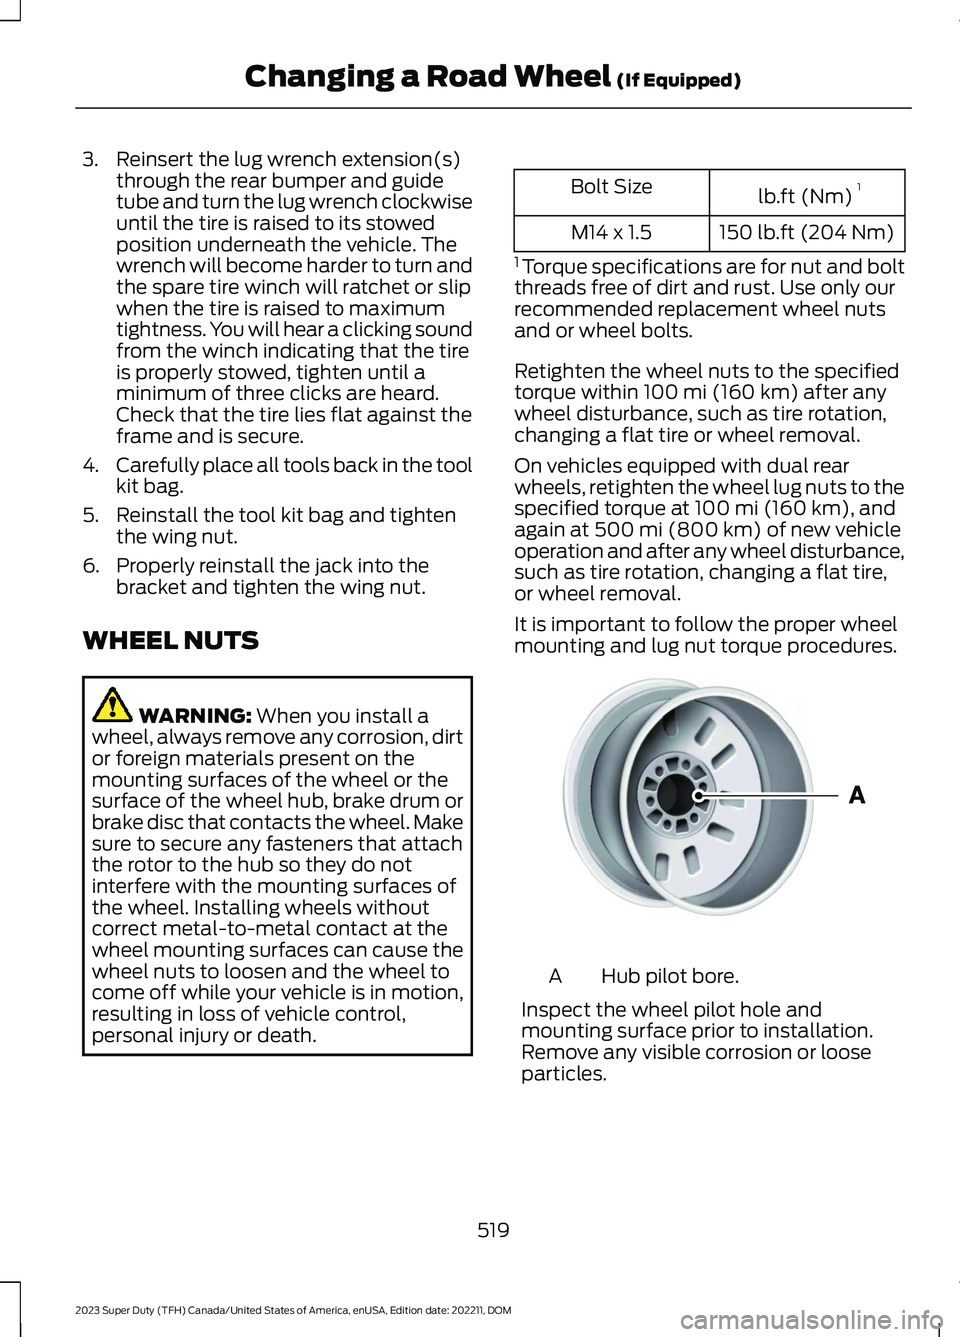
It is important to follow the proper wheelmounting and lug nut torque procedures.
Hub pilot bore.A
Inspect the wheel pilot hole andmounting surface prior to installation.Remove any visible corrosion or looseparticles.
519
2023 Super Duty (TFH) Canada/United States of America, enUSA, Edition date: 202211, DOMChanging a Road Wheel (If Equipped)E145950
Page 596 of 738
We strongly recommend only using ourgenuine or our authorized re-manufacturedreplacement parts engineered for yourvehicle.
Additives and Chemicals
We do not recommend using chemicals oradditives not approved by us as part ofyour vehicle’s normal maintenance. Pleaseconsult your warranty information.
Oils, Fluids and Flushing
In many cases, fluid discoloration is anormal operating characteristic and, byitself, does not necessarily indicate aconcern or that the fluid needs to bechanged. Have discolored fluids that alsoshow signs of overheating or foreignmaterial contamination checkedimmediately.
Make sure to change the vehicle’s oils andfluids at the specified intervals or inconjunction with a repair. Flushing is aviable way to change fluid for many vehiclesub-systems during scheduledmaintenance. It is critical that systems areflushed only with new fluid that is the sameas that required to fill and operate thesystem or using our approved flushingchemical.
Owner Checks and Services
Make sure you perform the following basicmaintenance checks and inspections.
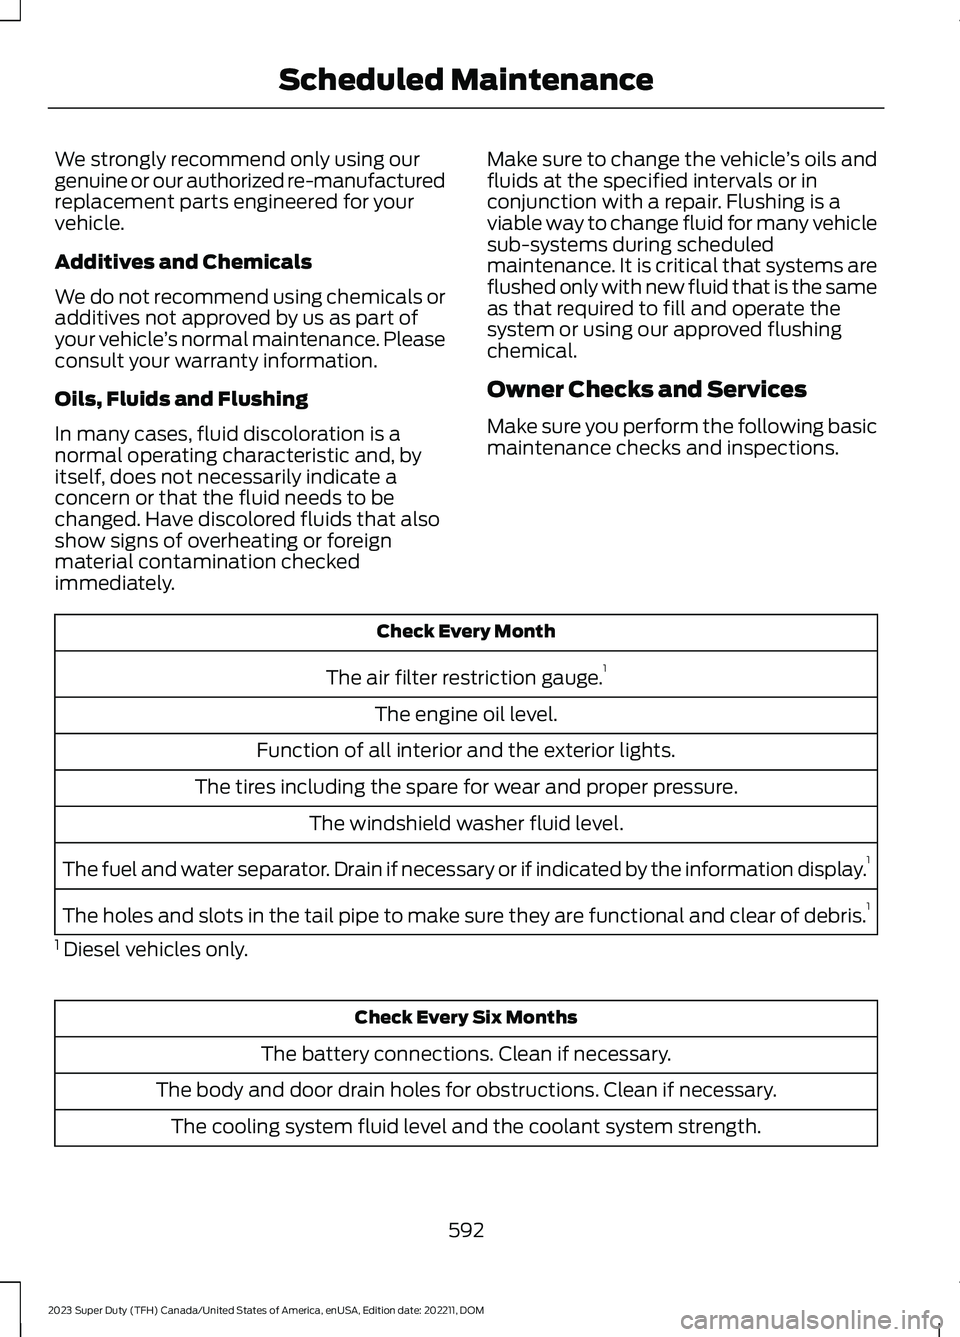
Check Every Month
The air filter restriction gauge.1
The engine oil level.
Function of all interior and the exterior lights.
The tires including the spare for wear and proper pressure.
The windshield washer fluid level.
The fuel and water separator. Drain if necessary or if indicated by the information display.1
The holes and slots in the tail pipe to make sure they are functional and clear of debris.1
1 Diesel vehicles only.
Check Every Six Months
The battery connections. Clean if necessary.
The body and door drain holes for obstructions. Clean if necessary.
The cooling system fluid level and the coolant system strength.
592
2023 Super Duty (TFH) Canada/United States of America, enUSA, Edition date: 202211, DOMScheduled Maintenance
Page 597 of 738
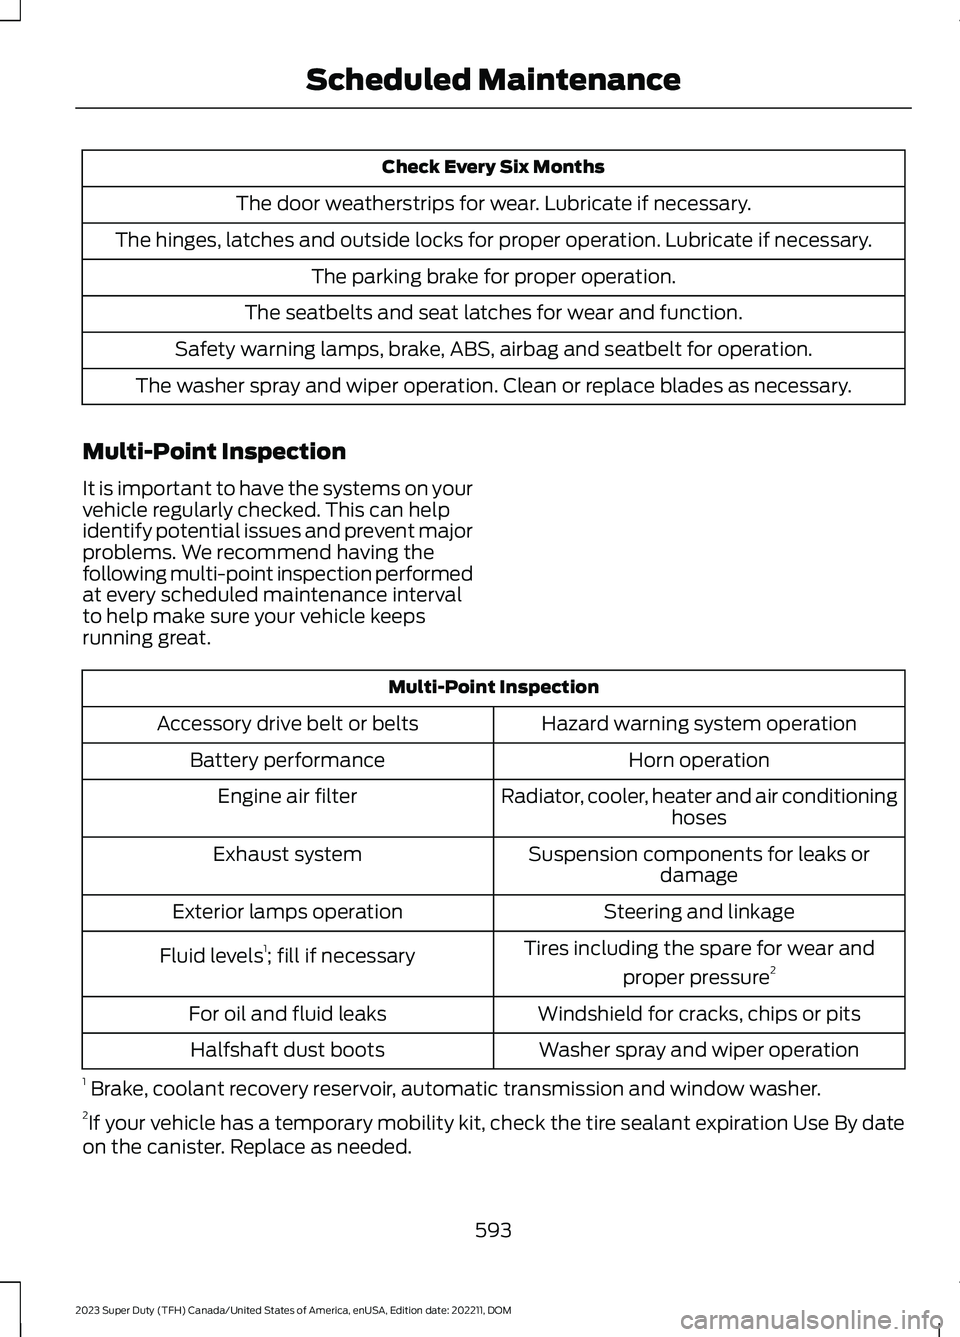
Check Every Six Months
The door weatherstrips for wear. Lubricate if necessary.
The hinges, latches and outside locks for proper operation. Lubricate if necessary.
The parking brake for proper operation.
The seatbelts and seat latches for wear and function.
Safety warning lamps, brake, ABS, airbag and seatbelt for operation.
The washer spray and wiper operation. Clean or replace blades as necessary.
Multi-Point Inspection
It is important to have the systems on yourvehicle regularly checked. This can helpidentify potential issues and prevent majorproblems. We recommend having thefollowing multi-point inspection performedat every scheduled maintenance intervalto help make sure your vehicle keepsrunning great.
Multi-Point Inspection
Hazard warning system operationAccessory drive belt or belts
Horn operationBattery performance
Radiator, cooler, heater and air conditioninghosesEngine air filter
Suspension components for leaks ordamageExhaust system
Steering and linkageExterior lamps operation
Tires including the spare for wear and
proper pressure2Fluid levels1; fill if necessary
Windshield for cracks, chips or pitsFor oil and fluid leaks
Washer spray and wiper operationHalfshaft dust boots
1 Brake, coolant recovery reservoir, automatic transmission and window washer.2If your vehicle has a temporary mobility kit, check the tire sealant expiration Use By dateon the canister. Replace as needed.
593
2023 Super Duty (TFH) Canada/United States of America, enUSA, Edition date: 202211, DOMScheduled Maintenance
Page 599 of 738
If your instrument cluster display resetsprematurely or becomes inoperative, youshould perform the oil change interval atsix months or 5,000 mi (8,000 km) fromyour last oil change. Never exceed one yearor 10,000 mi (16,000 km) between oilchange intervals.
You can drive your vehicle in such a waythat may lead to higher oil consumptionincluding extended time at high enginespeeds, high loads, engine braking, hardcornering maneuvers, track and off-roadusage. Under these conditions, oilconsumption of approximately 1 quart per500 miles (1 liter per 800 km) is possible.Check the engine oil level at every refuelingand adjust to maintain proper levels toavoid engine damage.
You can also drive your vehicle in such away that dilutes and increases the level ofoil by frequent short trips that do not allowthe engine to get to operating temperature,extended idling and low speed driving forlong periods of time.
It is important to rely upon your dealershipto properly diagnose and repair yourvehicle.
We strongly recommend only using ourgenuine or our authorized re-manufacturedreplacement parts engineered for yourvehicle.
Additives and Chemicals
We do not recommend using chemicals oradditives not approved by us as part ofyour vehicle’s normal maintenance. Pleaseconsult your warranty information.
Oils, Fluids and Flushing
In many cases, fluid discoloration is anormal operating characteristic and, byitself, does not necessarily indicate aconcern or that the fluid needs to bechanged. Have discolored fluids that alsoshow signs of overheating or foreignmaterial contamination checkedimmediately.
Make sure to change the vehicle’s oils andfluids at the specified intervals or inconjunction with a repair. Flushing is aviable way to change fluid for many vehiclesub-systems during scheduledmaintenance. It is critical that systems areflushed only with new fluid that is the sameas that required to fill and operate thesystem or using our approved flushingchemical.
Owner Checks and Services
Make sure you perform the following basicmaintenance checks and inspections.
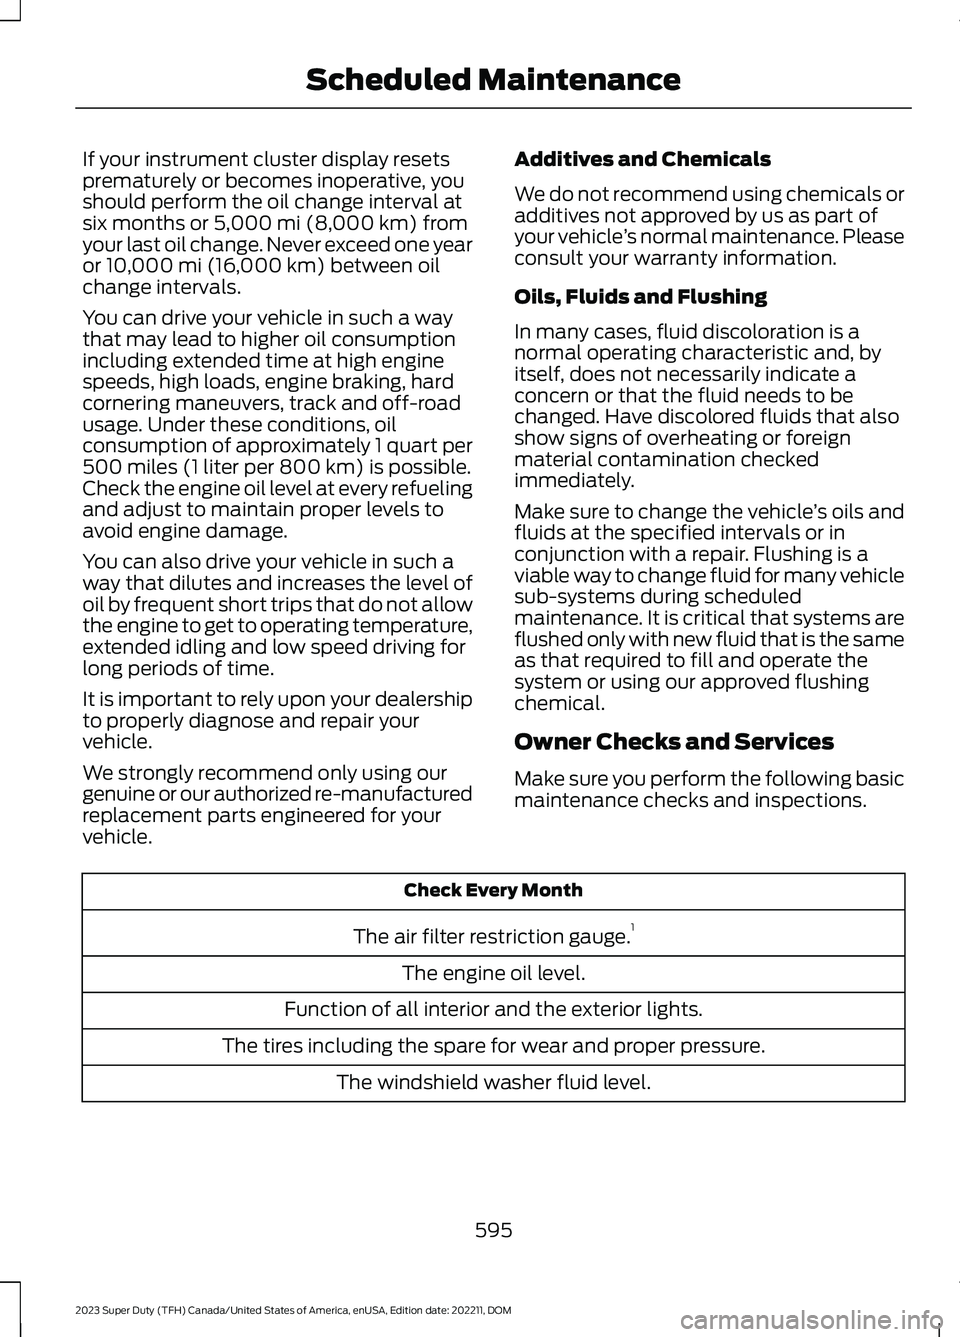
Check Every Month
The air filter restriction gauge.1
The engine oil level.
Function of all interior and the exterior lights.
The tires including the spare for wear and proper pressure.
The windshield washer fluid level.
595
2023 Super Duty (TFH) Canada/United States of America, enUSA, Edition date: 202211, DOMScheduled Maintenance