2023 FORD SUPER DUTY spare tire
[x] Cancel search: spare tirePage 81 of 738
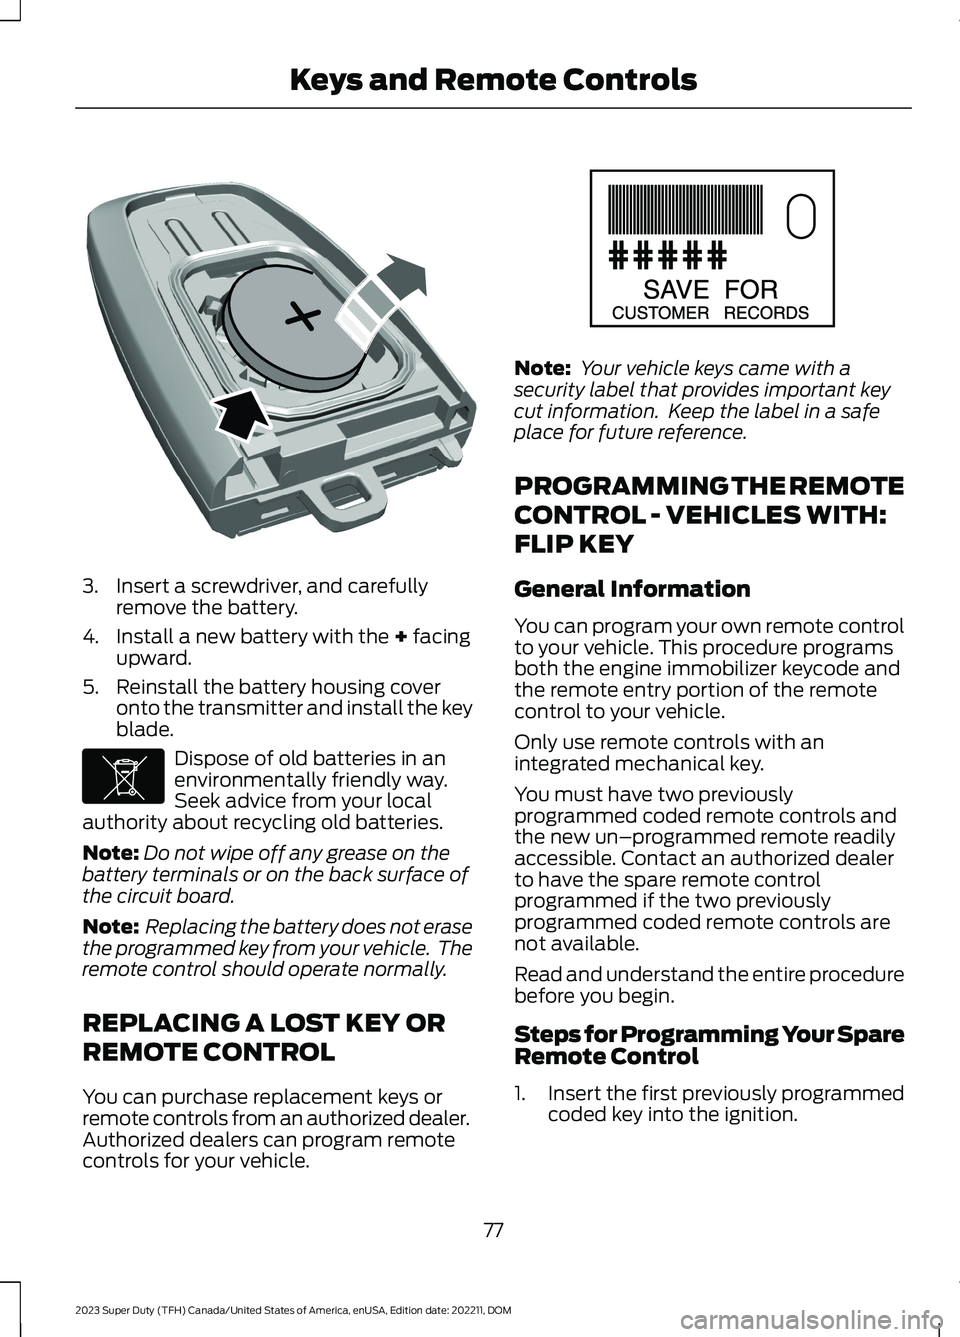
3.Insert a screwdriver, and carefullyremove the battery.
4.Install a new battery with the + facingupward.
5.Reinstall the battery housing coveronto the transmitter and install the keyblade.
Dispose of old batteries in anenvironmentally friendly way.Seek advice from your localauthority about recycling old batteries.
Note:Do not wipe off any grease on thebattery terminals or on the back surface ofthe circuit board.
Note: Replacing the battery does not erasethe programmed key from your vehicle. Theremote control should operate normally.
REPLACING A LOST KEY OR
REMOTE CONTROL
You can purchase replacement keys orremote controls from an authorized dealer.Authorized dealers can program remotecontrols for your vehicle.
Note: Your vehicle keys came with asecurity label that provides important keycut information. Keep the label in a safeplace for future reference.
PROGRAMMING THE REMOTE
CONTROL - VEHICLES WITH:
FLIP KEY
General Information
You can program your own remote controlto your vehicle. This procedure programsboth the engine immobilizer keycode andthe remote entry portion of the remotecontrol to your vehicle.
Only use remote controls with anintegrated mechanical key.
You must have two previouslyprogrammed coded remote controls andthe new un–programmed remote readilyaccessible. Contact an authorized dealerto have the spare remote controlprogrammed if the two previouslyprogrammed coded remote controls arenot available.
Read and understand the entire procedurebefore you begin.
Steps for Programming Your SpareRemote Control
1.Insert the first previously programmedcoded key into the ignition.
77
2023 Super Duty (TFH) Canada/United States of America, enUSA, Edition date: 202211, DOMKeys and Remote ControlsE218402 E107998 E151795
Page 82 of 738
2.Switch the ignition from off to on. Keepthe ignition on for at least threeseconds, but no more than 10 seconds.
3.Switch the ignition off and remove thefirst coded key from the ignition.
4.After three seconds but within 10seconds of switching the ignition off,insert the second previously coded keyinto the ignition.
5.Switch the ignition from off to on. Keepthe ignition on for at least threeseconds, but no more than 10 seconds.
6.Switch the ignition off and remove thesecond previously programmed codedkey from the ignition.
7.After three seconds but within 10seconds of switching the ignition offand removing the previouslyprogrammed coded key, insert the newun–programmed key into the ignition.
8.Switch the ignition from off to on. Keepthe ignition on for at least six secondsuntil you hear the door locks cycle.
9.Remove the newly programmed codedkey from the ignition.
The key starts the engine if programmingis successful. You can operate the keylessremote entry system with the new remotecontrol with integrated key.
If programming was not successful, wait20 seconds and repeat Steps 1 through 8.If you are still unsuccessful, take yourvehicle to an authorized dealer.
Note:You can program a maximum of sixcoded remote controls to your vehicle.
PROGRAMMING THE REMOTE
CONTROL - VEHICLES WITH:
PUSH BUTTON START
General Information
You must have two previouslyprogrammed remote controls inside yourvehicle and the new unprogrammedremote controls readily accessible. Contactan authorized dealer to have the spareremote control programmed if twopreviously programmed remotes are notavailable. Make sure that your vehicle isoff before beginning this procedure. Makesure that you close all the doors beforebeginning and that they remain closedthroughout the procedure. Perform allsteps within 30 seconds of starting thesequence. Stop and wait for at least oneminute before starting again if you performany steps out of sequence.
Read and understand the entire procedurebefore you begin.
Note:You can program a maximum of fourremote controls to your vehicle.
Note:If your programmed remote controlsare lost or stolen and you do not have anextra coded remote, you need to have yourvehicle towed to an authorized dealer. Storean extra programmed remote away fromyour vehicle in a safe place to help preventany inconvenience. Contact an authorizeddealer to purchase additional spare orreplacement remotes.
Steps for Programming Your SpareRemote Control
Note:Your vehicle is equipped with one ofthe following center consoles.
78
2023 Super Duty (TFH) Canada/United States of America, enUSA, Edition date: 202211, DOMKeys and Remote Controls
Page 99 of 738
Note:A tone sounds while the tailgatecloses.
Note:The tailgate stops and reverses if itdetects an obstruction when closing.
Lift-to-Close
To close the tailgate automatically usinglift-to-close, lift the tailgate approximately4 in (10 cm) and hold it for a few seconds.
Note:If the tailgate position is more thanhalfway open, it may not closeautomatically.
Manual Close
You can close the tailgate manually whenyou lift the tailgate in a continuous motion.
If you stop the tailgate motion, thelift-to-close feature engages and powercloses the tailgate.
Putting the Tailgate in Manual Mode
You can put the tailgate in manual modethrough the vehicle settings in yourtouchscreen.
Note:In manual mode, the tailgate onlyopens by the tailgate release button on thetailgate and messaging is reduced.
Note:A pop-up message appears on thetouchscreen if you press the tailgate buttonon the instrument panel when the tailgateis in Manual mode.
CLOSING THE TAILGATE USINGTHE REMOTE CONTROL
Press the remote control buttontwice within three seconds.
REMOVING AND INSTALLING
THE TAILGATE
WARNING: Always properly securecargo to prevent shifting cargo or cargofalling from the vehicle. Failure to do socould result in compromised vehiclestability and serious personal injury tovehicle occupants or others.
WARNING: The tailgate is heavy.Removal of the tailgate requires twoadults. Failure to follow this instructioncould result in personal injury or propertydamage.
1.Put the tailgate into manual mode byaccessing the vehicle settings using thetouchscreen.
2.Open the tailgate.
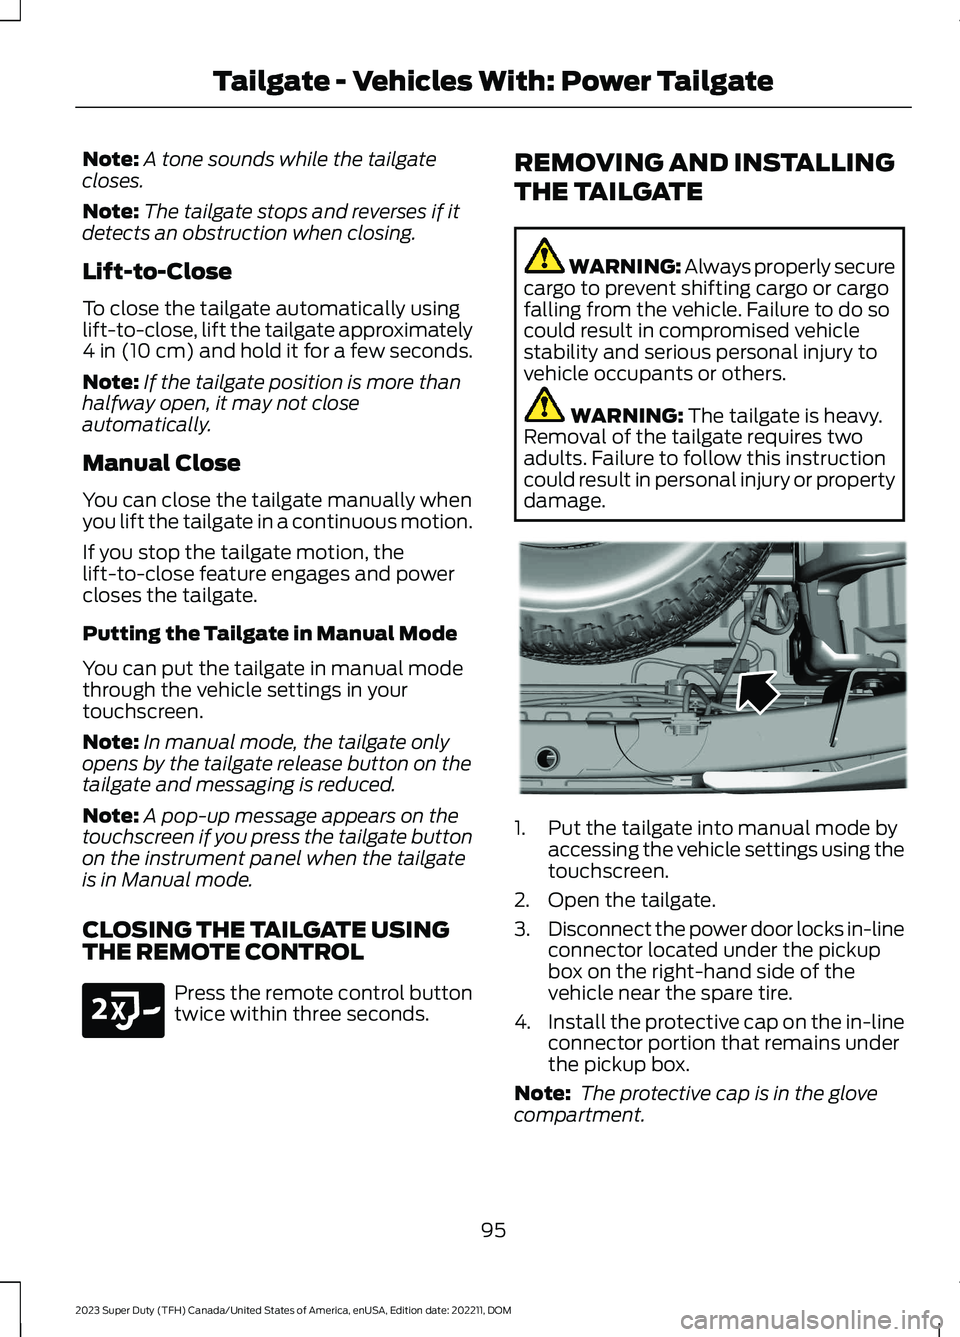
3.Disconnect the power door locks in-lineconnector located under the pickupbox on the right-hand side of thevehicle near the spare tire.
4.Install the protective cap on the in-lineconnector portion that remains underthe pickup box.
Note: The protective cap is in the glovecompartment.
95
2023 Super Duty (TFH) Canada/United States of America, enUSA, Edition date: 202211, DOMTailgate - Vehicles With: Power TailgateE191530 E189556
Page 244 of 738
damage drive components. Whentransitioning from consistently loose orslippery surfaces, be sure the four-wheeldrive system is not mechanically blockedonce on dry, hard surface roads intwo-wheel drive high.
Operating Four-Wheel Drive witha Spare or Worn Tires
Your four-wheel drive system is notintended to provide full function with tiresthat have different levels of wear or witha dissimilar spare tire. Incorrect use offour-wheel drive with such tires can causesystem damage.
If there is a difference in the level of wearamong tires on the vehicle or if you installa dissimilar spare tire on the vehicle, do notuse 4WD High or 4WD Low (if equipped)other than to get your vehicle unstuck.After getting your vehicle unstuck, shift to2H by performing the following steps:
1.Come to a stop on a flat, horizontalsurface
2.Shift the transmission to park (P) forautomatic transmissions and neutral(N) for manual transmissions.
3.Switch to two-wheel drive mode.
4.Shift the transmission to reverse (R).
5.Shift the transmission to drive (D) forautomatic transmissions and to firstgear for manual transmissions. Thisensures the transfer case system is nottrapped in place.
Mechanical Shift Blocking
On four-wheel drive vehicles with amechanically locked four-wheel drive highmode, the transfer case distributes torqueto the front wheels by mechanicallyinterlocking the front and rear driveshaftstogether. Various external factors affectshifting performance of this type of systemincluding, but not limited to:
•Vehicle acceleration.
•Dissimilar tire sizes.
•Steering input.
If the system detects a mechanical shiftblockage at speed after you selecttwo-wheel drive high, the message "4x4Unable to Disengage See Manual", coulddisplay momentarily. If this messagedisplays, one or more of the followingactions can relieve the mechanical shiftblock:
•Momentary acceleration.
•Momentary braking.
•Bringing the vehicle to a stop.
•Shifting the transmission to neutral andback to drive.
•Shifting the transmission to reverseand back to drive.
•Driving the vehicle around a tight turnat a slow speed.
SWITCHING FOUR-WHEEL
DRIVE ON AND OFF
A vehicle that comes with four-wheel drive,when selected, has the ability to use allfour wheels to power itself. This increasestraction, which may enable you to safelydrive over terrain and road conditions thata conventional two-wheel drive vehiclecannot.
On some four-wheel drive models, theinitial shift from two-wheel drive tofour-wheel drive while the vehicle ismoving can cause a momentary clunk andratcheting sound. These sounds are normalas the front drivetrain comes up to speedand are not cause for concern.
240
2023 Super Duty (TFH) Canada/United States of America, enUSA, Edition date: 202211, DOMFour-Wheel Drive (If Equipped)
Page 249 of 738
WHAT IS THE ELECTRONIC
LOCKING DIFFERENTIAL
The electronic locking differential is adevice housed in the rear axle and whenactivated, allows both wheels on that axleto turn at the same speed. The electroniclocking differential provides additionaltraction should your vehicle become stuck.
HOW DOES THE ELECTRONIC
LOCKING DIFFERENTIAL
WORK
You can activate the differentialelectronically and shift it on the fly withinthe operating speed range. The electronicdifferential disengages when the vehiclespeed exceeds a set value and it reengageswhen the vehicle speed drops below a setvalue. See Switching the ElectronicLocking Differential On and Off (page245). The electronic locking differentialcould engage based on certain selecteddrive modes. See Selecting a Drive Mode(page 311). The electronic lockingdifferential is for use in mud, rocks, sand,or any off-road condition where you needmaximum traction.
Note:The electronic locking differential isfor off-road use only and is not for use ondry pavement. Using the electronic lockingdifferential on dry pavement results inincreased tire wear, noise and vibration.
Note:The electronic locking differentialactivates or deactivates automaticallybased on speed, four-wheel drive mode, anddrive mode selection. See Switching theElectronic Locking Differential On andOff (page 245).
ELECTRONIC LOCKING
DIFFERENTIAL PRECAUTIONS
Operating the Electronic LockingDifferential with a Spare orMismatched Tires
On vehicles with an electronic lockingdifferential, the size of the spare tire canaffect performance of the system. If thereis a significant difference between the tworear tires, you may have limited electroniclocking differential functionality. If thesystem has difficulty disengaging, releasethe accelerator pedal and turn the steeringwheel in the opposite direction whenrolling. We recommend engaging anddisengaging the electronic lockingdifferential at a stop when you mount aspare on the rear axle.
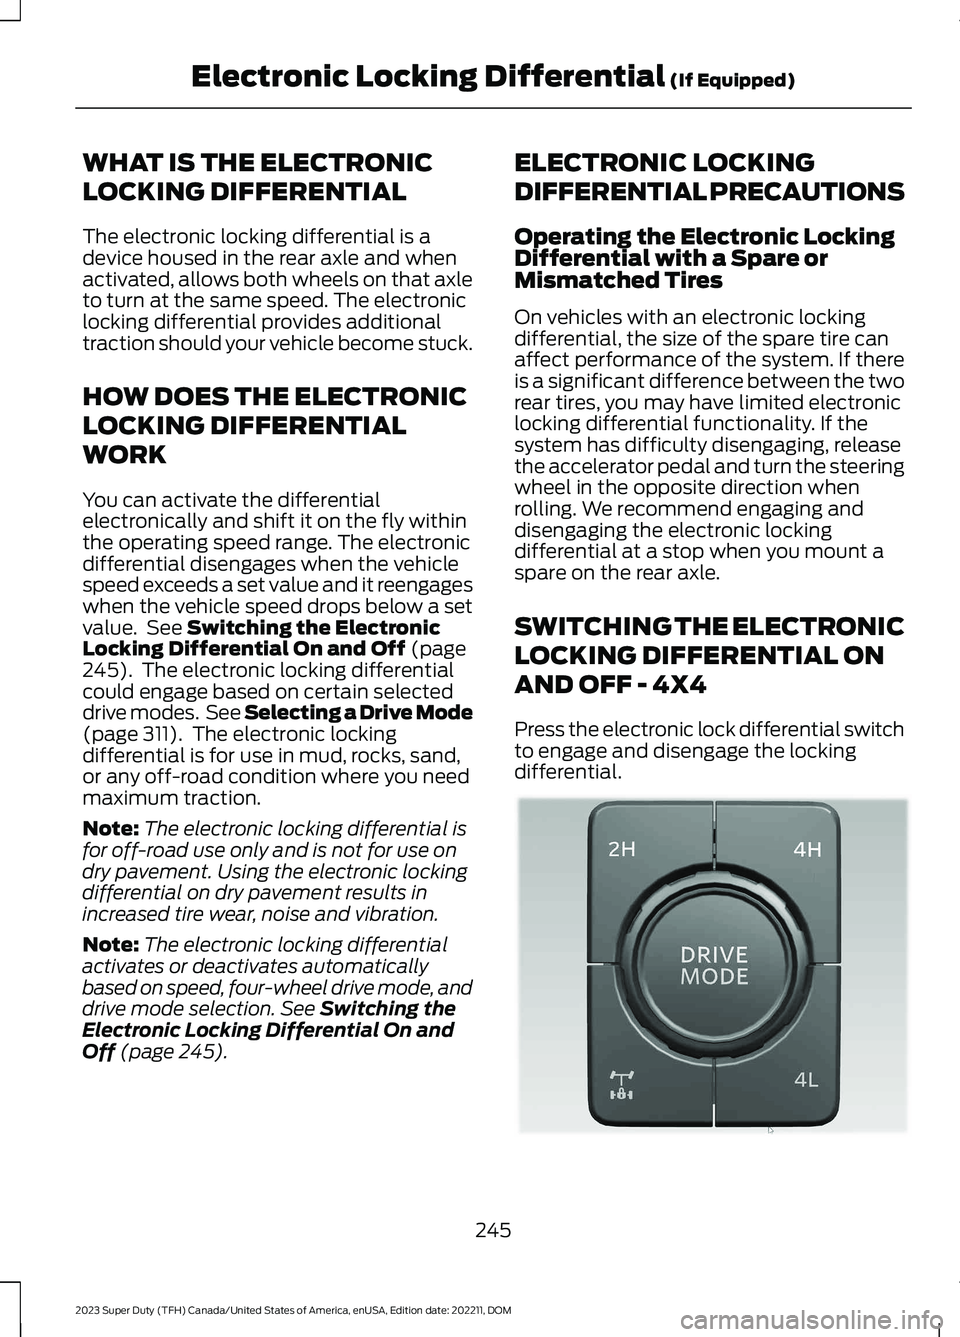
SWITCHING THE ELECTRONIC
LOCKING DIFFERENTIAL ON
AND OFF - 4X4
Press the electronic lock differential switchto engage and disengage the lockingdifferential.
245
2023 Super Duty (TFH) Canada/United States of America, enUSA, Edition date: 202211, DOMElectronic Locking Differential (If Equipped)E373433
Page 286 of 738

PARKING AID PRECAUTIONS
WARNING: To help avoid personalinjury, always use caution when inreverse (R) and when using the sensingsystem.
WARNING: The system may notdetect objects with surfaces that absorbreflection. Always drive with due careand attention. Failure to take care mayresult in a crash.
WARNING: Traffic control systems,fluorescent lamps, inclement weather,air brakes, external motors and fans mayaffect the correct operation of thesensing system. This may cause reducedperformance or false alerts.
WARNING: The system may notdetect small or moving objects,particularly those close to the ground.
WARNING: The parking aid systemcan only assist you to detect objectswhen your vehicle is moving at parkingspeeds. To help avoid personal injury youmust take care when using the parkingaid system.
WARNING: The system may notfunction if the sensor is blocked.
WARNING: In cold and severeweather conditions the system may notfunction. Rain, snow and spray can alllimit sensor performance.
WARNING: If damage occurs in theimmediate area surrounding the sensor,have your vehicle checked as soon aspossible.
Note:If your vehicle sustains damageleaving the sensors misaligned, this willcause inaccurate measurements or falsealerts.
When you connect a trailer to your vehicle,the rear parking aid detects the trailer andprovides an alert. Disable the parking aidwhen you connect a trailer to prevent thealert.
Note:Connected trailers might be detectedby the vehicle and parking aid turns offautomatically in those instances.
Note:Certain add-on devices installedaround the bumper or fascia may createfalse alerts, for example, large trailerhitches, bike or surfboard racks, license platebrackets, bumper covers or any other devicethat could block the normal detection zoneof the parking aid system. Aftermarket sparetires or spare tire covers mounted to the reartailgate could cause false alerts from thepark aid system. Remove the add-on deviceto prevent false alerts.
Note: Keep the sensors free from snow, iceand large accumulations of dirt. If thesensors are covered, the system's accuracycan be affected.
Do not clean the sensors with sharpobjects.
SWITCHING PARKING AID ON
AND OFF - VEHICLES WITH:
FRONT PARKING AID
Muting the Audible Tone
Press the parking aid button toswitch the system's audible toneon and off.
Switching Parking Aid On and OffLong-Term
The system can be set to stay disabled inbetween ignition cycles.
282
2023 Super Duty (TFH) Canada/United States of America, enUSA, Edition date: 202211, DOMParking Aids (If Equipped)E383616
Page 308 of 738

LANE CENTERINGREQUIREMENTS
You must keep your hands on the steeringwheel at all times.
Lane centering only activates when all ofthe following occur:
•Adaptive cruise control with lanecentering is enabled in your informationand entertainment screen. SeeSwitching Lane Centering On andOff (page 304).
•You have adaptive cruise control withstop and go enabled and set.
•The steering sensor detects your handson the steering wheel.
•The system detects both lane markingswhen driving on a straight road.
•Your vehicle is initially centered in thelane between two visible line markings.
Note:If the system does not detect validlane line markings, the system will remainin standby until valid line markings areavailable.
Note:If the system does not detect yourhands on the steering wheel, apply a slightforce to the steering wheel.
LANE CENTERING LIMITATIONS
Adaptive cruise control limitations applyto lane centering unless stated otherwiseor contradicted by a lane centeringlimitation. See Adaptive Cruise ControlLimitations (page 297).
Lane centering may not correctly operatein any of the following conditions:
•The lane width is too narrow or wide.
•The curve in the road is too small.
•The system does not detect theminimum required lane markings orwhen lanes merge or split.
•When the required steering effort tomaintain lane center exceeds the lanecentering system limit.
•When driving in areas that are underconstruction or when road work is inprogress.
•If the front windshield camera and/orthe front radar are blocked.
•When using a spare tire.
•Inclement weather conditionsincluding, but not limited to, high wind,heavy rain, and fog.
•Driving into direct sunlight.
•When modification to the steeringsystem has been made, includingalterations to the steering wheel.
•When towing a trailer.
•When the vehicle is loaded to near ormaximum payload. See LoadCarrying (page 351).
See Lane Centering Precautions (page303).
Note:System operation may also be limitedunder snow, heavy rain, or road sprayconditions.
Note:The system steering assistance islimited and may not have sufficient effortfor all driving situations and/or conditions,such as driving through tight curves ordriving through curves at high speeds.
SWITCHING LANE CENTERING ONAND OFF
Keep your hands on the steering wheel atall times.
The controls are on the steering wheel.
Press the button.
304
2023 Super Duty (TFH) Canada/United States of America, enUSA, Edition date: 202211, DOMAdaptive Cruise Control (If Equipped)E308131
Page 371 of 738
Your vehicle may have a temporary orconventional spare tire. A temporary sparetire is different in diameter or width,tread-type, or is from a differentmanufacturer than the road tires on yourvehicle. Consult information on the tirelabel or Safety Compliance label forlimitations when using.
When towing a trailer:
•Obey country specific regulations fortowing a trailer.
•Do not drive faster than 70 mph(113 km/h) during the first 500 mi(800 km).
•Do not make full-throttle starts.
•Check your hitch, electrical connectionsand trailer wheel lug nuts thoroughlyafter you have traveled 50 mi (80 km).
•When stopped in congested or heavytraffic during hot weather, place thetransmission in park (P) to aid engineand transmission cooling and to helpA/C performance.
•Turn off the speed control with heavyloads or in hilly terrain. The speedcontrol may turn off when you aretowing on long, steep slopes.
•Shift to a lower gear when driving downa long or steep hill. Do not continuouslyapply the brakes, as they may overheatand become less effective.
•If your transmission has Grade Assistor Tow/Haul, use this feature whentowing. This provides engine brakingand helps eliminate excessivetransmission shifting for optimum fueleconomy and transmission cooling.
•If your vehicle has AdvanceTrac withroll stability control, this system mayturn on during typical corneringmaneuvers with a heavily loaded trailer.This is normal. Turning the corner at aslower speed when towing may reducethis tendency.
•Allow more distance for stopping witha trailer attached. Anticipate stops andgradually brake.
•Avoid parking on a slope. However, ifyou must park on a slope, turn thesteering wheel to point your vehicletires away from traffic flow, set theparking brake, place the transmissionin park (P) and place wheel chocks infront and back of the trailer wheels.
Note:Chocks are not included with yourvehicle.
LAUNCHING OR RETRIEVING
A BOAT OR PERSONAL
WATERCRAFT
When backing down a ramp during boatlaunching or retrieval:
•Do not allow the static water level torise above the bottom edge of the rearbumper.
•Do not allow waves to break higherthan 6 in (15 cm) above the bottomedge of the rear bumper.
Exceeding 6 in (15 cm) could allow waterto enter vehicle components, causinginternal damage to the components andaffecting driveability, emissions andreliability.
Note:Replace the rear axle lubricantanytime the rear axle has been submergedin water.
Note:Disconnect the trailer wiringconnector before backing the trailer into thewater.
Note:Reconnect the trailer wiringconnector after removing the trailer fromthe water.
367
2023 Super Duty (TFH) Canada/United States of America, enUSA, Edition date: 202211, DOMTowing a Trailer