2023 FORD F650/750 fuel filter
[x] Cancel search: fuel filterPage 256 of 378
E250850
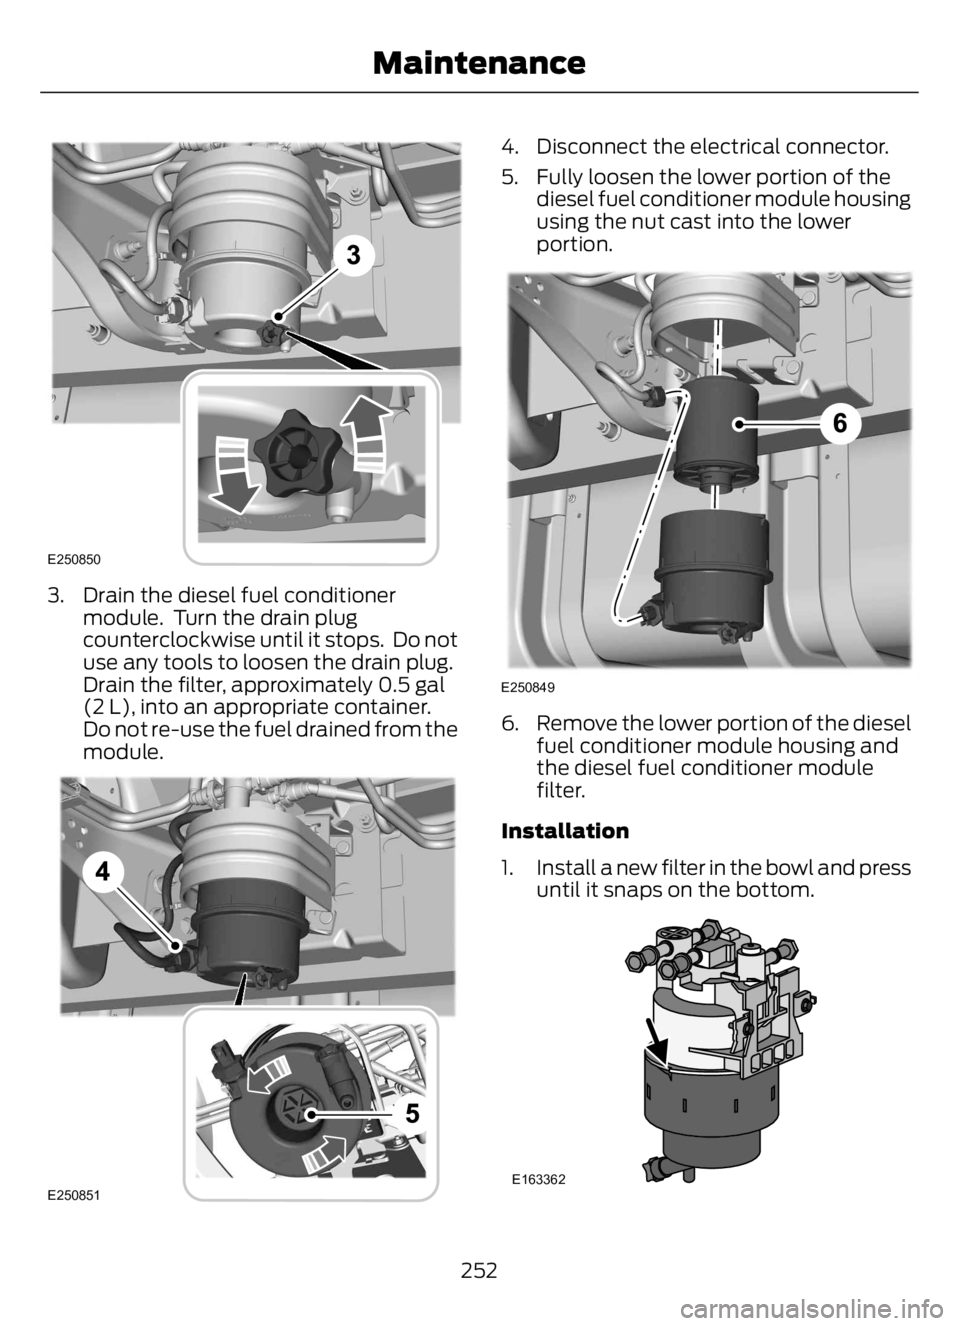
3. Drain the diesel fuel conditioner
module. Turn the drain plug
counterclockwise until it stops. Do not
use any tools to loosen the drain plug.
Drain the filter, approximately 0.5 gal
(2 L), into an appropriate container.
Do not re-use the fuel drained from the
module.
E250851
4. Disconnect the electrical connector.
5. Fully loosen the lower portion of the
diesel fuel conditioner module housing
using the nut cast into the lower
portion.
E250849
6. Remove the lower portion of the diesel
fuel conditioner module housing and
the diesel fuel conditioner module
filter.
Installation
1. Install a new filter in the bowl and press
until it snaps on the bottom.
E163362
252
Maintenance
Page 257 of 378
2. Install the lower portion of the housing
on the top portion. Tighten by hand
until you feel a strong resistance.
Continue to tighten with a 32mm
socket wrench until the mechanical
stop on the bottom meets the top.
3. Connect the electrical connector.
4. Tighten the drain plug, turn it clockwise
until it stops and you feel a strong
resistance. Do not use any tools to
tighten the drain plug.
5. Switch the ignition on for 30 seconds
and then switch the ignition off.
Repeat this operation six times in a row
to purge any trapped air from the fuel
system.
Engine-mounted Fuel Filter
Although the fuel system is not fully
pressurized when the vehicle is off, some
residual pressure may remain in the fuel
system since it can take some time for the
pressure to completely bleed off.
Therefore, we recommend you place an
absorbent cloth below the filter connectors
to absorb any fuel that may drain.
The engine-mounted fuel filter is a plastic
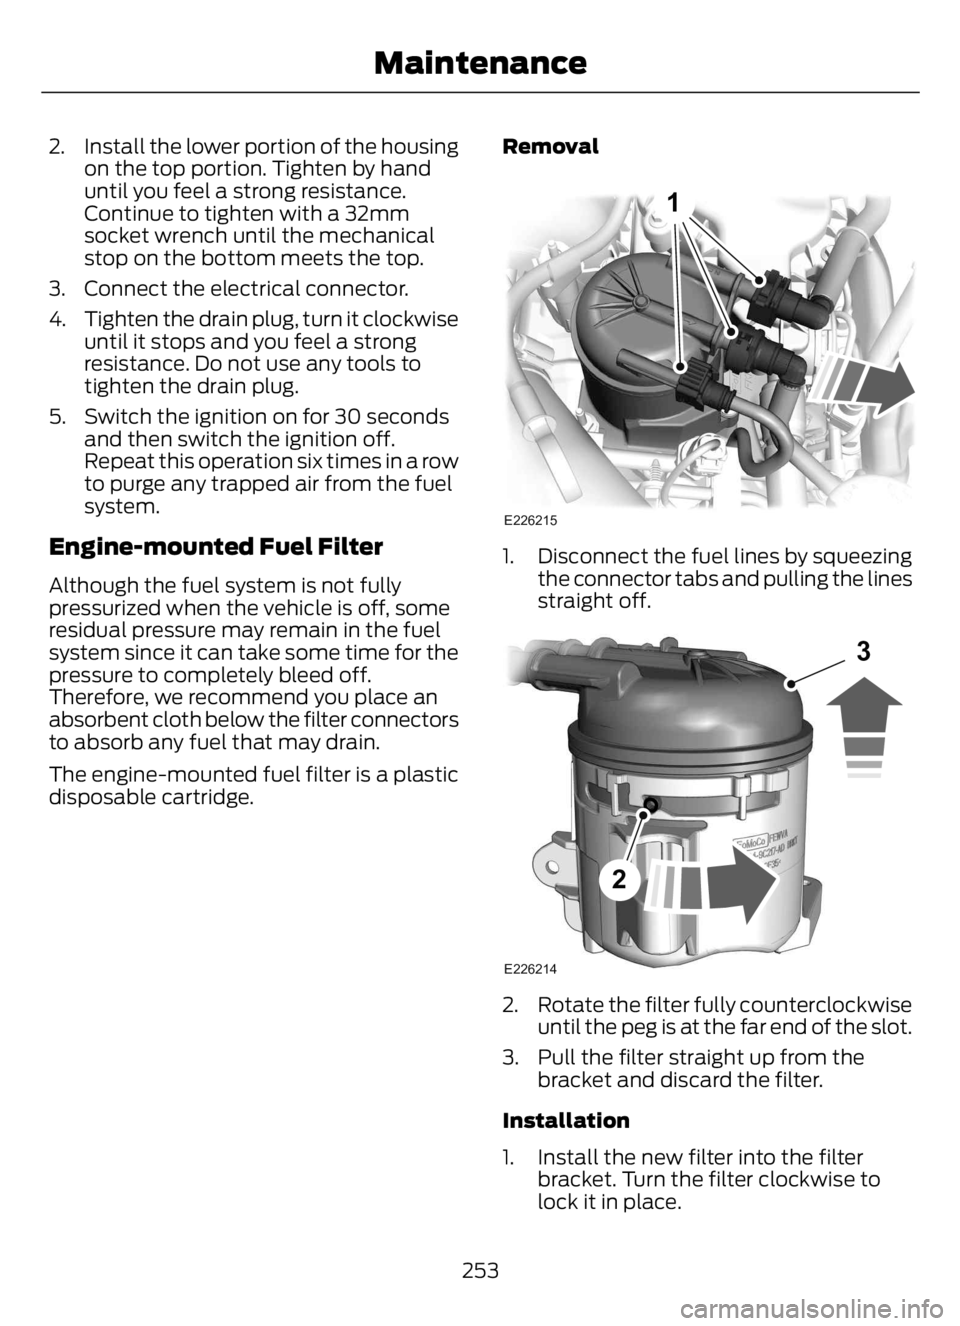
disposable cartridge.Removal
E226215
1
1. Disconnect the fuel lines by squeezing
the connector tabs and pulling the lines
straight off.
E226214
2
3
2. Rotate the filter fully counterclockwise
until the peg is at the far end of the slot.
3. Pull the filter straight up from the
bracket and discard the filter.
Installation
1. Install the new filter into the filter
bracket. Turn the filter clockwise to
lock it in place.
253
Maintenance
Page 259 of 378
Before engine operation, remove any debris
blocking the core.
• Turbocharger-to-charge air cooler.
• Charge air cooler-to-intake manifold
pipe.
• Mounting bracket.
• Chassis-mounted charge air cooler
core.
Inspect air intake piping:
• Check for accumulation of salt
deposits (where applicable). If present,
disassemble and clean the complete
air intake piping system. If pitting is
evident on the intake piping, use
Motorcraft Silicone Gasket and Sealant
TA-30 to seal joints against leakage.
• Check for loose hoses and clamps.
• Check for ruptured or collapsed hoses.
• Check air cleaner housing for cracks.
EXHAUST SYSTEM
INSPECTION
Note:If your vehicle is equipped with a
catalytic converter or muffler, do not blend
waste oil with diesel fuel. Operate only on
ultra-low sulfur (less than 15 parts per
million sulfur) diesel fuel with a cetane
value of 45 or higher.
If your diesel engine is equipped with a
catalytic converter, it is important to review
the maintenance schedule to make sure
proper functioning of the catalytic
converter. Also, take precautions not to
damage the catalytic converter when
servicing your engine or storing your
vehicle.
BRAKE SYSTEM INSPECTION
WARNING: Always wear a
respirator approved by the National
Institute of Occupational Studies of
Health (NIOSH) or Mine Safety and
Appliance (MSA) during all brake service
procedures. Wear the respirator from
removal of the wheels through assembly.
Never use compressed air or dry brushing
to clean brake parts or assemblies.
Clean brake parts and assemblies in
open air. During assembly, carefully
place all parts on the floor to avoid
getting dust in the air. Use an industrial
vacuum cleaner with a HEPA filter
system to clean dust from the brake
drums, backing plates and other brake
parts. After using the vacuum, remove
any remaining dust with a rag soaked in
water and wrung until nearly dry.
Never use compressed air or dry
sweeping to clean the work area. Use an
industrial vacuum cleaner with a HEPA
filter system and rags soaked in water
and wrung until nearly dry. Dispose of
used rags with care to avoid getting dust
in the air. Use an approved respirator
when emptying vacuum cleaners and
handling used rags.
Worker clean-up: Wash your hands
before eating, drinking or smoking.
Vacuum your work clothes after use and
then launder them separately, without
shaking them, to prevent fiber dust
getting into the air.
Your vehicle is equipped with
non-asbestos brake linings. However,
exposure to excessive amounts of brake
material (whether asbestos or
non-asbestos, fiberglass, mineral wool,
aramid or carbon) may be a serious health
hazard.
255
Maintenance
Page 269 of 378

• Never wash or rinse the engine while it
is hot or running; water in the running
engine may cause internal damage.
• Never wash or rinse any ignition coil,
spark plug wire or spark plug well, or
the area in and around these locations.
• Cover the battery, power distribution
box, and air filter assembly to prevent
water damage when cleaning the
engine.
CLEANING THE WINDOWS AND
WIPER BLADES
Car wash chemicals and environmental
fallout can result in windshield and wiper
blade contamination. Dirty windshield and
wipers will result in poor windshield wiper
operation. Keep the windshield and wiper
blades clean to maintain windshield wiper
performance.
To clean the windshield and wiper blades:
• Clean the windshield with a
non-abrasive glass cleaner. When
cleaning the interior of the windshield,
avoid getting any glass cleaner on the
instrument panel or door panels. Wipe
any glass cleaner off these surfaces
immediately.
• For windshields contaminated with
tree sap, chemicals, wax or bugs, clean
the entire windshield using steel wool
(no greater than 0000 grade) in a
circular motion and rinse with water.
• Clean the wiper blades with isopropyl
rubbing alcohol or windshield washer
concentrate.
Note: Do not use razor blades or other
sharp objects to clean or remove decals
from the inside of the heated rear window.
The vehicle warranty does not cover
damage caused to the heated rear window
grid lines.
CLEANING THE INTERIOR
WARNING: Do not use cleaning
solvents, bleach or dye on the vehicle's
seatbelts, as these actions may weaken
the belt webbing.
WARNING: On vehicles equipped
with seat-mounted airbags, do not use
chemical solvents or strong detergents.
Such products could contaminate the
side airbag system and affect
performance of the side airbag in a crash.
For fabric, carpets, cloth seats and seats
equipped with side airbags:
• Remove dust and loose dirt with a
vacuum cleaner.
• Remove light stains and soil with
Motorcraft Professional Strength
Carpet & Upholstery Cleaner.
• If grease or tar is present on the
material, spot-clean the area first with
Motorcraft Spot and Stain Remover. In
Canada, use Motorcraft Multi-Purpose
Cleaner.
• If a ring forms on the fabric after spot
cleaning, clean the entire area
immediately (but do not oversaturate)
or the ring will set.
• Do not use household cleaning
products or glass cleaners, which can
stain and discolor the fabric and affect
the flame retardant abilities of the seat
materials.
Mirrors
Do not clean the housing or glass of any
mirror with harsh abrasives, fuel or other
petroleum or ammonia-based cleaning
products.
265
Vehicle Care
Page 294 of 378
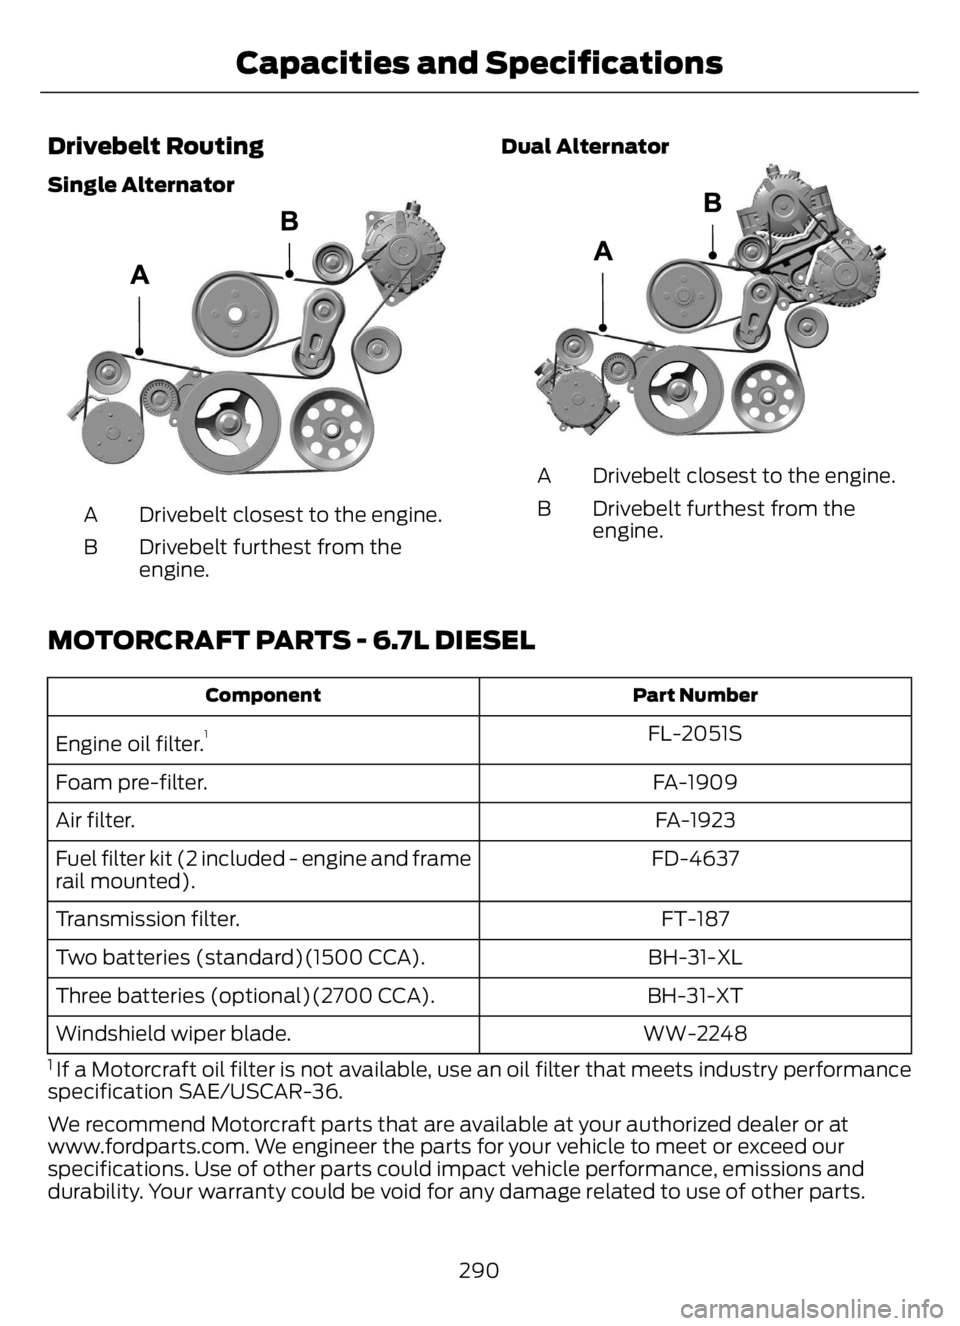
Drivebelt Routing
Single Alternator
E3305075E3305075
Drivebelt closest to the engine. A
Drivebelt furthest from the
engine. BDual Alternator
E2988579E2988579
Drivebelt closest to the engine. A
Drivebelt furthest from the
engine. B
MOTORCRAFT PARTS - 6.7L DIESEL
Part Number Component
FL-2051S
Engine oil filter.1
FA-1909 Foam pre-filter.
FA-1923 Air filter.
FD-4637 Fuel filter kit (2 included - engine and frame
rail mounted).
FT-187 Transmission filter.
BH-31-XL Two batteries (standard)(1500 CCA).
BH-31-XT Three batteries (optional)(2700 CCA).
WW-2248 Windshield wiper blade.
1 If a Motorcraft oil filter is not available, use an oil filter that meets industry performance
specification SAE/USCAR-36.
We recommend Motorcraft parts that are available at your authorized dealer or at
www.fordparts.com. We engineer the parts for your vehicle to meet or exceed our
specifications. Use of other parts could impact vehicle performance, emissions and
durability. Your warranty could be void for any damage related to use of other parts.
290
Capacities and Specifications
Page 298 of 378
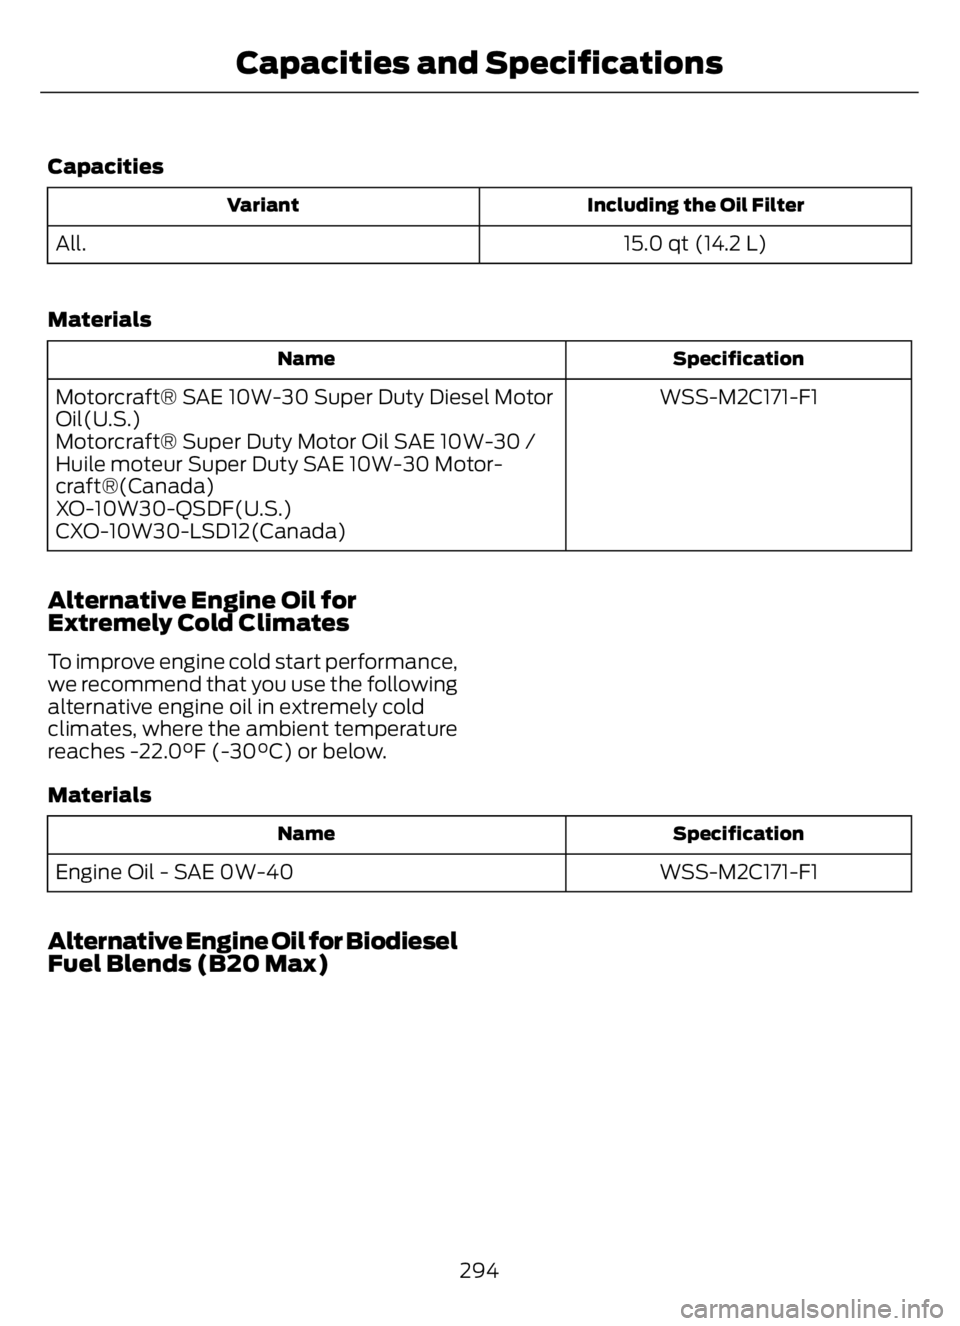
Capacities
Including the Oil Filter Variant
15.0 qt (14.2 L) All.
Materials
Specification Name
WSS-M2C171-F1 Motorcraft® SAE 10W-30 Super Duty Diesel Motor
Oil(U.S.)
Motorcraft® Super Duty Motor Oil SAE 10W-30 /
Huile moteur Super Duty SAE 10W-30 Motor-
craft®(Canada)
XO-10W30-QSDF(U.S.)
CXO-10W30-LSD12(Canada)
Alternative Engine Oil for
Extremely Cold Climates
To improve engine cold start performance,
we recommend that you use the following
alternative engine oil in extremely cold
climates, where the ambient temperature
reaches -22.0°F (-30°C) or below.
Materials
Specification Name
WSS-M2C171-F1 Engine Oil - SAE 0W-40
Alternative Engine Oil for Biodiesel
Fuel Blends (B20 Max)
294
Capacities and Specifications
Page 325 of 378
There are three types of maintenance
intervals for general vehicle environments:
On-Highway, City and Severe Service. In
all applications, monitoring miles
(kilometers) and time and when the engine
is due for an oil change determine the
actual interval. When the engine oil change
is required before the truck lubrication
interval, perform the lubrication at the
same time in order to reduce your vehicle’s
time out of service.
Air Brake Adjustment
WARNING: Failure to maintain
proper air brake adjustment can result
in reduction or loss of braking ability.
A qualified service technician, keeping to
the instructions in the service manual,
should perform air brake inspection and
adjustment or repairs.
Cam Brakes - Automatic Slack
Adjusters
WARNING: Do not manually adjust
the automatic slack adjusters to correct
excessive push rod stroke as it may result
in reduced brake effectiveness and a
vehicle crash. Excessive push rod stroke
indicates that a problem exists with the
automatic adjuster, with the installation
of the adjuster, or with foundation brake
components that manual adjustment
does not remedy. Seek service from a
qualified facility for excessive push rod
stroke.
Inspect standard air brakes equipped with
automatic slack adjusters for proper brake
adjustment as listed in the maintenance
schedule charts.
However, inspect the brakes more
frequently when subjecting them to heavy
use or adverse operating conditions such
as:
• Frequent brake applications while fully
loaded.
• Operation on hilly or mountainous
terrain.
• Frequent operation on dirt, gravel or
mud.
Some aftermarket brake linings also
require more frequent inspections.
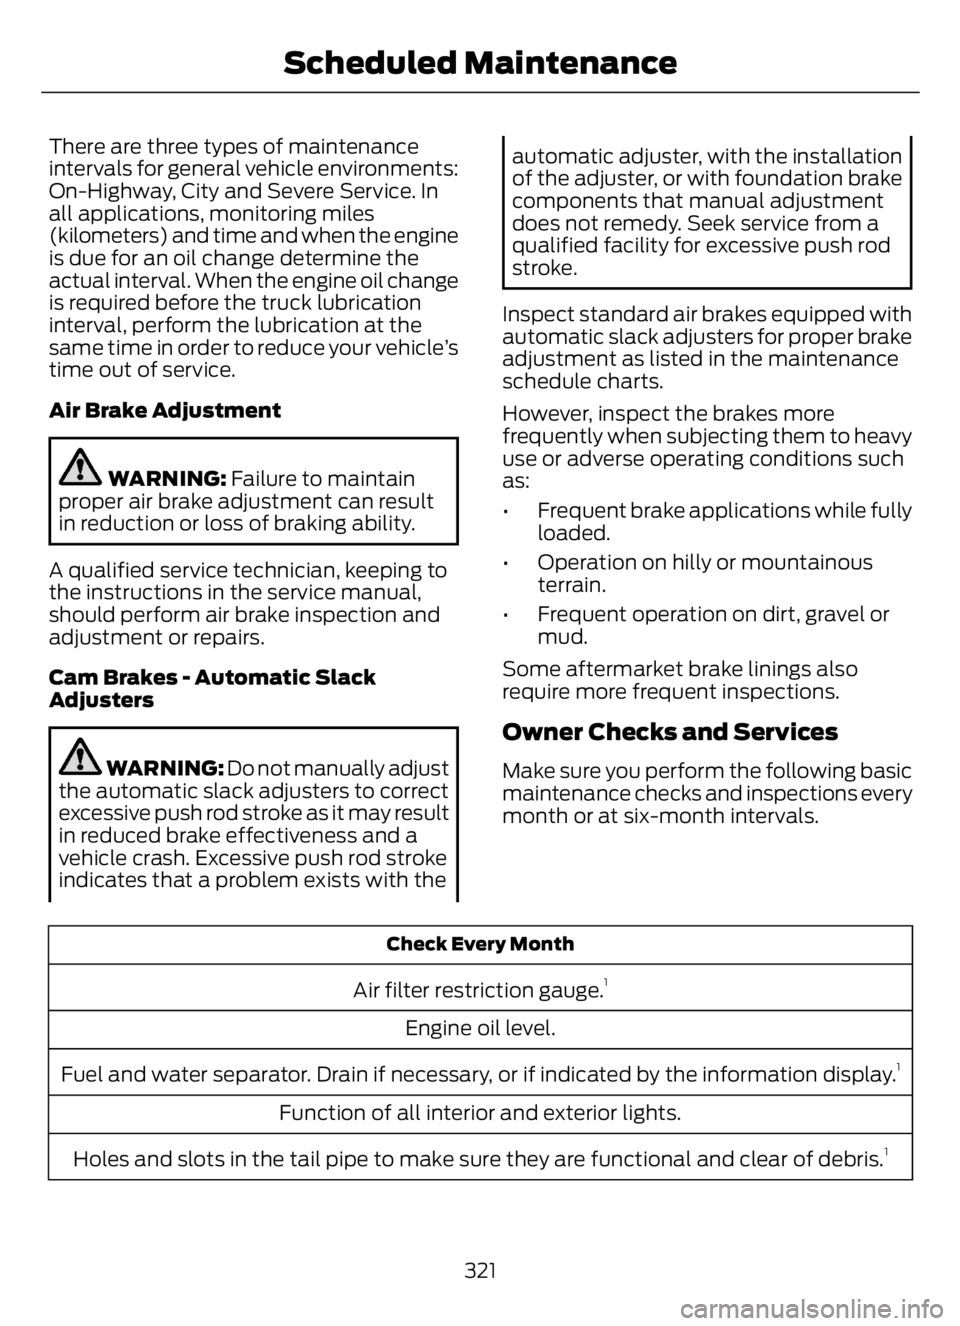
Owner Checks and Services
Make sure you perform the following basic
maintenance checks and inspections every
month or at six-month intervals.
Check Every Month
Air filter restriction gauge.1
Engine oil level.
Fuel and water separator. Drain if necessary, or if indicated by the information display.
1
Function of all interior and exterior lights.
Holes and slots in the tail pipe to make sure they are functional and clear of debris.
1
321
Scheduled Maintenance
Page 330 of 378

Other Maintenance Items
Replace the engine air filter. Every 30,000 mi
(48,000 km)
Replace the front wheel bearing grease and grease seal
if you have non-sealed bearings. Every 60,000 mi
(96,000 km)
Replace the spark plugs.
Every 97,000 mi
(156,000 km)
Replace the spark plug wires.
Change the rear axle fluid. See Special Operating
Conditions Scheduled Maintenance (page 329).
Every 105,000 mi
(168,000 km)
Inspect the accessory drive belt or belts.
1
Change the automatic transmission fluid and filter. Consult
an authorized dealer for requirements.
Every 150,000 mi
(240,000 km)Replace the accessory drive belt or belts if not replaced
within the last 100,000 mi (160,000 km).
Replace the front wheel bearings and seals if you have
non-sealed bearings.
Change the engine coolant.
2Every 200,000 mi
(320,000 km)
1 If not replaced, inspect every 15,000 mi (24,000 km).2 Initial replacement at 10 years or 200,000 mi (320,000 km), then every five years or
100,000 mi (160,000 km).
Diesel Engine
Note:Do not exceed the mileage or time
intervals.
At Every Oil Change Interval as Indicated by the Information Display1
Change the engine oil and filter.2
Drain the fuel filter water trap.
Refill the diesel exhaust fluid tank.
Rotate the tires, inspect the tires for wear and measure the tread depth.
3
326
Scheduled Maintenance