2023 FORD EXPLORER lock
[x] Cancel search: lockPage 345 of 573

•Use a spray with a 40 degree widespray angle pattern.
•Keep the nozzle at a 12 in (305 mm)distance and 90 degree angle to yourvehicle's surface.
Note:Holding the pressure washer nozzleat an angle to the vehicle's surface maydamage graphics and cause the edges topeel away from the vehicle's surface.
Underbody
Regularly clean the entire underside of yourvehicle. This includes the chassis, bodyfloor sheet metal and wheel wells usingfresh water. Keep body and door drainholes free of debris or foreign material.
Under Hood
For removing black rubber marks fromunder the hood we recommend MotorcraftWheel and Tire Cleaner or Motorcraft Bugand Tar Remover.
WAXING
Regular waxing is necessary to protect yourcar's paint from the elements. Werecommend that you wash and wax thepainted surface once or twice a year.
When washing and waxing, park yourvehicle in a shaded area out of directsunlight. Always wash your vehicle beforeapplying wax.
•Use a quality wax that does not containabrasives.
•Follow the manufacturer’s instructionsto apply and remove the wax.
•Apply a small amount of wax in aback-and-forth motion, not in circles.
•Do not allow wax to come in contactwith any non-body (low-gloss black)colored trim. The wax will discolor orstain the parts over time.
•Roof racks.
•Bumpers.
•Grained door handles.
•Side moldings.
•Mirror housings.
•Windshield cowl area.
•Do not apply wax to glass areas.
•After waxing, your car's paint shouldfeel smooth, and be free of streaks andsmudges.
CLEANING THE ENGINE
Engines are more efficient when they areclean because grease and dirt buildup keepthe engine warmer than normal.
When washing:
•Take care when using a power washerto clean the engine. The high-pressurefluid could penetrate the sealed partsand cause damage.
•Do not spray a hot engine with coldwater to avoid cracking the engineblock or other engine components.
•Spray Motorcraft Engine Shampoo andDegreaser on all parts that requirecleaning and pressure rinse clean. InCanada, use Motorcraft EngineShampoo.
Note:If your vehicle has an engine coverremove the cover before application ofMotorcraft Engine Shampoo and Degreaser.Immediately rinse away any over spray.
341
2023 Explorer (CTW) Canada/United States of America, enUSA, Edition date: 202209, First-PrintingVehicle Care
Page 373 of 573

•To reduce the chances of interferencefrom another vehicle, perform thesystem reset procedure at least 3 ft(1 m) away from another Ford MotorCompany vehicle undergoing thesystem reset procedure at the sametime.
•Do not wait more than two minutesbetween resetting each tire sensor orthe system can time-out and you haveto repeat the entire procedure on allfour wheels.
•A double horn sounds indicating theneed to repeat the procedure.
Performing the System Reset Procedure
Read the entire procedure beforeattempting.
1.Drive the vehicle above 20 mph(32 km/h) for at least two minutes,then park in a safe location where youcan easily get to all four tires and haveaccess to an air pump.
2.Place the ignition in the off position andkeep the key in the ignition.
3.Cycle the ignition to the on positionwith the engine off.
4.Turn the hazard flashers on then offthree times. You must accomplish thiswithin 10 seconds. If you successfullyenter the reset mode, the horn soundsonce, the system indicator flashes anda message shows in the informationdisplay. If this does not occur, pleasetry again starting at step 2. If afterrepeated attempts to enter the resetmode, the horn does not sound, thesystem indicator does not flash and nomessage shows in the informationdisplay, seek service from yourauthorized dealer.
5.Train the tire pressure monitoringsystem sensors in the tires using thefollowing system reset sequencestarting with the left front tire in thefollowing clockwise order: Left front -driver side front tire, Right front -passenger side front tire, Right rear -passenger side rear tire, Left rear -driver side rear tire.
6.Remove the valve cap from the valvestem on the left front tire. Decrease theair pressure until the horn sounds.
Note:The single horn tone confirms thatthe sensor identification code has beenlearned by the module for this position. If adouble horn is heard, the reset procedurewas unsuccessful, and you must repeat it.
7.Remove the valve cap from the valvestem on the right front tire. Decreasethe air pressure until the horn sounds.
8.Remove the valve cap from the valvestem on the right rear tire. Decrease theair pressure until the horn sounds.
9.Remove the valve cap from the valvestem on the left rear tire. Decrease theair pressure until the horn sounds.Training is complete after the hornsounds for the last tire trained, driverside rear tire, the system indicatorstops flashing, and a message showsin the information display.
10.Turn the ignition off. If two short hornbeeps are heard, the reset procedurewas unsuccessful and you mustrepeat it. If after repeating theprocedure and two short beeps areheard when the ignition is turned tooff, seek assistance from yourauthorized dealer.
369
2023 Explorer (CTW) Canada/United States of America, enUSA, Edition date: 202209, First-PrintingWheels and Tires
Page 375 of 573

•Use commercial car washingequipment.
•Try to repair the dissimilar spare tire.
Use of one of the dissimilar spare tireslisted above at any one wheel location canlead to impairment of the following:
•Handling, stability and brakingperformance.
•Comfort and noise.
•Ground clearance and parking at curbs.
•Winter weather driving capability.
•Wet weather driving capability.
•Four-wheel driving capability.
3.Full-size dissimilar spare withoutlabel on wheel.
When driving with the full-size dissimilarspare wheel and tire assembly, do not:
•Exceed 70 mph (113 km/h).
•Use more than one dissimilar sparewheel and tire assembly at a time.
•Use commercial car washingequipment.
•Use snow chains on the end of thevehicle with the dissimilar spare wheeland tire assembly.
The usage of a full-size dissimilar sparewheel and tire assembly can lead toimpairment of the following:
•Handling, stability and brakingperformance.
•Comfort and noise.
•Ground clearance and parking at curbs.
•Winter weather driving capability.
•Wet weather driving capability.
•Four-wheel driving capability.
When driving with the full-size dissimilarspare wheel and tire assembly additionalcaution should be given to:
•Towing a trailer.
•Driving vehicles equipped with acamper body.
•Driving vehicles with a load on thecargo rack.
Drive cautiously when using a full-sizedissimilar spare wheel and tire assemblyand seek service as soon as possible.
Tire Change Procedure
WARNING: The jack supplied withthis vehicle is only intended for changingwheels. Do not use the vehicle jack otherthan when you are changing a wheel inan emergency.
WARNING: Check that the vehiclejack is not damaged or deformed andthe thread is lubricated and clean.
WARNING: To help prevent yourvehicle from moving when changing awheel, shift the transmission into park(P), set the parking brake and use anappropriate block or wheel chock tosecure the wheel diagonally opposite tothe wheel being changed. For example,when changing the front left wheel,place an appropriate block or wheelchock on the right rear wheel.
WARNING: Always use the jackprovided as original equipment with yourvehicle. If using a jack other than the oneprovided, make sure the jack capacity isadequate for the vehicle weight,including any vehicle cargo ormodifications. If you are unsure if the jackcapacity is adequate, contact theauthorized dealer.
371
2023 Explorer (CTW) Canada/United States of America, enUSA, Edition date: 202209, First-PrintingWheels and Tires
Page 376 of 573

WARNING: Do not work on yourvehicle when the jack is the only supportas your vehicle could slip off the jack.Failure to follow this instruction couldresult in personal injury or death.
WARNING: Use only the specifiedjacking points. If you use other positions,you may damage the body, steering,suspension, engine, braking system orthe fuel lines.
WARNING: Never place anythingbetween the vehicle jack and yourvehicle.
WARNING: Never place anythingbetween the vehicle jack and the ground.
WARNING: Park your vehicle sothat you do not obstruct the flow oftraffic or place yourself in any danger andset up a warning triangle.
WARNING: Do not attempt tochange a tire on the side of the vehicleclose to moving traffic. Pull far enoughoff the road to avoid the danger of beinghit when operating the jack or changingthe wheel.
Note:Passengers should not remain in yourvehicle when the vehicle is being jacked.
Note:Jack at the specified locations toavoid damage to the vehicle.
Note:No maintenance or additionallubrication of your jack is required over theservice life of your vehicle.
1.Park on a level surface, set the parkingbrake and switch on the hazardflashers.
2.Apply the parking brake, place thetransmission in park (P) or reverse (R)for manual transmission. Turn theengine off.
3.If your vehicle has air suspension, usethe touch screen to switch on the AirSuspension Service Mode prior tojacking.
4.Block the wheel diagonally oppositethe flat tire. For example, if the leftfront tire is flat, block the right rearwheel.
372
2023 Explorer (CTW) Canada/United States of America, enUSA, Edition date: 202209, First-PrintingWheels and TiresE166722 E142551
Page 377 of 573

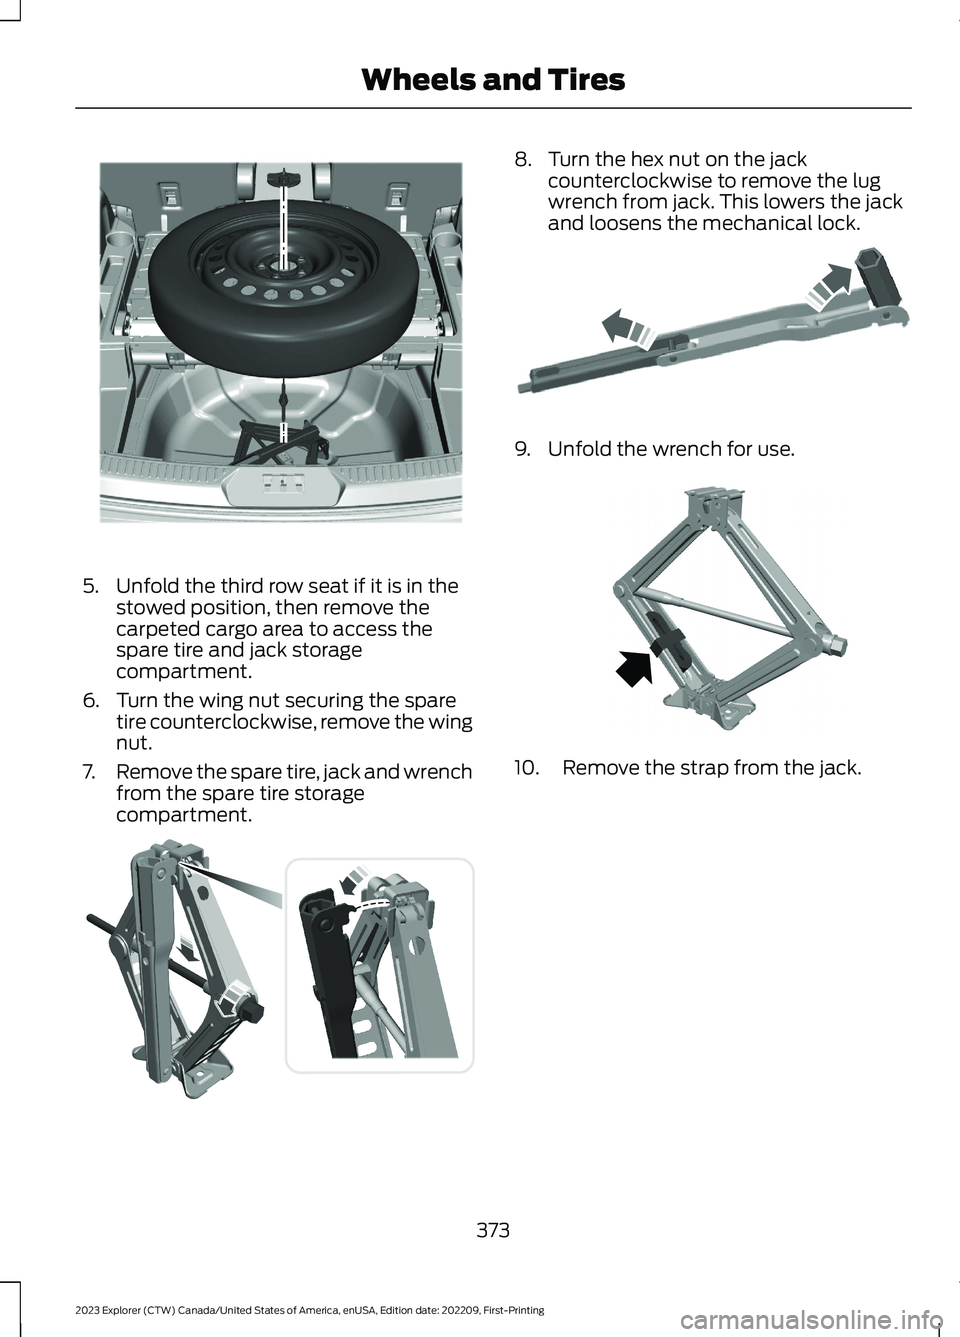
5.Unfold the third row seat if it is in thestowed position, then remove thecarpeted cargo area to access thespare tire and jack storagecompartment.
6.Turn the wing nut securing the sparetire counterclockwise, remove the wingnut.
7.Remove the spare tire, jack and wrenchfrom the spare tire storagecompartment.
8.Turn the hex nut on the jackcounterclockwise to remove the lugwrench from jack. This lowers the jackand loosens the mechanical lock.
9.Unfold the wrench for use.
10.Remove the strap from the jack.
373
2023 Explorer (CTW) Canada/United States of America, enUSA, Edition date: 202209, First-PrintingWheels and TiresE288598 E175694 E181744 E288597
Page 378 of 573

11.Loosen each wheel lug nut one-halfturn counterclockwise, but do notremove them until the flat tire israised off the ground.
12.Find the jacking points shown here,small arrow-shaped marks on thesills show the location of the jackingpoints.
13.Place the jack at the jacking pointnext to the tire which you arechanging. Turn the lug wrench handleclockwise until the flat tire iscompletely off the ground.
14.Remove the lug nuts with the lugwrench.
15.Replace the flat tire with the sparetire, making sure the valve stem isfacing outward.
16.Install the lug nuts snug against thehub. Do not fully tighten the lug nutsuntil the vehicle is lowered.
17.Turn the wrench handlecounterclockwise to lower the vehiclecompletely.
374
2023 Explorer (CTW) Canada/United States of America, enUSA, Edition date: 202209, First-PrintingWheels and Tires12E181745 E145908 E307859 E201156
Page 379 of 573

18.Remove the jack and fully tighten thelug nuts in the order shown. SeeTechnical Specifications (page376).
19.If you enabled the Air SuspensionService Mode, switch the mode offprior to driving.
20.Remove the wheel blocks.
Stowing the jack
1.To store the folded wrench on the jack,engage the bracket of the jack baseand the lug wrench pin, swing thewrench upwards, adjust jack heightuntil the wrench hook engages the holeon jack. Tighten the hex nut clockwiseby hand until secure.
2.Place the jack in the spare tirecompartment, install the wing nut andtighten clockwise by hand until secure.
Stowing the flat tire
You cannot store the full-sized road wheelin the temporary spare tire well.
1.Find the flat tire retainer strap tuckedinside the jack channel. Lower thecarpeted load floor.
2.Stow the flat tire in the cargo area onthe load floor with the wheel facing up.Secure the flat tire with the retainerstrap by following the next steps.
3.Locate the rear left side and right sidecargo tie-down rings. Push the loop endof the retainer strap through one cargotie-down ring. Thread the non-loop endthrough the loop.
4.Weave the retainer strap through thewheel openings.
375
2023 Explorer (CTW) Canada/United States of America, enUSA, Edition date: 202209, First-PrintingWheels and Tires12345E306781 E176165 E142906 E294325
Page 393 of 573

Note:We recommend using DOT 4 LowViscosity (LV) High Performance Brake Fluidor equivalent meeting WSS-M6C65-A2. Useof any fluid other than the recommendedfluid could cause reduced brakeperformance and not meet our performancestandards. Keep brake fluid clean and dry.Contamination with dirt, water, petroleumproducts or other materials could result inbrake system damage and possible failure.
Locks
Materials
SpecificationName
-Motorcraft® Penetrating and Lock Lubricant(U.S.)Motorcraft® Penetrating Fluid / Liquide dégrippantMotorcraft®(Canada)XL-1(U.S.)CXC-51-A(Canada)
Transfer Case
Capacities
QuantityVariant
1.1 qt (1 L)Four-wheel drive.
Materials
SpecificationName
WSS-M2C938-AMERCON® LV,Motorcraft® MERCON® LV Automatic TransmissionFluid(U.S.)Motorcraft® MERCON® LV Automatic TransmissionFluid / Huile pour boîte automatique MERCON® LVMotorcraft®(Canada)XT-10-QLVC(U.S.)CXT-10-LV6(Canada)
389
2023 Explorer (CTW) Canada/United States of America, enUSA, Edition date: 202209, First-PrintingCapacities and Specifications