2023 FORD EXPLORER lock
[x] Cancel search: lockPage 324 of 573

Note:The oil consumption of new enginesreaches its normal level after approximately3,000 mi (5,000 km).
Note:Increases in oil level can occur fromfrequent short trips that do not allow theengine to get to operating temperature, aswell as frequent idling or low speed drivingfor long periods of time.
Note:If oil levels are continuously notedabove the maximum mark, schedule a visitto your authorized dealer.
Adding Engine Oil
WARNING: Do not add engine oilwhen the engine is hot. Failure to followthis instruction could result in personalinjury.
WARNING: Do not remove the fillercap when the engine is running.
Do not use supplemental engine oiladditives because they are unnecessaryand could lead to engine damage that thevehicle warranty may not cover.
1.Clean the area surrounding the engineoil filler cap before you remove it.
2.Remove the engine oil filler cap.
3.Add engine oil that meets ourspecifications. See Capacities andSpecifications (page 384).
4.Reinstall the engine oil filler cap. Turnit clockwise until you feel a strongresistance.
Note:Make sure you install the oil filler capcorrectly.
Note: Do not add oil further than themaximum mark. Oil levels above themaximum mark may cause engine damage.
Note:Immediately soak up any oil spillagewith an absorbent cloth.
OIL CHANGE INDICATOR
RESET
Use the information display controls onthe steering wheel to reset the oil changeindicator.
From the main menu scroll to:
Action and descriptionMessage
Press the right arrow button,then from this menu scrollto the following message.
Settings
Press the right arrow button,then from this menu scrollto the following message.
Vehicle
Press and hold the OKbutton until the instrumentcluster displays thefollowing message.
Hold OK toReset
Reset Successful
When the oil change indic-ator resets the instrumentcluster displays 100%.
Remaining Life
{00}%
If the instrument clusterdisplays one of the followingmessages, repeat theprocess.
Not Reset
Reset Cancelled
320
2023 Explorer (CTW) Canada/United States of America, enUSA, Edition date: 202209, First-PrintingMaintenance
Page 329 of 573

It is very important to use predilutedcoolant approved to the correctspecification in order to avoid plugging thesmall passageways in the engine coolingsystem. See Capacities andSpecifications (page 378). Do not mixdifferent colors or types of coolant in yourvehicle. Mixing of engine coolants or usingan incorrect coolant may harm the engineor cooling system components and maynot be covered by the vehicle Warranty.
Note:If prediluted coolant is not available,use the approved concentrated coolantdiluting it to 50/50 with distilled water. SeeCapacities and Specifications (page 378).Using water that has not been deionisedmay contribute to deposit formation,corrosion and plugging of the small coolingsystem passageways.
Note: Coolants marketed for all makes andmodels may not be approved to ourspecifications and may cause damage tothe cooling system. Resulting componentdamage may not be covered by the vehicleWarranty.
If the coolant level is at or below theminimum mark, add prediluted coolantimmediately.
To top up the coolant level do thefollowing:
1.Unscrew the cap slowly. Any pressureescapes as you unscrew the cap.
2.Add prediluted coolant approved tothe correct specification. SeeCapacities and Specifications (page378).
3.Add enough prediluted coolant toreach the correct level.
4.Replace the coolant reservoir cap. Turnthe cap clockwise until it contacts thehard stop.
5.Check the coolant level in the coolantreservoir the next few times you driveyour vehicle. If necessary, add enoughprediluted engine coolant to bring thecoolant level to the correct level.
If you have to add more than 1.1 qt (1 L) ofengine coolant per month, have yourvehicle checked as soon as possible.Operating an engine with a low level ofcoolant can result in engine overheatingand possible engine damage.
In case of emergency, you can add a largeamount of water without engine coolantin order to reach a vehicle service location.In this instance, qualified personnel:
1.Must drain the cooling system.
2.Chemically clean the coolant system.
3.Refill with engine coolant as soon aspossible.
Water alone, without engine coolant, cancause engine damage from corrosion,overheating or freezing.
Do not use the following as a coolantsubstitute:
•Alcohol.
•Methanol.
•Brine.
•Any coolant mixed with alcohol ormethanol antifreeze.
Alcohol and other liquids can cause enginedamage from overheating or freezing.
Do not add extra inhibitors or additives tothe coolant. These can be harmful andcompromise the corrosion protection ofthe coolant.
Recycled Coolant
We do not recommend the use of recycledcoolant as an approved recycling processis not yet available.
Note:Dispose of used coolant in theappropriate manner.
325
2023 Explorer (CTW) Canada/United States of America, enUSA, Edition date: 202209, First-PrintingMaintenance
Page 335 of 573

•Climate control.
•Heated steering wheel.
•Audio unit.
•Navigation system.
A message may appear in the informationdisplay to alert you that battery protectionactions are active. This message is only fornotification that an action is taking place,and not intended to indicate an electricalproblem or that the battery requiresreplacement.
After battery replacement, or in somecases after charging the battery with anexternal charger, the battery managementsystem requires eight hours of vehicle sleeptime to relearn the battery state of charge.During this time, your vehicle must remainfully locked with the ignition switched off.
Note:Prior to relearning the battery stateof charge, the battery management systemmay temporarily disable some electricalsystems.
Electrical Accessory Installation
To make sure the battery managementsystem works correctly, do not connect anelectrical device ground connectiondirectly to the battery negative post. Thiscan cause inaccurate measurements ofthe battery condition and potentialincorrect system operation.
Note:If you add electrical accessories orcomponents to the vehicle, it may adverselyaffect battery performance and durability.This may also affect the performance ofother electrical systems in the vehicle.
Remove and Reinstall the Battery
Install a battery approved for use by ourspecifications. See Capacities andSpecifications (page 378).
To disconnect or remove the battery, dothe following:
1.Apply the parking brake and switch theignition off.
2.Switch all electrical equipment off, forexample lights and radio.
3.Wait a minimum of two minutes beforedisconnecting the battery.
Note:The engine management system hasa power hold function and remains poweredfor a period of time after you switch theignition off. This is to allow the system tostore diagnostic and adaptive tables.Disconnecting the battery without waitingcan cause damage not covered by thevehicle warranty.
4.Disconnect the negative battery cableterminal.
5.Disconnect the positive battery cableterminal.
6.Remove the battery securing clamp.
7.Remove the battery.
8.To install, reverse the removalprocedure.
Note:Before reconnecting the battery,make sure the ignition remains switched off.
Note:Make sure to fully tighten the batterycables.
If you disconnect or replace the vehiclebattery, you must reset the followingfeatures:
•Window bounce-back. See PowerWindows (page 94).
•Clock Settings.
•Pre-set radio stations.
Battery Disposal
Make sure that you dispose ofold batteries in anenvironmentally friendly way.Seek advice from your local authorityabout recycling old batteries.
331
2023 Explorer (CTW) Canada/United States of America, enUSA, Edition date: 202209, First-PrintingMaintenanceE107998
Page 338 of 573

•Climate control.
•Heated steering wheel.
•Audio unit.
•Navigation system.
A message may appear in the informationdisplay to alert you that battery protectionactions are active. This message is only fornotification that an action is taking place,and not intended to indicate an electricalproblem or that the battery requiresreplacement.
After battery replacement, or in somecases after charging the battery with anexternal charger, the battery managementsystem requires eight hours of vehicle sleeptime to relearn the battery state of charge.During this time, your vehicle must remainfully locked with the ignition switched off.
Note:Prior to relearning the battery stateof charge, the battery management systemmay temporarily disable some electricalsystems.
Electrical Accessory Installation
To make sure the battery managementsystem works correctly, do not connect anelectrical device ground connectiondirectly to the battery negative post. Thiscan cause inaccurate measurements ofthe battery condition and potentialincorrect system operation.
Note:If you add electrical accessories orcomponents to the vehicle, it may adverselyaffect battery performance and durability.This may also affect the performance ofother electrical systems in the vehicle.
Remove and Reinstall the Battery
Install a battery approved for use by ourspecifications. See Capacities andSpecifications (page 378).
To disconnect or remove the battery, dothe following:
1.Apply the parking brake and switch theignition off.
2.Switch all electrical equipment off, forexample lights and radio.
3.Wait a minimum of two minutes beforedisconnecting the battery.
Note:The engine management system hasa power hold function and remains poweredfor a period of time after you switch theignition off. This is to allow the system tostore diagnostic and adaptive tables.Disconnecting the battery without waitingcan cause damage not covered by thevehicle warranty.
4.Disconnect the negative battery cableterminal.
5.Disconnect the positive battery cableterminal.
6.Remove the battery securing clamp.
7.Remove the battery.
8.To install, reverse the removalprocedure.
Note:Before reconnecting the battery,make sure the ignition remains switched off.
Note:Make sure to fully tighten the batterycables.
If you disconnect or replace the vehiclebattery, you must reset the followingfeatures:
•Window bounce-back. See PowerWindows (page 94).
•Clock Settings.
•Pre-set radio stations.
Battery Disposal
Make sure that you dispose ofold batteries in anenvironmentally friendly way.Seek advice from your local authorityabout recycling old batteries.
334
2023 Explorer (CTW) Canada/United States of America, enUSA, Edition date: 202209, First-PrintingMaintenanceE107998
Page 339 of 573

ADJUSTING THE HEADLAMPS
Vertical Aim Adjustment
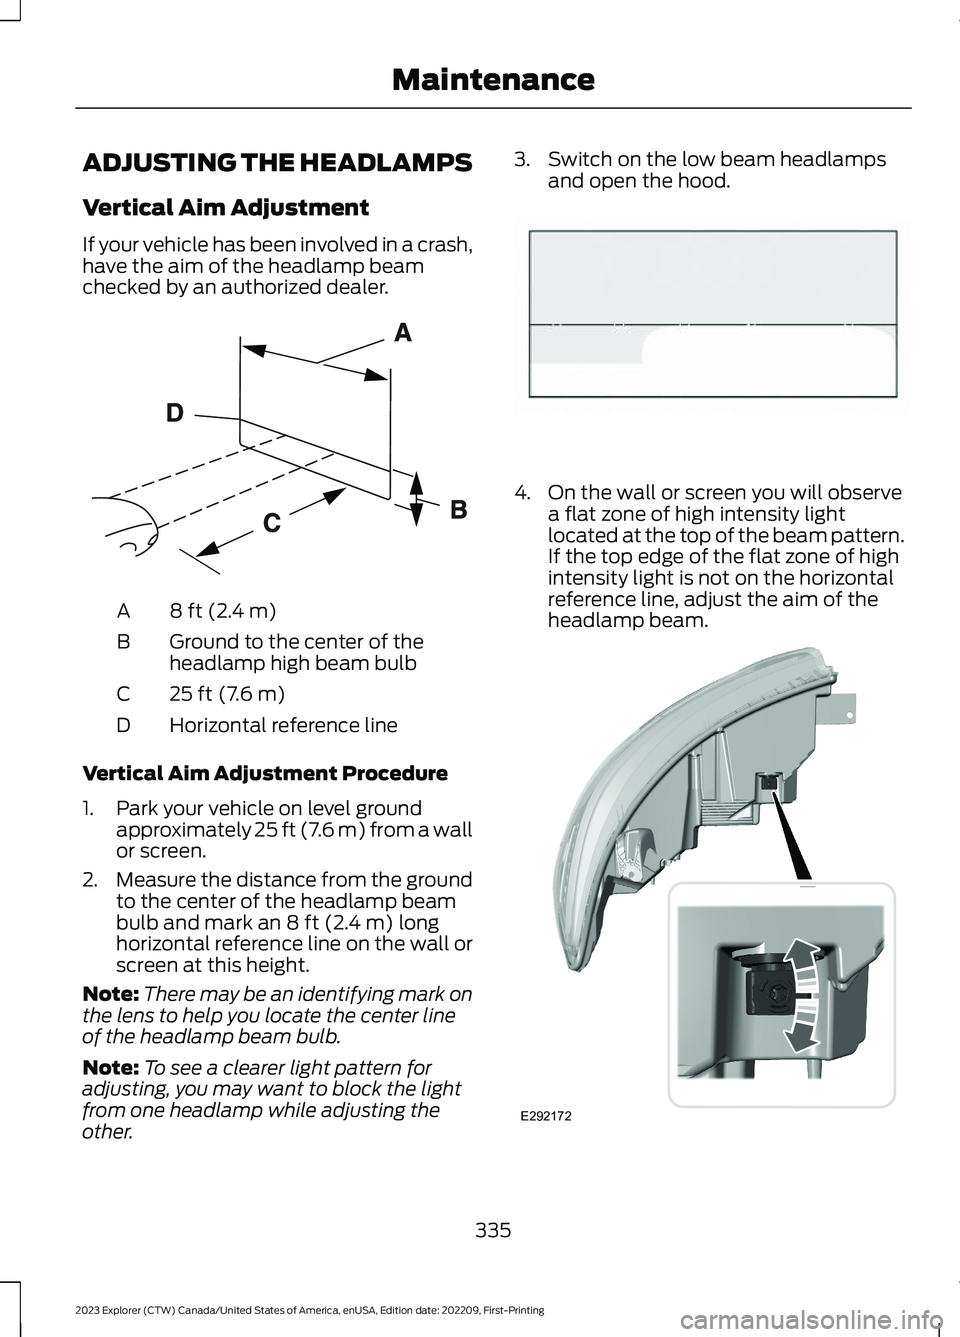
If your vehicle has been involved in a crash,have the aim of the headlamp beamchecked by an authorized dealer.
8 ft (2.4 m)A
Ground to the center of theheadlamp high beam bulbB
25 ft (7.6 m)C
Horizontal reference lineD
Vertical Aim Adjustment Procedure
1.Park your vehicle on level groundapproximately 25 ft (7.6 m) from a wallor screen.
2.Measure the distance from the groundto the center of the headlamp beambulb and mark an 8 ft (2.4 m) longhorizontal reference line on the wall orscreen at this height.
Note:There may be an identifying mark onthe lens to help you locate the center lineof the headlamp beam bulb.
Note:To see a clearer light pattern foradjusting, you may want to block the lightfrom one headlamp while adjusting theother.
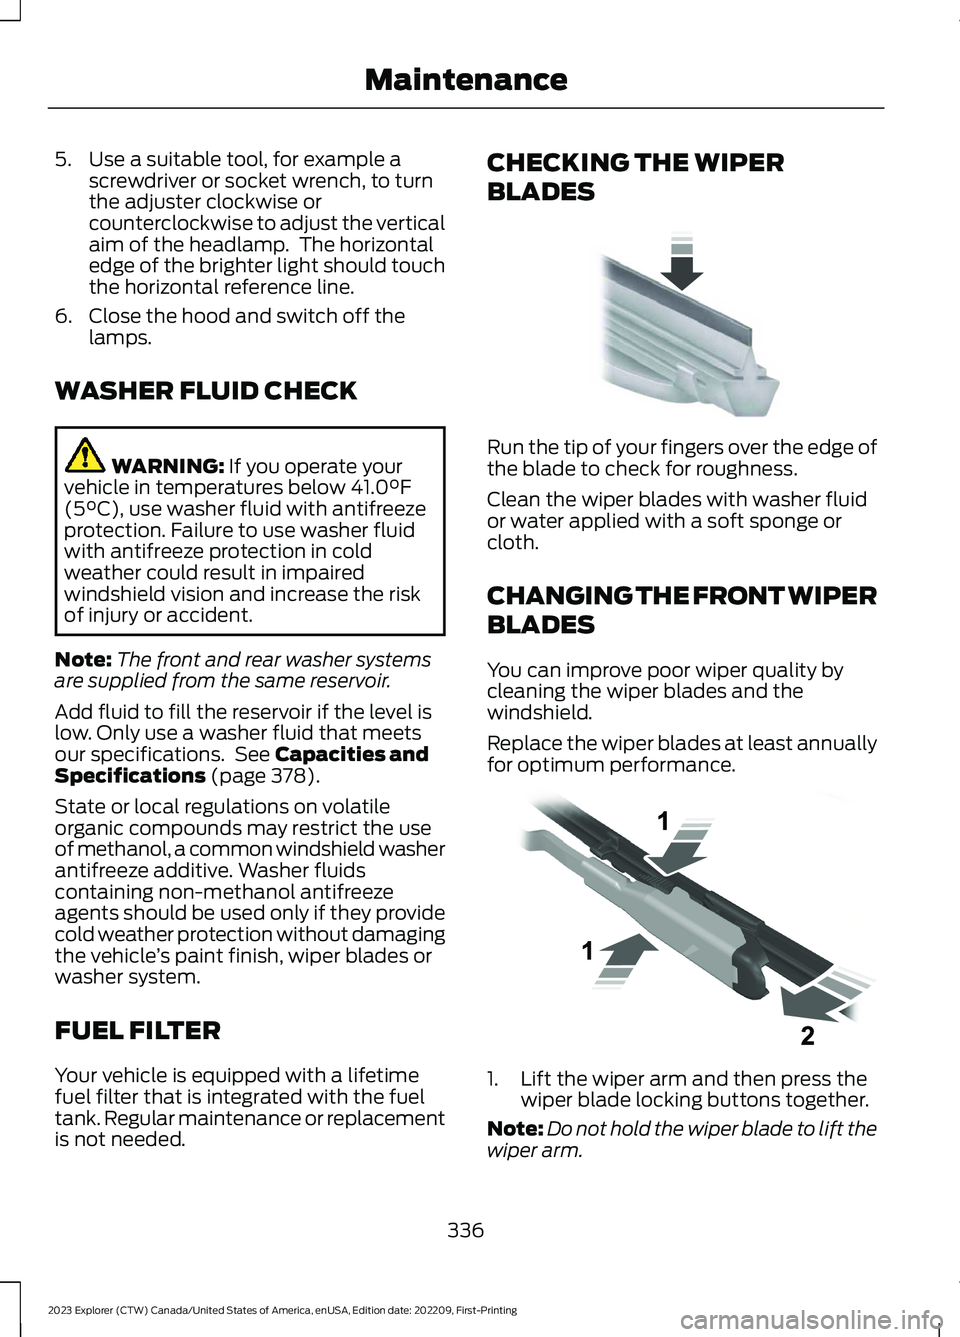
3.Switch on the low beam headlampsand open the hood.
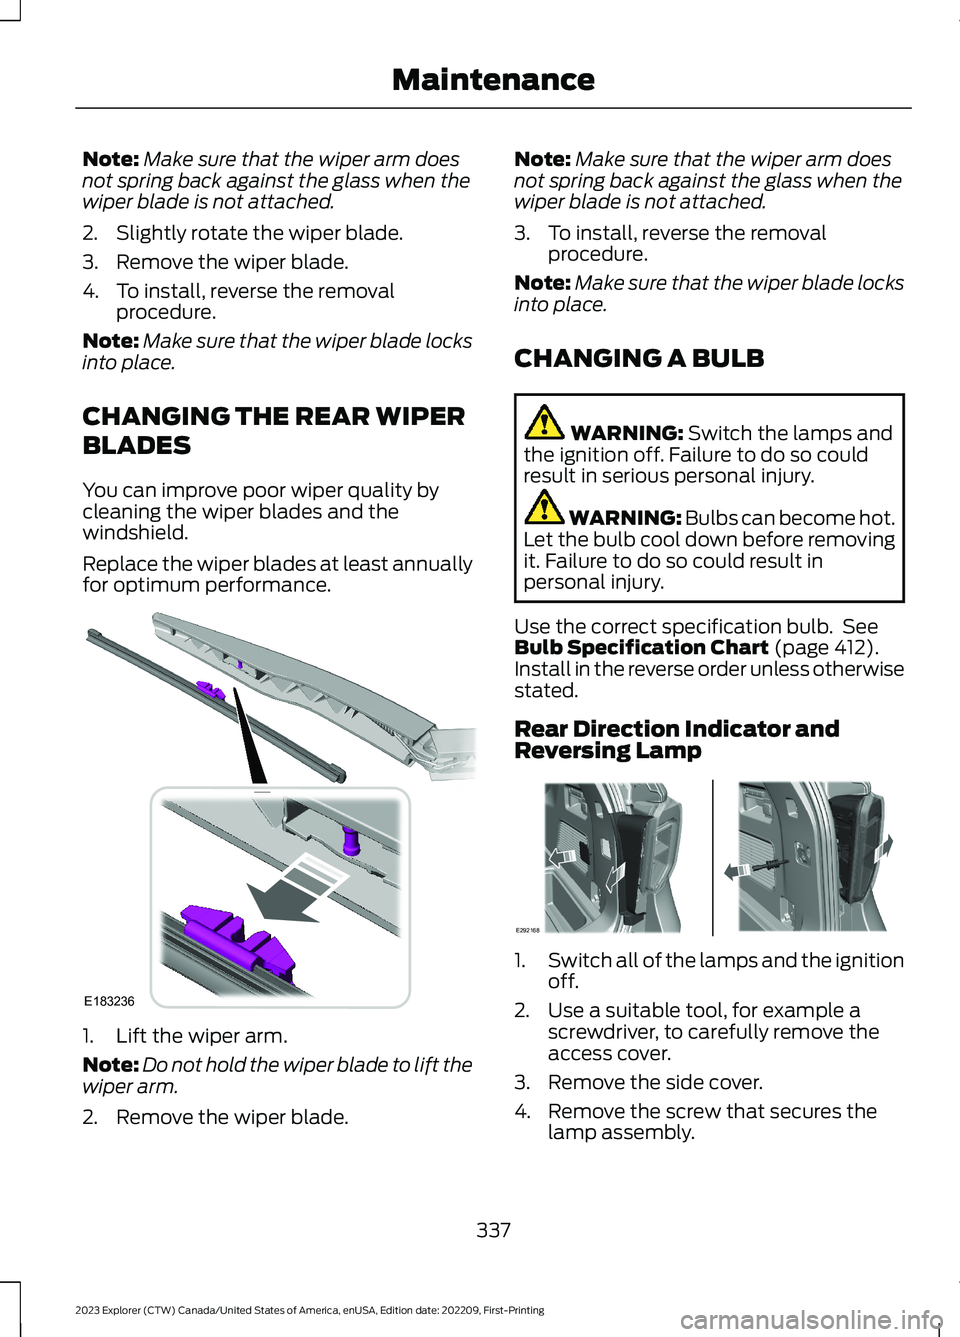
4.On the wall or screen you will observea flat zone of high intensity lightlocated at the top of the beam pattern.If the top edge of the flat zone of highintensity light is not on the horizontalreference line, adjust the aim of theheadlamp beam.
335
2023 Explorer (CTW) Canada/United States of America, enUSA, Edition date: 202209, First-PrintingMaintenanceE142592 E142465 E292172
Page 340 of 573

5.Use a suitable tool, for example ascrewdriver or socket wrench, to turnthe adjuster clockwise orcounterclockwise to adjust the verticalaim of the headlamp. The horizontaledge of the brighter light should touchthe horizontal reference line.
6.Close the hood and switch off thelamps.
WASHER FLUID CHECK
WARNING: If you operate yourvehicle in temperatures below 41.0°F(5°C), use washer fluid with antifreezeprotection. Failure to use washer fluidwith antifreeze protection in coldweather could result in impairedwindshield vision and increase the riskof injury or accident.
Note:The front and rear washer systemsare supplied from the same reservoir.
Add fluid to fill the reservoir if the level islow. Only use a washer fluid that meetsour specifications. See Capacities andSpecifications (page 378).
State or local regulations on volatileorganic compounds may restrict the useof methanol, a common windshield washerantifreeze additive. Washer fluidscontaining non-methanol antifreezeagents should be used only if they providecold weather protection without damagingthe vehicle’s paint finish, wiper blades orwasher system.
FUEL FILTER
Your vehicle is equipped with a lifetimefuel filter that is integrated with the fueltank. Regular maintenance or replacementis not needed.
CHECKING THE WIPER
BLADES
Run the tip of your fingers over the edge ofthe blade to check for roughness.
Clean the wiper blades with washer fluidor water applied with a soft sponge orcloth.
CHANGING THE FRONT WIPER
BLADES
You can improve poor wiper quality bycleaning the wiper blades and thewindshield.
Replace the wiper blades at least annuallyfor optimum performance.
1.Lift the wiper arm and then press thewiper blade locking buttons together.
Note:Do not hold the wiper blade to lift thewiper arm.
336
2023 Explorer (CTW) Canada/United States of America, enUSA, Edition date: 202209, First-PrintingMaintenanceE142463 E129990
Page 341 of 573

Note:Make sure that the wiper arm doesnot spring back against the glass when thewiper blade is not attached.
2.Slightly rotate the wiper blade.
3.Remove the wiper blade.
4.To install, reverse the removalprocedure.
Note:Make sure that the wiper blade locksinto place.
CHANGING THE REAR WIPER
BLADES
You can improve poor wiper quality bycleaning the wiper blades and thewindshield.
Replace the wiper blades at least annuallyfor optimum performance.
1.Lift the wiper arm.
Note:Do not hold the wiper blade to lift thewiper arm.
2.Remove the wiper blade.
Note:Make sure that the wiper arm doesnot spring back against the glass when thewiper blade is not attached.
3.To install, reverse the removalprocedure.
Note:Make sure that the wiper blade locksinto place.
CHANGING A BULB
WARNING: Switch the lamps andthe ignition off. Failure to do so couldresult in serious personal injury.
WARNING: Bulbs can become hot.Let the bulb cool down before removingit. Failure to do so could result inpersonal injury.
Use the correct specification bulb. SeeBulb Specification Chart (page 412).Install in the reverse order unless otherwisestated.
Rear Direction Indicator andReversing Lamp
1.Switch all of the lamps and the ignitionoff.
2.Use a suitable tool, for example ascrewdriver, to carefully remove theaccess cover.
3.Remove the side cover.
4.Remove the screw that secures thelamp assembly.
337
2023 Explorer (CTW) Canada/United States of America, enUSA, Edition date: 202209, First-PrintingMaintenanceE183236 E292168
Page 342 of 573

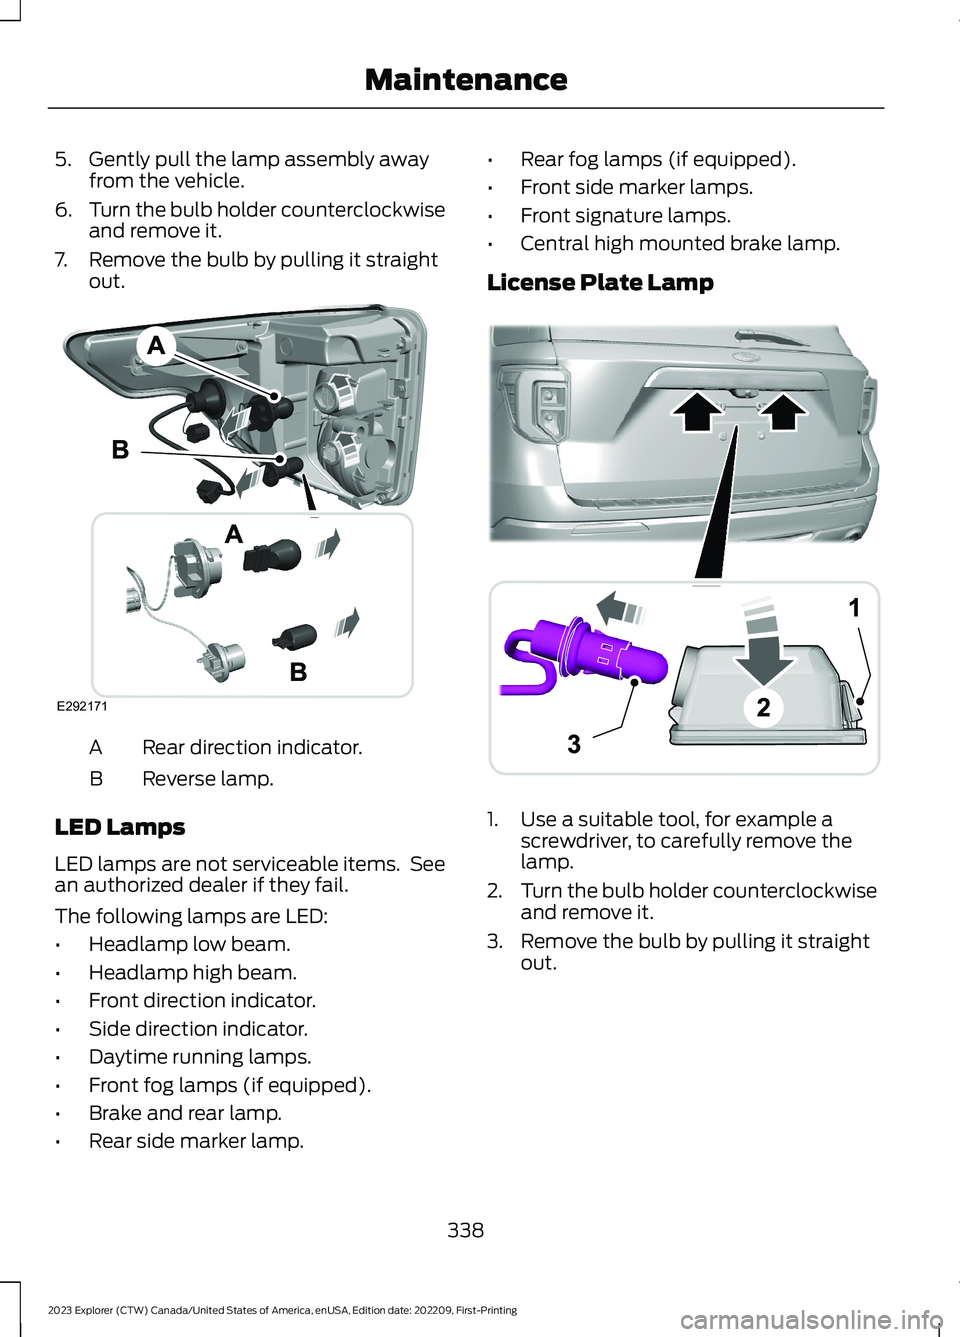
5.Gently pull the lamp assembly awayfrom the vehicle.
6.Turn the bulb holder counterclockwiseand remove it.
7.Remove the bulb by pulling it straightout.
Rear direction indicator.A
Reverse lamp.B
LED Lamps
LED lamps are not serviceable items. Seean authorized dealer if they fail.
The following lamps are LED:
•Headlamp low beam.
•Headlamp high beam.
•Front direction indicator.
•Side direction indicator.
•Daytime running lamps.
•Front fog lamps (if equipped).
•Brake and rear lamp.
•Rear side marker lamp.
•Rear fog lamps (if equipped).
•Front side marker lamps.
•Front signature lamps.
•Central high mounted brake lamp.
License Plate Lamp
1.Use a suitable tool, for example ascrewdriver, to carefully remove thelamp.
2.Turn the bulb holder counterclockwiseand remove it.
3.Remove the bulb by pulling it straightout.
338
2023 Explorer (CTW) Canada/United States of America, enUSA, Edition date: 202209, First-PrintingMaintenanceE292171 ABA12203AAE292276