2023 FORD EXPLORER remove seats
[x] Cancel search: remove seatsPage 29 of 573

INSTALLING CHILD
RESTRAINTS
Child Seats
Use a child restraint (sometimes called aninfant carrier, convertible seat, or toddlerseat) for Infants, toddlers and childrenweighing 40 lb (18 kg) or less (generallyfour-years-old or younger).
Using Lap and Shoulder Belts
WARNING: Do not place arearward facing child restraint in front ofan active airbag. Failure to follow thisinstruction could result in personal injuryor death.
WARNING: Properly securechildren 12 years old and under in a rearseating position whenever possible. Ifyou are unable to properly secure allchildren in a rear seating position,properly secure the largest child on thefront seat. If you must use a forwardfacing child restraint on the front seat,move the seat as far back as possible.Failure to follow these instructions couldresult in personal injury or death.
WARNING: Depending on whereyou secure a child restraint, anddepending on the child restraint design,you may block access to certain seatbeltbuckle assemblies and LATCH loweranchors, rendering those featurespotentially unusable. To avoid risk ofinjury, make sure occupants only useseating positions where they are able tobe properly restrained.
When installing a child restraint withcombination lap and shoulder belts:
•Use the correct seatbelt buckle for thatseating position.
•Insert the belt tongue into the properbuckle until you hear a snap and feel itlatch. Make sure the tongue is securelyfastened in the buckle.
•Keep the buckle release buttonpointing up and away from the childrestraint, with the tongue between thechild restraint and the release button,to prevent accidental unbuckling.
•Place the vehicle seat in the uprightposition before you install the childrestraint.
•For second row seating positions,adjust the recliner slightly to improvechild restraint fit. If needed, remove thehead restraints.
•For third row seating positions, stowthe head restraints to improve childrestraint fit. See Head Restraints(page 144).
•Put the seatbelt in the automaticlocking mode. See Step 5 in theprocedure that follows. This vehicledoes not require the use of a lockingclip.
Perform the following steps wheninstalling the child restraint withcombination lap and shoulder belts:
25
2023 Explorer (CTW) Canada/United States of America, enUSA, Edition date: 202209, First-PrintingChild SafetyE142594
Page 31 of 573

5.To put the retractor in the automaticlocking mode, grasp the shoulderportion of the belt and pull downwarduntil you pull all of the belt out.
Note:The automatic locking mode isavailable on the front passenger and rearseats.
6.Allow the belt to retract to removeslack. The belt clicks as it retracts toindicate it is in the automatic lockingmode.
7.Try to pull the belt out of the retractorto make sure the retractor is in theautomatic locking mode. You shouldnot be able to pull more belt out. If theretractor did not lock, unbuckle the beltand repeat Steps 5 and 6.
8.Remove remaining slack from the belt.Force the seat down with extra weight,for example, by pressing down orkneeling on the child restraint as youpull up on the shoulder belt to forceslack from the belt. This is necessaryto remove the remaining slack thatexists once you add the extra weightof the child to the child restraint. It alsohelps to achieve the proper snugnessof the child restraint to your vehicle.Sometimes, a slight lean toward thebuckle provides extra help to removeremaining slack from the belt.
9.If the child restraint has a tether strap,attach it now.
10.Before placing the child in the seat,forcibly move the seat forward andback to make sure you have the seatsecurely held in place. To check this,grab the seat at the belt path andattempt to move it side to side andforward and back. There should beno more than 1 in (2.5 cm) ofmovement for proper installation.
We recommend checking with a NHTSACertified Child Passenger SafetyTechnician to make sure you properlyinstalled the child restraint. In Canada,check with Transport Canada for referralto a Child Car Seat Clinic.
27
2023 Explorer (CTW) Canada/United States of America, enUSA, Edition date: 202209, First-PrintingChild SafetyE142875 E142533 E142534
Page 34 of 573

Second Row Bucket Seats and ThirdRow Seats
Second Row Bench Seats and ThirdRow Seats
Perform the following steps to install achild restraint with tether anchors:
Note:If you install a child restraint with rigidLATCH attachments, do not tighten thetether strap enough to lift the child restraintoff your vehicle seat cushion when the childis seated in it. Keep the tether strap just snugwithout lifting the front of the child restraint.Keeping the child restraint just touching yourvehicle seat gives the best protection in asevere crash.
For second row outermost seatingpositions, route the child restraint tetherstrap over the seat backrest, under thehead restraint and between the headrestraint posts. If needed, remove the headrestraint to improve the fit of the childrestraint or tether strap.
For the second row center seating position,route the child restraint tether strap overthe top of the head restraint. If needed,remove the head restraint to improve thefit of the child restraint or tether strap. SeeHead Restraints (page 144).
For third row seating positions, route thechild restraint tether strap over the seatbackrest, under the head restraint andbetween the head restraint posts. Ifneeded, fold the head restraint down toimprove the fit of the child restraint ortether strap. See Head Restraints (page144).
1.Route the tether strap.
2.Locate the correct anchor for theselected seating position.
3.Clip the tether strap to the anchor asshown. The tether hook may betwisted ½ turn to improve installation.If you clip the tether strap incorrectly,the child restraint may not be retainedproperly in the event of a crash.
30
2023 Explorer (CTW) Canada/United States of America, enUSA, Edition date: 202209, First-PrintingChild SafetyE319055 E319047 E190833
Page 37 of 573

BOOSTER SEATS
WARNING: Do not put the shouldersection of the seatbelt or allow the childto put the shoulder section of theseatbelt under their arm or behind theirback. Failure to follow this instructioncould reduce the effectiveness of theseatbelt and increase the risk of injury ordeath in a crash.
Use a belt-positioning booster seat forchildren who have outgrown or no longerproperly fit in a child safety restraint(generally children who are less than 57 in(1.45 m) tall, are greater than age 4 andless than age 12, and between 40 lb (18 kg)and 80 lb (36 kg) and upward to 100 lb(45 kg) if recommended by your childrestraint manufacturer). Many state andprovincial laws require that children useapproved booster seats until they reachage eight, a height of 57 in (1.45 m) tall, or80 lb (36 kg).
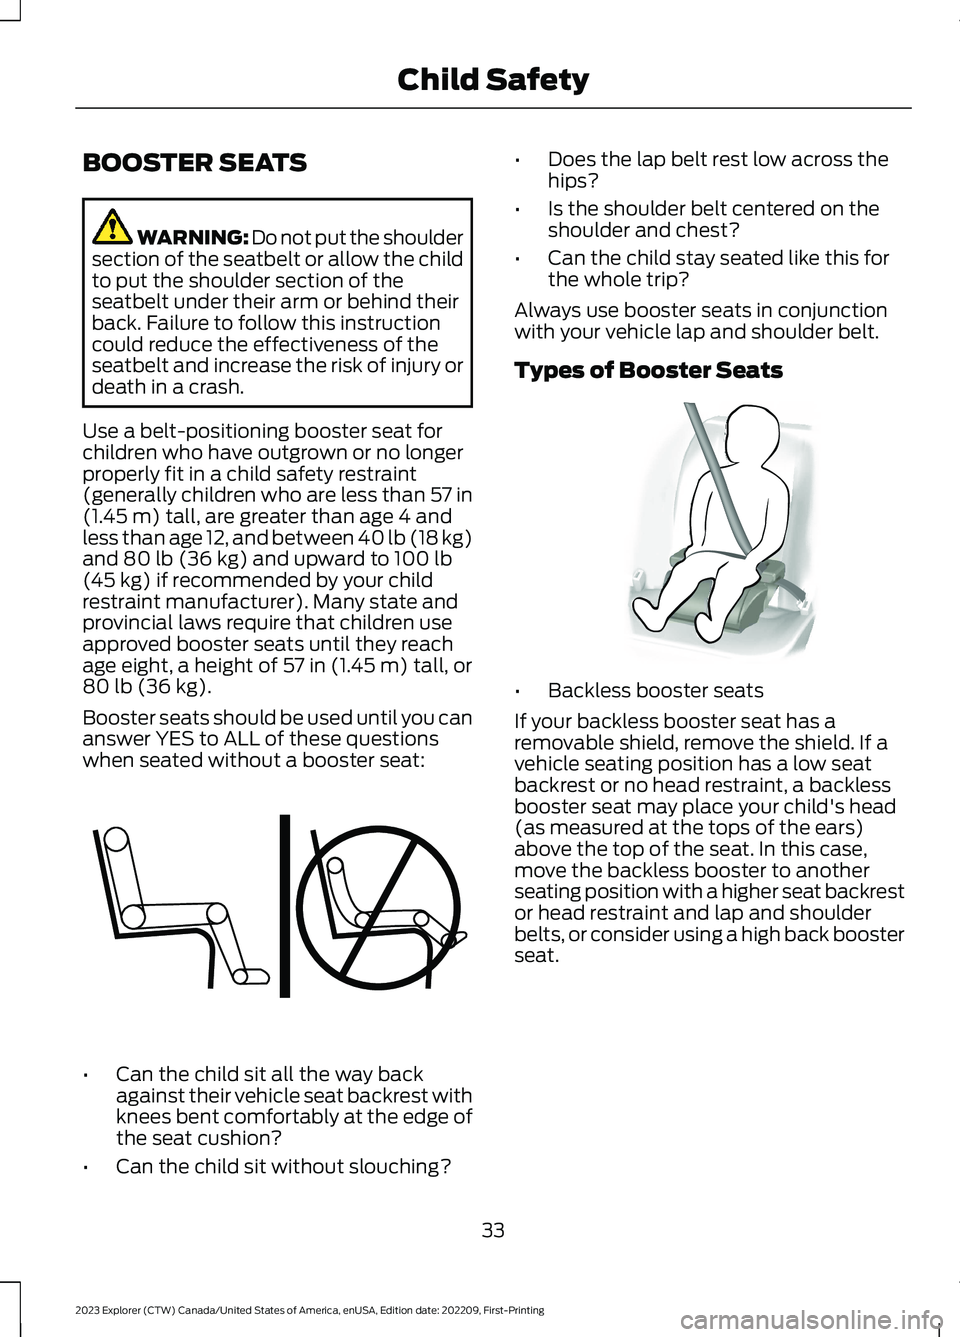
Booster seats should be used until you cananswer YES to ALL of these questionswhen seated without a booster seat:
•Can the child sit all the way backagainst their vehicle seat backrest withknees bent comfortably at the edge ofthe seat cushion?
•Can the child sit without slouching?
•Does the lap belt rest low across thehips?
•Is the shoulder belt centered on theshoulder and chest?
•Can the child stay seated like this forthe whole trip?
Always use booster seats in conjunctionwith your vehicle lap and shoulder belt.
Types of Booster Seats
•Backless booster seats
If your backless booster seat has aremovable shield, remove the shield. If avehicle seating position has a low seatbackrest or no head restraint, a backlessbooster seat may place your child's head(as measured at the tops of the ears)above the top of the seat. In this case,move the backless booster to anotherseating position with a higher seat backrestor head restraint and lap and shoulderbelts, or consider using a high back boosterseat.
33
2023 Explorer (CTW) Canada/United States of America, enUSA, Edition date: 202209, First-PrintingChild SafetyE142595 E68924
Page 40 of 573

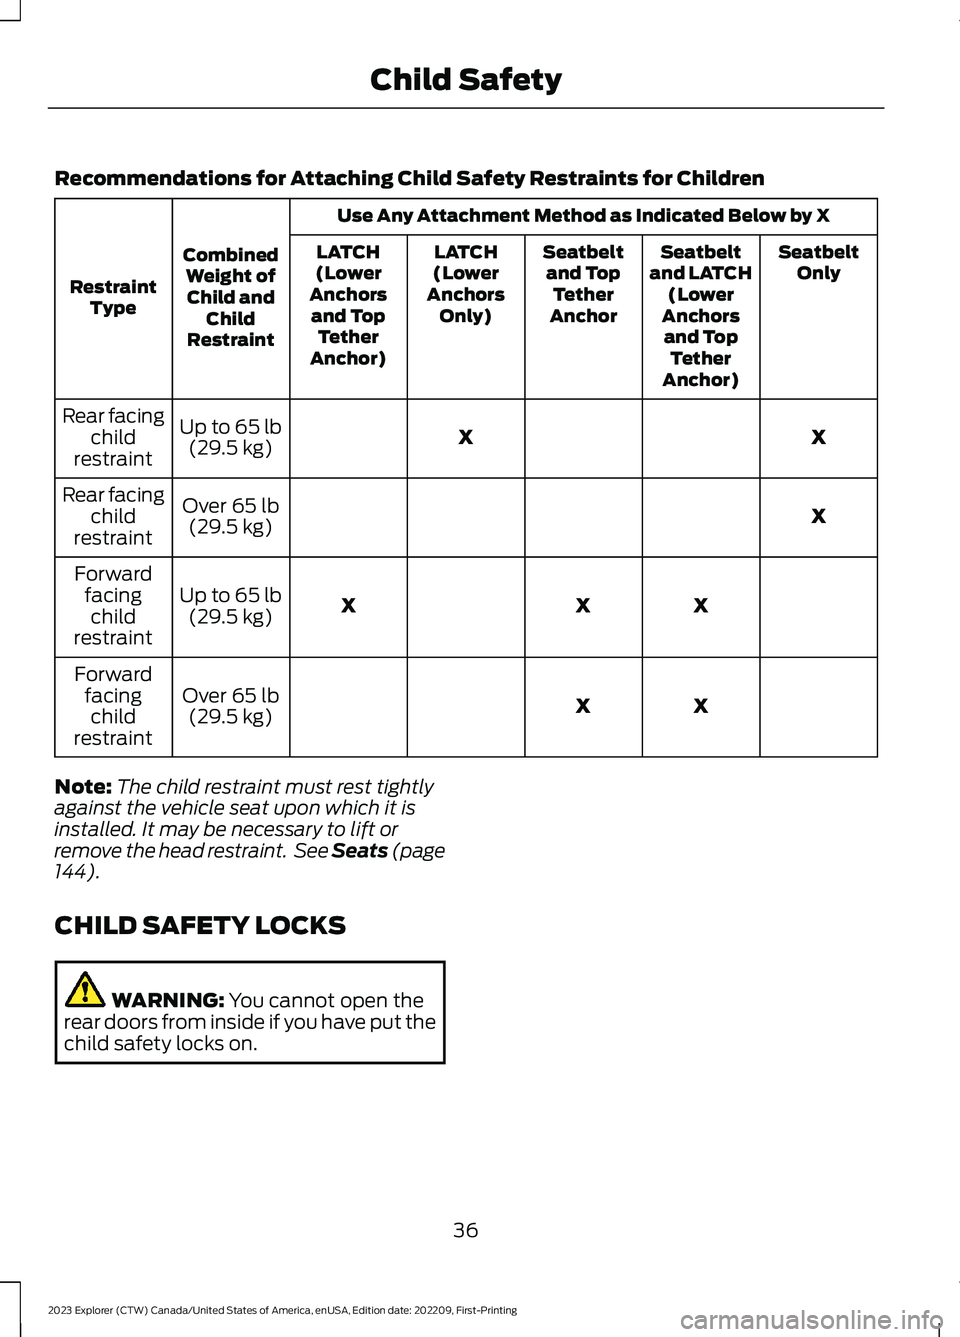
Recommendations for Attaching Child Safety Restraints for Children
Use Any Attachment Method as Indicated Below by X
CombinedWeight ofChild andChildRestraint
RestraintType
SeatbeltOnlySeatbeltand LATCH(LowerAnchorsand TopTetherAnchor)
Seatbeltand TopTetherAnchor
LATCH(LowerAnchorsOnly)
LATCH(LowerAnchorsand TopTetherAnchor)
XXUp to 65 lb(29.5 kg)
Rear facingchildrestraint
XOver 65 lb(29.5 kg)
Rear facingchildrestraint
XXXUp to 65 lb(29.5 kg)
Forwardfacingchildrestraint
XXOver 65 lb(29.5 kg)
Forwardfacingchildrestraint
Note:The child restraint must rest tightlyagainst the vehicle seat upon which it isinstalled. It may be necessary to lift orremove the head restraint. See Seats (page144).
CHILD SAFETY LOCKS
WARNING: You cannot open therear doors from inside if you have put thechild safety locks on.
36
2023 Explorer (CTW) Canada/United States of America, enUSA, Edition date: 202209, First-PrintingChild Safety
Page 77 of 573

POWER LIFTGATE
WARNING: It is extremelydangerous to ride in a cargo area, insideor outside of a vehicle. In a crash, peopleriding in these areas are more likely to beseriously injured or killed. Do not allowpeople to ride in any area of your vehiclethat is not equipped with seats andseatbelts. Make sure everyone in yourvehicle is in a seat and properly using aseatbelt. Failure to follow this warningcould result in serious personal injury ordeath.
WARNING: Make sure that you fullyclose the liftgate to prevent exhaustfumes from entering your vehicle. If youare unable to fully close the liftgate,open the air vents or the windows toallow fresh air to enter your vehicle.Failure to follow this instruction couldresult in personal injury or death.
WARNING: Keep keys out of reachof children. Do not allow children tooperate or play near an open or movingpower liftgate. You should supervise theoperation of the power liftgate at alltimes.
Note: Make sure that you close the liftgatebefore operating or moving your vehicle,especially in an enclosure, like a garage ora parking structure. This could damage theliftgate and its components.
Note: Do not hang anything, for examplea bike rack, from the glass or liftgate. Thiscould damage the liftgate and itscomponents.
Note:Make sure that you fully close theliftgate to prevent cargo from falling out.
The liftgate only operates with thetransmission in park (P).
If there is a problem with the open or closerequest, a tone sounds for one of thefollowing reasons:
•The ignition is on and the transmissionis not in park (P).
•The battery voltage is below theminimum operating voltage.
•The liftgate is not fully closed and yourvehicle speed is at or above 3 mph(5 km/h).
If the liftgate starts to close after it hasfully opened, this indicates there may beexcessive weight on the liftgate or apossible strut failure. A repetitive tonesounds and the liftgate closes undercontrol. If the liftgate continues to closeafter opening, have the system checkedby an authorized dealer. Remove anyexcessive weight from the liftgate.
Opening and Closing the Liftgate
WARNING: Make sure all personsare clear of the power liftgate areabefore using the power liftgate control.
Note: Make sure the area behind yourvehicle is free from obstruction and thatthere is enough room for you to operate theliftgate. Objects too close to your vehicle,for example a wall, garage door or anothervehicle may come into contact with themoving liftgate. This could damage theliftgate and its components.
Note:Be careful when opening or closingthe liftgate in a garage or other enclosedarea to avoid damaging the liftgate.
Note: Do not leave the liftgate open whenyou are driving. This could damage theliftgate and its components.
73
2023 Explorer (CTW) Canada/United States of America, enUSA, Edition date: 202209, First-PrintingLiftgate
Page 136 of 573

Seats
ActionMessage
Objects are by the passenger seat. After the objects are movedaway from the seat, if the warning stays on or continues to comeon have the system checked as soon as possible.
Occupant SensorBLOCKED RemoveObjects NearPassenger Seat
Displays as a reminder that memory seats are not available whiledriving.Memory Recall NotPermitted WhileDriving
Displays to show where your memory setting has been saved.Memory X Saved
Starting System
ActionMessage
Displays when starting the vehicle as a reminder to apply the brake.To START PressBrake
Displays when the starter has exceeded its cranking time inattempting to start the vehicle.Cranking TimeExceeded
Displays when the starter is attempting to start the vehicle.Engine StartPending PleaseWait
Displays when the pending start has been cancelled.Pending StartCancelled
132
2023 Explorer (CTW) Canada/United States of America, enUSA, Edition date: 202209, First-PrintingInformation Displays
Page 144 of 573

Note:Do not place objects under the frontseats as this may interfere with the airflowto the rear seats.
Note:Remove any snow, ice or leaves fromthe air intake area at the base of thewindshield.
Note:To improve the time to reach acomfortable temperature in hot weather,drive with the windows open until you feelcold air through the air vents.
Automatic Climate Control
Note:Adjusting the settings when yourvehicle interior is extremely hot or cold isnot necessary. Automatic mode is bestrecommended to maintain set temperature.
Note:The system adjusts to heat or coolthe interior to the temperature you selectas quickly as possible.
Note:For the system to function efficiently,the instrument panel and side air ventsshould be fully open.
Note:If you select AUTO during coldoutside temperatures, the system directsair flow to the windshield and side windowair vents. In addition, the blower motor mayrun at a slower speed until the engine warmsup.
Note:If you select AUTO during hottemperatures and the inside of the vehicleis hot, the system uses recirculated air tomaximize interior cooling. Blower motorspeed may also reduce until the air cools.
Quickly Heating the Interior
1.Press and release AUTO.
2.Adjust the temperature function to thesetting you prefer.
Recommended Settings forHeating
1.Press and release AUTO.
2.Adjust the temperature function to thesetting you prefer. Use 72°F (22°C) asa starting point, then adjust the settingas necessary.
Quickly Cooling the Interior
1.Press and release MAX A/C.
Recommended Settings forCooling
1.Press and release AUTO.
2.Adjust the temperature function to thesetting you prefer. Use 72°F (22°C) asa starting point, then adjust the settingas necessary.
Defogging the Side Windows inCold Weather
1.Press and release defrost or maximumdefrost.
2.Adjust the temperature control to thesetting you prefer. Use 72°F (22°C) asa starting point, then adjust the settingas necessary.
REAR PASSENGER CLIMATE
CONTROLS (IF EQUIPPED)
Note:Depending on your vehicle optionpackage, the controls may look differentfrom what you see here.
140
2023 Explorer (CTW) Canada/United States of America, enUSA, Edition date: 202209, First-PrintingClimate ControlE289989