2023 FORD EXPLORER Page 144
[x] Cancel search: Page 144Page 29 of 573

INSTALLING CHILD
RESTRAINTS
Child Seats
Use a child restraint (sometimes called aninfant carrier, convertible seat, or toddlerseat) for Infants, toddlers and childrenweighing 40 lb (18 kg) or less (generallyfour-years-old or younger).
Using Lap and Shoulder Belts
WARNING: Do not place arearward facing child restraint in front ofan active airbag. Failure to follow thisinstruction could result in personal injuryor death.
WARNING: Properly securechildren 12 years old and under in a rearseating position whenever possible. Ifyou are unable to properly secure allchildren in a rear seating position,properly secure the largest child on thefront seat. If you must use a forwardfacing child restraint on the front seat,move the seat as far back as possible.Failure to follow these instructions couldresult in personal injury or death.
WARNING: Depending on whereyou secure a child restraint, anddepending on the child restraint design,you may block access to certain seatbeltbuckle assemblies and LATCH loweranchors, rendering those featurespotentially unusable. To avoid risk ofinjury, make sure occupants only useseating positions where they are able tobe properly restrained.
When installing a child restraint withcombination lap and shoulder belts:
•Use the correct seatbelt buckle for thatseating position.
•Insert the belt tongue into the properbuckle until you hear a snap and feel itlatch. Make sure the tongue is securelyfastened in the buckle.
•Keep the buckle release buttonpointing up and away from the childrestraint, with the tongue between thechild restraint and the release button,to prevent accidental unbuckling.
•Place the vehicle seat in the uprightposition before you install the childrestraint.
•For second row seating positions,adjust the recliner slightly to improvechild restraint fit. If needed, remove thehead restraints.
•For third row seating positions, stowthe head restraints to improve childrestraint fit. See Head Restraints(page 144).
•Put the seatbelt in the automaticlocking mode. See Step 5 in theprocedure that follows. This vehicledoes not require the use of a lockingclip.
Perform the following steps wheninstalling the child restraint withcombination lap and shoulder belts:
25
2023 Explorer (CTW) Canada/United States of America, enUSA, Edition date: 202209, First-PrintingChild SafetyE142594
Page 34 of 573

Second Row Bucket Seats and ThirdRow Seats
Second Row Bench Seats and ThirdRow Seats
Perform the following steps to install achild restraint with tether anchors:
Note:If you install a child restraint with rigidLATCH attachments, do not tighten thetether strap enough to lift the child restraintoff your vehicle seat cushion when the childis seated in it. Keep the tether strap just snugwithout lifting the front of the child restraint.Keeping the child restraint just touching yourvehicle seat gives the best protection in asevere crash.
For second row outermost seatingpositions, route the child restraint tetherstrap over the seat backrest, under thehead restraint and between the headrestraint posts. If needed, remove the headrestraint to improve the fit of the childrestraint or tether strap.
For the second row center seating position,route the child restraint tether strap overthe top of the head restraint. If needed,remove the head restraint to improve thefit of the child restraint or tether strap. SeeHead Restraints (page 144).
For third row seating positions, route thechild restraint tether strap over the seatbackrest, under the head restraint andbetween the head restraint posts. Ifneeded, fold the head restraint down toimprove the fit of the child restraint ortether strap. See Head Restraints (page144).
1.Route the tether strap.
2.Locate the correct anchor for theselected seating position.
3.Clip the tether strap to the anchor asshown. The tether hook may betwisted ½ turn to improve installation.If you clip the tether strap incorrectly,the child restraint may not be retainedproperly in the event of a crash.
30
2023 Explorer (CTW) Canada/United States of America, enUSA, Edition date: 202209, First-PrintingChild SafetyE319055 E319047 E190833
Page 40 of 573

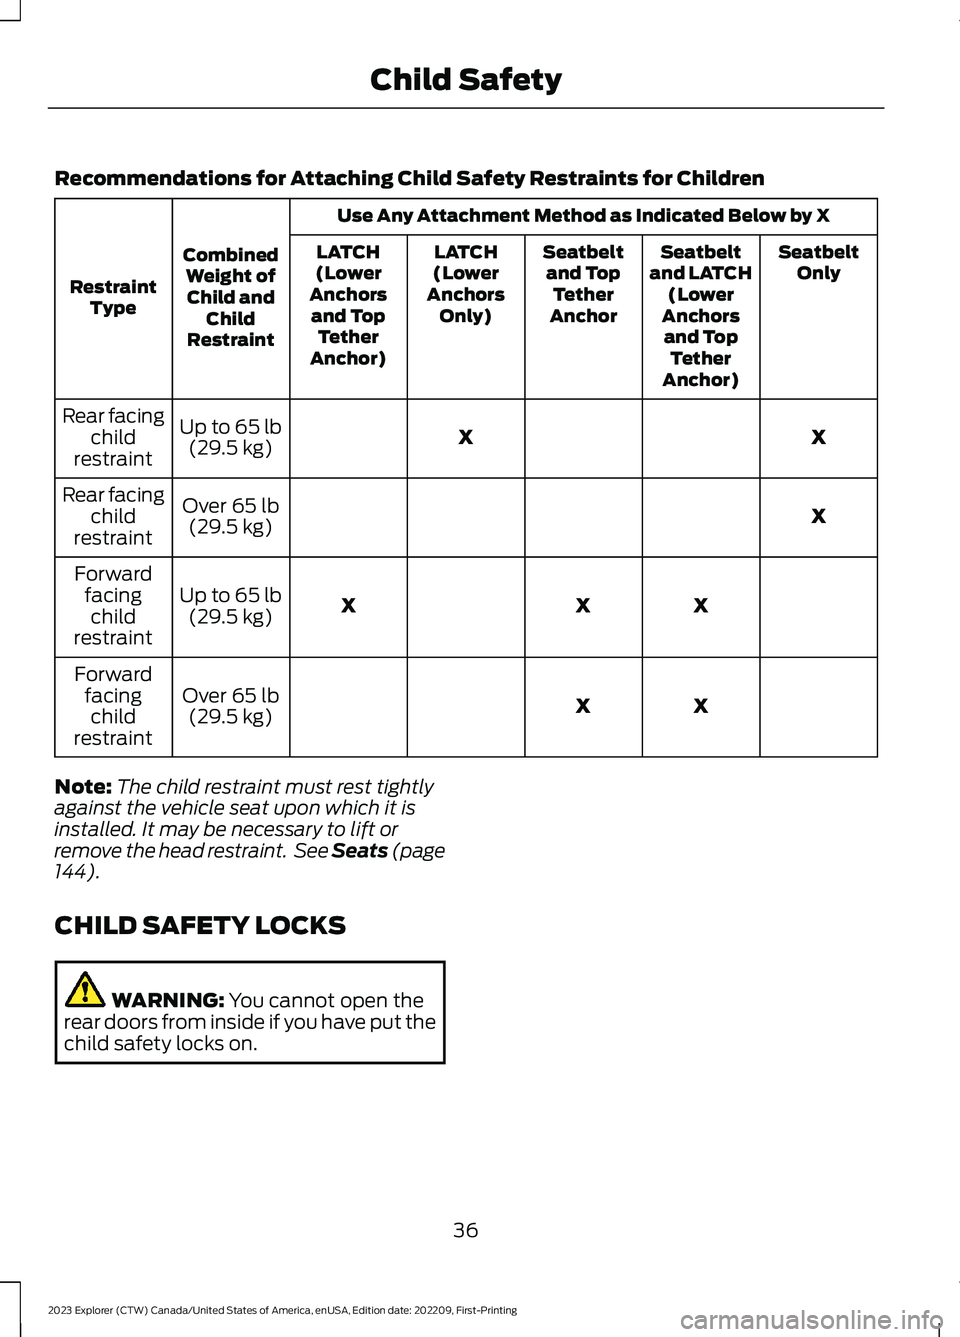
Recommendations for Attaching Child Safety Restraints for Children
Use Any Attachment Method as Indicated Below by X
CombinedWeight ofChild andChildRestraint
RestraintType
SeatbeltOnlySeatbeltand LATCH(LowerAnchorsand TopTetherAnchor)
Seatbeltand TopTetherAnchor
LATCH(LowerAnchorsOnly)
LATCH(LowerAnchorsand TopTetherAnchor)
XXUp to 65 lb(29.5 kg)
Rear facingchildrestraint
XOver 65 lb(29.5 kg)
Rear facingchildrestraint
XXXUp to 65 lb(29.5 kg)
Forwardfacingchildrestraint
XXOver 65 lb(29.5 kg)
Forwardfacingchildrestraint
Note:The child restraint must rest tightlyagainst the vehicle seat upon which it isinstalled. It may be necessary to lift orremove the head restraint. See Seats (page144).
CHILD SAFETY LOCKS
WARNING: You cannot open therear doors from inside if you have put thechild safety locks on.
36
2023 Explorer (CTW) Canada/United States of America, enUSA, Edition date: 202209, First-PrintingChild Safety
Page 83 of 573

ADJUSTING THE STEERING
WHEEL - VEHICLES WITH:
MANUAL ADJUSTABLE
STEERING COLUMN
WARNING: Do not adjust thesteering wheel when your vehicle ismoving.
Note:Make sure that you are sitting in thecorrect position. See Sitting in the CorrectPosition (page 144).
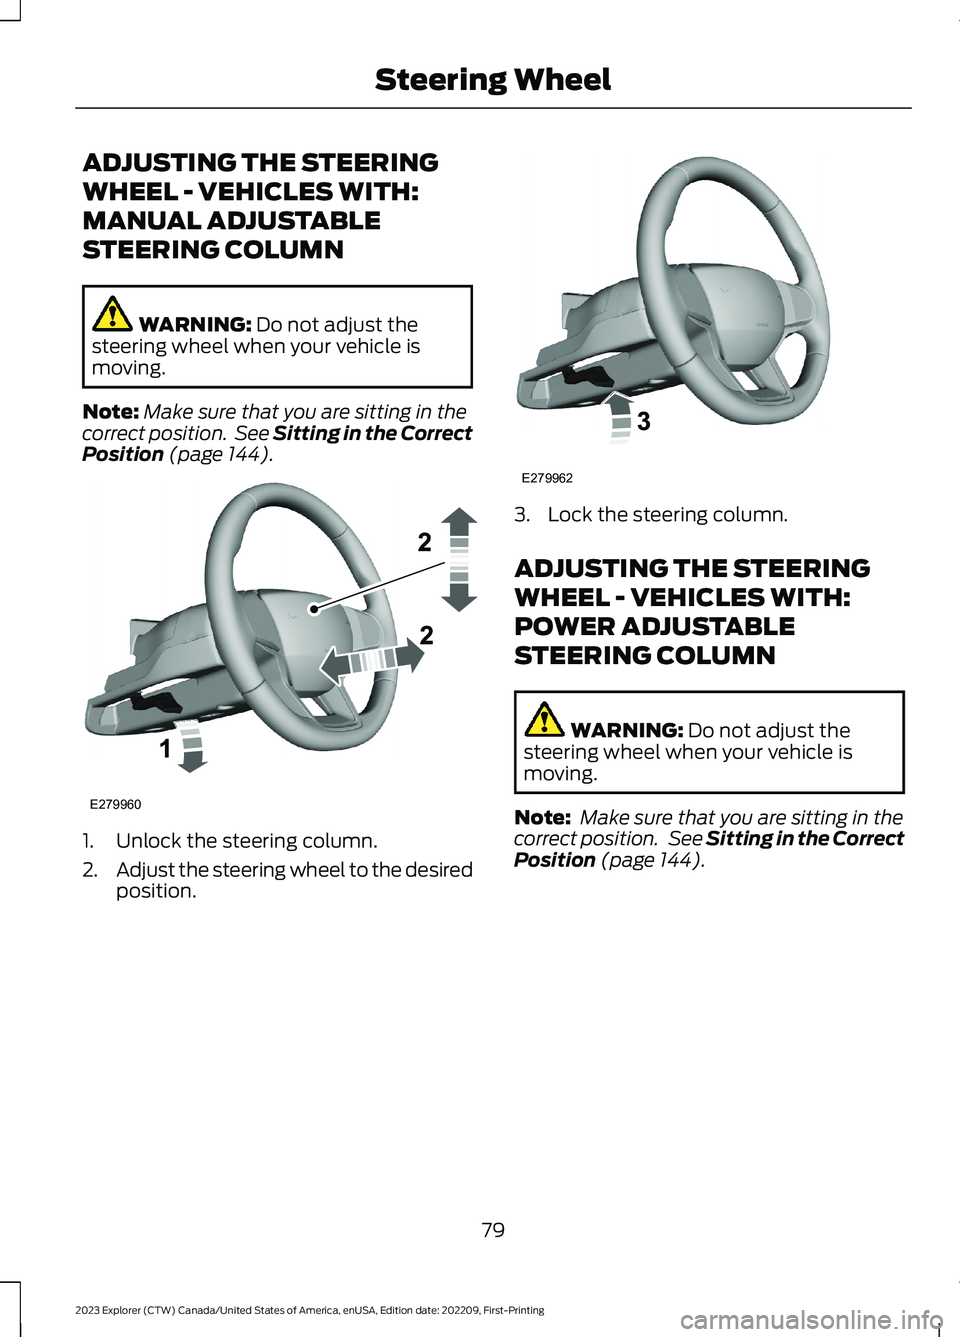
1.Unlock the steering column.
2.Adjust the steering wheel to the desiredposition.
3.Lock the steering column.
ADJUSTING THE STEERING
WHEEL - VEHICLES WITH:
POWER ADJUSTABLE
STEERING COLUMN
WARNING: Do not adjust thesteering wheel when your vehicle ismoving.
Note: Make sure that you are sitting in thecorrect position. See Sitting in the CorrectPosition (page 144).
79
2023 Explorer (CTW) Canada/United States of America, enUSA, Edition date: 202209, First-PrintingSteering WheelE279960 E279962
Page 109 of 573

Tachometer.A
Information display.B
Speedometer.C
Fuel gauge.D
Engine coolant temperature gauge.E
Information Display
Information that appears depends on yourvehicle settings. See GeneralInformation (page 115).
Fuel Gauge
The fuel gauge indicates about how muchfuel is in the fuel tank.
The arrow adjacent to the fuel pumpsymbol indicates on which side of yourvehicle the fuel filler door is located.
Note:The fuel gauge may vary slightlywhen your vehicle is moving or on a slope.
Low Fuel Reminder
A low fuel level reminder displays andsounds when the distance to emptyreaches 75 mi (120 km) to empty forMyKey, and at 50 mi (80 km),25 mi(40 km),10 mi (20 km) and 0 mi (0 km)for all vehicle keys.
Note:The low fuel reminder can appear atdifferent fuel gauge positions depending onfuel economy conditions. This variation isnormal.
Engine Coolant TemperatureGauge
Indicates engine coolant temperature. Atnormal operating temperature, the levelindicator will be in the normal range. If theengine coolant temperature exceeds thenormal range, stop your vehicle as soon assafely possible, switch off the engine andlet the engine cool.
WARNING: Do not remove thecoolant reservoir cap when the engine ison or the cooling system is hot. Wait 10minutes for the cooling system to cooldown. Cover the coolant reservoir capwith a thick cloth to prevent thepossibility of scalding and slowly removethe cap. Failure to follow this instructioncould result in personal injury.
WARNING LAMPS AND
INDICATORS
The following warning lamps andindicators alert you to a vehicle conditionthat may become serious. Some lampsilluminate when you start your vehicle tomake sure they work. If any lamps remainon after starting your vehicle, refer to therespective system warning lamp for furtherinformation.
Note:Some warning indicators appear inthe information display and function thesame as a warning lamp, but do not displaywhen you start your vehicle.
Adaptive Cruise Control (If Equipped)
The cruise control systemindicator light changes color toindicate what mode the systemis in. See How Does Adaptive CruiseControl With Stop and Go Work (page241).
105
2023 Explorer (CTW) Canada/United States of America, enUSA, Edition date: 202209, First-PrintingInstrument ClusterE144524
Page 204 of 573

Manually Shifting Gears in Drive (D)
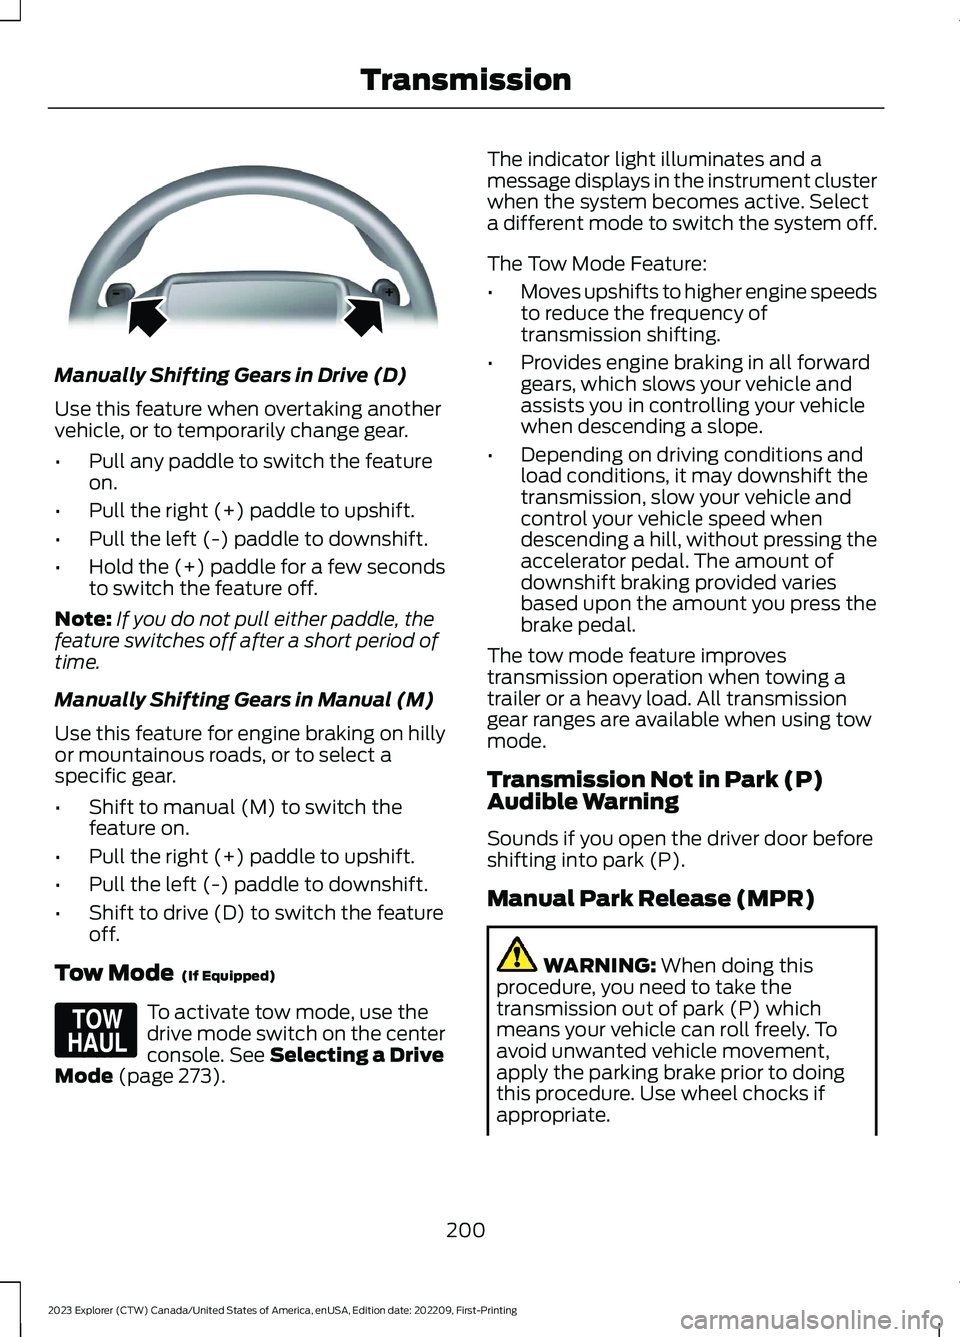
Use this feature when overtaking anothervehicle, or to temporarily change gear.
•Pull any paddle to switch the featureon.
•Pull the right (+) paddle to upshift.
•Pull the left (-) paddle to downshift.
•Hold the (+) paddle for a few secondsto switch the feature off.
Note:If you do not pull either paddle, thefeature switches off after a short period oftime.
Manually Shifting Gears in Manual (M)
Use this feature for engine braking on hillyor mountainous roads, or to select aspecific gear.
•Shift to manual (M) to switch thefeature on.
•Pull the right (+) paddle to upshift.
•Pull the left (-) paddle to downshift.
•Shift to drive (D) to switch the featureoff.
Tow Mode (If Equipped)
To activate tow mode, use thedrive mode switch on the centerconsole. See Selecting a DriveMode (page 273).
The indicator light illuminates and amessage displays in the instrument clusterwhen the system becomes active. Selecta different mode to switch the system off.
The Tow Mode Feature:
•Moves upshifts to higher engine speedsto reduce the frequency oftransmission shifting.
•Provides engine braking in all forwardgears, which slows your vehicle andassists you in controlling your vehiclewhen descending a slope.
•Depending on driving conditions andload conditions, it may downshift thetransmission, slow your vehicle andcontrol your vehicle speed whendescending a hill, without pressing theaccelerator pedal. The amount ofdownshift braking provided variesbased upon the amount you press thebrake pedal.
The tow mode feature improvestransmission operation when towing atrailer or a heavy load. All transmissiongear ranges are available when using towmode.
Transmission Not in Park (P)Audible Warning
Sounds if you open the driver door beforeshifting into park (P).
Manual Park Release (MPR)
WARNING: When doing thisprocedure, you need to take thetransmission out of park (P) whichmeans your vehicle can roll freely. Toavoid unwanted vehicle movement,apply the parking brake prior to doingthis procedure. Use wheel chocks ifappropriate.
200
2023 Explorer (CTW) Canada/United States of America, enUSA, Edition date: 202209, First-PrintingTransmissionE144821 E161509
Page 249 of 573

Optimal system performance requires aclear view of the road by thewindshield-mounted camera.
Optimal performance may not occur if:
•The camera is blocked.
•There is poor visibility or lightingconditions.
•There are bad weather conditions.
SWITCHING ADAPTIVE
CRUISE CONTROL ON AND OFF
The cruise controls are on the steeringwheel. See Cruise Control (page 82).
Switching Adaptive Cruise ControlOn
Press the button to set thesystem in standby mode.
The indicator, current gap setting and setspeed appear in the information display.
Switching Adaptive Cruise ControlOff
Press the button when thesystem is in standby mode, orswitch the ignition off.
Note:You erase the set speed when youswitch the system off.
Automatic Cancellation orDeactivation
The system may cancel if:
•The tires lose traction.
•You apply the parking brake.
The system may cancel and set the parkingbrake if:
•You unbuckle the seatbelt and openthe driver door after you stop yourvehicle.
•Your vehicle is at a stop continuouslyfor more than three minutes.
The system may turn off or preventactivating when requested if:
•The vehicle has a blocked sensor.
•The brake temperature is too high.
•There is a failure in the system or arelated system.
SETTING THE ADAPTIVE
CRUISE CONTROL SPEED
Drive to the speed you prefer.
Press the toggle button upwardor downward to set the currentspeed.
Take your foot off the accelerator pedal.
The indicator, current gap setting and setspeed appear in the information display.
A vehicle image illuminates if there is avehicle detected in front of you.
Note:When adaptive cruise control isactive, the speedometer may vary slightlyfrom the set speed displayed in theinformation display.
245
2023 Explorer (CTW) Canada/United States of America, enUSA, Edition date: 202209, First-PrintingAdaptive Cruise Control (If Equipped)E144529 E144529 E246884 E246885 E255686