2023 FORD EXPEDITION ECU
[x] Cancel search: ECUPage 397 of 658
ROADSIDE ASSISTANCE
Vehicles Sold in the United States:Getting Roadside Assistance
To fully assist you should you have avehicle concern, Ford Motor Companyoffers a complimentary roadsideassistance program. This program isseparate from the New Vehicle LimitedWarranty.
The service is available:
•24 hours a day, seven days a week.
•For the coverage period supplied withyour vehicle.
Roadside Assistance covers:
•A flat tire change with a good spare(except vehicles supplied with a tireinflation kit).
•Battery jump start.
•Lock-out assistance (key replacementcost is the customer's responsibility).
•Fuel delivery — independent servicecontractors, if not prohibited by state,local or municipal law, shall deliver upto 2 gal (8 L) of gasoline or 5 gal (20 L)of diesel fuel to a disabled vehicle.Roadside assistance limits fuel deliveryservice to two no-charge occurrenceswithin a 12-month period.
•Winch out — available within 100 ft(30 m) of a paved or countymaintained road, no recoveries.
•Towing — independent servicecontractors, if not prohibited by state,local or municipal law, shall tow Fordeligible vehicles to an authorized dealerwithin 35 mi (56 km) of thedisablement location or to the nearestauthorized dealer. If a memberrequests a tow to an authorized dealerthat is more than 35 mi (56 km) fromthe disablement location, the membershall be responsible for any mileagecosts in excess of 35 mi (56 km).
•Roadside Assistance includes up to$200 for a towed trailer if the disabledeligible vehicle requires service at thenearest authorized dealer. If the towingvehicle is operational but the trailer isnot, then the trailer does not qualify forany roadside services.
Vehicles Sold in the United States:Using Roadside Assistance
Complete the roadside assistanceidentification card and place it in yourwallet for quick reference. This card is inthe Owner's Manual kit.
United States vehicle customers whorequire Roadside Assistance, call1-800-241-3673.
If you need to arrange roadside assistancefor yourself, Ford Motor Companyreimburses a reasonable amount fortowing to the nearest dealership within35 mi (56 km). To obtain reimbursementinformation, United States vehiclecustomers call 1-800-241-3673.Customers need to submit their originalreceipts.
393
2023 Expedition (TB8) Canada/United States of America, enUSA, Edition date: 202207, DOMCrash and Breakdown Information
Page 402 of 658
WARNING: The recovery hook canbecome hot. Let the recovery hook cooldown before removing it. Failure to doso could result in personal injury.
Your vehicle has frame-mounted frontrecovery hooks.
Note:Do not apply a load to the recoveryhooks that is greater than the gross vehicleweight rating of your vehicle.
Before using recovery hooks:
•Make sure all attaching points aresecure and capable of withstandingthe applied load.
•Do not use chains, cables or tow strapswith metal hook ends.
•Only use recovery straps that have aminimum breaking strength two tothree times the gross vehicle weight ofthe stuck vehicle.
•Make sure the recovery strap is in goodcondition and free of visible cuts, tearsor damage.
•Use a damper device such as a tarp,heavy blanket or piece of carpet, andplace it over the recovery strap to helpabsorb the energy in the event thestrap breaks.
•Make sure the stuck vehicle is notloaded heavier than its gross vehicleweight rating specified on thecertification label.
•Align the tow vehicle and stuck vehiclein a straight line, within 10 degrees.
•Keep bystanders to the sides of thevehicle, at a distance of at least twicethe length of the recovery strap. Thishelps avoid injury from the hazard of arecovery hook or strap breaking, or avehicle lurching into their path.
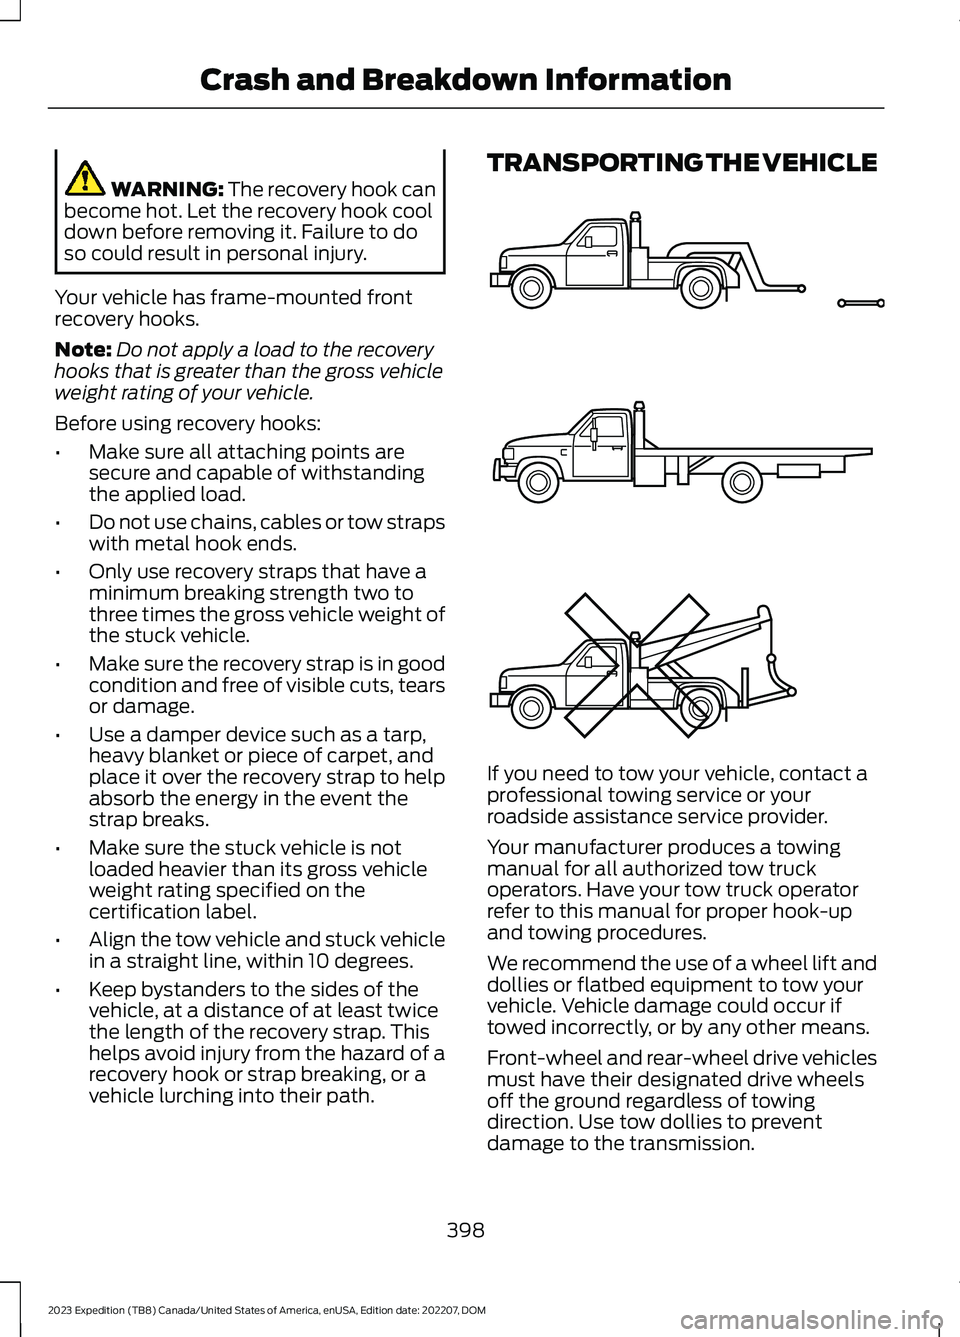
TRANSPORTING THE VEHICLE
If you need to tow your vehicle, contact aprofessional towing service or yourroadside assistance service provider.
Your manufacturer produces a towingmanual for all authorized tow truckoperators. Have your tow truck operatorrefer to this manual for proper hook-upand towing procedures.
We recommend the use of a wheel lift anddollies or flatbed equipment to tow yourvehicle. Vehicle damage could occur iftowed incorrectly, or by any other means.
Front-wheel and rear-wheel drive vehiclesmust have their designated drive wheelsoff the ground regardless of towingdirection. Use tow dollies to preventdamage to the transmission.
398
2023 Expedition (TB8) Canada/United States of America, enUSA, Edition date: 202207, DOMCrash and Breakdown InformationE143886
Page 404 of 658
TOWING YOUR VEHICLE
PRECAUTIONS
Use the following guidelines when towingyour vehicle. Failure to follow thisinstruction could result in vehicle damagenot covered by the vehicle warranty.
Note:Make sure you properly secure yourvehicle to the tow vehicle.
Note:If you are unsure of the vehicle’sconfiguration, contact an authorized dealer.
RECREATIONALLY TOWING
YOUR VEHICLE - 4X4
WARNING: Do not disconnect thebattery when recreationally towing yourvehicle. This prevents the transfer casefrom shifting properly and could causethe vehicle to roll, even if thetransmission is in park (P).
WARNING: Placing the transfercase in its neutral position could causeyour vehicle to freely roll. Make sure youpress and hold the brake pedal and thevehicle is in a secure, safe position whenyou place the transfer case in its neutralposition.
Follow these guidelines if you have a needfor recreational towing. An example ofrecreational towing would be towing yourvehicle behind a motorhome. Theseguidelines are to make sure that you donot damage the transmission.
You can only tow your vehicle with allwheels on the ground by placing thetransfer case in its neutral position andengaging the recreational tow feature.Perform the following steps afterpositioning your vehicle behind the towvehicle and properly securing themtogether.
Note:Put your climate control system inrecirculated air mode to prevent exhaustfumes from entering your vehicle.
Note:Failure to put the transfer case in itsneutral position can damage vehiclecomponents.
Note: You can check the towing status atany time by opening the driver door orturning the ignition to the accessory or onposition.Neutral Tow Enabled LeaveTransmission in Neutral appears in theinstrument cluster display to confirm youcan recreationally tow your vehicle.
Note:If your vehicle has an anti-theftalarm, make sure you switch perimetersensing on when towing. See Setting theAlarm Security Level (page 101).
Switching Neutral Tow On
1.Start your vehicle.
2.Press the 2H button on the four-wheeldrive mode control.
3.Place your vehicle in temporary neutralmode. See Entering TemporaryNeutral Mode (page 217).
4.Switch your vehicle off by pressing thepush button ignition switch once orturning the key as far toward the offposition as possible. A messageappears in the instrument clusterdisplay.
5.Switch your vehicle to accessory modeby pressing the push button ignitionswitch once without pressing the brakepedal or by turning the key to the onposition.
400
2023 Expedition (TB8) Canada/United States of America, enUSA, Edition date: 202207, DOMTowing Your Vehicle
Page 405 of 658
6.Press and hold the brake pedal.
7.Using the instrument cluster controlson the steering wheel, select Settings.
8.Select Neutral Tow.
9.Press and hold the OK button until aconfirmation message appears in theinformation display.
Note: If completed successfully, theinformation display shows Neutral TowEnabled Leave Transmission in Neutral.This indicates that your vehicle is safe totow with all wheels on the ground.
Note:If you do not see a confirmationmessage in the instrument cluster display,you must perform the procedure again fromthe beginning.
Note:You may hear noise as the transfercase shifts into its neutral position. This isnormal.
10.Release the brake pedal.
11.Leave the transmission in neutral (N)and switch your vehicle off bypressing the push button ignitionswitch once without pressing thebrake pedal or turning the key as fartoward the off position.
Note:Vehicles with keys do not turn to theoff position when the transmission is inneutral (N). You must leave the key in theignition when towing. Use the keyless entrykeypad or an extra set of keys to lock andunlock your vehicle.
Switching Neutral Tow Off
1.With your vehicle properly secured tothe tow vehicle, press and hold thebrake pedal and start the engine.
2.Switch your vehicle off by pressing thepush button ignition switch once orturning the key as far towards the offposition and release the brake pedal.
3.Place your vehicle in accessory modeby pressing the push button ignitionswitch once without pressing the brakepedal or by turning the ignition key tothe on position.
4.Press and hold the brake pedal.
5.Shift into park (P).
6.Release the brake pedal.
Note:If completed successfully, theinstrument cluster displays 2H and NeutralTow Disabled.
Note:You must perform the switchingneutral tow on and switching neutral towoff procedures again from the beginning ifthe indicator light and message do notdisplay.
Note:You may hear a noise as the transfercase shifts out of its neutral position. Thisis normal.
7.Apply the parking brake, thendisconnect your vehicle from the towvehicle.
8.Release the parking brake, start theengine, and shift into drive (D) to makesure the transfer case is out of theneutral tow position.
9.If the transfer case does notsuccessfully shift out of its neutralposition, set the parking brake. Haveyour vehicle checked as soon aspossible.
Resolving the Shift Delayed DriveForward Message
1.Press and hold the brake pedal.
2.Start your vehicle.
3.Shift into neutral (N).
4.With the vehicle running, shift into drive(D) and let the vehicle roll forward upto 3 ft (1 m).
401
2023 Expedition (TB8) Canada/United States of America, enUSA, Edition date: 202207, DOMTowing Your Vehicle
Page 423 of 658
1.Stop your vehicle as soon as it is safeto do so. Fully apply the parking brake,shift into park (P) or neutral (N).
2.Leave the engine running until thecoolant temperature gauge needlereturns to the normal position. If thetemperature does not drop afterseveral minutes, follow the remainingsteps.
3.Switch the engine off and wait for it tocool. Check the coolant level.
4.If the coolant level is at or below theminimum mark, add prediluted coolantimmediately.
5.If the coolant level is normal, restartthe engine and continue.
ENGINE AIR FILTER
CHANGING THE ENGINE AIRFILTER
WARNING: To reduce the risk ofvehicle damage and personal burninjuries, do not start your engine with theair cleaner removed and do not removeit while the engine is running.
Change the engine air filter element at theproper intervals. See Normal ScheduledMaintenance (page 542).
When changing the engine air filter, useonly the air filter element listed. SeeMotorcraft Parts (page 464).
Note: Failure to use the correct air filterelement may result in severe enginedamage. Resulting component damagemay not be covered by the vehicle Warranty.
Note: When servicing the air cleaner, donot allow foreign material to enter the airinduction system.
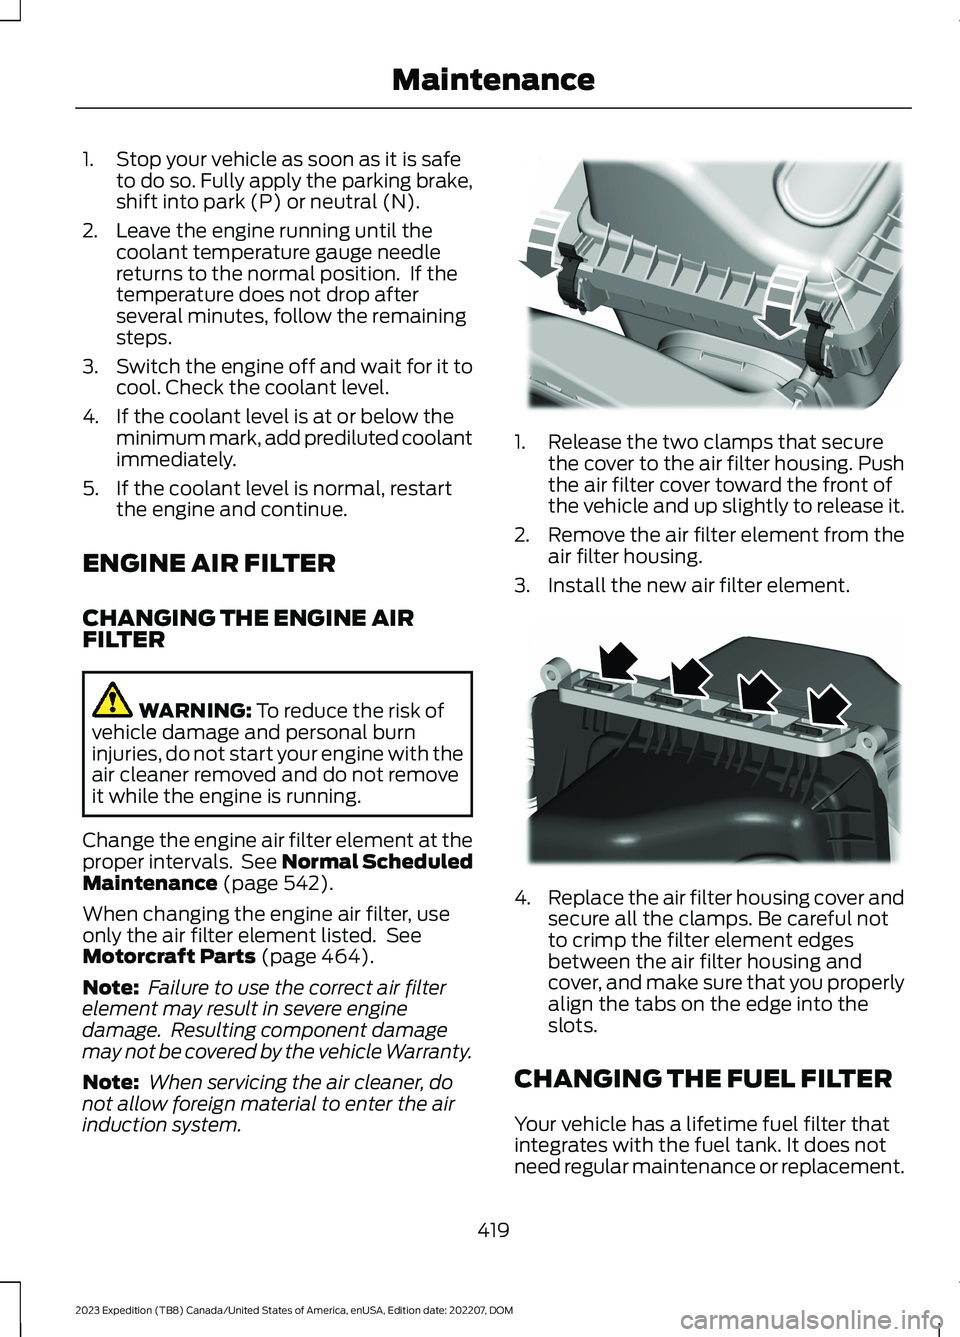
1.Release the two clamps that securethe cover to the air filter housing. Pushthe air filter cover toward the front ofthe vehicle and up slightly to release it.
2.Remove the air filter element from theair filter housing.
3.Install the new air filter element.
4.Replace the air filter housing cover andsecure all the clamps. Be careful notto crimp the filter element edgesbetween the air filter housing andcover, and make sure that you properlyalign the tabs on the edge into theslots.
CHANGING THE FUEL FILTER
Your vehicle has a lifetime fuel filter thatintegrates with the fuel tank. It does notneed regular maintenance or replacement.
419
2023 Expedition (TB8) Canada/United States of America, enUSA, Edition date: 202207, DOMMaintenanceE248801 E248800
Page 426 of 658
3.Wait a minimum of two minutes beforedisconnecting the battery.
Note:The engine management system hasa power hold function and remains poweredfor a period of time after you switch theignition off. This is to allow the system tostore diagnostic and adaptive tables.Disconnecting the battery without waitingcan cause damage not covered by thevehicle warranty.
4.Disconnect the negative battery cableterminal.
5.Disconnect the positive battery cableterminal.
6.Remove the battery securing clamp.
7.Remove the battery.
8.To install, reverse the removalprocedure.
Note:Before reconnecting the battery,make sure the ignition remains switched off.
Note:Make sure to fully tighten the batterycables.
If you disconnect or replace the vehiclebattery, you must reset the followingfeatures:
•Window bounce-back. See Lockingthe Rear Window Controls (page 128).
•Clock Settings.
•Pre-set radio stations.
Battery Disposal
Make sure that you dispose ofold batteries in anenvironmentally friendly way.Seek advice from your local authorityabout recycling old batteries.
ADJUSTING THE HEADLAMPS
Vertical Aim Adjustment
The headlamps on your vehicle areproperly aimed at the assembly plant. Ifyour vehicle has been in an accident,contact an authorized dealer to check andrealign your headlamps.
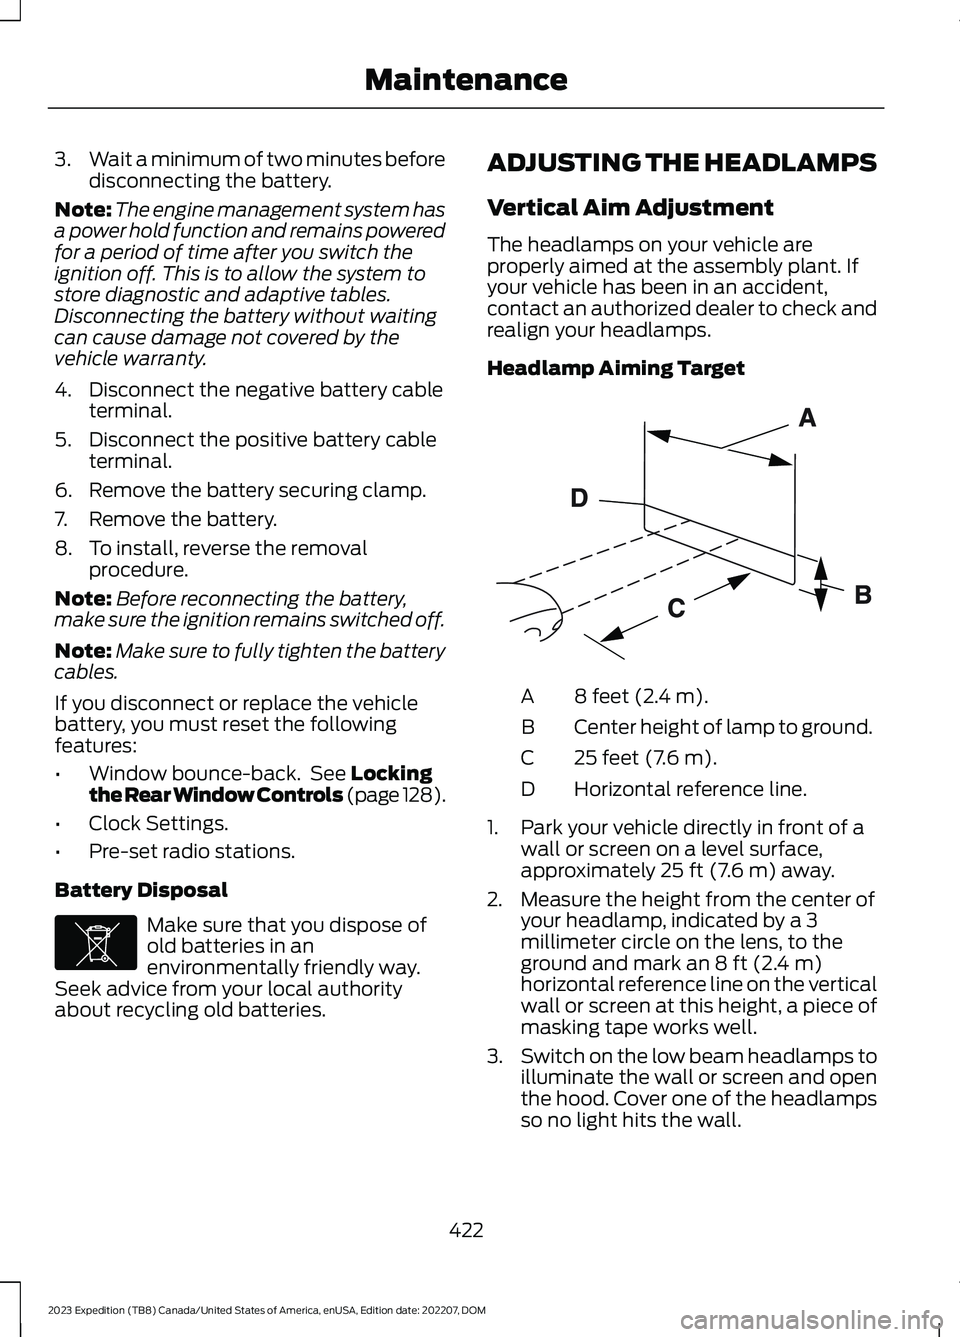
Headlamp Aiming Target
8 feet (2.4 m).A
Center height of lamp to ground.B
25 feet (7.6 m).C
Horizontal reference line.D
1.Park your vehicle directly in front of awall or screen on a level surface,approximately 25 ft (7.6 m) away.
2.Measure the height from the center ofyour headlamp, indicated by a 3millimeter circle on the lens, to theground and mark an 8 ft (2.4 m)horizontal reference line on the verticalwall or screen at this height, a piece ofmasking tape works well.
3.Switch on the low beam headlamps toilluminate the wall or screen and openthe hood. Cover one of the headlampsso no light hits the wall.
422
2023 Expedition (TB8) Canada/United States of America, enUSA, Edition date: 202207, DOMMaintenanceE107998 E142592
Page 461 of 658

Drive cautiously when using a full-sizedissimilar spare wheel and tire assemblyand seek service as soon as possible.
Location of the Spare Tire andTools
The spare tire is located under the vehicle,just forward of the rear bumper. The jack,swivel wrench and lug wrench are in thefollowing locations:
LocationItem
Under the vehicle, just forward of the rearbumperSpare tire
Under the access panel located in the floorcompartment behind the rear seatJack and tool kit bag
Tire Change Procedure
WARNING: Only use replacementtires and wheels that are the same size,load index, speed rating, and type asthose originally provided for your vehicle.The recommended tire and wheel sizescan be found on the Tire Label on thedriver side door frame or the edge of thedriver door. If this information is notfound in those locations, or for additionaloptions, contact your authorized dealer.Use of any tire or wheel notrecommended, could affect the safetyand performance of your vehicle, whichcould result in an increased risk of lossof vehicle control, vehicle rollover,personal injury and death.
WARNING: To help prevent yourvehicle from moving when changing awheel, shift the transmission into park(P), set the parking brake and use anappropriate block or wheel chock tosecure the wheel diagonally opposite tothe wheel being changed. For example,when changing the front left wheel,place an appropriate block or wheelchock on the right rear wheel.
WARNING: Only use the jackprovided as original equipment with yourvehicle.
WARNING: Switch off the runningboards before jacking or placing anyobject under your vehicle. Never placeyour hand between the extended runningboard and your vehicle. A moving runningboard may cause injury.
WARNING: Only use the sparewheel carrier to stow wheels providedwith your vehicle.
WARNING: Ensure screwthread isadequately lubricated before use.
WARNING: Switch the ignition offand apply the parking brake. If yourvehicle has a manual transmission, shiftinto first or reverse gear. If your vehiclehas an automatic transmission, shift intopark (P).
WARNING: Only use the specifiedjacking points. If you use any otherlocations you could damage vehiclecomponents, such as brake lines.
457
2023 Expedition (TB8) Canada/United States of America, enUSA, Edition date: 202207, DOMChanging a Road Wheel
Page 465 of 658
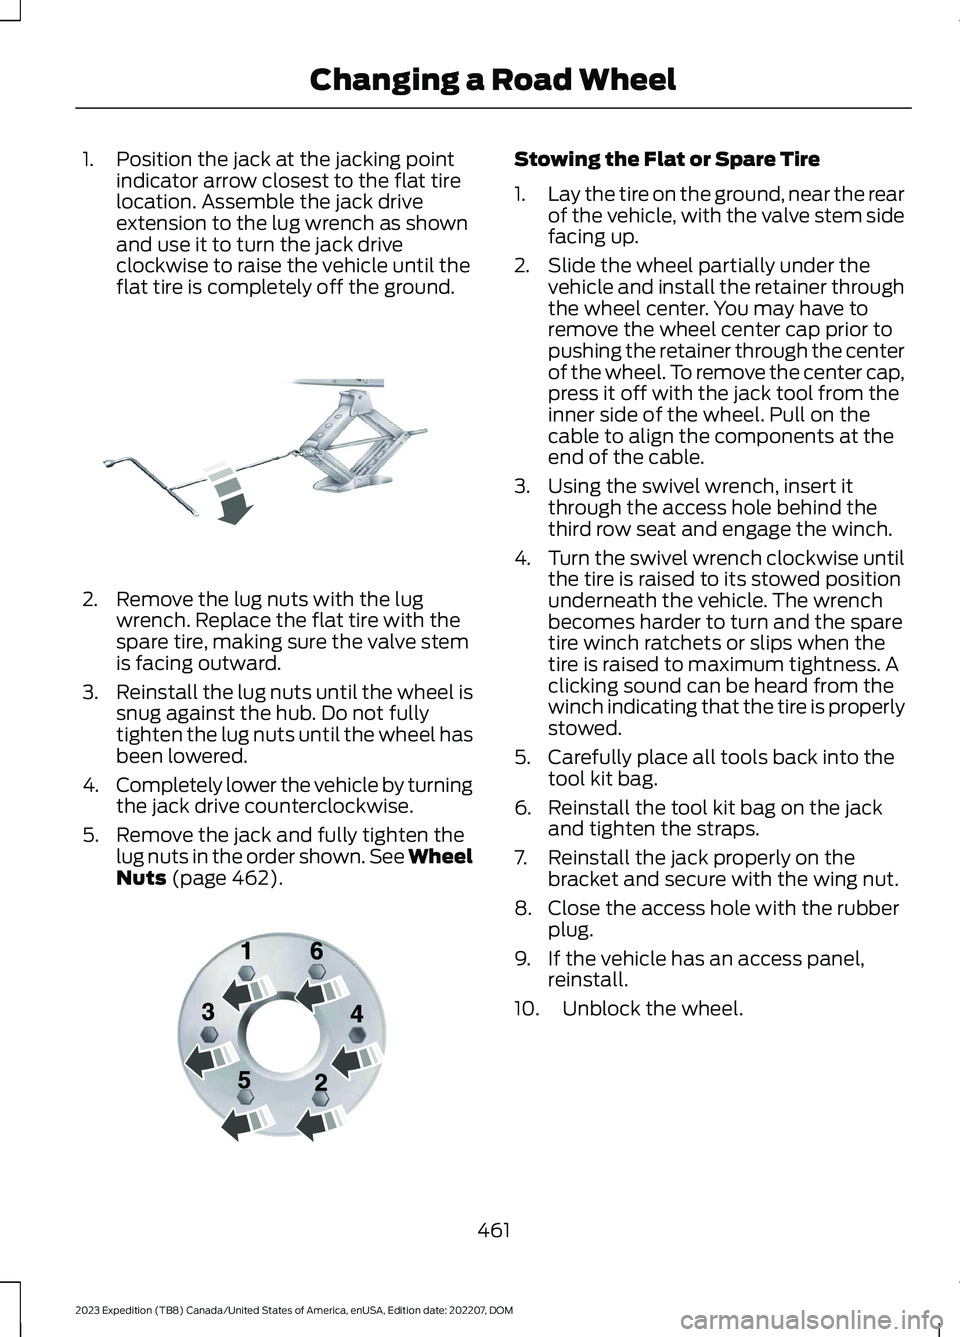
1.Position the jack at the jacking pointindicator arrow closest to the flat tirelocation. Assemble the jack driveextension to the lug wrench as shownand use it to turn the jack driveclockwise to raise the vehicle until theflat tire is completely off the ground.
2.Remove the lug nuts with the lugwrench. Replace the flat tire with thespare tire, making sure the valve stemis facing outward.
3.Reinstall the lug nuts until the wheel issnug against the hub. Do not fullytighten the lug nuts until the wheel hasbeen lowered.
4.Completely lower the vehicle by turningthe jack drive counterclockwise.
5.Remove the jack and fully tighten thelug nuts in the order shown. See WheelNuts (page 462).
Stowing the Flat or Spare Tire
1.Lay the tire on the ground, near the rearof the vehicle, with the valve stem sidefacing up.
2.Slide the wheel partially under thevehicle and install the retainer throughthe wheel center. You may have toremove the wheel center cap prior topushing the retainer through the centerof the wheel. To remove the center cap,press it off with the jack tool from theinner side of the wheel. Pull on thecable to align the components at theend of the cable.
3.Using the swivel wrench, insert itthrough the access hole behind thethird row seat and engage the winch.
4.Turn the swivel wrench clockwise untilthe tire is raised to its stowed positionunderneath the vehicle. The wrenchbecomes harder to turn and the sparetire winch ratchets or slips when thetire is raised to maximum tightness. Aclicking sound can be heard from thewinch indicating that the tire is properlystowed.
5.Carefully place all tools back into thetool kit bag.
6.Reinstall the tool kit bag on the jackand tighten the straps.
7.Reinstall the jack properly on thebracket and secure with the wing nut.
8.Close the access hole with the rubberplug.
9.If the vehicle has an access panel,reinstall.
10.Unblock the wheel.
461
2023 Expedition (TB8) Canada/United States of America, enUSA, Edition date: 202207, DOMChanging a Road WheelE325278 E166719