2023 FORD EXPEDITION clock
[x] Cancel search: clockPage 218 of 658
MANUAL (M)
In manual (M) you can select a specificgear. See Manually Shifting Gears (page215).
Note:We recommend using this mode fordriving on hilly or mountainous roads orwhen towing a trailer. See Towing a Trailer(page 358).
SHIFTING YOUR VEHICLE INTO
GEAR
Console Shifter
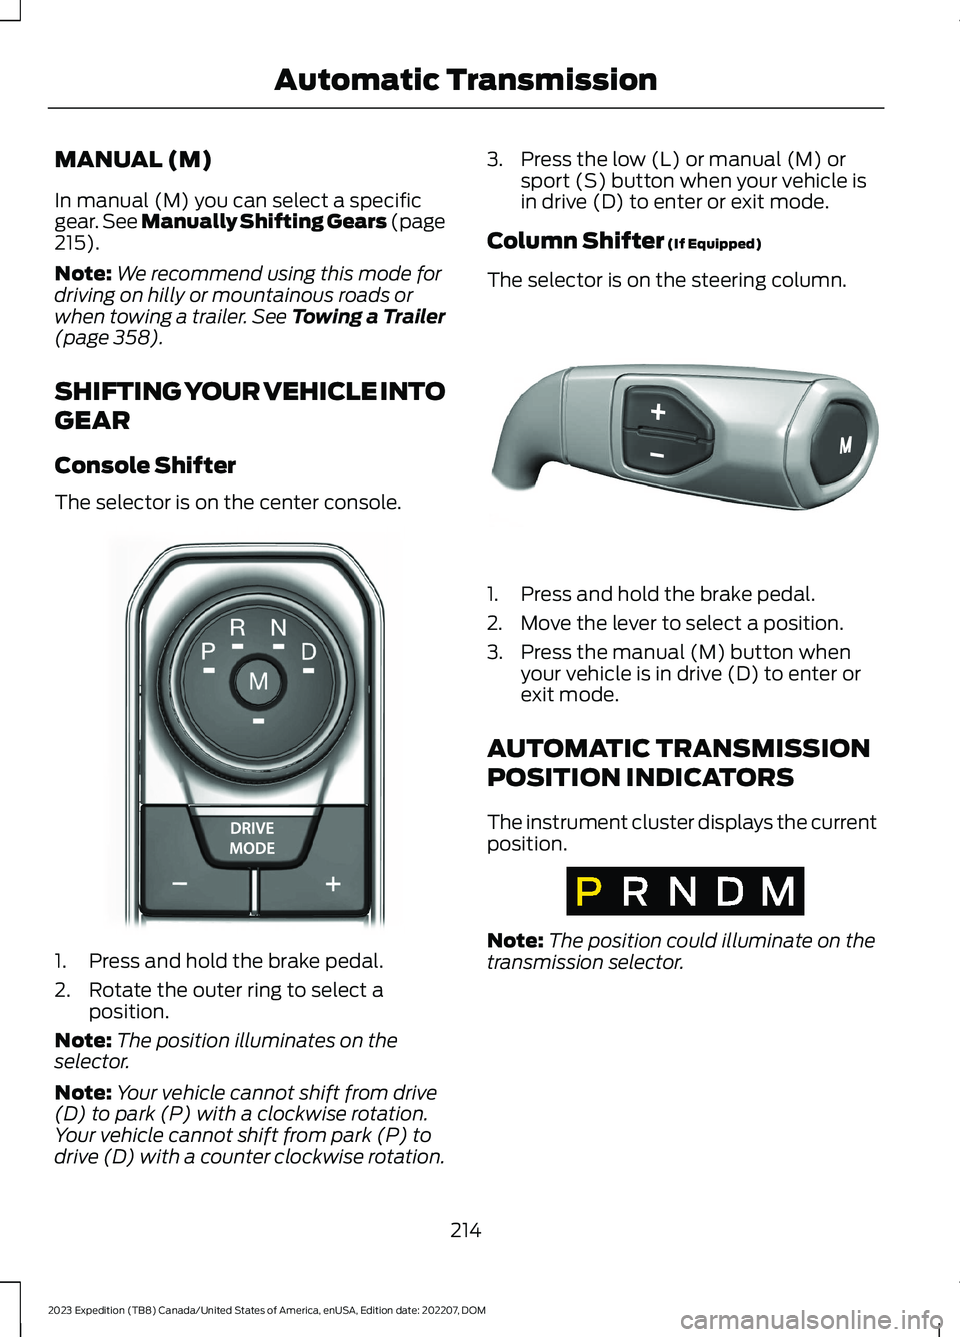
The selector is on the center console.
1.Press and hold the brake pedal.
2.Rotate the outer ring to select aposition.
Note:The position illuminates on theselector.
Note:Your vehicle cannot shift from drive(D) to park (P) with a clockwise rotation.Your vehicle cannot shift from park (P) todrive (D) with a counter clockwise rotation.
3.Press the low (L) or manual (M) orsport (S) button when your vehicle isin drive (D) to enter or exit mode.
Column Shifter (If Equipped)
The selector is on the steering column.
1.Press and hold the brake pedal.
2.Move the lever to select a position.
3.Press the manual (M) button whenyour vehicle is in drive (D) to enter orexit mode.
AUTOMATIC TRANSMISSION
POSITION INDICATORS
The instrument cluster displays the currentposition.
Note:The position could illuminate on thetransmission selector.
214
2023 Expedition (TB8) Canada/United States of America, enUSA, Edition date: 202207, DOMAutomatic TransmissionE252861 E327267 E317778
Page 231 of 658
LOCKING AND UNLOCKING
THE ELECTRONIC LIMITED-
SLIP DIFFERENTIAL
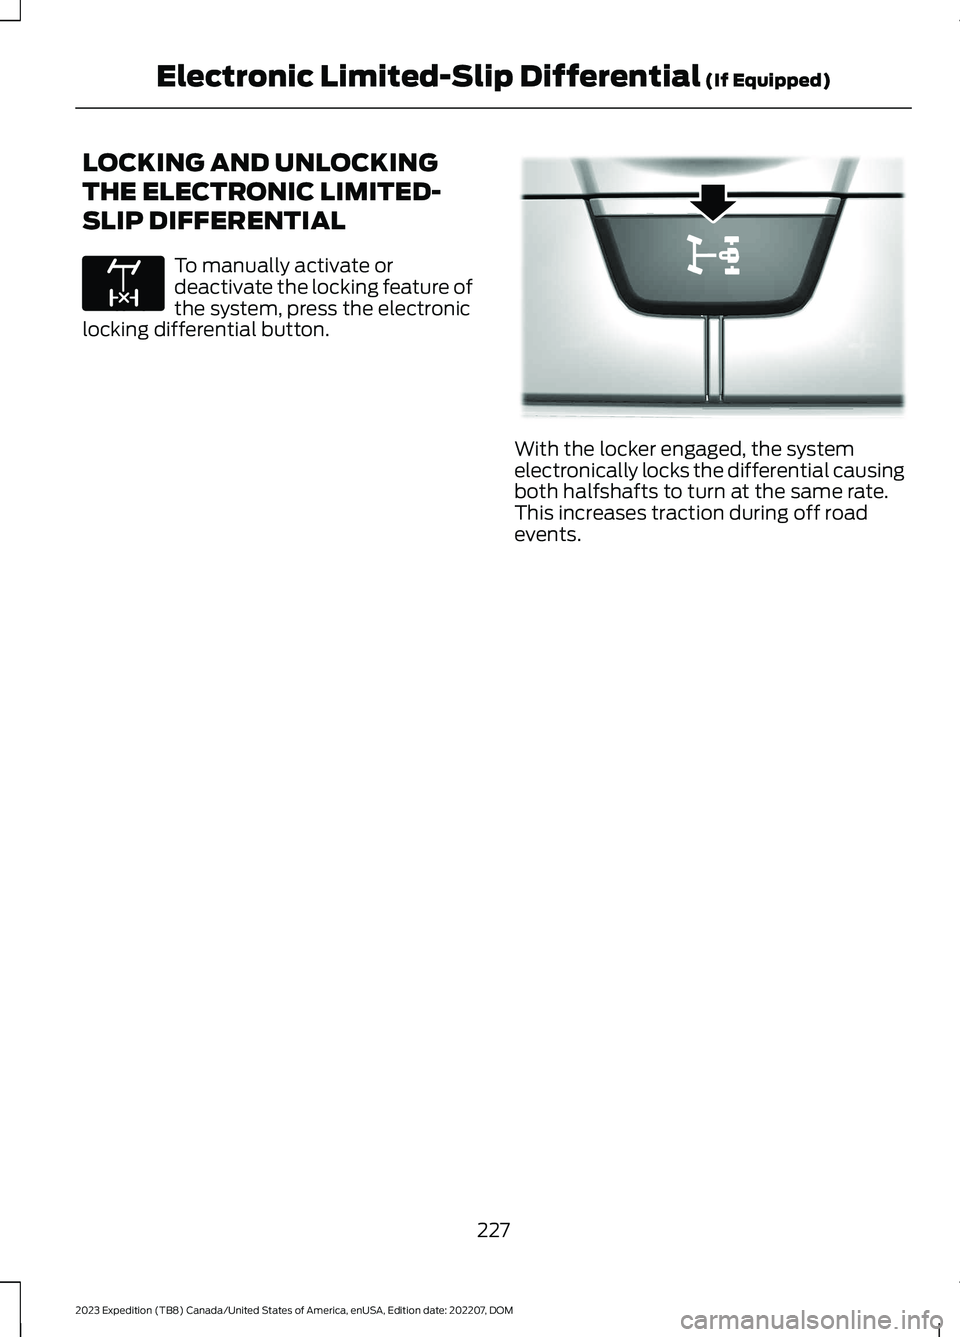
To manually activate ordeactivate the locking feature ofthe system, press the electroniclocking differential button.
With the locker engaged, the systemelectronically locks the differential causingboth halfshafts to turn at the same rate.This increases traction during off roadevents.
227
2023 Expedition (TB8) Canada/United States of America, enUSA, Edition date: 202207, DOMElectronic Limited-Slip Differential (If Equipped)E163170 E372047
Page 377 of 658
Note:You need to complete at least a 90°turn, and longer trailers could require a 180°turn. Camera trailer tracking requires thesystem to locate the hitch ball as well asdetermine the trailer length. Some trailerscould require you to drive straight then turnmultiple times before calibration completes.The touchscreen provides instructions andnotifies you when calibration completes.
Note:For best results, do not calibrate thesystem at night when calibrating.
SWITCHING TRAILER BACKUP
ASSISTANCE ON AND OFF
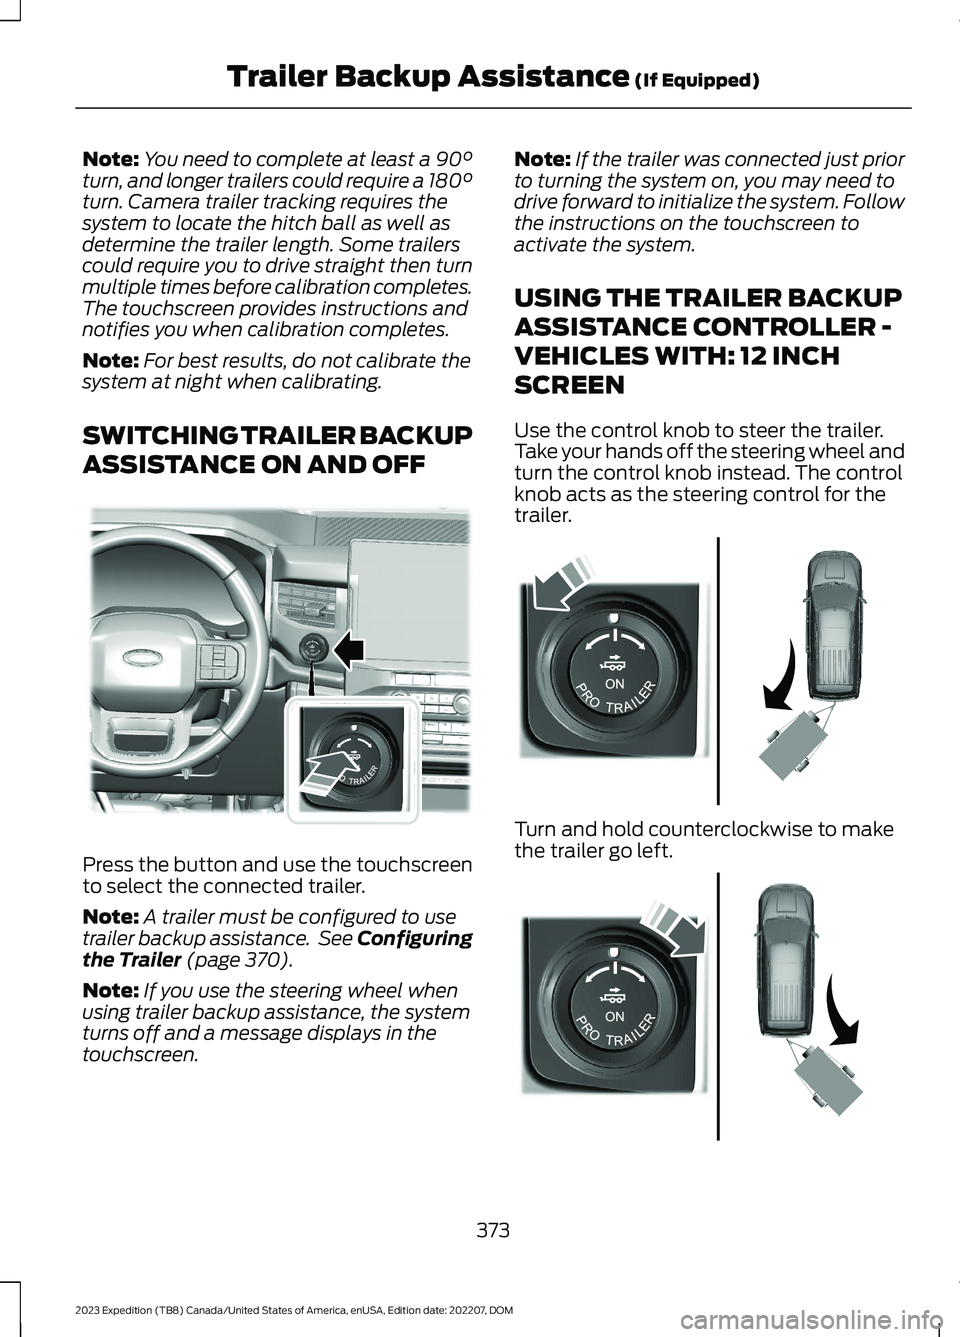
Press the button and use the touchscreento select the connected trailer.
Note:A trailer must be configured to usetrailer backup assistance. See Configuringthe Trailer (page 370).
Note:If you use the steering wheel whenusing trailer backup assistance, the systemturns off and a message displays in thetouchscreen.
Note:If the trailer was connected just priorto turning the system on, you may need todrive forward to initialize the system. Followthe instructions on the touchscreen toactivate the system.
USING THE TRAILER BACKUP
ASSISTANCE CONTROLLER -
VEHICLES WITH: 12 INCH
SCREEN
Use the control knob to steer the trailer.Take your hands off the steering wheel andturn the control knob instead. The controlknob acts as the steering control for thetrailer.
Turn and hold counterclockwise to makethe trailer go left.
373
2023 Expedition (TB8) Canada/United States of America, enUSA, Edition date: 202207, DOMTrailer Backup Assistance (If Equipped)E349261 E349262 E349263
Page 378 of 658
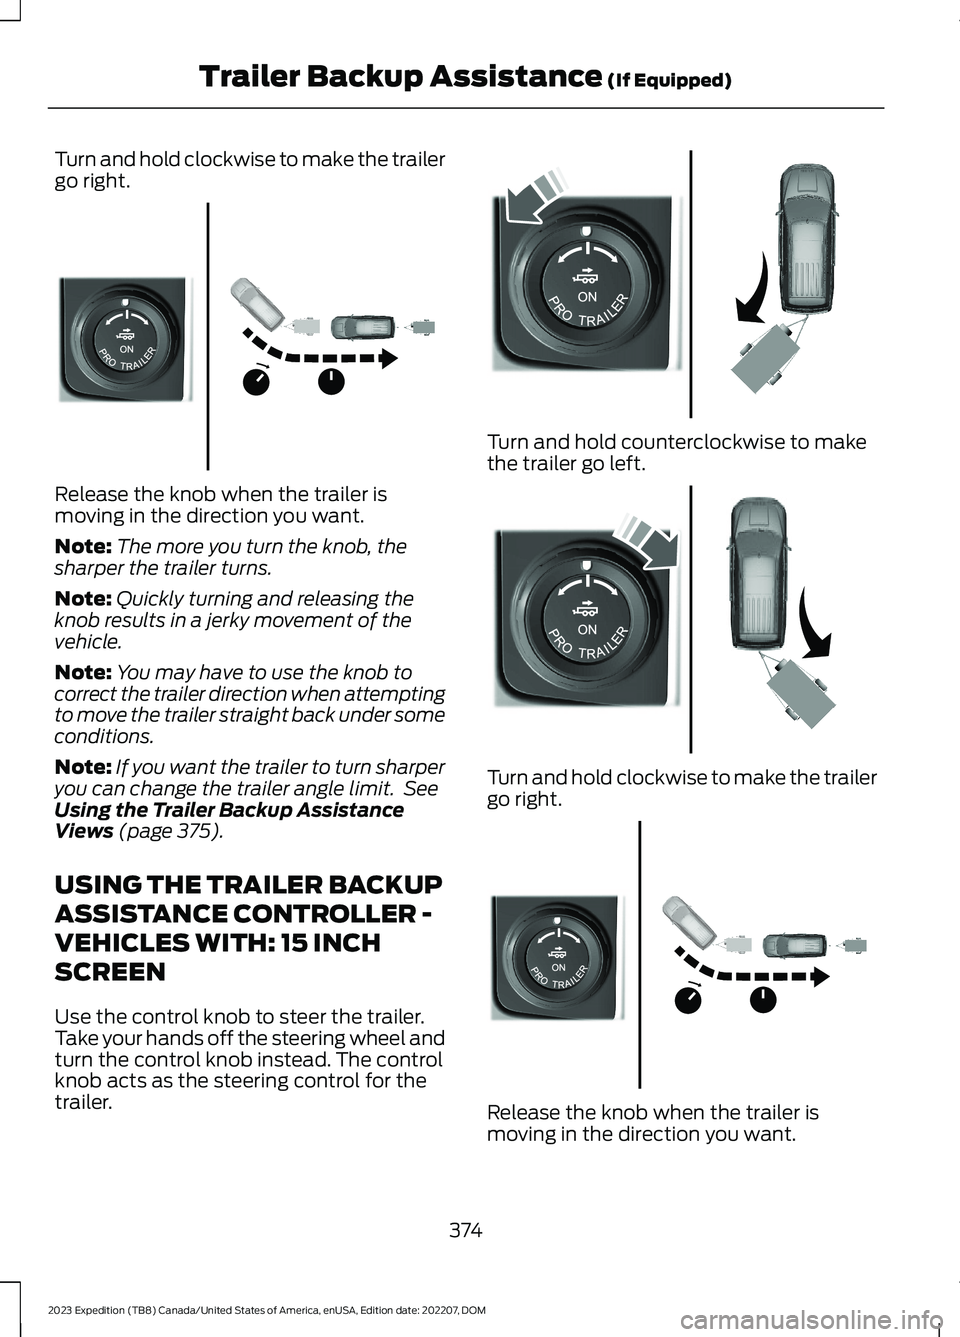
Turn and hold clockwise to make the trailergo right.
Release the knob when the trailer ismoving in the direction you want.
Note:The more you turn the knob, thesharper the trailer turns.
Note:Quickly turning and releasing theknob results in a jerky movement of thevehicle.
Note:You may have to use the knob tocorrect the trailer direction when attemptingto move the trailer straight back under someconditions.
Note:If you want the trailer to turn sharperyou can change the trailer angle limit. SeeUsing the Trailer Backup AssistanceViews (page 375).
USING THE TRAILER BACKUP
ASSISTANCE CONTROLLER -
VEHICLES WITH: 15 INCH
SCREEN
Use the control knob to steer the trailer.Take your hands off the steering wheel andturn the control knob instead. The controlknob acts as the steering control for thetrailer.
Turn and hold counterclockwise to makethe trailer go left.
Turn and hold clockwise to make the trailergo right.
Release the knob when the trailer ismoving in the direction you want.
374
2023 Expedition (TB8) Canada/United States of America, enUSA, Edition date: 202207, DOMTrailer Backup Assistance (If Equipped)E349264 E349262 E349263 E349264
Page 418 of 658
ENGINE OIL
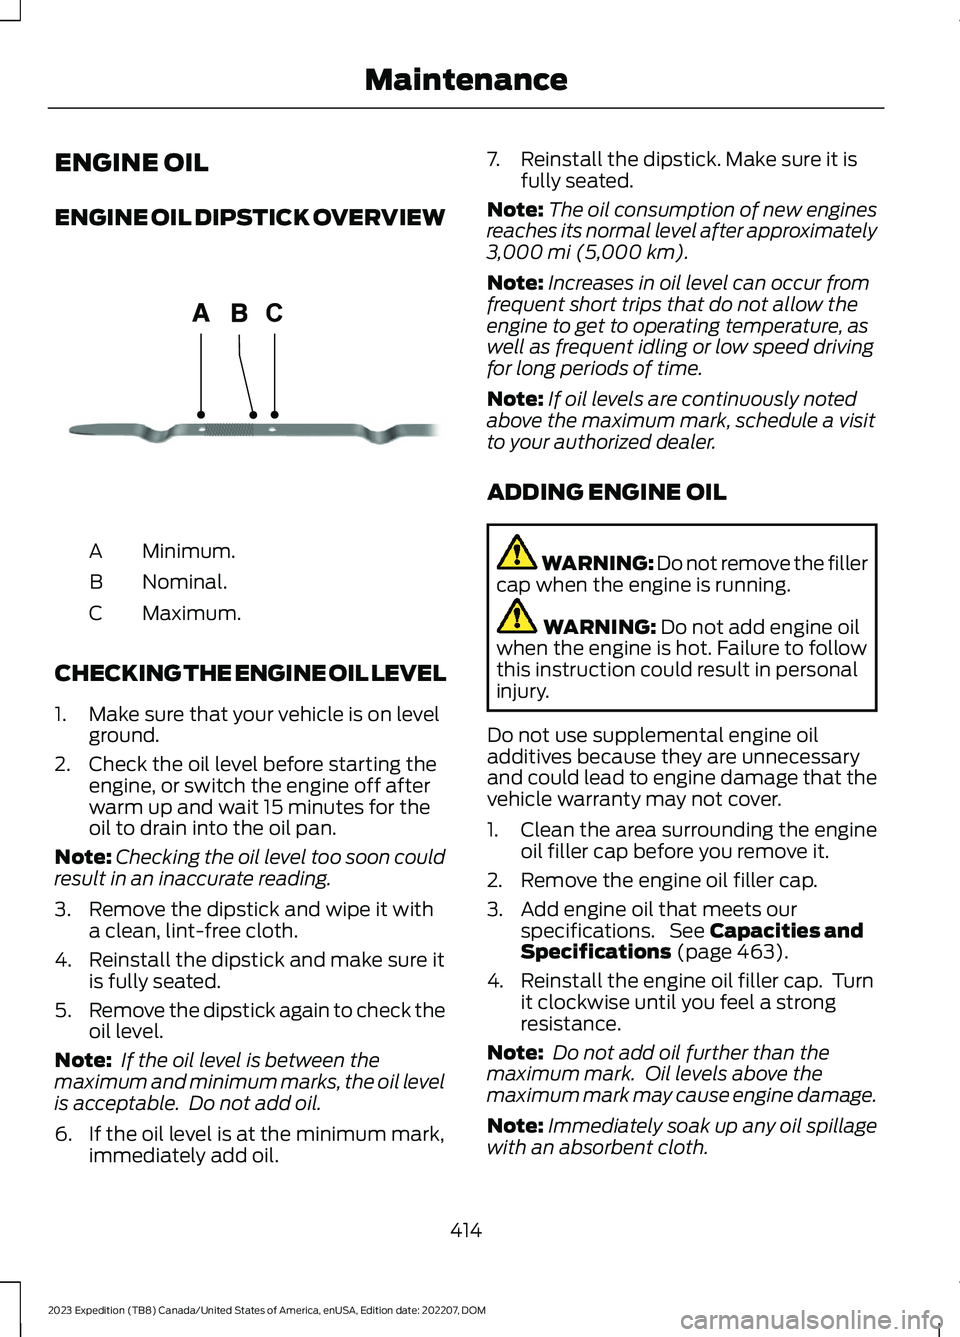
ENGINE OIL DIPSTICK OVERVIEW
Minimum.A
Nominal.B
Maximum.C
CHECKING THE ENGINE OIL LEVEL
1.Make sure that your vehicle is on levelground.
2.Check the oil level before starting theengine, or switch the engine off afterwarm up and wait 15 minutes for theoil to drain into the oil pan.
Note:Checking the oil level too soon couldresult in an inaccurate reading.
3.Remove the dipstick and wipe it witha clean, lint-free cloth.
4.Reinstall the dipstick and make sure itis fully seated.
5.Remove the dipstick again to check theoil level.
Note: If the oil level is between themaximum and minimum marks, the oil levelis acceptable. Do not add oil.
6.If the oil level is at the minimum mark,immediately add oil.
7.Reinstall the dipstick. Make sure it isfully seated.
Note:The oil consumption of new enginesreaches its normal level after approximately3,000 mi (5,000 km).
Note:Increases in oil level can occur fromfrequent short trips that do not allow theengine to get to operating temperature, aswell as frequent idling or low speed drivingfor long periods of time.
Note:If oil levels are continuously notedabove the maximum mark, schedule a visitto your authorized dealer.
ADDING ENGINE OIL
WARNING: Do not remove the fillercap when the engine is running.
WARNING: Do not add engine oilwhen the engine is hot. Failure to followthis instruction could result in personalinjury.
Do not use supplemental engine oiladditives because they are unnecessaryand could lead to engine damage that thevehicle warranty may not cover.
1.Clean the area surrounding the engineoil filler cap before you remove it.
2.Remove the engine oil filler cap.
3.Add engine oil that meets ourspecifications. See Capacities andSpecifications (page 463).
4.Reinstall the engine oil filler cap. Turnit clockwise until you feel a strongresistance.
Note: Do not add oil further than themaximum mark. Oil levels above themaximum mark may cause engine damage.
Note:Immediately soak up any oil spillagewith an absorbent cloth.
414
2023 Expedition (TB8) Canada/United States of America, enUSA, Edition date: 202207, DOMMaintenanceCE354437
Page 420 of 658
WARNING: Do not allow the fluidto touch your skin or eyes. If thishappens, rinse the affected areasimmediately with plenty of water andcontact your physician.
Note: Do not use stop leak pellets, coolingsystem sealants, or non-specified additivesas they can cause damage to the enginecooling or heating systems. Resultingcomponent damage may not be covered bythe vehicle Warranty.
Note:Automotive fluids are notinterchangeable.
It is very important to use predilutedcoolant approved to the correctspecification in order to avoid plugging thesmall passageways in the engine coolingsystem. See Capacities andSpecifications (page 463). Do not mixdifferent colors or types of coolant in yourvehicle. Mixing of engine coolants or usingan incorrect coolant may harm the engineor cooling system components and couldvoid the vehicle Warranty.
Note:If prediluted coolant is not available,use the approved concentrated coolantdiluting it to 50/50 with deionized ordistilled water. See Capacities andSpecifications (page 463). Using water thathas not been deionized may contribute todeposit formation, corrosion and pluggingof the small cooling system passageways.
To top up the coolant level do thefollowing:
1.Unscrew the cap slowly. Any pressureescapes as you unscrew the cap.
2.Add enough prediluted coolant toreach the correct level.
Note:We do not recommend the use ofrecycled coolant.
3.Replace the coolant reservoir cap. Turnthe cap clockwise until it contacts thehard stop.
4.Check the coolant level in the coolantreservoir the next few times you driveyour vehicle. If necessary, repeat step2.
If you have to add more than 1.1 qt (1 L) ofengine coolant per month, have yourvehicle checked as soon as possible.Operating an engine with a low level ofcoolant can result in engine overheatingand possible engine damage.
In case of emergency, you can add a largeamount of water without engine coolantin order to reach a vehicle service location.Service your vehicle as soon as possible.
Water alone, without engine coolant, cancause engine damage from corrosion,overheating or freezing.
Do not use the following as a coolantsubstitute, as they can cause enginedamage from overheating or freezing:
•Alcohol.
•Methanol.
•Brine.
•Any coolant mixed with alcohol ormethanol antifreeze.
Do not add extra inhibitors or additives tothe coolant. These can be harmful andcompromise the corrosion protection ofthe coolant.
Severe Climates
If you drive in extremely cold climates, youmay need to increase the coolantconcentration above 50%.
Note:A coolant concentration of 60%provides improved freeze point protection.Coolant concentrations above 60%decrease the overheat protectioncharacteristics of the coolant and couldcause engine damage.
416
2023 Expedition (TB8) Canada/United States of America, enUSA, Edition date: 202207, DOMMaintenance
Page 426 of 658
3.Wait a minimum of two minutes beforedisconnecting the battery.
Note:The engine management system hasa power hold function and remains poweredfor a period of time after you switch theignition off. This is to allow the system tostore diagnostic and adaptive tables.Disconnecting the battery without waitingcan cause damage not covered by thevehicle warranty.
4.Disconnect the negative battery cableterminal.
5.Disconnect the positive battery cableterminal.
6.Remove the battery securing clamp.
7.Remove the battery.
8.To install, reverse the removalprocedure.
Note:Before reconnecting the battery,make sure the ignition remains switched off.
Note:Make sure to fully tighten the batterycables.
If you disconnect or replace the vehiclebattery, you must reset the followingfeatures:
•Window bounce-back. See Lockingthe Rear Window Controls (page 128).
•Clock Settings.
•Pre-set radio stations.
Battery Disposal
Make sure that you dispose ofold batteries in anenvironmentally friendly way.Seek advice from your local authorityabout recycling old batteries.
ADJUSTING THE HEADLAMPS
Vertical Aim Adjustment
The headlamps on your vehicle areproperly aimed at the assembly plant. Ifyour vehicle has been in an accident,contact an authorized dealer to check andrealign your headlamps.
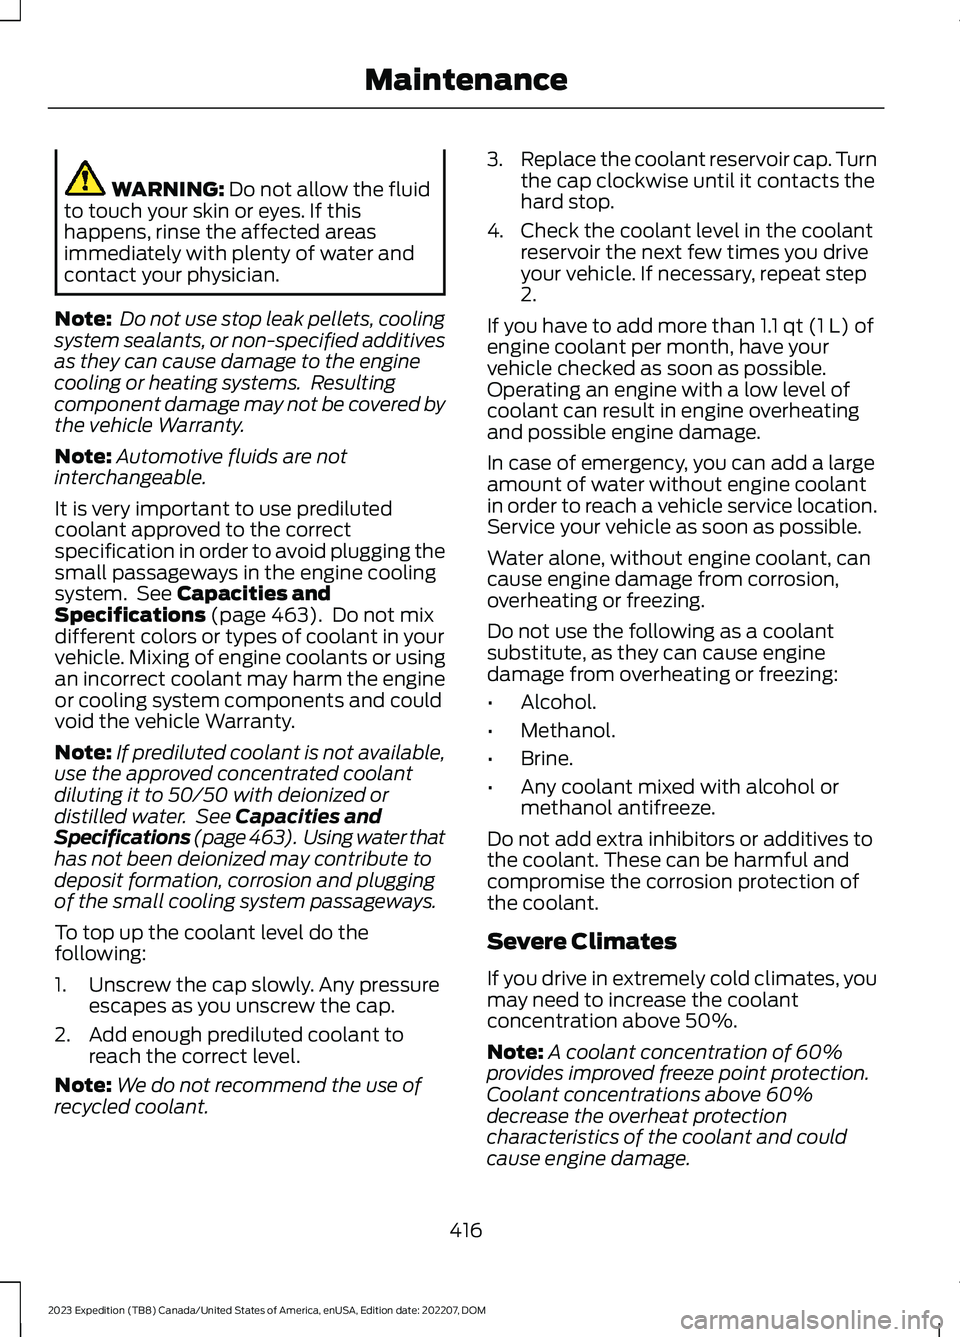
Headlamp Aiming Target
8 feet (2.4 m).A
Center height of lamp to ground.B
25 feet (7.6 m).C
Horizontal reference line.D
1.Park your vehicle directly in front of awall or screen on a level surface,approximately 25 ft (7.6 m) away.
2.Measure the height from the center ofyour headlamp, indicated by a 3millimeter circle on the lens, to theground and mark an 8 ft (2.4 m)horizontal reference line on the verticalwall or screen at this height, a piece ofmasking tape works well.
3.Switch on the low beam headlamps toilluminate the wall or screen and openthe hood. Cover one of the headlampsso no light hits the wall.
422
2023 Expedition (TB8) Canada/United States of America, enUSA, Edition date: 202207, DOMMaintenanceE107998 E142592
Page 427 of 658
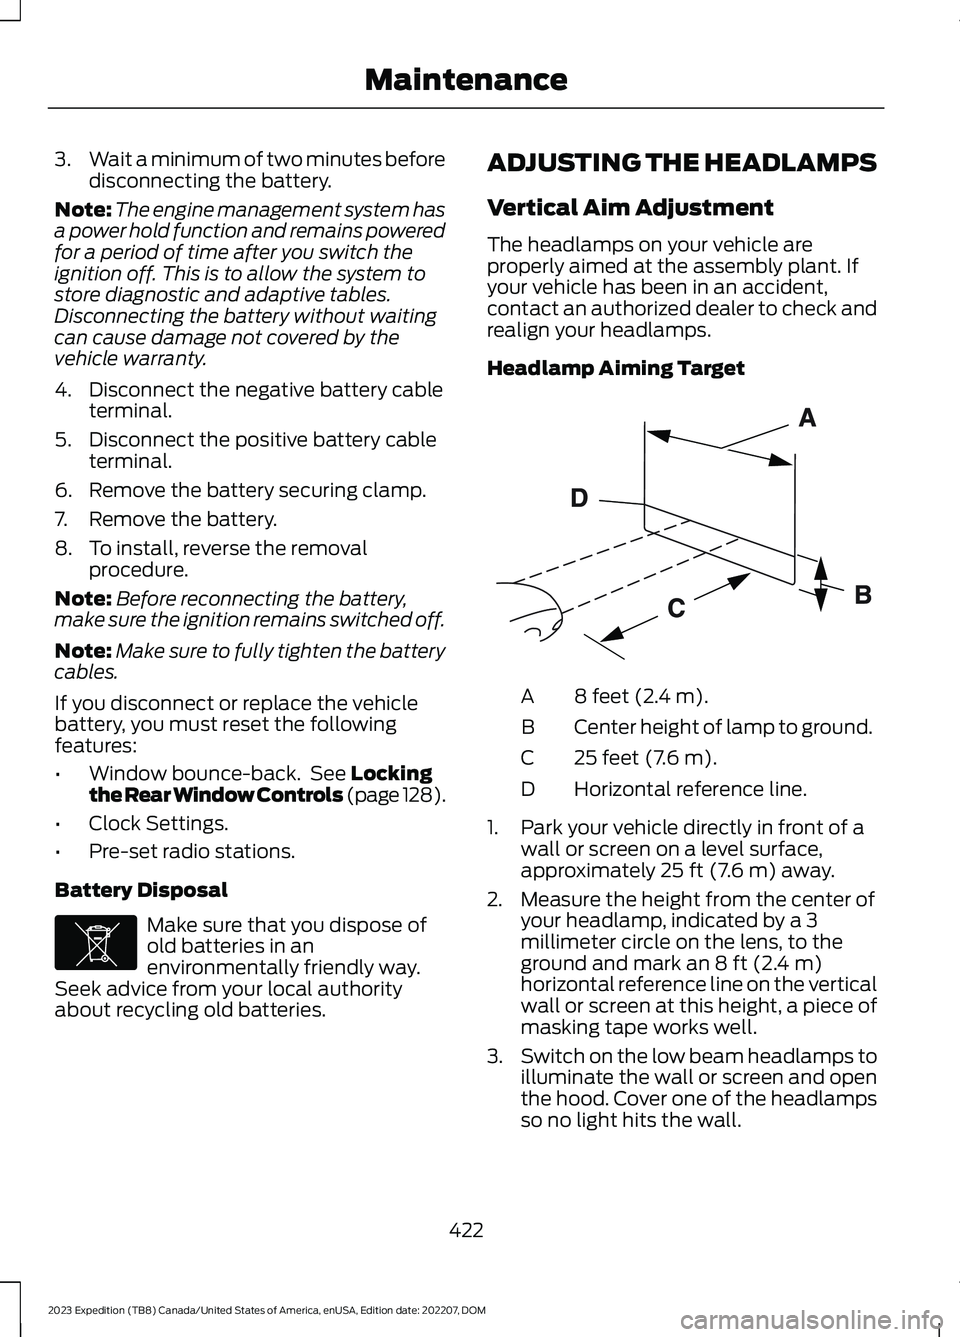
4.On the wall or screen, observe a lightpattern with a distinct horizontal edgetoward the right. If this edge is not atthe horizontal reference line, adjust thebeam so the edge is at the same heightas the horizontal reference line.
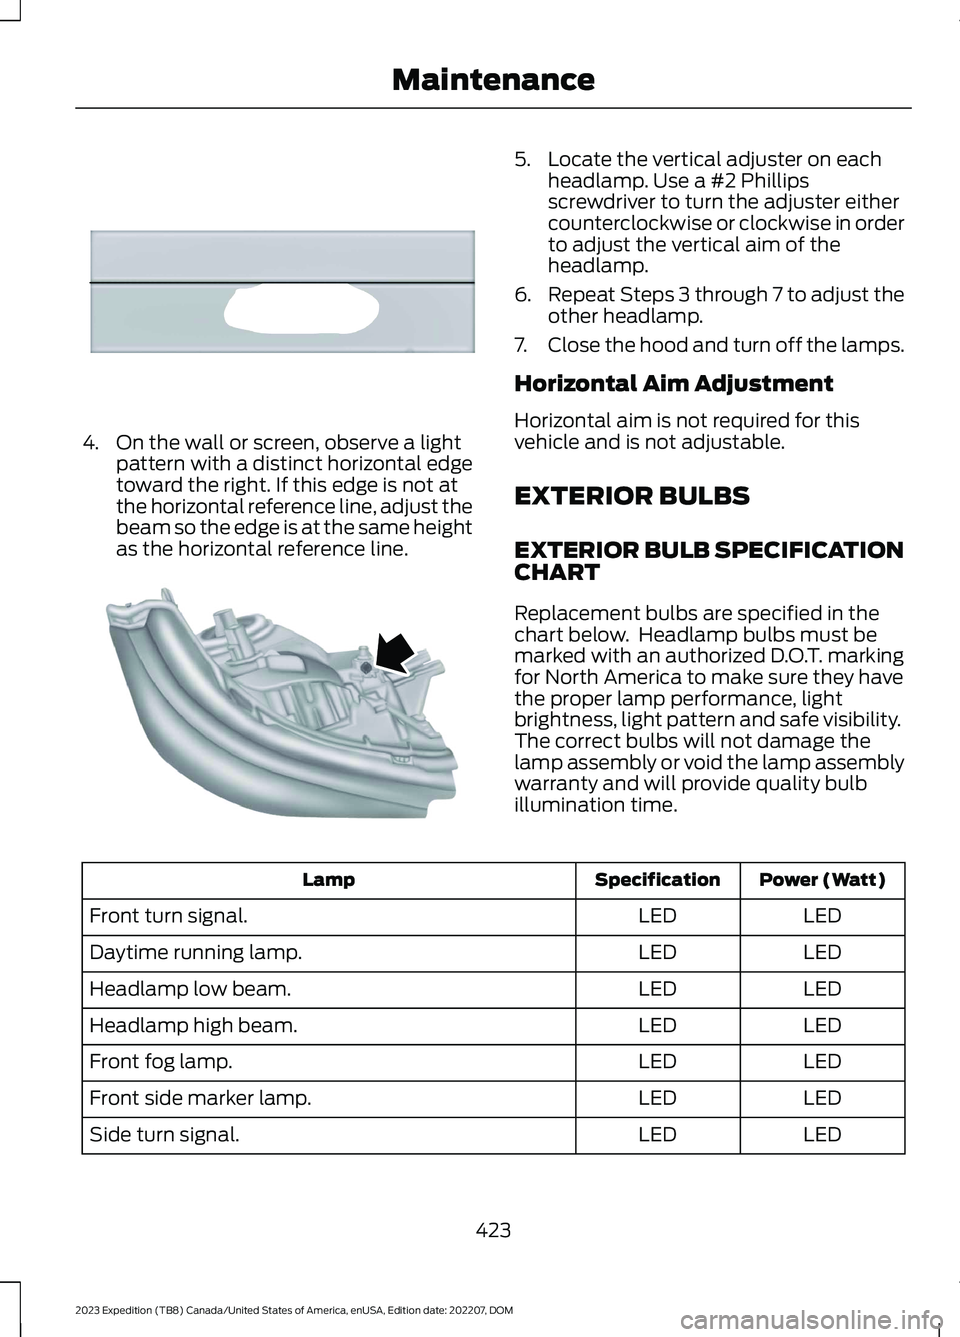
5.Locate the vertical adjuster on eachheadlamp. Use a #2 Phillipsscrewdriver to turn the adjuster eithercounterclockwise or clockwise in orderto adjust the vertical aim of theheadlamp.
6.Repeat Steps 3 through 7 to adjust theother headlamp.
7.Close the hood and turn off the lamps.
Horizontal Aim Adjustment
Horizontal aim is not required for thisvehicle and is not adjustable.
EXTERIOR BULBS
EXTERIOR BULB SPECIFICATIONCHART
Replacement bulbs are specified in thechart below. Headlamp bulbs must bemarked with an authorized D.O.T. markingfor North America to make sure they havethe proper lamp performance, lightbrightness, light pattern and safe visibility.The correct bulbs will not damage thelamp assembly or void the lamp assemblywarranty and will provide quality bulbillumination time.
Power (Watt)SpecificationLamp
LEDLEDFront turn signal.
LEDLEDDaytime running lamp.
LEDLEDHeadlamp low beam.
LEDLEDHeadlamp high beam.
LEDLEDFront fog lamp.
LEDLEDFront side marker lamp.
LEDLEDSide turn signal.
423
2023 Expedition (TB8) Canada/United States of America, enUSA, Edition date: 202207, DOMMaintenanceE167358 E163806