2023 FORD EXPEDITION ESP
[x] Cancel search: ESPPage 457 of 658

When the malfunction indicator isilluminated, the system may not be ableto detect or signal low tire pressure asintended. TPMS malfunctions may occurfor a variety of reasons, including theinstallation of replacement or alternatetires or wheels on the vehicle that preventthe TPMS from functioning properly.Always check the TPMS malfunctiontelltale after replacing one or more tires orwheels on your vehicle to ensure that thereplacement or alternate tires and wheelsallow the TPMS to continue to functionproperly.
WARNING: Changes ormodifications not expressively approvedby the party responsible for compliancecould void the user's authority to operatethe equipment. The term "IC:" before theradio certification number only signifiesthat Industry Canada technicalspecifications were met.
This device complies with Part 15 of theFCC Rules and with License exempt RSSStandards of Industry Canada. Operationis subject to the following two conditions:
1.This device may not cause harmfulinterference, and
2.This device must accept anyinterference received, includinginterference that may cause undesiredoperation.
TIRE PRESSURE MONITORING
SYSTEM PRECAUTIONS
WARNING: The tire pressuremonitoring system is not a substitute formanually checking tire pressures. Youshould periodically check tire pressuresusing a pressure gauge. Failure tocorrectly maintain tire pressures couldincrease the risk of tire failure, loss ofcontrol, vehicle rollover and personalinjury.
WARNING: Do not use the tirepressure displayed in the informationdisplay as a tire pressure gauge. Failureto follow this instruction could result inpersonal injury or death.
Note:The use of tire sealants can damagethe tire pressure monitoring system.
Note:If the tire pressure monitor sensorbecomes damaged it may not function.
TIRE PRESSURE MONITORING
SYSTEM LIMITATIONS
When the outside temperature dropssignificantly, the tire pressure coulddecrease and activate the low tire pressurewarning lamp.
The warning lamp could also illuminatewhen you use a spare wheel, or tire sealantfrom the inflator kit.
Note:Regularly checking the vehicle tirepressures can reduce the possibility for thewarning lamp to illuminate due to outsideair temperature changes.
Note:After you inflate the tires to therecommended pressure it could take up totwo minutes of driving over 20 mph(32 km/h) for the warning indicator to turnoff.
453
2023 Expedition (TB8) Canada/United States of America, enUSA, Edition date: 202207, DOMTire Pressure Monitoring System
Page 463 of 658
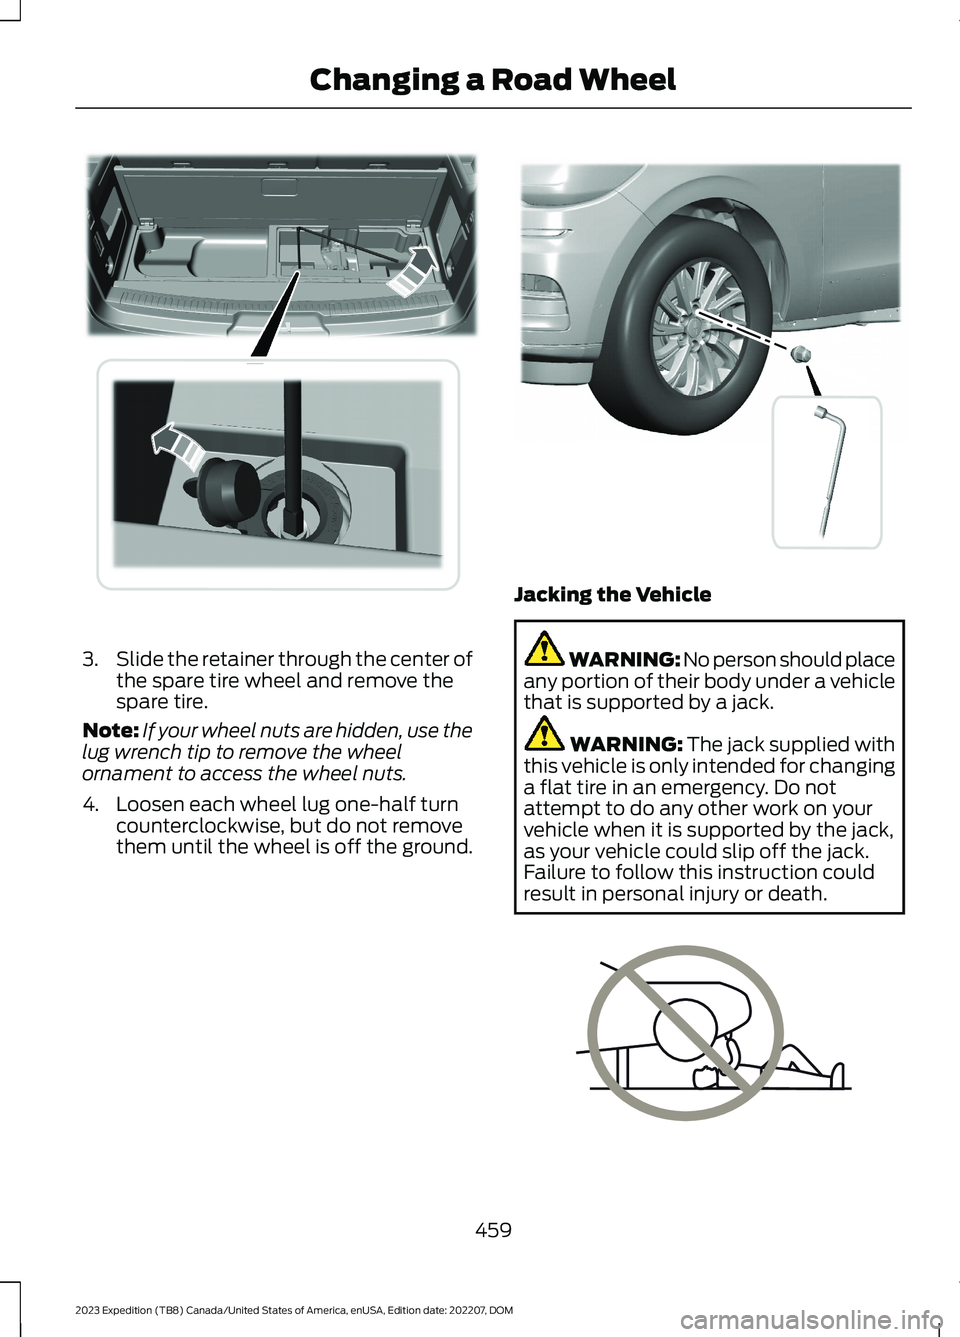
3.Slide the retainer through the center ofthe spare tire wheel and remove thespare tire.
Note:If your wheel nuts are hidden, use thelug wrench tip to remove the wheelornament to access the wheel nuts.
4.Loosen each wheel lug one-half turncounterclockwise, but do not removethem until the wheel is off the ground.
Jacking the Vehicle
WARNING: No person should placeany portion of their body under a vehiclethat is supported by a jack.
WARNING: The jack supplied withthis vehicle is only intended for changinga flat tire in an emergency. Do notattempt to do any other work on yourvehicle when it is supported by the jack,as your vehicle could slip off the jack.Failure to follow this instruction couldresult in personal injury or death.
459
2023 Expedition (TB8) Canada/United States of America, enUSA, Edition date: 202207, DOMChanging a Road WheelE273399 E358685 E166722
Page 464 of 658

WARNING: The jack supplied withthis vehicle is only intended for changinga flat tire in an emergency. Do notattempt to do any other work on yourvehicle when it is supported by the jack,as your vehicle could slip off the jack.Failure to follow this instruction couldresult in personal injury or death.
WARNING: The jack should beused on level firm ground whereverpossible.
WARNING: Never place anythingbetween the vehicle jack and the ground.
WARNING: Never place anythingbetween the vehicle jack and yourvehicle.
WARNING: It is recommended thatthe wheels of the vehicle be chocked,and that no person should remain in avehicle that is being jacked.
WARNING: Failure to follow theseguidelines could result in an increasedrisk of loss of vehicle control, injury ordeath.
Note:The jack does not requiremaintenance or additional lubrication overthe service life of your vehicle.
Note:Both the front and rear jacking pointsare on the frame rails. The correct locationson the frame rails are marked with an arrowpunched into the frame rail. Jack at thespecified locations to avoid damaging yourvehicle.
Front jacking point
Rear jacking point
460
2023 Expedition (TB8) Canada/United States of America, enUSA, Edition date: 202207, DOMChanging a Road WheelE325274 E325281
Page 465 of 658
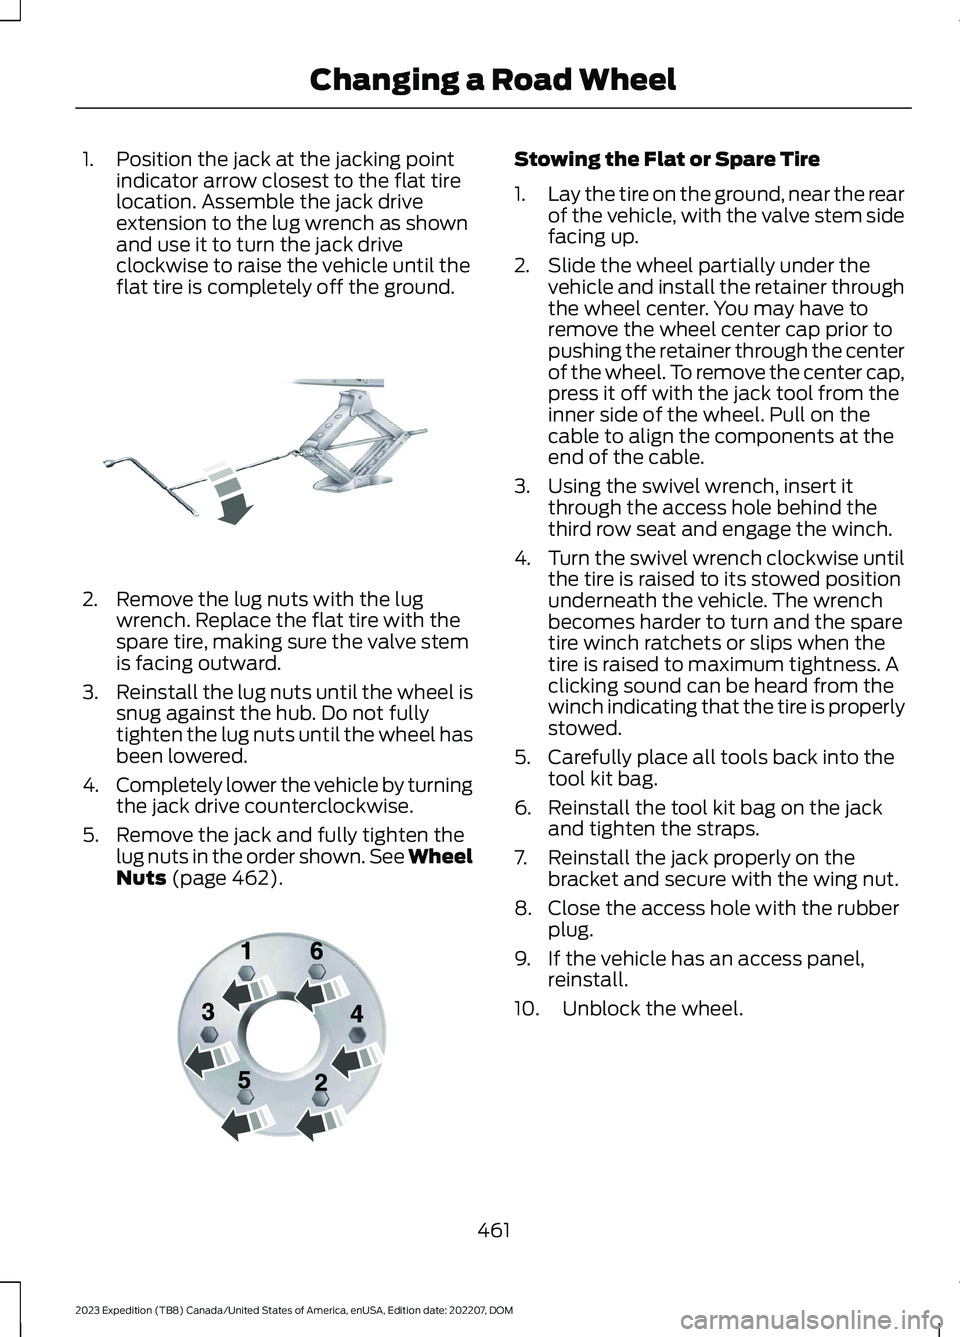
1.Position the jack at the jacking pointindicator arrow closest to the flat tirelocation. Assemble the jack driveextension to the lug wrench as shownand use it to turn the jack driveclockwise to raise the vehicle until theflat tire is completely off the ground.
2.Remove the lug nuts with the lugwrench. Replace the flat tire with thespare tire, making sure the valve stemis facing outward.
3.Reinstall the lug nuts until the wheel issnug against the hub. Do not fullytighten the lug nuts until the wheel hasbeen lowered.
4.Completely lower the vehicle by turningthe jack drive counterclockwise.
5.Remove the jack and fully tighten thelug nuts in the order shown. See WheelNuts (page 462).
Stowing the Flat or Spare Tire
1.Lay the tire on the ground, near the rearof the vehicle, with the valve stem sidefacing up.
2.Slide the wheel partially under thevehicle and install the retainer throughthe wheel center. You may have toremove the wheel center cap prior topushing the retainer through the centerof the wheel. To remove the center cap,press it off with the jack tool from theinner side of the wheel. Pull on thecable to align the components at theend of the cable.
3.Using the swivel wrench, insert itthrough the access hole behind thethird row seat and engage the winch.
4.Turn the swivel wrench clockwise untilthe tire is raised to its stowed positionunderneath the vehicle. The wrenchbecomes harder to turn and the sparetire winch ratchets or slips when thetire is raised to maximum tightness. Aclicking sound can be heard from thewinch indicating that the tire is properlystowed.
5.Carefully place all tools back into thetool kit bag.
6.Reinstall the tool kit bag on the jackand tighten the straps.
7.Reinstall the jack properly on thebracket and secure with the wing nut.
8.Close the access hole with the rubberplug.
9.If the vehicle has an access panel,reinstall.
10.Unblock the wheel.
461
2023 Expedition (TB8) Canada/United States of America, enUSA, Edition date: 202207, DOMChanging a Road WheelE325278 E166719
Page 468 of 658
MOTORCRAFT PARTS
Motorcraft Part NumberComponent
FA-1883Air filter element.
BAGM-48H6-760Battery.
FP-92Cabin air filter.
FL-500-SEngine oil filter.1
WW-1107-ARear window wiper blade.
SP-596Spark plug.
WW-2248-AWindshield wiper blade.
1 If a Motorcraft oil filter is not available, use an oil filter that meets industry performancespecification SAE/USCAR-36.
We recommend Motorcraft parts that are available at your authorized dealer or atwww.parts.ford.com. We engineer these parts for your vehicle to meet or exceed ourspecifications. Use of other parts could impact vehicle performance, emissions anddurability. Your warranty could be void for any damage related to use of other parts.
464
2023 Expedition (TB8) Canada/United States of America, enUSA, Edition date: 202207, DOMCapacities and Specifications
Page 485 of 658
AUDIO SYSTEM
PRECAUTIONS
WARNING: Driving while distractedcan result in loss of vehicle control, crashand injury. We strongly recommend thatyou use extreme caution when using anydevice that may take your focus off theroad. Your primary responsibility is thesafe operation of your vehicle. Werecommend against the use of anyhand-held device while driving andencourage the use of voice-operatedsystems when possible. Make sure youare aware of all applicable local lawsthat may affect the use of electronicdevices while driving.
Listening to loud audio for long periods oftime could damage your hearing.
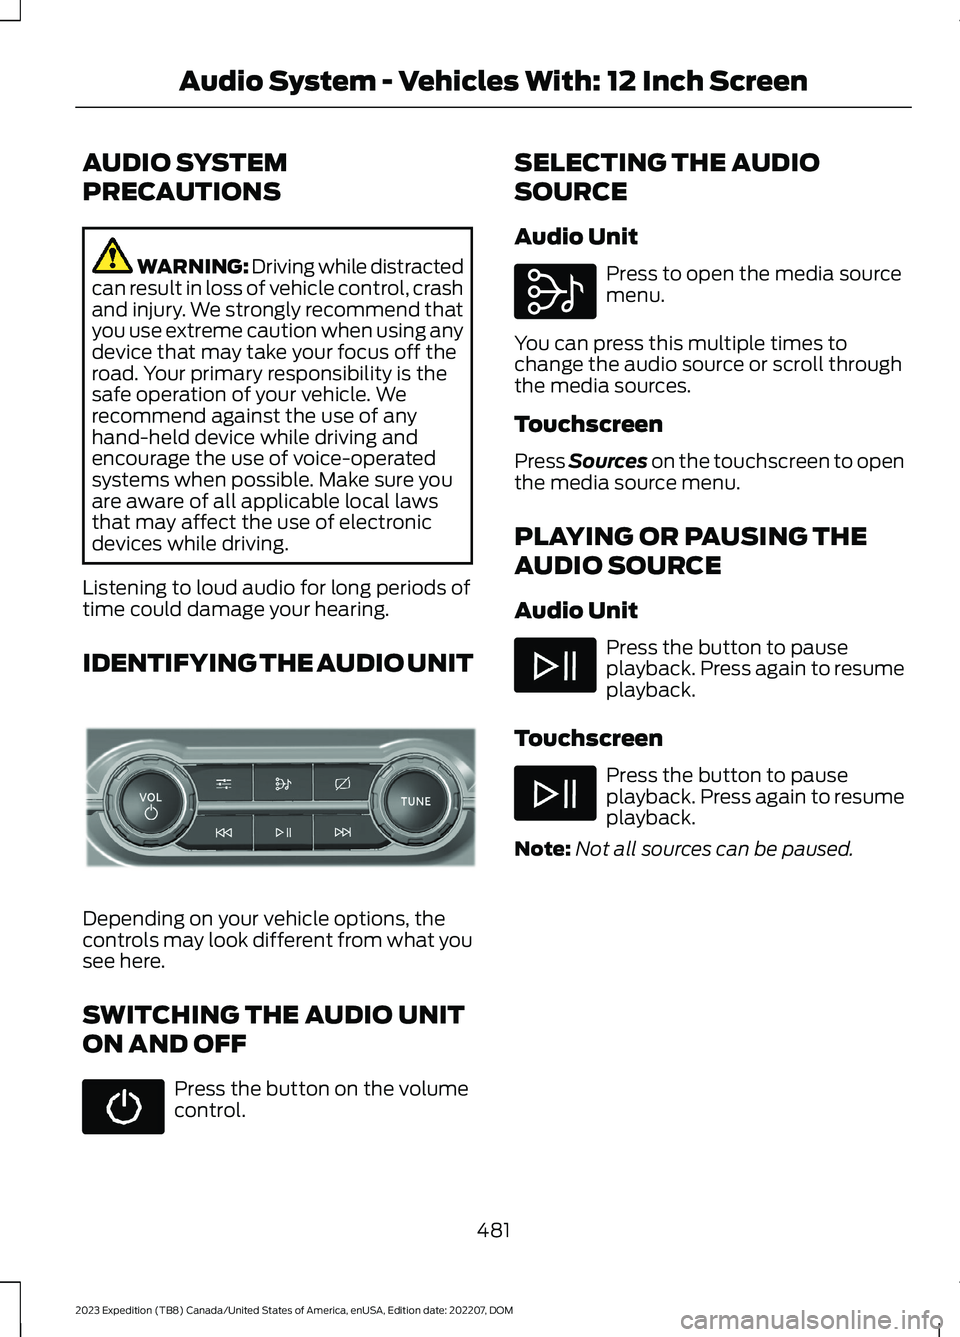
IDENTIFYING THE AUDIO UNIT
Depending on your vehicle options, thecontrols may look different from what yousee here.
SWITCHING THE AUDIO UNIT
ON AND OFF
Press the button on the volumecontrol.
SELECTING THE AUDIO
SOURCE
Audio Unit
Press to open the media sourcemenu.
You can press this multiple times tochange the audio source or scroll throughthe media sources.
Touchscreen
Press Sources on the touchscreen to openthe media source menu.
PLAYING OR PAUSING THE
AUDIO SOURCE
Audio Unit
Press the button to pauseplayback. Press again to resumeplayback.
Touchscreen
Press the button to pauseplayback. Press again to resumeplayback.
Note:Not all sources can be paused.
481
2023 Expedition (TB8) Canada/United States of America, enUSA, Edition date: 202207, DOMAudio System - Vehicles With: 12 Inch ScreenE308144 E308143
Page 488 of 658
Using the Station List
1.Press Browse.
Note:Available on FM radio only.
2.Press a station.
SWITCHING THE DISPLAY ON
AND OFF
Audio Unit
Press the button.
Touchscreen
To switch the display off:
1.Press Settings on the touchscreen.
2.Press Display Settings.
3.Press Display Off.
Note:The display defaults to on each timeyou switch your vehicle on.
To switch the display on, press anywhereon the touchscreen.
DIGITAL RADIO (IF EQUIPPED)
WHAT IS DIGITAL RADIO
HD Radio™ technology is the digitalevolution of analog AM/FM radio.
For additional information, visitwww.HDRadio.com.
HD Radio Technology is manufacturedunder license from iBiquity DigitalCorporation and foreign patents. HD Radioand the HD and HD Radio logos areproprietary trademarks of XPERI. Thevehicle manufacturer and XPERI are notresponsible for the content sent using HDRadio technology. Content may bechanged, added or deleted at any time atthe station owner's discretion.
HOW DOES DIGITAL RADIO WORK
Your system has a special receiver thatallows it to receive digital broadcasts inaddition to analog broadcasts.
HD1 signifies the main programming statusand is available in both analog and digitalbroadcasts. Other multicast stations areonly available digitally and could containnew or different content.
Note:When the system first receives anHD1 station, it plays the station in the analogversion until it verifies the station is an HDRadio station. Then it shifts to the digitalversion.
Note:There is an audio mute delay whenswitching to an HD2 or HD3 station becausethe system has to reacquire and decode thedigital signal.
DIGITAL RADIO LIMITATIONS
If you are outside the reception area, thesystem could not work.
If you are on the fringe of the receptionarea, the station could mute due to weaksignal strength.
Note:If you are listening to HD1, the systemchanges back to the analog broadcast untilthe digital broadcast is available again. Ifyou are listening to any other multicastchannels, the station mutes and staysmuted unless it is able to connect to thedigital signal again.
484
2023 Expedition (TB8) Canada/United States of America, enUSA, Edition date: 202207, DOMAudio System - Vehicles With: 12 Inch ScreenE272035
Page 496 of 658
AUDIO SYSTEM
PRECAUTIONS
WARNING: Driving while distractedcan result in loss of vehicle control, crashand injury. We strongly recommend thatyou use extreme caution when using anydevice that may take your focus off theroad. Your primary responsibility is thesafe operation of your vehicle. Werecommend against the use of anyhand-held device while driving andencourage the use of voice-operatedsystems when possible. Make sure youare aware of all applicable local lawsthat may affect the use of electronicdevices while driving.
Listening to loud audio for long periods oftime could damage your hearing.
IDENTIFYING THE AUDIO UNIT
Note:Depending on your vehicle options,the controls may look different from whatyou see here.
SWITCHING THE AUDIO UNIT
ON AND OFF
Press the button on the volumecontrol.
SELECTING THE AUDIO
SOURCE
Press Sources on thetouchscreen to open the mediasource menu.
PLAYING OR PAUSING THE
AUDIO SOURCE
Audio Unit
Press the button to pauseplayback. Press again to resumeplayback.
Touchscreen
Press the button to pauseplayback. Press again to resumeplayback.
Note:Not all sources can be paused.
ADJUSTING THE VOLUME
492
2023 Expedition (TB8) Canada/United States of America, enUSA, Edition date: 202207, DOMAudio System - Vehicles With: 15 Inch ScreenE346553 E250655 E248939