2023 DODGE CHALLENGER transmission
[x] Cancel search: transmissionPage 5 of 300

3
Headlight Time Delay ................................................. 41
Lights-On Reminder ................................................... 41
Fog Lights — If Equipped ............................................ 42
Turn Signals .............................................................. 42
Lane Change Assist — If Equipped............................. 42
INTERIOR LIGHTS ...............................................................42 Front Map/Reading Lights ........................................ 42
Ambient Light — If Equipped ...................................... 42
Dimmer Controls ........................................................ 43
Illuminated Entry ........................................................ 43
WINDSHIELD WIPERS AND WASHERS ........................... 44 Windshield Wiper Operation....................................... 44
Rain Sensing Wipers — If Equipped ........................... 45
CLIMATE CONTROLS ..........................................................45 Automatic Climate Control Descriptions
And Functions ............................................................. 45
Automatic Temperature Control (ATC) ...................... 48
Climate Voice Commands .......................................... 48
Operating Tips ............................................................ 48
INTERIOR STORAGE AND EQUIPMENT ............................49 Storage ........................................................................ 49
Illuminated Cupholders — If Equipped....................... 50
USB/AUX Control ......................................................... 50
Electrical Power Outlets.............................................. 50
WINDOWS ............................................................................52 Power Window Controls .............................................. 52
Wind Buffeting............................................................. 52
POWER SUNROOF — IF EQUIPPED ...................................52 Opening And Closing The Sunroof ............................. 53
Pinch Protect Feature — If Equipped ......................... 53
Sunshade Operation ................................................... 53
Sunroof Maintenance ................................................. 53
Ignition Off Operation.................................................. 53 HOOD.................................................................................... 54
Opening The Hood .......................................................54
Closing The Hood ......................................................... 54
TRUNK .................................................................................. 54 Opening The Trunk ......................................................54
Closing The Trunk ........................................................ 55
Trunk Safety ................................................................ 55
Cargo Area Features.................................................... 55
GETTING TO KNOW YOUR
INSTRUMENT PANEL
INSTRUMENT CLUSTER ..................................................... 56 Instrument Cluster Descriptions ................................. 57
INSTRUMENT CLUSTER DISPLAY ..................................... 57 Location And Controls ................................................. 58
Engine Oil Life Reset ................................................... 59
Performance Shift Indicator (PSI) — If Equipped ....... 59
Instrument Cluster Display Selectable
Menu Items .................................................................. 60
Battery Saver On/Battery Saver
Mode Message — Electrical Load Reduction
Actions — If Equipped .................................................. 62
WARNING LIGHTS AND MESSAGES ................................ 63 Red Warning Lights ..................................................... 63
Yellow Warning Lights ................................................. 66
Yellow Indicator Lights ................................................ 68
Green Indicator Lights ................................................. 68
White Indicator Lights.................................................. 69
Blue Indicator Lights.................................................... 69
ONBOARD DIAGNOSTIC SYSTEM — OBD II ..................... 69 Onboard Diagnostic System (OBD II)
Cybersecurity ...............................................................70
EMISSIONS INSPECTION AND MAINTENANCE
PROGRAMS ........................................................................ 70
STARTING AND OPERATING
STARTING THE ENGINE...................................................... 71 Manual Transmission — If Equipped .......................... 71
Automatic Transmission — If Equipped...................... 71
Normal Starting ........................................................... 71
AutoPark ...................................................................... 72
Extended Park Starting ............................................... 73
If Engine Fails To Start ............................................... 74
Cold Weather Operation
(Below –22°F Or −30°C) .......................................... 74
After Starting................................................................ 74
ENGINE BREAK-IN RECOMMENDATIONS —
3.6L & 5.7L ......................................................................... 74
PARKING BRAKE ................................................................ 74
MANUAL TRANSMISSION — IF EQUIPPED ...................... 76 6-Speed Manual Transmission................................... 76
Shifting ......................................................................... 76
Recommended Shift Speeds ...................................... 77
1–4 Skip Shift ............................................................. 77
Downshifting ................................................................ 77
AUTOMATIC TRANSMISSION —
IF EQUIPPED ...................................................................... 78 Ignition Park Interlock ................................................. 78
Brake Transmission Shift Interlock
(BTSI) System ............................................................. 79
8-Speed Automatic Transmission ............................. 79
SPORT MODE — WITHOUT PERFORMANCE
CONTROL ............................................................................. 83
FUEL SAVER TECHNOLOGY 5.7L — IF EQUIPPED .......... 83
ELECTRIC POWER STEERING ........................................... 83
CRUISE CONTROL SYSTEMS — IF EQUIPPED ................. 84 Cruise Control ............................................................. 84
Adaptive Cruise Control (ACC) .................................... 85
23_LA_OM_EN_USC_t.book Page 3
Page 7 of 300

5
IN CASE OF EMERGENCY
HAZARD WARNING FLASHERS ..................................... 199
ASSIST AND SOS MIRROR — IF EQUIPPED .................. 199
JACKING AND TIRE CHANGING ...................................... 202 Preparations For Jacking .......................................... 202
Jack Location/Spare Tire Stowage ......................... 202Jacking And Changing A Tire ................................... 203
TIRE SERVICE KIT — IF EQUIPPED ................................. 206 Alternate Tire Service Kit — If Equipped .................. 211
JUMP STARTING .............................................................. 216 Preparations For Jump Start .................................... 216
Jump Starting Procedure .......................................... 217
IF YOUR ENGINE OVERHEATS ........................................ 218
MANUAL PARK RELEASE–8–SPEED
TRANSMISSION ............................................................... 218
FREEING A STUCK VEHICLE............................................ 220
TOWING A DISABLED VEHICLE ..................................... 221 All Wheel Drive (AWD) Models — If Equipped.......... 222
Rear-Wheel Drive (RWD) Models ............................. 222
ENHANCED ACCIDENT RESPONSE
SYSTEM (EARS) ............................................................... 222
EVENT DATA RECORDER (EDR) ..................................... 222
SERVICING AND MAINTENANCE
SCHEDULED SERVICING ................................................ 223 3.6L And 5.7L Engines ............................................ 223
ENGINE COMPARTMENT ................................................ 228 3.6L Engine .............................................................. 228
5.7L Engine .............................................................. 229
Checking Oil Level .................................................... 230
Adding Washer Fluid................................................. 230Maintenance-Free Battery ....................................... 231
Pressure Washing ..................................................... 231
VEHICLE MAINTENANCE ................................................. 231 Engine Oil ................................................................. 231Engine Oil Filter ......................................................... 233Engine Air Cleaner Filter ........................................... 233Air Conditioner Maintenance ................................... 234Accessory Drive Belt Inspection............................... 235
Body Lubrication ....................................................... 235
Windshield Wiper Blades ......................................... 236
Exhaust System ........................................................ 237Cooling System ......................................................... 237Brake System ........................................................... 240
Clutch Hydraulic System —
Manual Transmission (If Equipped) ........................ 240
Manual Transmission — If Equipped ....................... 240
Automatic Transmission — If Equipped ................... 241
All-Wheel Drive (AWD) — If Equipped ...................... 241Rear Axle ................................................................... 241
Fuses ......................................................................... 242
Bulb Replacement .................................................... 250 TIRES ..................................................................................253
Tire Safety Information ............................................. 253
Tires — General Information ..................................... 261
Tire Types ................................................................... 264Spare Tires — If Equipped ......................................... 264
Wheel And Wheel Trim Care ..................................... 266
Snow Traction Devices ............................................. 267
Tire Rotation Recommendations ............................. 268
DEPARTMENT OF TRANSPORTATION UNIFORM
TIRE QUALITY GRADES ................................................... 268 Treadwear .................................................................. 268
Traction Grades ......................................................... 269
Temperature Grades ................................................. 269
VEHICLE STORAGE ...........................................................269
BODYWORK ......................................................................270 Protection From Atmospheric Agents ...................... 270
Body And Underbody Maintenance.......................... 270
Preserving The Bodywork ......................................... 270
INTERIORS ........................................................................ 271 Seats And Fabric Parts.............................................. 271Plastic And Coated Parts .......................................... 271
Leather Surfaces ....................................................... 272
Glass Surfaces .......................................................... 272
23_LA_OM_EN_USC_t.book Page 5
Page 8 of 300

6
TECHNICAL SPECIFICATIONS
VEHICLE IDENTIFICATION NUMBER (VIN) ..................... 273
BRAKE SYSTEM................................................................ 273
WHEEL AND TIRE TORQUE SPECIFICATIONS .............. 273
Torque Specifications ............................................... 273
FUEL REQUIREMENTS ..................................................... 274 3.6L Engine ............................................................... 274
5.7L Engine (With Automatic Transmission) ........... 2745.7L Engine (With Manual Transmission) ............... 274
Reformulated Gasoline............................................. 275
Materials Added To Fuel .......................................... 275
Gasoline/Oxygenate Blends ..................................... 275
Do Not Use E-85 In Non-Flex Fuel Vehicles............. 275
CNG And LP Fuel System Modifications .................. 276Methylcyclopentadienyl Manganese
Tricarbonyl (MMT) In Gasoline ................................. 276Fuel System Cautions ............................................... 276
FLUID CAPACITIES ........................................................... 277
ENGINE FLUIDS AND LUBRICANTS ............................... 278
CHASSIS FLUIDS AND LUBRICANTS ............................. 279
CUSTOMER ASSISTANCE
SUGGESTIONS FOR OBTAINING SERVICE FOR
YOUR VEHICLE ................................................................ 280 Prepare For The Appointment.................................. 280
Prepare A List............................................................ 280
Be Reasonable With Requests ................................ 280
IF YOU NEED ASSISTANCE ............................................. 280 Roadside Assistance ................................................ 280
FCA US LLC Customer Center .................................. 281
FCA Canada Inc. Customer Center .......................... 281
Mexico ....................................................................... 281Puerto Rico And US Virgin Islands ........................... 281
Customer Assistance For The Hearing Or
Speech Impaired (TDD/TTY) .................................... 282Service Contract ...................................................... 282 WARRANTY INFORMATION.............................................282
MOPAR® PARTS ..............................................................282
REPORTING SAFETY DEFECTS ......................................282 In The 50 United States And Washington, D.C........ 282
In Canada................................................................... 283
PUBLICATION ORDER FORMS .......................................283
GENERAL INFORMATION................................................. 284
CHANGE OF OWNERSHIP OR ADDRESS.......................284
23_LA_OM_EN_USC_t.book Page 6
Page 11 of 300

9
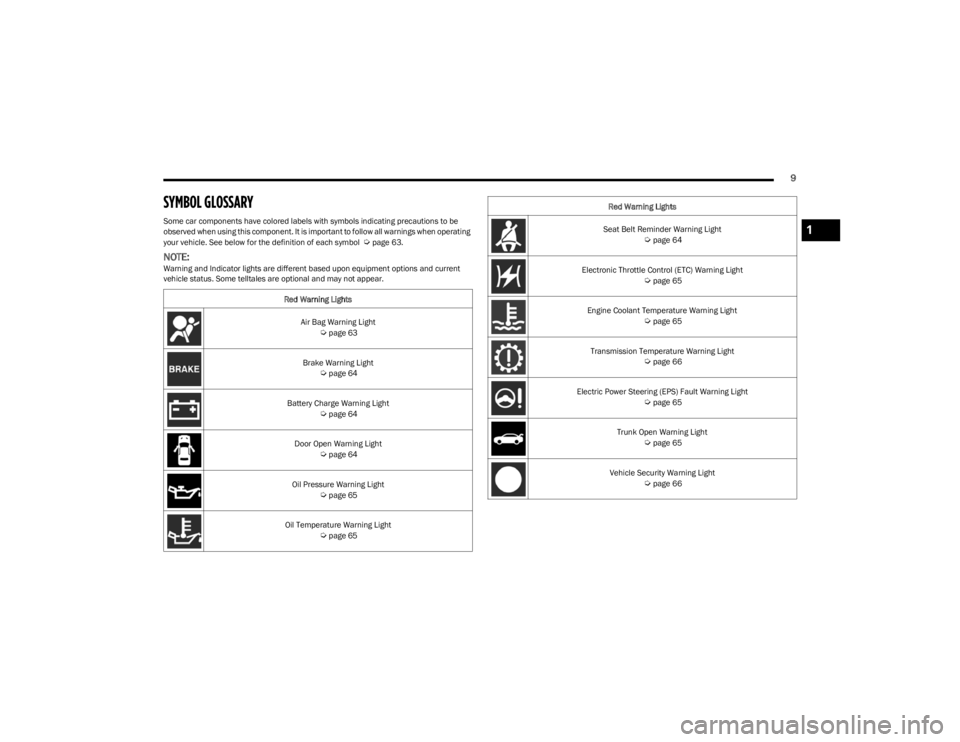
SYMBOL GLOSSARY
Some car components have colored labels with symbols indicating precautions to be
observed when using this component. It is important to follow all warnings when operating
your vehicle. See below for the definition of each symbol
Úpage 63.
NOTE:Warning and Indicator lights are different based upon equipment options and current
vehicle status. Some telltales are optional and may not appear.Red Warning Lights
Air Bag Warning Light
Úpage 63
Brake Warning Light
Úpage 64
Battery Charge Warning Light
Úpage 64
Door Open Warning Light
Úpage 64
Oil Pressure Warning Light
Úpage 65
Oil Temperature Warning Light
Úpage 65
Seat Belt Reminder Warning Light Úpage 64
Electronic Throttle Control (ETC) Warning Light
Úpage 65
Engine Coolant Temperature Warning Light
Úpage 65
Transmission Temperature Warning Light
Úpage 66
Electric Power Steering (EPS) Fault Warning Light
Úpage 65
Trunk Open Warning Light
Úpage 65
Vehicle Security Warning Light
Úpage 66
Red Warning Lights
1
23_LA_OM_EN_USC_t.book Page 9
Page 23 of 300

GETTING TO KNOW YOUR VEHICLE21
When the Vehicle Security system is armed, the interior
power door lock switches will not unlock the doors.
The ultrasonic intrusion sensor (motion detector)
actively monitors your vehicle every time you arm the
Vehicle Security system. If you prefer, you can turn off
the ultrasonic intrusion sensor when arming the
Vehicle Security system. To do so, push the lock button
on the key fob three times within 15 seconds of arming
the system (while the Vehicle Security Light is flashing
rapidly). The vehicle will remain locked but will disable
the alarm in the case of repeated false alarms due to
ambient conditions.
The Vehicle Security system is designed to protect your
vehicle; however, you can create conditions where the
system will give you a false alarm. If one of the previously
described arming sequences has occurred, the Vehicle
Security system will arm regardless of whether you are in
the vehicle or not. If you remain in the vehicle and open a
door, the alarm will sound. If this occurs, disarm the
Vehicle Security system.
If the Vehicle Security system is armed and the battery
becomes disconnected, the Vehicle Security system will
remain armed when the battery is reconnected; the
exterior lights will flash and the horn will sound. If this
occurs, disarm the Vehicle Security system.
SECURITY SYSTEM MANUAL OVERRIDE
The Vehicle Security system will not arm if you lock the
doors using the manual door lock.
DOORS
MANUAL DOOR LOCKS
The power door locks can be manually locked from inside
the vehicle by using the door lock knob. To lock each door,
push the door lock knob on each door trim panel
downward. To unlock each door, pull the door lock knob on
each door trim panel upward.
Door Lock Knob
If the door lock knob is down when you shut the door, the
door will lock. Therefore, make sure the key fob is not
inside the vehicle before closing the door.
NOTE:Manually locking the vehicle will not arm the Vehicle
Security system.
WARNING!
For personal security and safety in the event of a
collision, lock the vehicle doors before you drive as
well as when you park and leave the vehicle.
Before exiting a vehicle, always shift the automatic
transmission into PARK or the manual transmission
into FIRST gear or REVERSE, apply the parking brake,
place the ignition in the OFF position, remove the key
fobs from the vehicle and lock all doors, and lock
your vehicle.
When leaving the vehicle, always remove the key
from the ignition and lock your vehicle. Unsupervised
use of vehicle equipment may cause severe personal
injuries and death.
Never leave children alone in a vehicle, or with
access to an unlocked vehicle. Allowing children to
be in a vehicle unattended is dangerous for a
number of reasons. A child or others could be seri -
ously or fatally injured. Children should be warned
not to touch the parking brake, brake pedal or gear
selector.
Do not leave the key fob in or near the vehicle, or in
a location accessible to children, and do not leave
the ignition of a vehicle equipped with Keyless
Enter ‘n Go™ in the ACC or ON/RUN position. A child
could operate power windows, other controls, or
move the vehicle.
2
23_LA_OM_EN_USC_t.book Page 21
Page 38 of 300

36GETTING TO KNOW YOUR VEHICLE
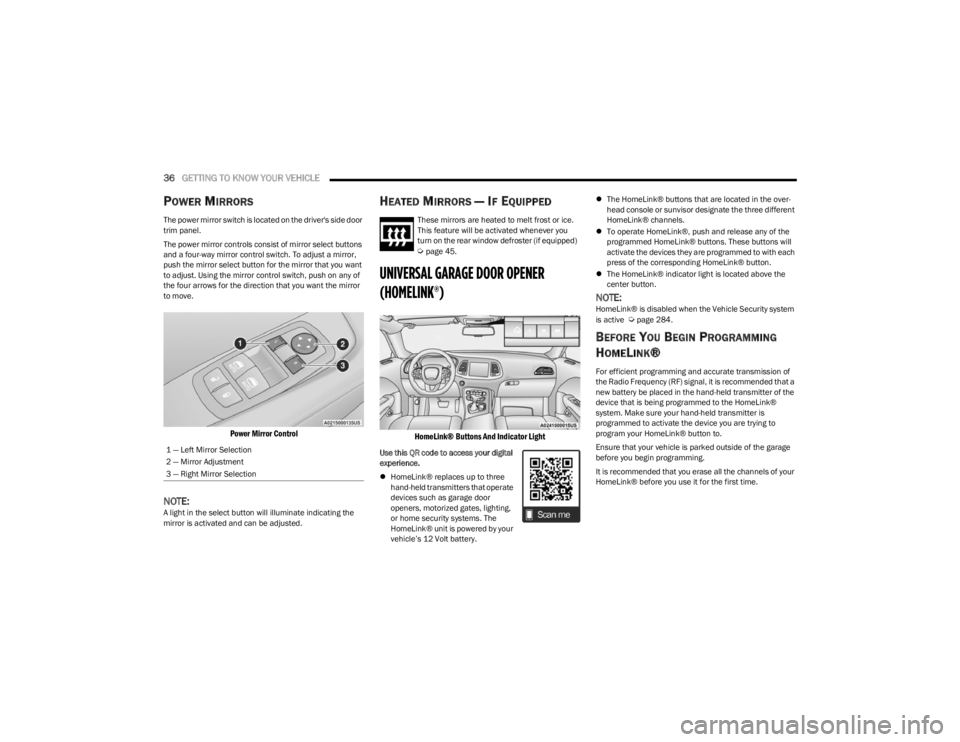
POWER MIRRORS
The power mirror switch is located on the driver's side door
trim panel.
The power mirror controls consist of mirror select buttons
and a four-way mirror control switch. To adjust a mirror,
push the mirror select button for the mirror that you want
to adjust. Using the mirror control switch, push on any of
the four arrows for the direction that you want the mirror
to move.
Power Mirror Control
NOTE:A light in the select button will illuminate indicating the
mirror is activated and can be adjusted.
HEATED MIRRORS — IF EQUIPPED
These mirrors are heated to melt frost or ice.
This feature will be activated whenever you
turn on the rear window defroster (if equipped)
Úpage 45.
UNIVERSAL GARAGE DOOR OPENER
(HOMELINK®)
HomeLink® Buttons And Indicator Light
Use this QR code to access your digital
experience.
HomeLink® replaces up to three
hand-held transmitters that operate
devices such as garage door
openers, motorized gates, lighting,
or home security systems. The
HomeLink® unit is powered by your
vehicle’s 12 Volt battery.
The HomeLink® buttons that are located in the over -
head console or sunvisor designate the three different
HomeLink® channels.
To operate HomeLink®, push and release any of the
programmed HomeLink® buttons. These buttons will
activate the devices they are programmed to with each
press of the corresponding HomeLink® button.
The HomeLink® indicator light is located above the
center button.
NOTE:HomeLink® is disabled when the Vehicle Security system
is active Úpage 284.
BEFORE YOU BEGIN PROGRAMMING
H
OMELINK®
For efficient programming and accurate transmission of
the Radio Frequency (RF) signal, it is recommended that a
new battery be placed in the hand-held transmitter of the
device that is being programmed to the HomeLink®
system. Make sure your hand-held transmitter is
programmed to activate the device you are trying to
program your HomeLink® button to.
Ensure that your vehicle is parked outside of the garage
before you begin programming.
It is recommended that you erase all the channels of your
HomeLink® before you use it for the first time.
1 — Left Mirror Selection
2 — Mirror Adjustment
3 — Right Mirror Selection
23_LA_OM_EN_USC_t.book Page 36
Page 40 of 300

38GETTING TO KNOW YOUR VEHICLE
Non-Rolling Code Garage Door Opener Final Steps
1. Push and hold the programmed HomeLink® button
and observe the HomeLink® indicator light. If the
HomeLink® indicator light stays on constantly,
programming is complete.
2. Push the programmed HomeLink® button to confirm that the garage door opener motor operates. If the
garage door opener motor does not operate, repeat
the steps from the beginning.
PROGRAMMING HOMELINK® TO A
M
ISCELLANEOUS DEVICE
The procedure on how to program HomeLink® to a
miscellaneous device follows the same procedure as
programming to a garage door opener
Úpage 37. Be sure
to determine if the device has a rolling code, or non-rolling
code before beginning the programming process.
NOTE:Canadian Radio Frequency (RF) laws require transmitter
signals to time-out (or quit) after several seconds of trans -
mission, which may not be long enough for HomeLink® to
pick up the signal during programming. Similar to this
Canadian law, some U.S. gate operators are designed to
time-out in the same manner. The procedure may need to
be performed multiple times to successfully pair the
device to your HomeLink® buttons.
REPROGRAMMING A SINGLE
H
OMELINK® BUTTON
To reprogram a single HomeLink® button that has been
previously trained, without erasing all the channels,
proceed as follows. Be sure to determine whether the new
device you want to program the HomeLink® button to has
a rolling code, or non-rolling code.
1. Place the ignition in the ON/RUN position, without
starting the engine.
2. Push and hold the desired HomeLink® button until the HomeLink® indicator light begins to flash after
20 seconds. Do not release the button.
3. Without releasing the button , proceed with Step 2 in
“Programming HomeLink® To A Garage Door
Opener” and follow all remaining steps.
CANADIAN/GATE OPERATOR
P
ROGRAMMING
For programming transmitters in Canada/United States
that require the transmitter signals to “time-out” after
several seconds of transmission: Canadian Radio Frequency (RF) laws require transmitter
signals to time-out (or quit) after several seconds of
transmission, which may not be long enough for
HomeLink® to pick up the signal during programming.
Similar to this Canadian law, some U.S. gate operators are
designed to time-out in the same manner.
It may be helpful to unplug the device during the cycling
process to prevent possible overheating of the garage
door or gate motor.
1. Place the ignition in the ON/RUN position.
NOTE:For vehicles equipped with Keyless Enter ‘n Go™, place
the ignition in the RUN position. Make sure while
programming HomeLink® with the engine on that your
vehicle is outside of your garage, or that the garage door
remains open at all times.
2. Place the hand-held transmitter 1 to 3 inches (3 to 8
cm) away from the HomeLink® button you wish to
program while keeping the HomeLink® indicator light
in view.
3. Continue to push and hold the HomeLink® button while you push and release (cycle) your hand-held
transmitter every two seconds until HomeLink® has
successfully accepted the frequency signal. The
indicator light will flash slowly and then rapidly when
fully trained.
4. Watch for the HomeLink® indicator to change flash rates. When it changes, it is programmed. It may take
up to 30 seconds or longer in rare cases. The garage
door may open and close while you are programming.
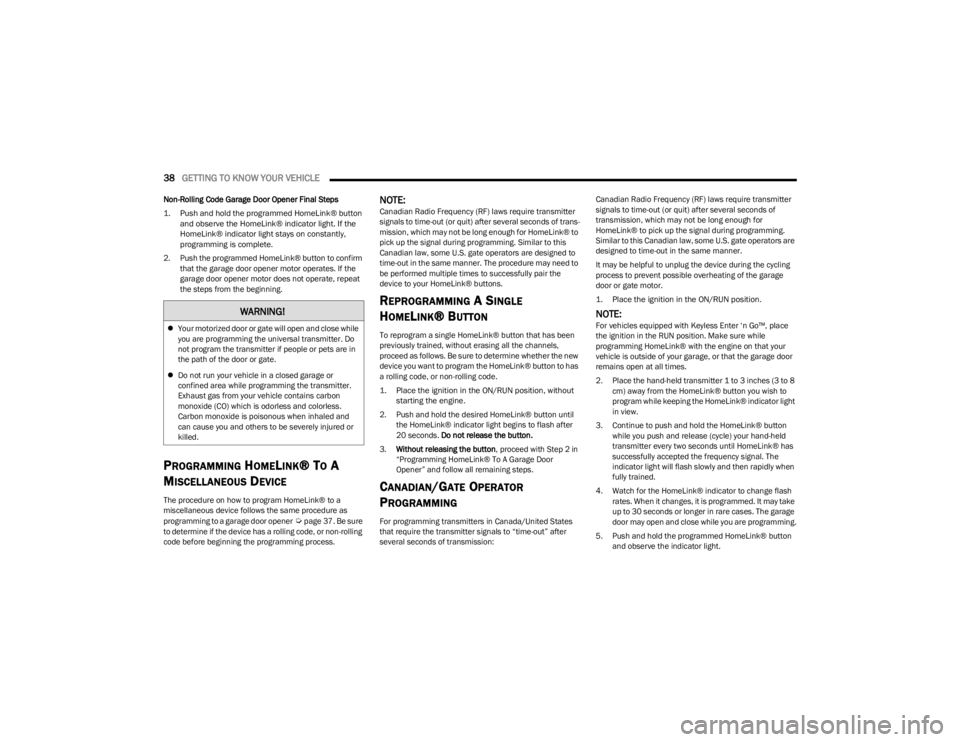
5. Push and hold the programmed HomeLink® button and observe the indicator light.
WARNING!
Your motorized door or gate will open and close while
you are programming the universal transmitter. Do
not program the transmitter if people or pets are in
the path of the door or gate.
Do not run your vehicle in a closed garage or
confined area while programming the transmitter.
Exhaust gas from your vehicle contains carbon
monoxide (CO) which is odorless and colorless.
Carbon monoxide is poisonous when inhaled and
can cause you and others to be severely injured or
killed.
23_LA_OM_EN_USC_t.book Page 38
Page 47 of 300

GETTING TO KNOW YOUR VEHICLE45
RAIN SENSING WIPERS — IF EQUIPPED
This feature senses rain or snowfall on the windshield and
automatically activates the wipers. Rotate the end of the
multifunction lever to one of four settings to activate this
feature.
The sensitivity of the system can be adjusted with the
multifunction lever. Wiper delay position 1 is the least
sensitive, and wiper delay position 4 is the most sensitive.
Wiper delay position three should be used for normal rain
conditions.
NOTE:
The Rain Sensing feature will not operate when the
wiper switch is in the low or high-speed position.
The Rain Sensing feature may not function properly
when ice, or dried salt water is present on the
windshield.
Use of products containing wax or silicone may reduce
Rain Sensing performance.
The Rain Sensing feature can be turned on and off
using the Uconnect system
Úpage 107.
The Rain Sensing system has protection features for the
wiper blades and arms, and will not operate under the
following conditions:
Low Ambient Temperature — When the ignition is first
placed in the ON position, the Rain Sensing system will
not operate until the wiper switch is moved, vehicle
speed is greater than 0 mph (0 km/h), or the outside
temperature is greater than 32°F (0°C).
Transmission In NEUTRAL Position — When the ignition
is ON, and the transmission is in the NEUTRAL position,
the Rain Sensing system will not operate until the wiper
switch is moved, vehicle speed is greater than 3 mph
(5 km/h), or the gear selector is moved out of the
NEUTRAL position.
Remote Start Mode Inhibit — On vehicles equipped with
the Remote Start system, Rain Sensing wipers are not
operational when the vehicle is in the Remote Start
mode.
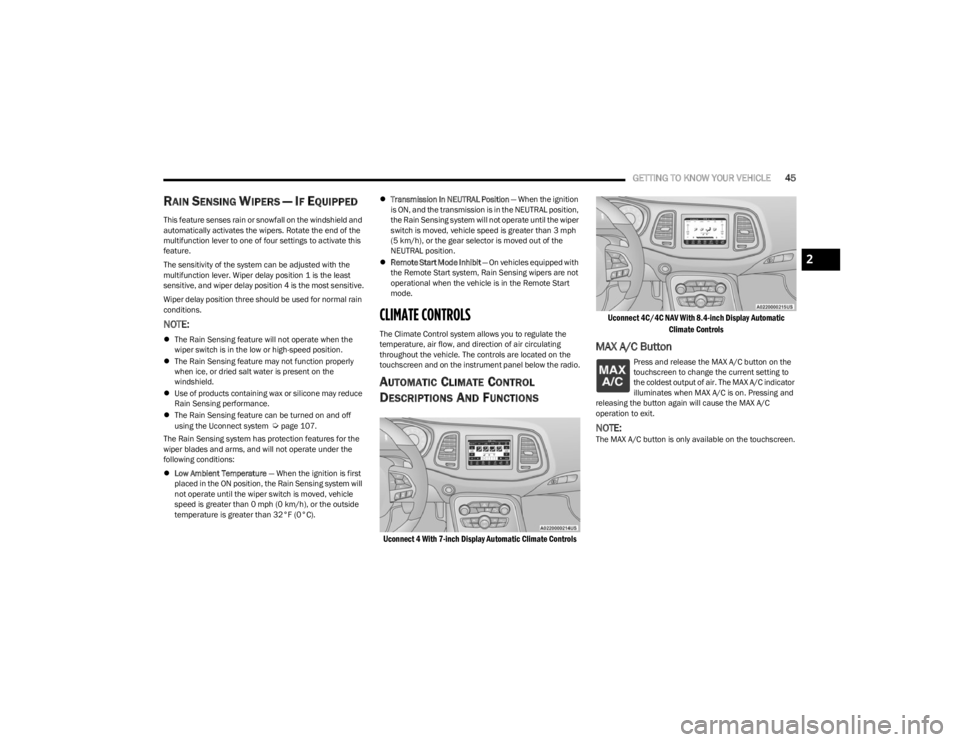
CLIMATE CONTROLS
The Climate Control system allows you to regulate the
temperature, air flow, and direction of air circulating
throughout the vehicle. The controls are located on the
touchscreen and on the instrument panel below the radio.
AUTOMATIC CLIMATE CONTROL
D
ESCRIPTIONS AND FUNCTIONS
Uconnect 4 With 7-inch Display Automatic Climate Controls Uconnect 4C/4C NAV With 8.4-inch Display Automatic
Climate Controls
MAX A/C Button
Press and release the MAX A/C button on the
touchscreen to change the current setting to
the coldest output of air. The MAX A/C indicator
illuminates when MAX A/C is on. Pressing and
releasing the button again will cause the MAX A/C
operation to exit.
NOTE:The MAX A/C button is only available on the touchscreen.
2
23_LA_OM_EN_USC_t.book Page 45