2023 DODGE CHALLENGER trunk release
[x] Cancel search: trunk releasePage 14 of 300

12
GETTING TO KNOW YOUR VEHICLE
KEYS
KEY FOB
Your vehicle is equipped with a key fob which
supports Passive Entry, Remote Keyless Entry (RKE),
Keyless Enter ‘n Go™ (if equipped), Remote Start
(if equipped), and remote trunk operation. The key fob
allows you to lock or unlock the doors and trunk from
distances up to approximately 66 ft (20 m). The key fob does not need to be pointed at the vehicle to activate the
system. The key fob also contains an emergency key,
which is stored in the rear of the key fob.
NOTE:
The key fob’s wireless signal may be blocked if the key
fob is located next to a mobile phone, laptop, or other
electronic device. This may result in poor performance.
With ignition in the ON position and the vehicle moving
at 2 mph (4 km/h), all RKE commands are disabled.
Key Fob
NOTE:In case the ignition switch does not change with the push
of a button, the key fob may have a low or fully depleted
battery. A low key fob battery can be verified by referring to
the instrument cluster, which will display directions to
follow
Úpage 284.
To Lock/Unlock The Doors And Trunk
Push and release the unlock button on the key fob once to
unlock the driver's door or twice within five seconds to
unlock all doors. Push and release the lock button on the
key fob to lock all doors.
When the doors are unlocked, the turn signals will flash
and the illuminated entry features will be activated. When
the doors are locked, the turn signals will flash and the
horn will chirp. This setting can be adjusted in the
Uconnect system
Úpage 107.
NOTE:
If the vehicle is unlocked with the key fob, and no door
is opened within 60 seconds, the vehicle will relock and
the Vehicle Security system (if equipped) will arm.
If one or more doors are open, or the trunk is open, the
doors will lock. The doors will unlock again automati -
cally if the key fob is left inside the passenger compart -
ment, otherwise the doors will stay locked.
1 — Unlock
2 — Trunk Open
3 — Lock
4 — Remote Start (If Equipped)
5 — PANIC Button
6 — Emergency Key
23_LA_OM_EN_USC_t.book Page 12
Page 15 of 300

GETTING TO KNOW YOUR VEHICLE13
All doors can be programmed to unlock on the first push
of the unlock button through Uconnect Settings
Úpage 107.
NOTE:When you use the key fob to open any door, the courtesy
lights, overhead lights, and approach lighting in the
outside mirrors (if equipped) will turn on.
To Unlatch The Trunk
Push the trunk button on the key fob two times within five
seconds to unlatch the trunk.
Using The Panic Feature
To turn the Panic feature on or off, push the Panic button
on the key fob. When the Panic feature is activated, the
turn signals will flash, the horn will pulse on and off, and
the interior lights will turn on.
The Panic feature will stay on for three minutes unless you
turn it off by either pushing the Panic button a second time
or drive the vehicle at a speed of 15 mph (24 km/h) or
greater.
NOTE:
The interior lights will turn off if you place the ignition in
the ACC or ON/RUN position while the Panic feature is
activated. However, the exterior lights and horn will
remain on.
You may need to be less than 35 ft (11 m) from the
vehicle when using the key fob to turn off the Panic
feature due to the radio frequency noises emitted by
the system.
Key Left Vehicle Feature
If a valid key fob is no longer detected inside the vehicle
while the vehicle’s ignition system is in the ON/RUN or
START position, the message “Key Fob Has Left The
Vehicle” will be shown in the instrument cluster display
along with an interior chime. An exterior audible and visual
alert will also be activated to warn the driver.
The vehicle’s horn will rapidly chirp three times along with
a single flash of the vehicle’s exterior lights.
NOTE:
The doors have to be open and then closed in order for
the vehicle to detect a key fob; the Key Left Vehicle
feature will not activate until all of the doors are closed.
These alerts will not be activated in situations where
the vehicle’s engine is left running with the key fob
inside.
Replacing The Battery In The Key Fob
The recommended replacement battery is one CR2032
battery.
NOTE:
Customers are recommended to use a battery
obtained from Mopar®. Aftermarket coin battery
dimensions may not meet the original OEM coin battery
dimensions.
Perchlorate Material — special handling may apply. See
www.dtsc.ca.gov/hazardouswaste/perchlorate for
further information.
Do not touch the battery terminals that are on the back
housing or the printed circuit board.
1. Remove the emergency key (2) by sliding the emergency key release (1) on the back of the key fob
and pulling the emergency key out with your other
hand.
Emergency Key Removal
1 — Emergency Key Release Button
2 — Emergency Key
2
23_LA_OM_EN_USC_t.book Page 13
Page 19 of 300

GETTING TO KNOW YOUR VEHICLE17
NOTE:
When opening the driver's door with the ignition in
ON/RUN (engine not running), a chime will sound to
remind you to place the ignition in the OFF position.
In addition to the chime, the message will display
“Ignition Or Accessory On” in the cluster.
For more information on proper engine starting
procedures, see
Úpage 71.
REMOTE START — IF EQUIPPED
This system uses the key fob to start the engine
conveniently from outside the vehicle while still
maintaining security. The system has a range
of 328 ft (100 m).
Remote Start is used to defrost windows in cold weather,
and to reach a comfortable climate in all ambient
conditions before the driver enters the vehicle.
NOTE:Obstructions between the vehicle and key fob may reduce
this range Úpage 284.
HOW TO USE REMOTE START
Push and release the Remote Start button on the key fob
twice within five seconds. The vehicle doors will lock, the
parking lights will flash, and the horn will chirp
(if programmed). Then, the engine will start, and the
vehicle will remain in the Remote Start mode for a
15 minute cycle. Pushing the Remote Start button a third
time shuts the engine off.
To drive the vehicle, push the unlock button, and place the
ignition in the ON/RUN position.
NOTE:
With Remote Start, the engine will only run for
15 minutes.
Remote Start can only be used twice.
If an engine fault is present or fuel level is low, the
vehicle will start and then shut down in 10 seconds.
The parking lights will turn on and remain on during
Remote Start mode.
For security, power window and power sunroof opera -
tion (if equipped) are disabled when the vehicle is in
the Remote Start mode.
The ignition must be placed in the ON/RUN position
before the Remote Start sequence can be repeated for
a third cycle.
All of the following conditions must be met before the
engine will remote start:
Gear selector in PARK
Doors closed
Hood closed
Trunk closed
Hazard switch off
Brake switch inactive (brake pedal not pressed)
Battery at an acceptable charge level
Panic button not pushed
System not disabled from previous Remote Start event
Vehicle Security system indicator flashing
WARNING!
Do not start or run an engine in a closed garage or
confined area. Exhaust gas contains carbon
monoxide (CO) which is odorless and colorless.
Carbon monoxide is poisonous and can cause
serious injury or death when inhaled.
Keep key fobs away from children. Operation of the
Remote Start system, windows, door locks or other
controls could cause serious injury or death.
2
23_LA_OM_EN_USC_t.book Page 17
Page 21 of 300

GETTING TO KNOW YOUR VEHICLE19
For more information on ATC, MTC, and climate control
settings, see Úpage 45.
NOTE:These features will stay on through the duration of Remote
Start until the ignition is placed in the ON/RUN position.
The climate control settings will change if manually
adjusted by the driver while the vehicle is in Remote Start
mode, and exit automatic override. This includes the OFF
button on the climate controls, which will turn the system
off.
REMOTE START WINDSHIELD WIPER
D
E-ICER ACTIVATION — IF EQUIPPED
When Remote Start is active and the outside ambient
temperature is less than 33°F (0.6°C), the Windshield
Wiper De-Icer will activate. Exiting Remote Start will
resume its previous operation. If the Windshield Wiper
De-Icer was active, the timer and operation will continue.
REMOTE START CANCEL MESSAGE —
I
F EQUIPPED
One of the following messages will display in the
instrument cluster display if the vehicle fails to remote
start or exits Remote Start prematurely:
Remote Start Canceled — Door Open
Remote Start Canceled — Hood Open
Remote Start Canceled — Fuel Low
Remote Start Canceled — Trunk Open
Remote Start Disabled — Start Vehicle To Reset The message will stay active until the ignition is placed in
the ON/RUN position.
VEHICLE SECURITY SYSTEM — IF EQUIPPED
The Vehicle Security system monitors the vehicle doors for
unauthorized entry and the Keyless Enter ‘n Go™ Ignition
for unauthorized operation. While the Vehicle Security
system is armed, interior switches for door locks and trunk
release are disabled. If something triggers the alarm, the
Vehicle Security system will provide the following audible
and visible signals:
The horn will pulse
The turn signals will flash
The Vehicle Security Light in the instrument cluster will
flash
TO ARM THE SYSTEM
Follow these steps to arm the Vehicle Security system:
1. Make sure the vehicle’s ignition is placed in the OFF
position.
2. Perform one of the following methods to lock the vehicle:
Push lock on the interior power door lock switch
with the driver and/or passenger door open.
Push the lock button on the exterior Passive Entry
door handle with a valid key fob available in the
same exterior zone
Úpage 22.
Push the lock button on the key fob.
3. If any doors are open, close them.
TO DISARM THE SYSTEM
The Vehicle Security system can be disarmed using any of
the following methods:
Push the unlock button on the key fob.
Grab the Passive Entry door handle to unlock the door
Úpage 22.
Push the START/STOP ignition button (requires at least
one valid key fob in the vehicle).
NOTE:
The driver's door key cylinder and the trunk button on
the key fob cannot arm or disarm the Vehicle Security
system.
When the Vehicle Security system is armed, the interior
power door lock switches will not unlock the doors.
The Vehicle Security system is designed to protect your
vehicle. However, you can create conditions where the
system will give you a false alarm. If one of the previously
described arming sequences has occurred, the Vehicle
Security system will arm, regardless of whether you are in
the vehicle or not. If you remain in the vehicle and open a
door, the alarm will sound. If this occurs, disarm the
Vehicle Security system.
If the Vehicle Security system is armed and the battery
becomes disconnected, the Vehicle Security system will
remain armed when the battery is reconnected; the
exterior lights will flash, and the horn will sound. If this
occurs, disarm the Vehicle Security system.
2
23_LA_OM_EN_USC_t.book Page 19
Page 56 of 300

54GETTING TO KNOW YOUR VEHICLE
HOOD
OPENING THE HOOD
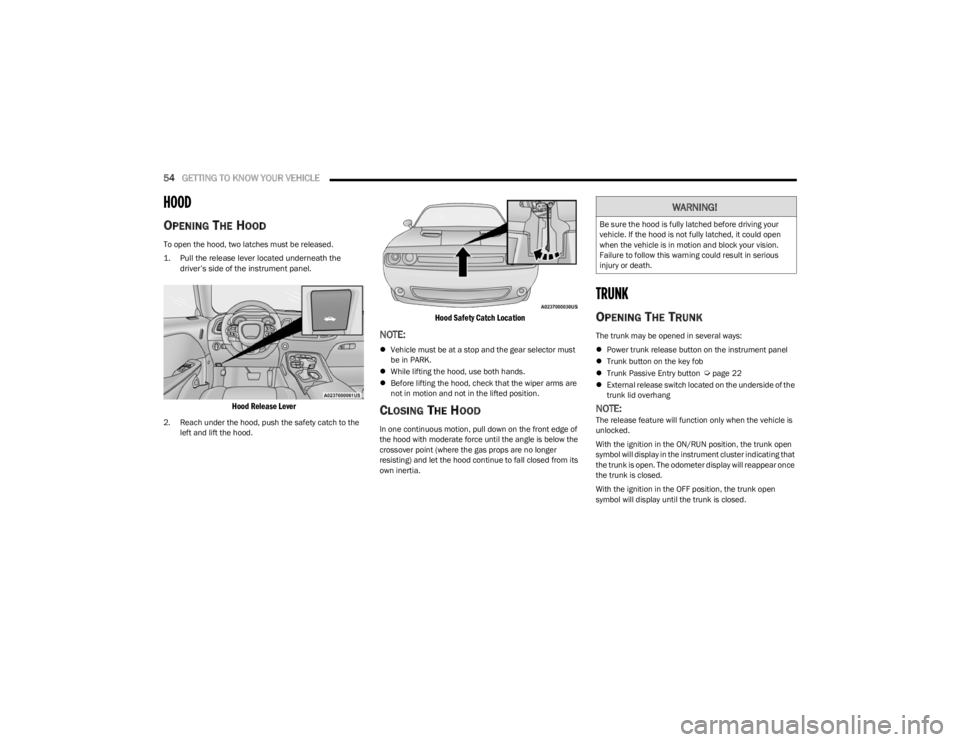
To open the hood, two latches must be released.
1. Pull the release lever located underneath the
driver’s side of the instrument panel.
Hood Release Lever
2. Reach under the hood, push the safety catch to the left and lift the hood.
Hood Safety Catch Location
NOTE:
Vehicle must be at a stop and the gear selector must
be in PARK.
While lifting the hood, use both hands.
Before lifting the hood, check that the wiper arms are
not in motion and not in the lifted position.
CLOSING THE HOOD
In one continuous motion, pull down on the front edge of
the hood with moderate force until the angle is below the
crossover point (where the gas props are no longer
resisting) and let the hood continue to fall closed from its
own inertia.
TRUNK
OPENING THE TRUNK
The trunk may be opened in several ways:
Power trunk release button on the instrument panel
Trunk button on the key fob
Trunk Passive Entry button
Úpage 22
External release switch located on the underside of the
trunk lid overhang
NOTE:The release feature will function only when the vehicle is
unlocked.
With the ignition in the ON/RUN position, the trunk open
symbol will display in the instrument cluster indicating that
the trunk is open. The odometer display will reappear once
the trunk is closed.
With the ignition in the OFF position, the trunk open
symbol will display until the trunk is closed.
WARNING!
Be sure the hood is fully latched before driving your
vehicle. If the hood is not fully latched, it could open
when the vehicle is in motion and block your vision.
Failure to follow this warning could result in serious
injury or death.
23_LA_OM_EN_USC_t.book Page 54
Page 57 of 300

GETTING TO KNOW YOUR VEHICLE55
Power Trunk Release Button
The trunk can be opened from inside the
vehicle using the power trunk release button
located on the instrument panel to the left of
the steering wheel.
NOTE:The automatic transmission must be in PARK before the
button will operate. For manual transmissions, the vehicle
must be in NEUTRAL.
Key Fob Trunk Release ButtonPush the power trunk button on the key fob
twice within five seconds to release the trunk.
Passive Entry Button
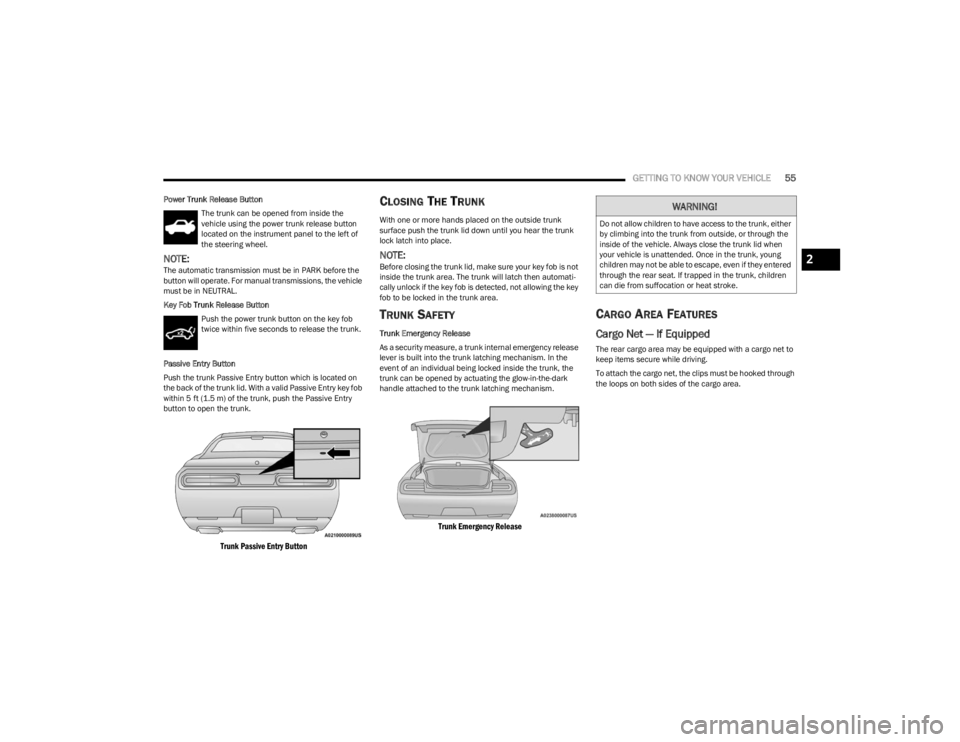
Push the trunk Passive Entry button which is located on
the back of the trunk lid. With a valid Passive Entry key fob
within 5 ft (1.5 m) of the trunk, push the Passive Entry button to open the trunk.
Trunk Passive Entry Button
CLOSING THE TRUNK
With one or more hands placed on the outside trunk
surface push the trunk lid down until you hear the trunk
lock latch into place.
NOTE:Before closing the trunk lid, make sure your key fob is not
inside the trunk area. The trunk will latch then automati -
cally unlock if the key fob is detected, not allowing the key
fob to be locked in the trunk area.
TRUNK SAFETY
Trunk Emergency Release
As a security measure, a trunk internal emergency release
lever is built into the trunk latching mechanism. In the
event of an individual being locked inside the trunk, the
trunk can be opened by actuating the glow-in-the-dark
handle attached to the trunk latching mechanism.
Trunk Emergency Release
CARGO AREA FEATURES
Cargo Net — If Equipped
The rear cargo area may be equipped with a cargo net to
keep items secure while driving.
To attach the cargo net, the clips must be hooked through
the loops on both sides of the cargo area.
WARNING!
Do not allow children to have access to the trunk, either
by climbing into the trunk from outside, or through the
inside of the vehicle. Always close the trunk lid when
your vehicle is unattended. Once in the trunk, young
children may not be able to escape, even if they entered
through the rear seat. If trapped in the trunk, children
can die from suffocation or heat stroke.
2
23_LA_OM_EN_USC_t.book Page 55
Page 208 of 300

206IN CASE OF EMERGENCY
TIRE SERVICE KIT — IF EQUIPPED
Use this QR code to access your digital
experience.
The Tire Service Kit is located in the
trunk.
NOTE:Depending on vehicle trim level, tire
service kit models may vary.
Small punctures up to 1/4 inch (6 mm) in the tire tread
can be sealed with the Tire Service Kit. Foreign objects
(e.g., screws or nails) should not be removed from the tire.
The Tire Service Kit can be used in outside temperatures
down to approximately -4°F (-20°C).
This kit will provide a temporary tire seal, allowing you to
drive your vehicle up to 100 miles (160 km) with a
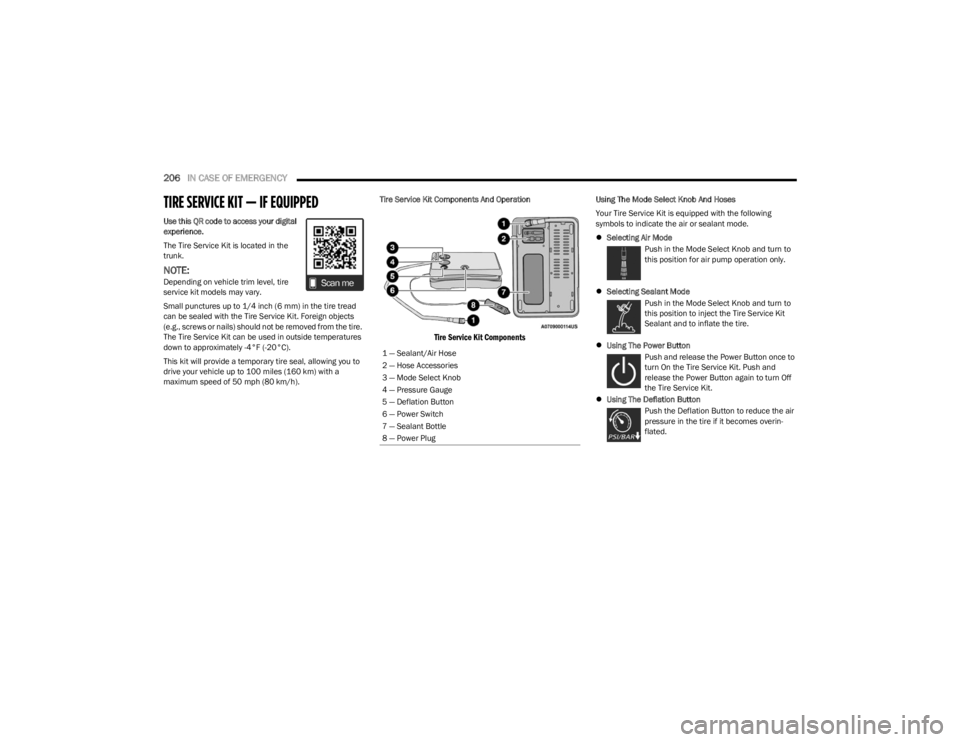
maximum speed of 50 mph (80 km/h). Tire Service Kit Components And Operation
Tire Service Kit Components
Using The Mode Select Knob And Hoses
Your Tire Service Kit is equipped with the following
symbols to indicate the air or sealant mode.
Selecting Air Mode
Push in the Mode Select Knob and turn to
this position for air pump operation only.
Selecting Sealant Mode
Push in the Mode Select Knob and turn to
this position to inject the Tire Service Kit
Sealant and to inflate the tire.
Using The Power Button
Push and release the Power Button once to
turn On the Tire Service Kit. Push and
release the Power Button again to turn Off
the Tire Service Kit.
Using The Deflation Button
Push the Deflation Button to reduce the air
pressure in the tire if it becomes overin -
flated.
1 — Sealant/Air Hose
2 — Hose Accessories
3 — Mode Select Knob
4 — Pressure Gauge
5 — Deflation Button
6 — Power Switch
7 — Sealant Bottle
8 — Power Plug
23_LA_OM_EN_USC_t.book Page 206
Page 218 of 300

216IN CASE OF EMERGENCY
(F) SEALANT BOTTLE AND HOSE REPLACE -
MENT:
1. Uncoil the Sealant Hose (4) (clear in color).
2. Locate the round Sealant Bottle release button in the recessed area under the sealant bottle.
3. Push the Sealant Bottle release button. The Sealant Bottle (1) will pop up. Remove the bottle and dispose
of it accordingly.
4. Clean any remaining sealant from the Tire Service Kit housing.
5. Position the new Sealant Bottle (1) in the housing so that the Sealant Hose (4) aligns with the hose slot in
the front of the housing. Push the bottle into the
housing. An audible click will be heard indicating the
bottle is locked into place.
6. Verify that the cap is installed on the fitting at the end of the Sealant Hose (4) and return the hose to its
storage area (located on the bottom of the air pump).
7. Return the Tire Service Kit to its storage location in the vehicle.
JUMP STARTING
If your vehicle has a discharged battery, it can be jump
started using a set of jumper cables and a battery in
another vehicle, or by using a portable battery booster
pack. Jump starting can be dangerous if done improperly,
so please follow the procedures in this section carefully.
NOTE:When using a portable battery booster pack, follow the
manufacturer's operating instructions and precautions.
PREPARATIONS FOR JUMP START
The battery is stored under an access cover in the trunk.
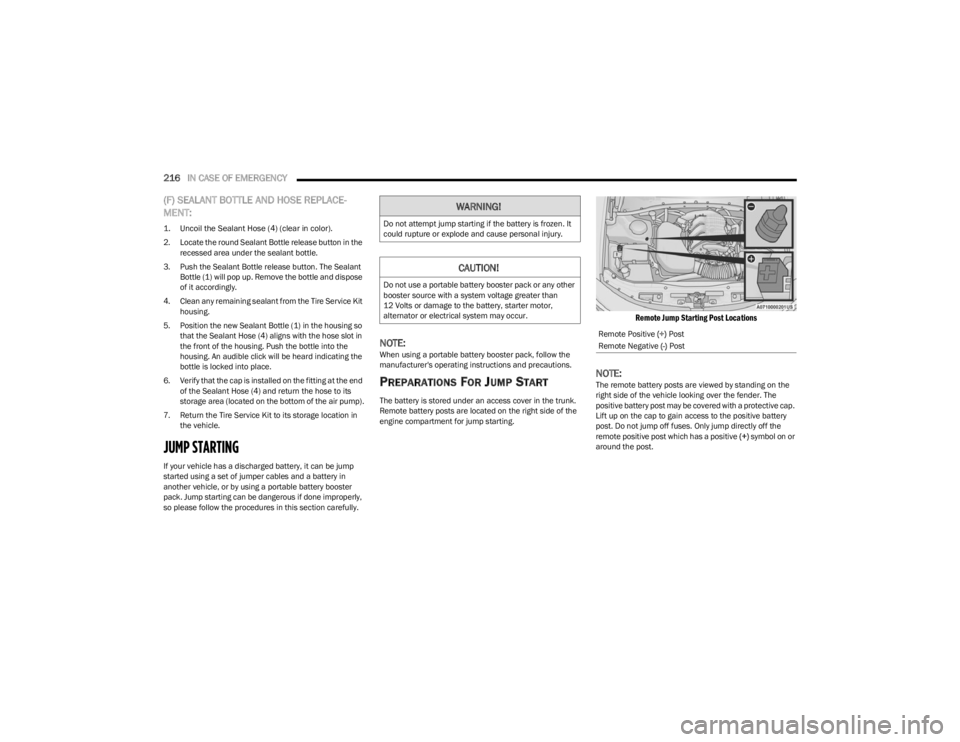
Remote battery posts are located on the right side of the
engine compartment for jump starting.
Remote Jump Starting Post Locations
NOTE:The remote battery posts are viewed by standing on the
right side of the vehicle looking over the fender. The
positive battery post may be covered with a protective cap.
Lift up on the cap to gain access to the positive battery
post. Do not jump off fuses. Only jump directly off the
remote positive post which has a positive (+) symbol on or
around the post.
WARNING!
Do not attempt jump starting if the battery is frozen. It
could rupture or explode and cause personal injury.
CAUTION!
Do not use a portable battery booster pack or any other
booster source with a system voltage greater than
12 Volts or damage to the battery, starter motor,
alternator or electrical system may occur.
Remote Positive (+) Post
Remote Negative (-) Post
23_LA_OM_EN_USC_t.book Page 216